To avoid these ads, REGISTER NOW!

ZMotorsports Shop Projects 2.0

To avoid these ads, REGISTER NOW!
OP
Z

zmotorsports

ALLIANCE MEMBER
Joined
Oct 20, 2009
Messages
21,427
Location
Northern Utah
A little more progress tonight.

Ran a flap disk over the pieces and deburred them then tack welded the wing sections in place.

60365e73b6e44de1031023276f348343.jpg

55f8ff0f3b23c7220236e7f118a58d15.jpg

b5722eb19d2426e480b08db7a2b008b4.jpg

Thanks for looking.
 

Attachments

  • 60365e73b6e44de1031023276f348343.jpg
    60365e73b6e44de1031023276f348343.jpg
    77.5 KB · Views: 0
  • b5722eb19d2426e480b08db7a2b008b4.jpg
    b5722eb19d2426e480b08db7a2b008b4.jpg
    84.5 KB · Views: 0
  • 55f8ff0f3b23c7220236e7f118a58d15.jpg
    55f8ff0f3b23c7220236e7f118a58d15.jpg
    89 KB · Views: 0
Last edited:

StormcrowAz

Well-known member
Joined
Nov 3, 2011
Messages
750
Location
Phoenix, AZ
Fantastic work, I always enjoy reading through your posts.

Especially envious of the consistency and quality of your welds. Makes me want to lock myself in the shop and do nothing but practice running beads for a month or two. I don't think the wife, dogs, or people who receive the mortgage checks would appreciate it as much, though. :)
 
OP
Z

zmotorsports

ALLIANCE MEMBER
Joined
Oct 20, 2009
Messages
21,427
Location
Northern Utah
Fantastic work, I always enjoy reading through your posts.

Especially envious of the consistency and quality of your welds. Makes me want to lock myself in the shop and do nothing but practice running beads for a month or two. I don't think the wife, dogs, or people who receive the mortgage checks would appreciate it as much, though. :)

Thank you, I appreciate the comments.

I wish my welds were more consistent however as I don't weld enough to really fine tune them to what I want. I may go a couple of weeks or even a month between getting under a hood and welding is a perishable skillset if not routinely exercised.

Thanks for following along on my projects. I've been enjoying yours as well as you do nice work.:beer:
 

lilscorpion

Well-known member
Joined
Mar 15, 2010
Messages
3,600
Location
Colorado
Mike - that really came together fast and looks great. I’m now thinking hard about getting a metal bandsaw. If I had more space it wouldn’t be a tough decision.

You’re going to MIG weld it right?
 
OP
Z

zmotorsports

ALLIANCE MEMBER
Joined
Oct 20, 2009
Messages
21,427
Location
Northern Utah
Mike - that really came together fast and looks great. I’m now thinking hard about getting a metal bandsaw. If I had more space it wouldn’t be a tough decision.

You’re going to MIG weld it right?


Thanks Matt. I don’t know about the fast part though, we’ve been on it two weeks now but only working on it a couple of hours a night. Last year I was working g do much on things and long hours and I was getting burned out. I don’t want to feel that way again so I’m pacing myself a bit.

As for welding process, yes, this has been MIG welded so far. Been using both my Miller MM211 for the thinner 10-gauge wings and my MM251 for the 1/4” and 3/16” on the center section and mounting brackets.

Also Matt, I highly recommend a vertical bandsaw. I use mine a LOT and for projects like this a vertical bandsaw is invaluable. I was tight on space at my last shop but it was well worth it.

Thanks for stopping by and checking in on my projects Matt.
 
OP
Z

zmotorsports

ALLIANCE MEMBER
Joined
Oct 20, 2009
Messages
21,427
Location
Northern Utah
We were able to finish up most of the welding on the wings today.

Prior to disassembly, we tacked some side wings on the center section to fill the gap between the lower radiator mount and the outer wings. Then removed all of the modular components to complete the welding and start metal finishing.
d64ba97b4b3af6c415ab747c787e658b.jpg

abd9ac25b168d4a91f108d2f0ae7d1a2.jpg

Driver’s side wing unbolted and being removed.
fa8a862f2825ae75ee4e652e01ef947e.jpg

14c26be47d60a606b09feee6af976669.jpg

43ac2915e526f0d785a3dec7e46512d1.jpg

Thanks for looking.
 

Attachments

  • 14c26be47d60a606b09feee6af976669.jpg
    14c26be47d60a606b09feee6af976669.jpg
    110.6 KB · Views: 0
  • 43ac2915e526f0d785a3dec7e46512d1.jpg
    43ac2915e526f0d785a3dec7e46512d1.jpg
    106.2 KB · Views: 0
  • abd9ac25b168d4a91f108d2f0ae7d1a2.jpg
    abd9ac25b168d4a91f108d2f0ae7d1a2.jpg
    86.8 KB · Views: 0
  • d64ba97b4b3af6c415ab747c787e658b.jpg
    d64ba97b4b3af6c415ab747c787e658b.jpg
    98 KB · Views: 0
  • fa8a862f2825ae75ee4e652e01ef947e.jpg
    fa8a862f2825ae75ee4e652e01ef947e.jpg
    92.9 KB · Views: 1
Last edited:

LXCam

ALLIANCE MEMBER
Joined
Apr 23, 2013
Messages
19,153
Location
AZ
That’s going to be great. I did the same thing on mine, built up the outer seem welds just so I could grind it all back off but also did a heavy stitch weld on the inside for strength.
 
OP
Z

zmotorsports

ALLIANCE MEMBER
Joined
Oct 20, 2009
Messages
21,427
Location
Northern Utah

ksp683

Active member
Joined
Oct 4, 2010
Messages
33
Location
Regina, SK
Long time lurker,
Just wanted to drop a note and let you know that your project thread is by far my favorite spot to stop and see what you have been doing.
Thank you for continually posting your projects up. You have a big audience that appreciates your attention to detail and thought process behind all your work.

Thank you,

KP
 
OP
Z

zmotorsports

ALLIANCE MEMBER
Joined
Oct 20, 2009
Messages
21,427
Location
Northern Utah
Long time lurker,
Just wanted to drop a note and let you know that your project thread is by far my favorite spot to stop and see what you have been doing.
Thank you for continually posting your projects up. You have a big audience that appreciates your attention to detail and thought process behind all your work.

Thank you,

KP

Thank you KP for your long term lurkey-ness.:lol_hitti

I am flattered and happy to hear that you enjoy my projects.
 
To avoid these ads, REGISTER NOW!
OP
Z

zmotorsports

ALLIANCE MEMBER
Joined
Oct 20, 2009
Messages
21,427
Location
Northern Utah
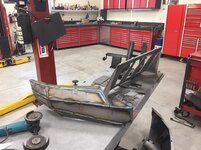
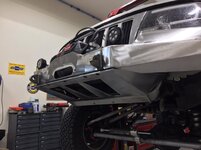
Beautiful welds on that winch mount.

Thank you.

I had some minor issues with my wire feed on my little MM211 due to an old spool of wire which caused some inconstancies in the welds but luckily they were all in areas that will be metal finished and blended anyways.

Now that I got that sorted I hope to have resolved the issue and can complete the bumper.

Thanks for stopping by and checking out my projects.
 

QwikKotaTx

Well-known member
Joined
Aug 10, 2013
Messages
967
Location
Seabrook, TX
Thank you.

I had some minor issues with my wire feed on my little MM211 due to an old spool of wire which caused some inconstancies in the welds but luckily they were all in areas that will be metal finished and blended anyways.

Now that I got that sorted I hope to have resolved the issue and can complete the bumper.

Thanks for stopping by and checking out my projects.

I had to buy a new gun assembly for my Lincoln and a proper drive wheel for non-flux core wire. I still need years of practice to weld half as well as you do. Bumper is looking good so far.
 
OP
Z

zmotorsports

ALLIANCE MEMBER
Joined
Oct 20, 2009
Messages
21,427
Location
Northern Utah
I had to buy a new gun assembly for my Lincoln and a proper drive wheel for non-flux core wire. I still need years of practice to weld half as well as you do. Bumper is looking good so far.

Thank you. My issue was an old spool of .023" wire that kept getting snagged or pinched wire as it was unrolling. I should have put my new spool of wire on when I purchased the welder last year but I decided to try and finish up my old 15+ year spool first and it bit me in the *** on this project. I'm still trying to use it up but before I weld anything more I'm sure I will be putting a new roll on the machine.

I appreciate the comments and thanks for following along.
 
OP
Z

zmotorsports

ALLIANCE MEMBER
Joined
Oct 20, 2009
Messages
21,427
Location
Northern Utah
We were able to get more work done on my son’s WJ winch bumper yesterday.

We started by clamping each wing to the fab table for knocking down the welds and metal finishing all of the pieces.
6c56eb5de6f2d58841cfefd82d646659.jpg

06d78ddb5aa07572a9769e490e6a12f9.jpg

97de9f2db02fac97d159bf3bb0674269.jpg

3acb08efed670a13f59c6e34063e2aef.jpg

Winch mocked into position to determine light placement.
ff43dddb09baf4f903ae6677f354b366.jpg

KC LED lights mocked up in place.
13785d98e3dd778283b364b3286260b1.jpg

178a1dd7bcb81ce7a6e5aca008abea88.jpg

5b2afe5260a772648aa26fa959e4f089.jpg

Lower valance metal finished and bolted in place.
e4b772f744595c094b9b7dced53416fc.jpg

0741b8a52a816b93801f9bac3581211c.jpg

5a6b34ebeea94c1be8aeae9cf096490e.jpg

After closing up the shop for the day the wife and I decided to go for a drive. We took the truck to stretch its legs and it rolled over 100k miles on the way home.
be112064be40d7b167081322570247c0.jpg

Thanks for looking.
 

Attachments

  • 5a6b34ebeea94c1be8aeae9cf096490e.jpg
    5a6b34ebeea94c1be8aeae9cf096490e.jpg
    79.1 KB · Views: 0
  • 3acb08efed670a13f59c6e34063e2aef.jpg
    3acb08efed670a13f59c6e34063e2aef.jpg
    79.4 KB · Views: 0
  • ff43dddb09baf4f903ae6677f354b366.jpg
    ff43dddb09baf4f903ae6677f354b366.jpg
    92.1 KB · Views: 0
  • 13785d98e3dd778283b364b3286260b1.jpg
    13785d98e3dd778283b364b3286260b1.jpg
    90.9 KB · Views: 0
  • 178a1dd7bcb81ce7a6e5aca008abea88.jpg
    178a1dd7bcb81ce7a6e5aca008abea88.jpg
    53.6 KB · Views: 0
  • 0741b8a52a816b93801f9bac3581211c.jpg
    0741b8a52a816b93801f9bac3581211c.jpg
    93.4 KB · Views: 0
  • e4b772f744595c094b9b7dced53416fc.jpg
    e4b772f744595c094b9b7dced53416fc.jpg
    82.1 KB · Views: 0
  • 5b2afe5260a772648aa26fa959e4f089.jpg
    5b2afe5260a772648aa26fa959e4f089.jpg
    73.2 KB · Views: 0
  • 97de9f2db02fac97d159bf3bb0674269.jpg
    97de9f2db02fac97d159bf3bb0674269.jpg
    78.2 KB · Views: 0
  • 06d78ddb5aa07572a9769e490e6a12f9.jpg
    06d78ddb5aa07572a9769e490e6a12f9.jpg
    76.7 KB · Views: 0
  • 6c56eb5de6f2d58841cfefd82d646659.jpg
    6c56eb5de6f2d58841cfefd82d646659.jpg
    122.2 KB · Views: 0
  • be112064be40d7b167081322570247c0.jpg
    be112064be40d7b167081322570247c0.jpg
    88.2 KB · Views: 0
Last edited:

Yarz

Well-known member
Joined
Sep 11, 2013
Messages
121
Location
Tarentum PA
Looks amazing! :bowdown:

I have a question about the center section: Is there any way for water/other debris to exit the winch box?

It won't be an issue if he cleans and maintains his vehicles like you do, but us mere mortals would have all kinds of junk (leaves, etc) trapped in there.
 
OP
Z

zmotorsports

ALLIANCE MEMBER
Joined
Oct 20, 2009
Messages
21,427
Location
Northern Utah
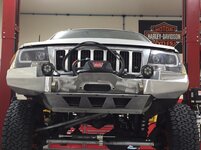
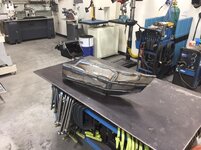
That front bumper turned out beautiful.

The Dmax is almost broken in :)

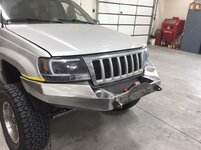
That’s purdy Mike! I say clear coat it and DONE. :)

Man that is a nice bumper!

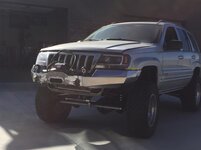
Very nice bumper. Makes the WJ standout.

jhn9840
John

outstanding love your attention to details!

Thanks everyone. I appreciate the comments about the bumper. He's pretty pleased with the way it turned out and now anxious to get it powder coated and installed for the last time.

Paco, yep, the D-Max still has a LOT of life left in her. I was trying to postpone that 100k mile mark as long as I could but I guess for a 15 year old truck that isn't bad.

Cam, Jared said the same thing, that we should just clearcoat it and be call it done but it needs color.:bounce:
 
Last edited:
OP
Z

zmotorsports

ALLIANCE MEMBER
Joined
Oct 20, 2009
Messages
21,427
Location
Northern Utah
Looks amazing! :bowdown:

I have a question about the center section: Is there any way for water/other debris to exit the winch box?

It won't be an issue if he cleans and maintains his vehicles like you do, but us mere mortals would have all kinds of junk (leaves, etc) trapped in there.

Thank you.

Yes, the back of the bottom is open and will allow any moisture/water to drain out the back and down. Also, he's probably more **** about his cars than I am so keeping it clean won't be an issue.

Thanks for following along.
 
OP
Z

zmotorsports

ALLIANCE MEMBER
Joined
Oct 20, 2009
Messages
21,427
Location
Northern Utah
Mike,
Fantastic work as always. Will you be getting the bumper powder coated?

Thanks Mark. Yes, it will be getting powder coated the same as the rear. We also have sliders we need to fabricate as well as a tube section in the rear hatch that will also be powder coated silver once we get the bumper done.
 

OutlawDrifter

Well-known member
Joined
Jan 20, 2015
Messages
3,878
Location
KS
Fantastic work as usual Mike. Will the powder coat match the paint, or will it be a differing color?
 

Finallygotit

ALLIANCE MEMBER
Joined
Jul 6, 2013
Messages
4,088
Location
Tucson, AZ
......Yes, the back of the bottom is open and will allow any moisture/water to drain out the back and down. Also, he's probably more **** about his cars than I am so keeping it clean won't be an issue.

Thanks for following along.

How is that even possible?? :headscrat

Great job Mike!


:beer:
 
To avoid these ads, REGISTER NOW!
Top Bottom