
You are using an out of date browser. It may not display this or other websites correctly.
You should upgrade or use an alternative browser.
You should upgrade or use an alternative browser.
ZMotorsports Shop Projects 2.0
- Thread starter zmotorsports
- Start date
OP
zmotorsports
ALLIANCE MEMBER
That turned out excellent.
Nice work.
Thank you.
That looks deadly sleek! Barely can even tell there’s real steel bumpers on that thing!
Thanks. These definitely tested me as this body has so many lines to try and follow. Hidden in plain site is something I like to strive for so I appreciate the comments.
OP
zmotorsports
ALLIANCE MEMBER
Yup she turned out exceptionally nice bud, excellent job! But I gotta say I’m really enjoying the orange French tickler up front, such a nice touch..
Uh, that doesn’t sound right
Lol Cam. Yeah I was giving him a hard time when he was backing out last night telling him I was going to take his pacifier. I'm betting if I continue giving him **** he'll have a silver Flat Link on there by the end of the year.

Biff Lungren
Well-known member
- Joined
- Sep 1, 2013
- Messages
- 80
Wow those bumpers are amazing! You've expressed that you like to keep a stock or sleeper look, and yes you did! But one who can see it will see that it is highly capable.
Thanks for sharing your beautiful work and your work ethic!
Thanks for sharing your beautiful work and your work ethic!
OP
zmotorsports
ALLIANCE MEMBER
Wow those bumpers are amazing! You've expressed that you like to keep a stock or sleeper look, and yes you did! But one who can see it will see that it is highly capable.
Thanks for sharing your beautiful work and your work ethic!
Thank you very much for your comments and for stopping by to check out my projects. I’m flattered.
fnieto
Well-known member
Your sons rig turned out stellar all the way around!
OP
zmotorsports
ALLIANCE MEMBER
Your sons rig turned out stellar all the way around!
Thank you Paco, I appreciate that.
MP&C
Well-known member
Well done Mike! You continue to raise the bar, with all those components the fit and finish is spot on! I'm sure the same can't be said for the aftermarket parts available.
OP
zmotorsports
ALLIANCE MEMBER
Well done Mike! You continue to raise the bar, with all those components the fit and finish is spot on! I'm sure the same can't be said for the aftermarket parts available.
Thank you Robert, I really appreciate that.
I must admit it was sure nice to bolt everything together after powder coating and not have to ream out holes or pry things around to fit properly. I was very pleased with the way all of the pieces pretty much fell together upon final assembly.
OP
zmotorsports
ALLIANCE MEMBER
WoooHooo.
Mowed my lawn for the first time of the season tonight. We’re supposed to have a wet few days and around the house and shop it was getting very long.
After putting the mowers away I thought I would take a look at my lathe’s compound slide. When I was machining a tapered bung for my son I detected a little more resistance than normal in the compound slide.
Removed and disassembled.

Cleaning up the components.

Double checking the surfaces.

Completed and ready for use.

Mowed my lawn for the first time of the season tonight. We’re supposed to have a wet few days and around the house and shop it was getting very long.
After putting the mowers away I thought I would take a look at my lathe’s compound slide. When I was machining a tapered bung for my son I detected a little more resistance than normal in the compound slide.
Removed and disassembled.
Cleaning up the components.
Double checking the surfaces.
Completed and ready for use.
Attachments


C_F
ALLIANCE MEMBER
Seriously...that has to be the slickest operating lathe compound slide west of the Mississippi. And the fact that you mic'd the tolerances, then posted up photos makes me believe you have (no way!) WAY too much time on your hands! I think I need to come by & throw a few dandelion seeds & maybe some morning glory sprouts over your fence to give you something to chase this summer!
J/K
P/S, gotta love the free lawn watering season! I sure do. Although, I hope the Ground Clear I sprayed yesterday on my areas where I want just dirt will remain "just dirt", with this weather forecast.
And the fact that you mic'd the tolerances, then posted up photos makes me believe you have (no way!) WAY too much time on your hands! I think I need to come by & throw a few dandelion seeds & maybe some morning glory sprouts over your fence to give you something to chase this summer! J/K
P/S, gotta love the free lawn watering season! I sure do. Although, I hope the Ground Clear I sprayed yesterday on my areas where I want just dirt will remain "just dirt", with this weather forecast.
Last edited:
OP
zmotorsports
ALLIANCE MEMBER
Seriously...that has to be the slickest operating lathe compound slide west of the Mississippi.
J/K
P/S, gotta love the free lawn watering season! I sure do. Although, I hope the Ground Clear I sprayed yesterday on my areas where I want just dirt will remain "just dirt", with this weather forecast.
Ha ha ha. Dandelions or weeds of any kind in my yard are fighting words.
I have a few weeds that I detected in my front where the asphalt meets the curb and I noticed one in a driveway seam but debated on going on weed patrol before the rain and opted to wait until it was over because I'm sure there will be more afterwards. I call it weed patrol when I'm out with my pump sprayer addressing any weeds or grass where it shouldn't be.

As for my lathe compound slide, it was just a little tight when I used it last and thought maybe a piece of grit or metal shaving may have gotten under the slide and in a way and I didn't want it to wear anything so I thought I had better address it sooner rather than later.
I wouldn't say I have too much time on my hands I just can't stand to let things go and cause more grief later on. While I have things apart I like to measure and inspect but largely due to my curiosity. Funny thing is I really didn't find anything out of the ordinary, except maybe a small amount of cosmoline that I may have not fully removed when the lathe was new. The ways were perfectly flat and the scraping was like new so a good cleaning and maybe a little more fine tuning on the gibs was all that was needed. Now it floats across the ways it is so smooth and even.
Finallygotit
ALLIANCE MEMBER
WoooHooo.
Mowed my lawn for the first time of the season tonight.......
Mike, you have to be the only guy I know that actually looks forward to mowing the lawn, or are you running a fever?

Nice work all around!

OP
zmotorsports
ALLIANCE MEMBER
Mike, you have to be the only guy I know that actually looks forward to mowing the lawn, or are you running a fever?
Nice work all around!
Thanks for stopping by Dan. I think I'm fine.
I just love mowing my lawn and seeing the end result, although it's still a little brown in spots. I feel it very therapeutic to mow it, I do some of my best thinking while mowing the lawn.
It's blowing that damn white **** off of my concrete that I despise.
Green lawn= soothing. White ****= aggravating.
Finallygotit
ALLIANCE MEMBER
Thanks for stopping by Dan. I think I'm fine.
I just love mowing my lawn and seeing the end result, although it's still a little brown in spots. I feel it very therapeutic to mow it, I do some of my best thinking while mowing the lawn.
It's blowing that damn white **** off of my concrete that I despise.
Green lawn= soothing. White ****= aggravating.

PhantomEB
Well-known member
Hell I can’t wait for mid Spring to come around, especially if this health crisis still has me off work. I so can’t wait To clean up 6 months of 3 shithounds, then it be a Load or two of the clay top soil to the dump and the cheapest gravel/pea gravel topped off with artificial turf to be the next phase of my back yard. Summer will transform my ultra boring 16x8 deck into a BBQ area/sitting area two level deck for more privacy. Then I only have to mow the front from now on.
OP
zmotorsports
ALLIANCE MEMBER
Hell I can’t wait for mid Spring to come around, especially if this health crisis still has me off work. I so can’t wait To clean up 6 months of 3 shithounds, then it be a Load or two of the clay top soil to the dump and the cheapest gravel/pea gravel topped off with artificial turf to be the next phase of my back yard. Summer will transform my ultra boring 16x8 deck into a BBQ area/sitting area two level deck for more privacy. Then I only have to mow the front from now on.
Sounds like a nice modification. When I put my back yard in I ran an extra gas line with the intentions of putting in a sunken fire pit and a brick/rock grille area with seating but never got around to it. Now that I have my back yard looking so nice I can't bring myself to tear it up and do that. I have my grille sitting on my deck and enjoy the view of my back yard from the deck above vs. in a sunken fire pit area. Doubt I'll ever go through with it now as I love my yard the way it is.
I appreciate you taking the time to stop by and check out my projects. Sounds like your project will be nice when done.
Hi mike, love your work and really enjoy reading the threads. I ha ve a question if you dont mind. Back on your sons bumper project you were talkking about your mig wire giving you trouble. Did you use .024" wire to weld up the whole bumper? I would have thought to use at least .030 or .035 on the 1/4" stuff. Not critiquing just trying to learn from a much better welder/fabricator than myself.
thanks.
thanks.
OP
zmotorsports
ALLIANCE MEMBER
Hi mike, love your work and really enjoy reading the threads. I ha ve a question if you dont mind. Back on your sons bumper project you were talkking about your mig wire giving you trouble. Did you use .024" wire to weld up the whole bumper? I would have thought to use at least .030 or .035 on the 1/4" stuff. Not critiquing just trying to learn from a much better welder/fabricator than myself.
thanks.
Thanks for following along and for the feedback.
On all of my bumpers I use my big welder (MM251) and .030" on the structural 3/16" and 1/4" plate work. I just use the smaller welder (MM211) running .024" on the 10-gauge material when doing an open corner joint because it blends so nice with good penetration yet not excessive material laid down. Anything inside such as mounting tabs, etc. are welded with my MM251 and .030" wire. I wouldn't use my smaller welder with the smaller wire for the foundation of the bumper or anything structural over about 1/8" material.
Sorry if I wasn't more clear on which wire/welder I used for which application.
OP
zmotorsports
ALLIANCE MEMBER
Tonight I was able to get a few housekeeping items addressed that I have wanted to for a while.
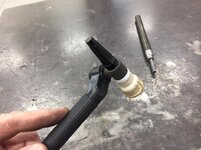
I purchased a CK Flexloc 230 about 6+ months ago but haven’t had time to put it on my Miller Dynasty. I remedied that.



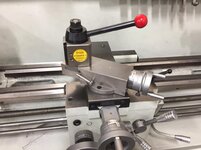
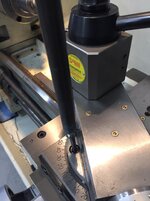
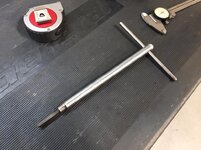
I also addressed a couple of tools for the lathe. I like having things right within reach when working to help be proficient when working. My toolbox is only about 10’ from my lathe but when I need to adjust my compound slide angle I have to grab a 6mm Allen socket, extension and ratchet. I thought I would fabricate one to keep at the ready on the lathe itself plus have a 3/16” Allen T handle for my toolholders.
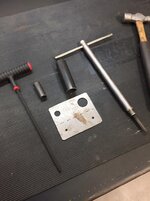
Starting with a 9/16” wrench (for the toolholder jambnut), a 3/16” Allen T and a 6mm Allen socket.

Raw materials include an 8” length of .625” chromoly tubing, 6.625” length of .312” O1 drill rod, a 10-24 x 1” socket head capscrew and a small drop of 1” 6061 aluminum.

Facing the ends of the tubing.
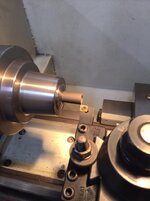

Machining the major OD of the 6mm Allen socket down to .500” for a pressed fit into the tubing.

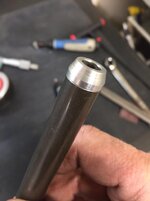
Chamfered and pressing together.

Ready for welding.

Testing for clearance after welding.


Using a 1/4 rounding tool to radius the end of the .312” O1 drill rod.

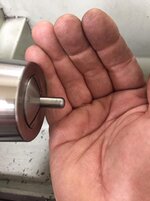

Next up is to machine the cap/retention end out of the 1” aluminum drop.

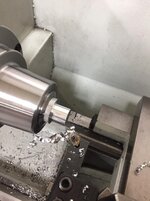
Faced and turned down to .625” OD.

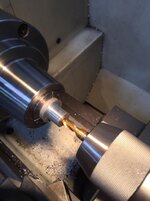
Drilled for the 10-24 screw and counter bored to clear the socket head capscrew. I used a 3/8” 2-flute end mill and sunk it .200” deep.

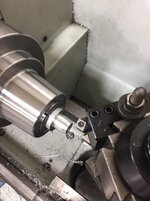
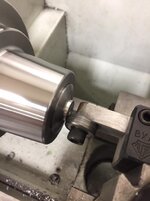
Turned the compound slide to 20-degrees and chamfered the end.
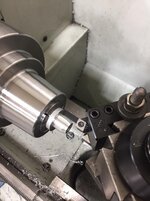
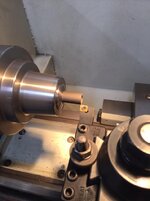
Continued ......
I purchased a CK Flexloc 230 about 6+ months ago but haven’t had time to put it on my Miller Dynasty. I remedied that.
I also addressed a couple of tools for the lathe. I like having things right within reach when working to help be proficient when working. My toolbox is only about 10’ from my lathe but when I need to adjust my compound slide angle I have to grab a 6mm Allen socket, extension and ratchet. I thought I would fabricate one to keep at the ready on the lathe itself plus have a 3/16” Allen T handle for my toolholders.
Starting with a 9/16” wrench (for the toolholder jambnut), a 3/16” Allen T and a 6mm Allen socket.
Raw materials include an 8” length of .625” chromoly tubing, 6.625” length of .312” O1 drill rod, a 10-24 x 1” socket head capscrew and a small drop of 1” 6061 aluminum.
Facing the ends of the tubing.
Machining the major OD of the 6mm Allen socket down to .500” for a pressed fit into the tubing.
Chamfered and pressing together.
Ready for welding.
Testing for clearance after welding.
Using a 1/4 rounding tool to radius the end of the .312” O1 drill rod.
Next up is to machine the cap/retention end out of the 1” aluminum drop.
Faced and turned down to .625” OD.
Drilled for the 10-24 screw and counter bored to clear the socket head capscrew. I used a 3/8” 2-flute end mill and sunk it .200” deep.
Turned the compound slide to 20-degrees and chamfered the end.
Continued ......
Attachments
-
 8dfea65c204b2838c9891224a82c3b5c.jpg72.8 KB · Views: 0
 -
 b0538640364e9b9bade6c2626014626f.jpg72.9 KB · Views: 0
 -
 9266b54faaf544c9a859aaba7e59f80c.jpg56.1 KB · Views: 0
 -
 495028d12dba889d03d3cd6906056900.jpg73.7 KB · Views: 0
 -
 727ddccc143da4441cf7339815f65d8b.jpg127 KB · Views: 0
 -
 495a58cc7a49fd7bfd6b00f1e845d4f5.jpg53.3 KB · Views: 0
 -
 568d2e1b4906e40181f9305d3a15155c.jpg68.7 KB · Views: 0
 -
 933da3e322f4ed3bc016caeda9c9a510.jpg116.5 KB · Views: 0
 -
 65167be630661edcfde3303ab34ae909.jpg102.1 KB · Views: 0
 -
 561ff5ca8ea7d46831d208371df90cdc.jpg71.7 KB · Views: 0
 -
 56d3cfb0fd2e14e3cc6d911b380d56bf.jpg110.8 KB · Views: 0
 -
 2feda505187e41d82c7992471d3f08cd.jpg81.3 KB · Views: 0
 -
 c128816eac9a32cc420cd80ddd094ff1.jpg107.2 KB · Views: 0
 -
 687ec3efe2bd5ce7c9891032470839f6.jpg62.3 KB · Views: 0
 -
 473e35f285a7afe0b094c1ddfa0fe1c0.jpg129.2 KB · Views: 0
 -
 a71f2cff73cd86040884bca036163ba5.jpg68.5 KB · Views: 0
 -
 aad46c6517b4252d3c176e2aff6dec91.jpg59.3 KB · Views: 0
 -
 d5900991e496580a17cb6dadfd4fab98.jpg115.3 KB · Views: 0
 -
 89076f0fb8e984afb6438b954e5c9f57.jpg85.2 KB · Views: 0
 -
 e0a2e567ad728c86a15753e570042ed7.jpg77.9 KB · Views: 0
Last edited:
OP
zmotorsports
ALLIANCE MEMBER
Continuing on.
I turned the cap around in the collet and used my small parts alignment tool to get it running true.

This is an easily made shop tool using a piece of bar stock and a couple of small diameter bearings that clamps into a toolholder.

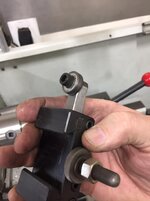
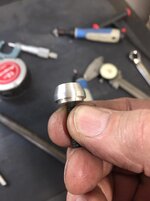
Lastly I machined a .040” deep step turned to .499” diameter.
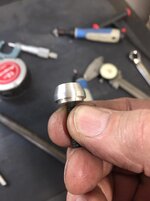

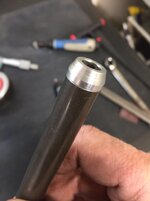
I wanted to knock the slight buildup of weld down to .625” diameter.

Moving over to the milling machine I drilled a hole across the end .300” from the end.

Grabbed my 3/16” chucking reamer.

Slowed the RPM down and reamed the hole for a tight fit.

Next in the mill I found center of the .312” O1 drill rod and drilled for tapping a 10-24 thread.


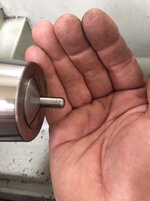
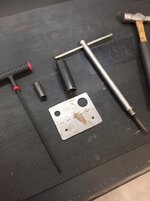
Completed.
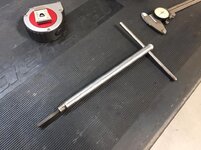

Works like a charm.
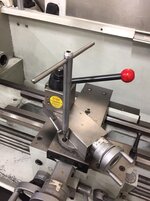
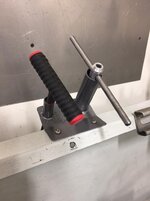
Now to build a holder.
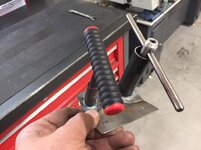
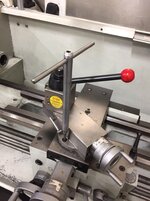
Bead blasted, painted and installed on the back splash.
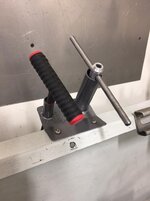

Now everything is within easy reach.
Thanks for looking.
I turned the cap around in the collet and used my small parts alignment tool to get it running true.
This is an easily made shop tool using a piece of bar stock and a couple of small diameter bearings that clamps into a toolholder.
Lastly I machined a .040” deep step turned to .499” diameter.
I wanted to knock the slight buildup of weld down to .625” diameter.
Moving over to the milling machine I drilled a hole across the end .300” from the end.
Grabbed my 3/16” chucking reamer.
Slowed the RPM down and reamed the hole for a tight fit.
Next in the mill I found center of the .312” O1 drill rod and drilled for tapping a 10-24 thread.
Completed.
Works like a charm.
Now to build a holder.
Bead blasted, painted and installed on the back splash.
Now everything is within easy reach.
Thanks for looking.
Attachments
-
 6555ad2c61503304c8e89288707dc207.jpg70.5 KB · Views: 0
 -
 80a8a8b2e38bcbe55389d4cb7028dd91.jpg53.7 KB · Views: 0
 -
 95df9b8abdcfc441b774d6f072c1449e.jpg54.2 KB · Views: 0
 -
 718c13a0a8e8ed19776eae3695ff3d5a.jpg72.6 KB · Views: 0
 -
 a5449a5f939afbe2321c57af4cfdd313.jpg55.1 KB · Views: 0
 -
 6817bfcaa7633fdb79b3d932af582691.jpg63.1 KB · Views: 0
 -
 41ba825ac3b4f47d9d61ed8767953667.jpg71.8 KB · Views: 0
 -
 7bd257febd5f1e7580ad05f615f2df29.jpg63.2 KB · Views: 0
 -
 1dc90ddb63a552fc261ea0f30876205c.jpg51.2 KB · Views: 0
 -
 c8484024322d6c842c96500e1d57a728.jpg47.5 KB · Views: 0
 -
 83f79bce5c314dd3bac14d838e980900.jpg122.6 KB · Views: 0
 -
 8b71356b149152c7e8d05464f313e55f.jpg95.5 KB · Views: 0
 -
 81ca5e4304aa1d64d4b8be3e28ffda0c.jpg54.6 KB · Views: 0
 -
 5507579391a1431ff648ece3e2c988e4.jpg129.6 KB · Views: 0
 -
 dac21a825eb20eba4f26989872e8e88e.jpg160.3 KB · Views: 0
 -
 dc973b9e3c0496424a96691bbf7ee5c9.jpg75.6 KB · Views: 0
 -
 0b93b261cad3b84c9fe817a5bc38a4f0.jpg66.8 KB · Views: 0
 -
 edf9ddf91a1efd42aafcd3f4aaea3602.jpg61.7 KB · Views: 0
 -
 1168e8cab642b1384b4893d9c18eeb4c.jpg72.6 KB · Views: 0
 -
 e3fa5a32c9063e84d9b6805e64d0884f.jpg52 KB · Views: 1
Last edited:
Bigblue&Goldie
Well-known member
That T-Handle......
What kind of collet chuck do you have? I've never seen the "small parts aligner"; that's pretty cool. I'll have to look into that.
Out of curiosity why the Flex Loc over the regular Flex? I have the regular Flex and like it, but I'm kinda thinking there's some advantages to the Flex Loc.
What kind of collet chuck do you have? I've never seen the "small parts aligner"; that's pretty cool. I'll have to look into that.
Out of curiosity why the Flex Loc over the regular Flex? I have the regular Flex and like it, but I'm kinda thinking there's some advantages to the Flex Loc.
Last edited:
OP
zmotorsports
ALLIANCE MEMBER
That T-Handle......
What kind of collet chuck do you have? I've never seen the "small parts aligner"; that's pretty cool. I'll have to look into that.
Out of curiosity why the Flex Loc over the regular Flex? I have the regular Flex and like it, but I'm kinda thinking there's some advantages to the Flex Loc.
Thanks Ryan, I appreciate the comments and for following along.
The collet chuck is a 5C collet chuck made by Lathemaster. It is an import chuck and seems to be a very nice quality chuck. I've had it for a couple of years now and it is the one on my lathe the most. It is a set true style so it can be dialed in to a knat's *** (technical term).
For holding round stock it is by far the best and most accurate way to hold the work and is easily changed out between my Gator 6" 6-jaw when needed as my lathe utilizes the D1-4 mounting configuration. Those seem to be the two chucks I use the most although I have a nice 6" 3-jaw and an 8" 4-jaw as well.
The small parts alignment tool is something I saw on Tom's Techniques years ago and copied it. It works great to get parts to run true without having to use a DTI and a mallet to bang the parts around, it's quick and easy.
As for the Flexloc, I have had a Weldcraft WP-20 Flex head for about 14 years now, I bought it when I bought my Miller Dynasty 300 TIGRunner. I love the lightweight 25' Superflex hoses and the flex head worked very well with not issues. I've heard of people breaking the heads off but I've worked within the limits of the flex and don't bend it beyond that and have had no issues and really like it. There have been a few times when welding on a tube chassis that I have wanted something that would bend a bit further and even back against itself and saw Jody on Welding Tips & Tricks use one and it looked intriguing. I got a discount code from Arc Zone last year and couldn't think of what to use it on so I bought the CK Flexloc 230-amp version but didn't install it until last night. It has the same 25' Superflex hoses and upon first using it I will admit it felt a bit odd in my hand but that was quickly overcome with my impressed rigidity and flexibility of the torch. For welding around a tube joint @ 90-degrees I was playing with the angle it was amazing just how precise I could keep the torch angle even while working my way around a tube weldment.
When I first bought the torch my thinking was I would just connect it and use it as needed because This Old Tony had mentioned he burned his up in one of his video but after conversing with several other people on Instagram and YouTube I was finding that most use it as their only torch and keep it on their machine full-time, and they do much more welding than I do. I am going to try it out as my full-time torch and see just how well it works out. If I don't like it for my every day torch I will switch back to my flex head and just use this one when the occasion calls for it but so far I think I am going to like it.
OP
zmotorsports
ALLIANCE MEMBER
Not only do you do an outstanding job on every project you envision, design, and complete (and very timely, too), but you document it with an excellent narrative and pictures. Thank you!
Mike
Thank you, I appreciate that. It's nice to know I make sense to others and not just in my own head.
C_F
ALLIANCE MEMBER
Not only do you do an outstanding job on every project you envision, design, and complete (and very timely, too), but you document it with an excellent narrative and pictures. Thank you!
Mike
Ain't that the truth. At first I was getting ready to give Mike a jab of "geez you sure seem to have a lot of free time on your hands"...but with each progressing photo, I realized I was more & more slack-jawed with each photo, and eventually found myself saying DAYUM! I am witnessing a master in his idle time creating a couple tiny masterpieces!

Mike, watching the creation of these neat tools brings back some of your previous posts where folks have asked you to fabricate gun parts for them. I truly believe that if you landed on this planet a few decades earlier, you would have given the likes of Dan Wesson/John Browning/R.J Gatling/etc. a run for their money. Definitely.
Although I bet none of those guys had zen moments like you while mowing their grass. So there's that.
OP
zmotorsports
ALLIANCE MEMBER
Ain't that the truth. At first I was getting ready to give Mike a jab of "geez you sure seem to have a lot of free time on your hands"...but with each progressing photo, I realized I was more & more slack-jawed with each photo, and eventually found myself saying DAYUM! I am witnessing a master in his idle time creating a couple tiny masterpieces!
Mike, watching the creation of these neat tools brings back some of your previous posts where folks have asked you to fabricate gun parts for them. I truly believe that if you landed on this planet a few decades earlier, you would have given the likes of Dan Wesson/John Browning/R.J Gatling/etc. a run for their money. Definitely.
Although I bet none of those guys had zen moments like you while mowing their grass. So there's that.
Thank you very much for the comments, I'm very flattered but I don't think I am in the same league as those that individuals that you mentioned. I'm glad you like the documented progression through my projects. I could merely post up pictures of the final product if you like but for me, I like to see people's projects move along from concept through fabrication and then the finished product. For me I think it demonstrates, or at least gives us a glimpse, into their thought process and the way their mind works when they see something vs. when I see that same thing. Plus I like to see other people's fabrication, machining and overall shop tools and equipment in use.
Thank you for following along with my various projects.
Kiwi Canuck
Well-known member
WoooHooo.
Mowed my lawn for the first time of the season tonight. We’re supposed to have a wet few days and around the house and shop it was getting very long.
After putting the mowers away I thought I would take a look at my lathe’s compound slide. When I was machining a tapered bung for my son I detected a little more resistance than normal in the compound slide.
Removed and disassembled.
Completed and ready for use.


Mike, I'm just finally getting around to installing my Aloris QCTP on my PM 1340GT and I have a couple of questions.
On your QCTP how tight a fit did you make the T Nut, I have mine tight so it needed a light tap to install it, but was wondering if it really needs to be like that as it tightens up when the nut is tightened, I think you also had an issue with yours and needed an adjustment of some sort IIRC.
What lube did you put in the compound slide when you assembled it, specifically the part that rotates where the mini T nuts are, grease or way oil.
Last question, the alignment of the QCTP, I notice you have yours at about 45 degrees to the compound slide body, is that the normal position?
OK another last question, do you have any idea how many PM 1340GT lathes you have helped Matt sell?
I bought mine because of your positive experience with yours and I also followed your lead and bought the 3 phase model and installed a VFD, I did the full rewire and replaced all the contactors with relays and added a 2 stage braking resistor, forward reverse toggle, proximity stop and wired for a coolant pump etc.
I'm working on completing my DRO install this weekend as well.
Thanks for your contribution and showing me the way to the rabbit hole.
David.
Last edited:
OP
zmotorsports
ALLIANCE MEMBER
Mike, I'm just finally getting around to installing my Aloris QCTP on my PM 1340GT and I have a couple of questions.
On your QCTP how tight a fit did you make the T Nut, I have mine tight so it needed a light tap to install it, but was wondering if it really needs to be like that as it tightens up when the nut is tightened, I think you also had an issue with yours and needed an adjustment of some sort IIRC.
What lube did you put in the compound slide when you assembled it, specifically the part that rotates where the mini T nuts are, grease or way oil.
Last question, the alignment of the QCTP, I notice you have yours at about 45 degrees to the compound slide body, is that the normal position?
OK another last question, do you have any idea how many PM 1340GT lathes you have helped Matt sell?
I bought mine because of your positive experience with yours and I also followed your lead and bought the 3 phase model and installed a VFD, I did the full rewire and replaced all the contactors with relays and added a 2 stage braking resistor, forward reverse toggle, proximity stop and wired for a coolant pump etc.
I'm working on completing my DRO install this weekend as well.
Thanks for your contribution and showing me the way to the rabbit hole.
David.
David, thank you, I am flattered by your comments. I haven't spoken to Matt is quite some time but when I contacted him about two years inquiring about a surface grinder he had informed me that he had gotten quite a few calls and many mentioning either me by name or by my video so I'm sure there have been a few. Although I think you may be giving me a bit too much credit on just how many.
I am glad to know the information has been helpful because when I was looking at lathes there was absolutely no information on this lathe anywhere I could find. I merely wanted to give people some information, which was more than I had.As for the early issues with my QCTP, mine was due to the fact that I didn't have my mill yet and therefore I used the original Taiwanese T-nut and the Dorian stud. The issue was the stud ended up pulling the T-nut upward slightly in the middle which came in contact with the bottom of the toolpost and therefore prevented it from tightening down and was moving as the tool was moving across the work.
Once I got my mill setup and machined the new Dorian T-nut that issue was resolved as the material was much higher quality than the cast material of the original T-nut. I also made sure there was some clearance between the top of the T-nut and the bottom of the toolpost to allow it to be fully tightened without coming in contact one with the other. As for the fitment of the T-nut inside of the compound slide it was not snug but not sloppy either. It can easily be slid in/out by hand without any persuasion.
For lubrication on the compound slide, I put a little red GLCI #2 grease inside of the round boss in the middle of the cross slide carriage and squirted a few pumps of #2 way oil around the small T-nuts. After cleaning the compound slide components I spread some #2 way oil around the ways and the gibs and put a little on the threads of the compound screw. Once it was assemble but before fully adjusting the gibs I use the oiler ports to pump a few pumps of #2 way oil in then performed the final adjustment on the gibs. Keep in mind it would be better to place some rags under the carriage for a night or two. I didn't as I was in a hurry to close up the shop and the next night noticed that much of the way oil made it way to the floor and the chip pan.
No big deal as it easily wiped up but I should have known it would continue to flow out over night.I'm jealous of your DRO installation. I have wanted to install a DRO on my lathe for a couple of years now but the funds always seem to go elsewhere. I am however, still very impressed with the precision of this lathe. The other night I when I was turning down a piece of 1" 6061 aluminum, after the first cut, and micing the OD I determined I needed to remove .269". As you know, that is one full revolution of the cross slide dial and then .069" more. I machined the .200" in four cuts @ .050" each and when I returned to zero I was EXACTLY .069" from my target diameter. I moved my dial off by the .069" and moved towards zero in two cuts. Landing on my zero and checking with a mic I was dead nuts on my target diameter. I am impressed with the accuracy and repeatability of this machine. I keep telling myself I "want" a DRO even though my head tells me I really don't "need" a DRO.
Thanks again for following along David and I appreciate the kind words.
Finallygotit
ALLIANCE MEMBER
I keep telling myself I "want" a DRO even though my head tells me I really don't "need" a DRO.
You know you "need" the DRO. Life is so much better with a DRO on a machine.
OP
zmotorsports
ALLIANCE MEMBER
You know you "need" the DRO. Life is so much better with a DRO on a machine.
Ha ha Dan. I can try to tell my wife I "need" a DRO on the lathe and she'll probably go for it but I can get along fine without it. The mill on the other hand is something I am very glad I have a DRO on as it is a game changer. Not that working with backlash is impossible, it's just much quicker and easier on a mill and more of a pleasure to use with a DRO.
Although your hypnotic technique may be working.
Wanna Ride
Well-known member
- Joined
- Jul 28, 2010
- Messages
- 2,790
Mike, I don't know which impresses me more... your attention to detail and precision on every project you tackle, or your patience to document every step of every project, create the post and attach all the pics.
Always amazing results on both!
Always amazing results on both!
Finallygotit
ALLIANCE MEMBER
.....Although your hypnotic technique may be working.
Look into my eyes
, you "need" a DRO.
OP
zmotorsports
ALLIANCE MEMBER
Mike, I don't know which impresses me more... your attention to detail and precision on every project you tackle, or your patience to document every step of every project, create the post and attach all the pics.
Always amazing results on both!
Thank you very much. I appreciate the comments.
OP
zmotorsports
ALLIANCE MEMBER
Look into my eyes
It's working Dan, now I've been looking at DRO's again.
MP&C
Well-known member
What are friends for if not to help you spend your money!
OP
zmotorsports
ALLIANCE MEMBER
What are friends for if not to help you spend your money!
And there's not shortage of members helping me try and spend money.
4 FN 27
ALLIANCE MEMBER
It's working Dan, now I've been looking at DRO's again.
I vote DRO Mike...
I am trying to figure out how to put one on my Band Saw...might save me the investment of a new Saw with a NC Feeder System on it...LOL. I like my Tubing cut +/-.005...
OP
zmotorsports
ALLIANCE MEMBER
I vote DRO Mike...
I am trying to figure out how to put one on my Band Saw...might save me the investment of a new Saw with a NC Feeder System on it...LOL. I like my Tubing cut +/-.005...
Looking and actually buying are two different things Pat. I started looking again but don't know if/when I will actually pull the trigger. At this point it's a luxury and not a necessity.
4 FN 27
ALLIANCE MEMBER
Looking and actually buying are two different things Pat. I started looking again but don't know if/when I will actually pull the trigger. At this point it's a luxury and not a necessity.
Oh I get it Mike. I was about to pull the trigger on a LVD Strippit PPED Press Brake. But put that on hold...I have until tomorrow to put 20% down on a sweet deal...but...
Man I want to do it...