To avoid these ads, REGISTER NOW!

Unfaced ceiling insulation with paint as vapor barrier

Jaja

Well-known member
Joined
Oct 2, 2017
Messages
94
Location
Michigan
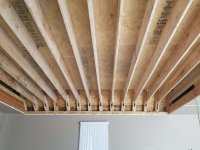
Attached are pics of ceiling after I raised it 14". It didn't occur to me at the time to add vapor barrier before we reinstalled the ceiling with 5/8" drywall. BTW, the new joists are 2x12 and the ceiling is already finished.

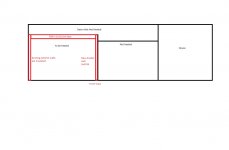
Now I'm finally planning to adding insulation to a section of my garage that will be heated. I'm putting up a dividing wall and will be heating the section on the left in the crude attached image. The bosses side is on the right and adjacent to the house and will remain unheated.

The insulation will go in from above like a typical attic insulation job but I only see a few options for adding vapor barrier from the top:

1. 6 mil poly stabled and taped in each bay cavity. - Not expensive but a hassle given the bay is ~25 ft. long

2. Adding rigid foam that's sealed around the edges to each cavity like this: https://www.nrcan.gc.ca/sites/www.nrcan.gc.ca/files/images/enerpedia/figure_5-10_5.jpg but it's an added expense I would prefer to avoid.

3. I've seen where poly is sealed on top of the joist: https://www.nrcan.gc.ca/sites/www.nrcan.gc.ca/files/images/enerpedia/figure_5-9_0.jpg All insulation will be in the cavity and not on top of the joist as it has a floor and the atic area is used for light storage.

I'm not aware of any other solutions from above to add a vapor barrier.

I'm leaning toward unfaced R30 rolls in the cavity (which is very economical compared to faced batts or rolls) and painting the ceiling with a vapor barrier paint. This seems check all the boxes: ease of work, cost, effective.

Any thoughts on this approach?
 

Attachments
  • ceiling.jpg
    ceiling.jpg
    54.7 KB · Views: 66
  • after.jpg
    after.jpg
    146.1 KB · Views: 91
  • after2.jpg
    after2.jpg
    147.7 KB · Views: 93
Last edited:
To avoid these ads, REGISTER NOW!

The Cobbler

Super Moderator
Staff member
Joined
Oct 24, 2013
Messages
25,953
Location
Niagara Region, Ontario, Canada
Re: Unfaced ceiling insulation wilth paint as vapor barrier

There's ongoing discussions whether vapour barrier is needed in garages. and, the vapour barrier goes to the heated side , so it looks like you can still do that?
 

tfinniii

Well-known member
Joined
Aug 13, 2013
Messages
124
Location
Balto., Md.
Re: Unfaced ceiling insulation wilth paint as vapor barrier

Vapor barrier would go on heated space side. After sheetrock a good paint will stop air infiltration and that would act as vapor barrier.
 
OP
J

Jaja

Well-known member
Joined
Oct 2, 2017
Messages
94
Location
Michigan
Re: Unfaced ceiling insulation wilth paint as vapor barrier

There's ongoing discussions whether vapour barrier is needed in garages. and, the vapour barrier goes to the heated side , so it looks like you can still do that?

Yes, lots of discussion and differences of opinion on this topic. Here was a good post: https://www.garagejournal.com/forum/showthread.php?t=412533 that helped with my research.

Seems most of the brands are latex based but oil based is the best vapor barrier from my reading.

Here's a good link for perm ratings of various materials:
https://insulationinstitute.org/im-...idance-2/moisture-management/vapor-retarders/
 

Leaflessshadetree

Well-known member
Joined
Aug 1, 2013
Messages
7,171
Location
Don't ask.
Re: Unfaced ceiling insulation wilth paint as vapor barrier

You can install faced insulation with the faced side down. Staple to the side of the joists.
 
OP
J

Jaja

Well-known member
Joined
Oct 2, 2017
Messages
94
Location
Michigan
Re: Unfaced ceiling insulation wilth paint as vapor barrier

You can install faced insulation with the faced side down. Staple to the side of the joists.

Would it be possible to compress ~9" of insulation to staple to sides? I never tried it...
 

CombatNinja

Well-known member
Joined
Aug 24, 2013
Messages
1,456
Re: Unfaced ceiling insulation wilth paint as vapor barrier

Staple to the face of the joists, that is the way to do it correctly. Also, do not compress fiberglass batts, ever. R-value goes down drastically. I would probably go faced stapled to the face of the joists and overlapped to give that continuous vapor retarder and I hate the installs from below using those wire insulation hangers since they compress it every couple of feet. I don't know what size those joists are but get the size that fits that cavity without being compressed. R-30 is going to be massive overkill anyway and you are going to be limited with how well you can sea that overhead door. That will be the limiting factor in this setup.
 
Last edited:
OP
J

Jaja

Well-known member
Joined
Oct 2, 2017
Messages
94
Location
Michigan
Re: Unfaced ceiling insulation wilth paint as vapor barrier

Staple to the face of the joists, that is the way to do it correctly. Also, do not compress fiberglass batts, ever. R-value goes down drastically. I would probably go faced stapled to the face of the joists and overlapped to give that continuous vapor retarder and I hate the installs from below using those wire insulation hangers since they compress it every couple of feet. I don't know what size those joists are but get the size that fits that cavity without being compressed. R-30 is going to be massive overkill anyway and you are going to be limited with how well you can sea that overhead door. That will be the limiting factor in this setup.

I agree this would be ideal, but with the drywall already back up and the ceiling finished (and painted) my options seem limited to the few I listed in the 1st post. Joists are 2x12 and on 16" centers meaning I have a 11-1/4" by 15-1/2 cavity to work with. Unfaced R30 rolls @ 25' long are under $20 at the big box stores right now.
 

CombatNinja

Well-known member
Joined
Aug 24, 2013
Messages
1,456
Re: Unfaced ceiling insulation wilth paint as vapor barrier

I see you edited your original post--so you are going to go up above and remove the subfloor up there? It looks to already be in place in the pictures. Was the decision to insulate a last minute call? I don't understand why you would install ply from above and drywall below and then worry about insulation.

I would not sweat the vapor barrier. Not an issue. Just put down that R30 from the top and it will be as snug as the air leaks in the overhead door allow.
 
OP
J

Jaja

Well-known member
Joined
Oct 2, 2017
Messages
94
Location
Michigan
Re: Unfaced ceiling insulation wilth paint as vapor barrier

I see you edited your original post--so you are going to go up above and remove the subfloor up there? It looks to already be in place in the pictures. Was the decision to insulate a last minute call? I don't understand why you would install ply from above and drywall below and then worry about insulation.

I would not sweat the vapor barrier. Not an issue. Just put down that R30 from the top and it will be as snug as the air leaks in the overhead door allow.

Yes, I'll need to remove the subfloor and install the insulation. The attic already had flooring in it when I bought the house. I've been doing the work in phases since I moved in and didn't consider the need for a vapor barrier when I had the ceiling raised. I pulled the flooring once already, not that many sheets really. The stuff on top of them is will be most of the work.

Thanks for the input on this. The lack of objections here seems I'm on the right track.
 
To avoid these ads, REGISTER NOW!

beech1948

Member
Joined
Jun 17, 2011
Messages
13
I notice that you have OSB over the ceiling. OSB is as much resin and glue as it is particles. Therefore the OSB could be considered your vapour barrier and will jkust need a coat of paint to lighten the ceiling aspect.
 

CombatNinja

Well-known member
Joined
Aug 24, 2013
Messages
1,456
The OSB is not his ceiling. Not shown in the pictures (which is why we are all confused) is the 5/8" drywall that he has already installed/taped/mudded/sanded/painted. He is going to go up top, remove that OSB, place unfaced fiberglass between the joist and then resecure the OSB.
 

i4ni

Well-known member
Joined
Jan 23, 2010
Messages
1,015
Why go to all the trouble taking up, insulating,and re-laying the osb? Cut in an access hole mid way in each truss bay with a holesaw. Dense pack both ways with blown cellulose then glue the plug back in. So much easier. As far as a vapor barrier semi gloss paint on the ceiling is fine.
 
Last edited:

CombatNinja

Well-known member
Joined
Aug 24, 2013
Messages
1,456
My argument against that is twofold: One, you would have to cut a hole is every single stud bay, which would take just about as long as just pulling up the OSB. Two, you will never get the blown-in the fill every cavity 100%. You're going to be left with voids.

Oh, and since his hobby is clearly ripping stuff apart, it will be hard to remove blown-in cellulose, it kind of goes everywhere.
 
OP
J

Jaja

Well-known member
Joined
Oct 2, 2017
Messages
94
Location
Michigan
Why go to all the trouble taking up, insulating,and re-laying the osb? Cut in an access hole mid way in each truss bay with a holesaw. Dense pack both ways with blown cellulose then glue the plug back in. So much easier. As far as a vapor barrier semi gloss paint on the ceiling is fine.

Not a bad idea if done from top. I have to install venting baffles to the soffits anyhow. I would have preferred do something like this to keep the cellulose from dropping into the soffits. I don't expect the baffles themselves to do much to stop blow in from finding its way into the soffits.
 

Attachments

  • IMG_0687.jpg
    IMG_0687.jpg
    47.7 KB · Views: 24

i4ni

Well-known member
Joined
Jan 23, 2010
Messages
1,015
My argument against that is twofold: One, you would have to cut a hole is every single stud bay, which would take just about as long as just pulling up the OSB. Two, you will never get the blown-in the fill every cavity 100%. You're going to be left with voids.

Oh, and since his hobby is clearly ripping stuff apart, it will be hard to remove blown-in cellulose, it kind of goes everywhere.

Your arguments pretty weak there, Goober. But Hey, We all remember our first Beer too.:drunk:
 

CombatNinja

Well-known member
Joined
Aug 24, 2013
Messages
1,456
I promise if you had two identical layouts such as presented in this thread and you had one two-man crew pull up the OSB, blow in the cellulose unobstructed and button everything back up vs a two-man crew cut holes in every stud bay, blow in cellulose with specialized hoses designed to 'snake' into stud bays, and repair every hole, the crew that pulled the OSB would not only be done first, but they would have a better end result with no voids. I've only done this 20 times though, what do I know?
 

i4ni

Well-known member
Joined
Jan 23, 2010
Messages
1,015
I promise if you had two identical layouts such as presented in this thread and you had one two-man crew pull up the OSB, blow in the cellulose unobstructed and button everything back up vs a two-man crew cut holes in every stud bay, blow in cellulose with specialized hoses designed to 'snake' into stud bays, and repair every hole, the crew that pulled the OSB would not only be done first, but they would have a better end result with no voids. I've only done this 20 times though, what do I know?

:lol_hitti
 
To avoid these ads, REGISTER NOW!
Top Bottom