To avoid these ads, REGISTER NOW!

Another Irish Version of a Welding Table!

OP
B

Bobnoxious32

Well-known member
Joined
Feb 21, 2016
Messages
54
Location
Ireland
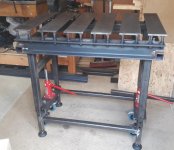
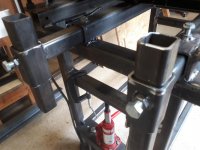
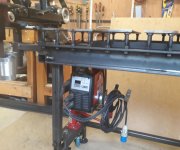
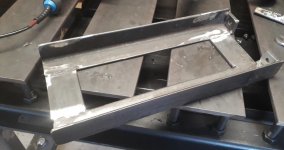
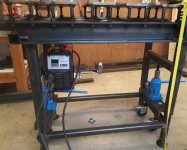
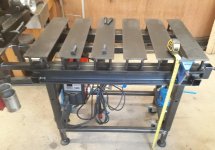
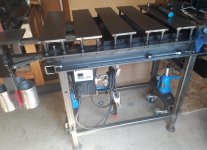
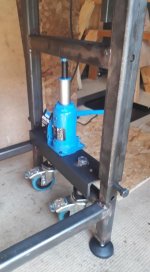
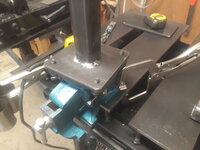
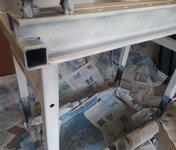
Heres the Top-Frame assembled to the Sub-Frame.

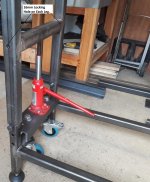
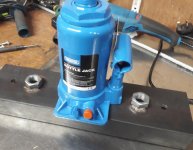
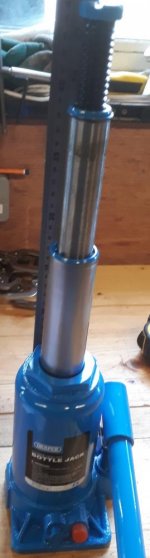
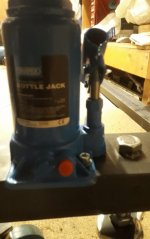
These bottle jacks only have enough lift for approx 135mm.
I got some high lift 1s for an upgrade to double that (Future post)!
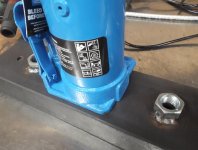
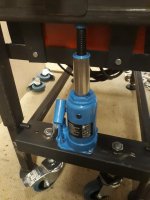
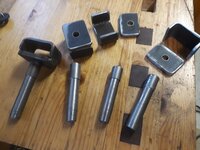
The bottle jacks dont hold the Top-Frame at this height, they only get it there. 4 bolts through the Sub-Frame legs (under each leg of the Top Frame) hold it at the desired height (safer).

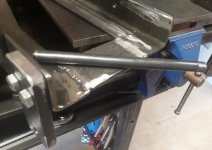
At its lowest setting the locking holes (on the Top-Frame) align with the top holes on each leg of the Sub-Frame.
With a 16mm bolt through each of these locking holes, the Top-Frame is locked to the Sub-Frame. That allows the bottle jacks to lower the castors. It works great. But if I had my time again i would drill these locking holes of the Top-Frame 17mm and not 16mm. Would make alignment easier to push the 4 bolts into the Sub-Frame.

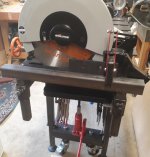
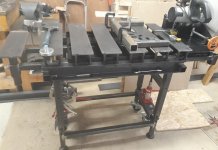
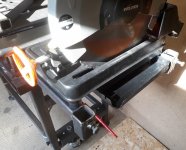
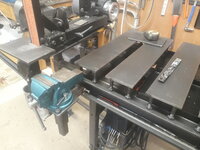
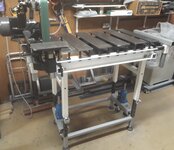
The evolution chop saw sits on extension tubes on the RHS.
A few more upgrades are needed here to make it more secure (future post).

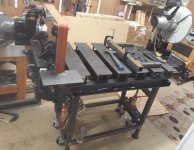
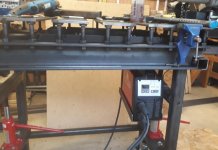
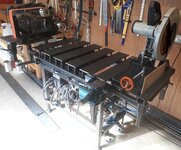
The vertical bar stock on the left is the start of the 2x72" belt grinder holding plate (future post).

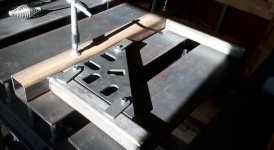
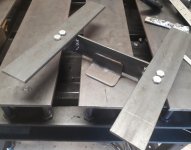
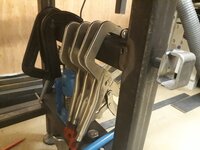
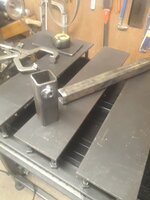
The C-Channels make a really good storage location for scribers, rulers, dot punchs and other small tools (keeps them off the worktop & readily available)
 

Attachments

  • 10. 20200322_120349.jpg
    10. 20200322_120349.jpg
    135.8 KB · Views: 165
  • 10. 20200322_113755.jpg
    10. 20200322_113755.jpg
    124.9 KB · Views: 139
  • 10. 20200322_164254.jpg
    10. 20200322_164254.jpg
    147.5 KB · Views: 146
To avoid these ads, REGISTER NOW!

fordkid88

Well-known member
Joined
Nov 10, 2013
Messages
680
Drill some holes in each leg of the outer frame and weld some bolts to those spots. This way you can synch down the bolts and lock the frames together.
 
OP
B

Bobnoxious32

Well-known member
Joined
Feb 21, 2016
Messages
54
Location
Ireland
Is there any play between the two frames?
Hi JH1990, there's very little play, however it moves up and down without binding.
I greased the Sub-Frame to allow easy movement (maybe the bottle jack overcomes any resistance too!).
Top-Frame is 50x50x4mm (4mm wall).
Sub-Frame is 40x40x4mm (4mm wall).
50(Top-Frame) -4(wall)-40(box)-4(wall)=2mm gap (approx 1/16" play).
But remember there is a weld seam (maybe 1mm) so only 1mm (approx 1/32") play on 1 side.
With the tight fit, it still moves up and down grand anyway!
 
OP
B

Bobnoxious32

Well-known member
Joined
Feb 21, 2016
Messages
54
Location
Ireland
Nice welding table. I like the integral chopsaw mount.

Thanks PugetDude, I used it today to cut some long bar stock (approx 3m) and it makes the job a lot easier having it level with the bench top.
No more looking for a timber offcut the same height as the chop saw for the tail end of the length! :bounce:
 
OP
B

Bobnoxious32

Well-known member
Joined
Feb 21, 2016
Messages
54
Location
Ireland
Drill some holes in each leg of the outer frame and weld some bolts to those spots. This way you can synch down the bolts and lock the frames together.

Hi Fordkid88, I like your thinking but I reckon the 4Ton bottle jacks would overcome the resistance of the tightened bolts and just scratch a line down each leg of the sub frame until each bolt would slip into a hole on the subframe.

I'm thinking down the line if I could get a smooth pointed bar welded to a T-handle for each locking hole (maybe 15mm diameter) instead of the 16mm bolts they will slid in/out a lot easier! Kind of like a podger tool end!
 
OP
B

Bobnoxious32

Well-known member
Joined
Feb 21, 2016
Messages
54
Location
Ireland
Next job: Receiver tube for the 72" belt grinder.
Fireball squares used again to make the receiver tube square and weld it onto the bench square.
The levelled bench top makes for easy work holding.
 

Attachments

  • 11. 20200328_143641.jpg
    11. 20200328_143641.jpg
    90.9 KB · Views: 83
  • 11. 20200328_143633.jpg
    11. 20200328_143633.jpg
    118.2 KB · Views: 81
  • 11. 20200328_142719.jpg
    11. 20200328_142719.jpg
    73.1 KB · Views: 75
  • 11. 20200328_140325.jpg
    11. 20200328_140325.jpg
    153.7 KB · Views: 78
  • 11. 20200328_133806.jpg
    11. 20200328_133806.jpg
    62.3 KB · Views: 82
OP
B

Bobnoxious32

Well-known member
Joined
Feb 21, 2016
Messages
54
Location
Ireland
Two more vertical locking receiver tubes (50x50x4mm) were needed for supporting the baseplate for the 72" belt grinder. I bored two 13mm holes in these and welded on M12 nuts.
Then two 40x40x4mm tubes were welded to the shortened 10mm plate. The shortened plate will allow the 72" belt grinder to rotate 90° without the motor fouling the plate (this would prevent the grinder rotating fully 90°).
I threaded 3 M10 holes in the shortened plate to bolt the Belt Grinder on with.
I found the cross member of the Bench Top-Frame is excellent for holding C Clamps (helps keeps the bench top clutter free).
I had 2 sides from a cheap Woodworking Table Saw (turned upside down), that I bolted together and use for catching welding slag and dust. It fit perfectly under the slotted bench top (keeps the dust, spent welding rod ends and slag off the floor).
 

Attachments

  • 12. 20200328_171525.jpg
    12. 20200328_171525.jpg
    86.3 KB · Views: 68
  • 12. 20200328_165053.jpg
    12. 20200328_165053.jpg
    59.7 KB · Views: 59
  • 12. 20200328_162109.jpg
    12. 20200328_162109.jpg
    124.4 KB · Views: 56
  • 12. 20200328_162101.jpg
    12. 20200328_162101.jpg
    146.2 KB · Views: 53
  • 12. 20200328_153719.jpg
    12. 20200328_153719.jpg
    119 KB · Views: 56
OP
B

Bobnoxious32

Well-known member
Joined
Feb 21, 2016
Messages
54
Location
Ireland
Next job: Secure the Chop saw with an outfeed rail and fit the 72" belt grinder.

I fit another inverted bench top tray (from the cheap woodworking table saw) under the chop saw as a spark catcher. A bracket on the receiver tube helps hold it up.

The 72in belt grinder was bolted to the short bench top plate allowing it to rotate 90. Handy being able to rotate the belt!
 

Attachments

  • 13. 20200405_163535.jpg
    13. 20200405_163535.jpg
    99.1 KB · Views: 67
  • 13. 20200329_204336.jpg
    13. 20200329_204336.jpg
    130.6 KB · Views: 66
  • 13. 20200329_204140.jpg
    13. 20200329_204140.jpg
    147.9 KB · Views: 65
  • 13. 20200329_202052.jpg
    13. 20200329_202052.jpg
    147.1 KB · Views: 62
  • 13. 20200329_164900.jpg
    13. 20200329_164900.jpg
    110 KB · Views: 56
  • 13. 20200329_164854.jpg
    13. 20200329_164854.jpg
    148.9 KB · Views: 54
  • 13. 20200329_164851.jpg
    13. 20200329_164851.jpg
    136.4 KB · Views: 58
OP
B

Bobnoxious32

Well-known member
Joined
Feb 21, 2016
Messages
54
Location
Ireland
Next Job: Mount Invertor Welder under the bench.
I made a base frame to hold the Invertor welder.
It was important that the welder could be moved to either side, so the hanger bracket had to be removable to hang on either side of the bench.
I wasnt sure what would be a good height for it, so bolted the base frame to the hanger instead of welding it, to allow for potential modification.
I tapped both sides of the base frame M8 thread to allow it to be mounted either side (reversing the hanger bracket).
In its current position its better on the left as its nearer to the power outlet.
 

Attachments

  • 14. 20200405_163516.jpg
    14. 20200405_163516.jpg
    111.2 KB · Views: 52
  • 14. 20200405_160950.jpg
    14. 20200405_160950.jpg
    123 KB · Views: 53
  • 14. 20200405_160924.jpg
    14. 20200405_160924.jpg
    84.7 KB · Views: 44
  • 14. 20200405_152831.jpg
    14. 20200405_152831.jpg
    77.7 KB · Views: 42
  • 14. 20200405_152815.jpg
    14. 20200405_152815.jpg
    107.7 KB · Views: 41
  • 14. 20200405_152809.jpg
    14. 20200405_152809.jpg
    102.3 KB · Views: 40
  • 14. 20200405_152756.jpg
    14. 20200405_152756.jpg
    109.4 KB · Views: 43

jh1990

Active member
Joined
Feb 8, 2017
Messages
32
Looking great!

Do you have to use your tracking knob often on your belt grinder with different belts?

I'm at the "tweaking" point on my belt grinder build but I only have one belt to test with. I can get it to track by hand but it's not running in the middle of the drive or idler wheel. I also had to use a decent amount tracking adjustment.
 
OP
B

Bobnoxious32

Well-known member
Joined
Feb 21, 2016
Messages
54
Location
Ireland
Looking great!

Do you have to use your tracking knob often on your belt grinder with different belts?

I'm at the "tweaking" point on my belt grinder build but I only have one belt to test with. I can get it to track by hand but it's not running in the middle of the drive or idler wheel. I also had to use a decent amount tracking adjustment.
Cheers JH1990.
I just finished my first belt yesterday (been using it since 19May2019), its not abrasive anymore.
That belt tracked very well, the tracking wheel was at full tilt (tracking fork touching the base, tracking knob at lowest position), the top of the tracking wheel was to the LHS and bottom of the tracking wheel was to the RHS.
The new belt isnt tracking very well yet, so i need to revisit the tweaking myself!
I recall it took ages to get the first belt to track well.
 

jh1990

Active member
Joined
Feb 8, 2017
Messages
32
I've think I'm being too picky. I wanted the belt dead center on all the wheels with no tracking adjustment needed. I've got machinist squares out, straight edge, fireball squares, etc trying to get it to run dead on. It's definitely close enough but I can't run the belt backwards and forwards without the tracking adjustment.

In fact I can't even get it to run backwards.

I had to add some additional washers to my platen wheels to get them centered. I probably have some slight cant somewhere.
 
To avoid these ads, REGISTER NOW!
OP
B

Bobnoxious32

Well-known member
Joined
Feb 21, 2016
Messages
54
Location
Ireland
Next Job: Upgrade Bottle Jacks to Draper 13107 High lift bottle jacks to get some extra height out of the adjustable top.
Some dimensions of the bottle jack here, couldnt find them online, bit of a gamble that it would fit when i bought the bottle jacks.
 

Attachments

  • 15. 20200407_211841.jpg
    15. 20200407_211841.jpg
    121 KB · Views: 21
  • 15. 20200407_211834.jpg
    15. 20200407_211834.jpg
    119.5 KB · Views: 23
  • 15. 20200406_111310.jpg
    15. 20200406_111310.jpg
    49.3 KB · Views: 21
  • 15. 20200406_111306.jpg
    15. 20200406_111306.jpg
    40.7 KB · Views: 21
  • 15. 20200406_111254.jpg
    15. 20200406_111254.jpg
    47 KB · Views: 19
  • 15. 20200406_111351.jpg
    15. 20200406_111351.jpg
    64.9 KB · Views: 20
  • 15. 20200406_111235.jpg
    15. 20200406_111235.jpg
    31.1 KB · Views: 22
OP
B

Bobnoxious32

Well-known member
Joined
Feb 21, 2016
Messages
54
Location
Ireland
I drilled a few holes through the cast base of the bottle jack and mounted them to the C Channel for the castors.
When refit the castor mechanism still works and you can get the extra height out of the bench.
 

Attachments

  • 16. 20200412_100900.jpg
    16. 20200412_100900.jpg
    129.3 KB · Views: 29
  • 16. 20200412_100844.jpg
    16. 20200412_100844.jpg
    151.3 KB · Views: 30
  • 16. 20200412_100334.jpg
    16. 20200412_100334.jpg
    144.7 KB · Views: 28
  • 15. 20200411_141104.jpg
    15. 20200411_141104.jpg
    140.6 KB · Views: 30
  • 15. 20200411_141036.jpg
    15. 20200411_141036.jpg
    62.5 KB · Views: 28
  • 15. 20200407_211819.jpg
    15. 20200407_211819.jpg
    52.8 KB · Views: 28
  • 15. 20200407_211757.jpg
    15. 20200407_211757.jpg
    70.4 KB · Views: 29
OP
B

Bobnoxious32

Well-known member
Joined
Feb 21, 2016
Messages
54
Location
Ireland
Some updated pics of the castor mechanism with the new Draper Bottle Jacks.
The bottle jacks were half price too, money well spent!
 

Attachments

  • 17. 20200412_101350.jpg
    17. 20200412_101350.jpg
    133.1 KB · Views: 30
  • 17. 20200412_101401.jpg
    17. 20200412_101401.jpg
    83 KB · Views: 26
  • 17. 20200412_104135.jpg
    17. 20200412_104135.jpg
    76.4 KB · Views: 25
  • 17. 20200412_104154.jpg
    17. 20200412_104154.jpg
    106.8 KB · Views: 34

rourkek4

New member
Joined
Sep 15, 2016
Messages
1
Hi Bob,

Nice work, do fireball tools ship to Ireland or did you use addresspal etc?

Kevin
 
OP
B

Bobnoxious32

Well-known member
Joined
Feb 21, 2016
Messages
54
Location
Ireland
Hi Bob,

Nice work, do fireball tools ship to Ireland or did you use addresspal etc?

Kevin
Thanks Kevin,
You can buy them from the Fireball USA websites European link.
I think they ship in bulk to StrongHand tools in the Czech Republic and from there to Eire.
I ordered them in April and they arrived in September.
The Monster Square (Triangle) €85 is better than the Mega Square €110.
It can be used more often. They cost €35 in shipping and another €48 in VAT.
But they makes a novices welds a lot better than they would be and speed up the Job!
 

Spanner

Well-known member
Joined
Dec 14, 2018
Messages
153
Location
Spain
That’s a serious piece of kit you built there, well done and thanks for bringing us along on the journey.


Tool Junkie!!!
 
OP
B

Bobnoxious32

Well-known member
Joined
Feb 21, 2016
Messages
54
Location
Ireland
I Have 5 small C Clamps.
They're always in the way and never there when you need them!

I made a small bracket to hang off the invertor welder frame.
Threaded the welder frame M8 and M12 for the bar.
Rounded the sharp edges off the top of the bar and assembled.

They're quick to put away and grab when needed now.
 

Attachments

  • 18. 20200413_195533.jpg
    18. 20200413_195533.jpg
    137.3 KB · Views: 80
  • 18. 20200413_194036.jpg
    18. 20200413_194036.jpg
    106.2 KB · Views: 64
  • 18. 20200413_194016.jpg
    18. 20200413_194016.jpg
    117.9 KB · Views: 62
  • 18. 20200413_193740.jpg
    18. 20200413_193740.jpg
    103.6 KB · Views: 64

richeyc2000

Well-known member
Joined
Feb 22, 2015
Messages
984
Location
Europe
That’s a fantastic addition to the beast of a bench.
Not a weld insight which I admire even more so. [emoji1303]

What other additions are going to included on this multifunctional bench, I can’t wait to find out.
 
OP
B

Bobnoxious32

Well-known member
Joined
Feb 21, 2016
Messages
54
Location
Ireland
it's been a while! I got a lathe and made proper bench podgers to hold the top frame above the sub frame so the bottle jacks aren't holding the weight.

I even painted them and a few parts since. But I need to get those photos together before I post it!
 

Attachments

  • IMG-20210104-WA0003.jpg
    IMG-20210104-WA0003.jpg
    130.5 KB · Views: 34
  • IMG-20210104-WA0004.jpg
    IMG-20210104-WA0004.jpg
    160.4 KB · Views: 33
  • IMG-20210104-WA0005.jpg
    IMG-20210104-WA0005.jpg
    139.2 KB · Views: 33
  • IMG-20210104-WA0006.jpg
    IMG-20210104-WA0006.jpg
    185.6 KB · Views: 34
  • IMG-20210104-WA0007.jpg
    IMG-20210104-WA0007.jpg
    107.1 KB · Views: 36
  • IMG-20210104-WA0009.jpg
    IMG-20210104-WA0009.jpg
    97.4 KB · Views: 39
  • 20210104_173007.jpg
    20210104_173007.jpg
    622 KB · Views: 23
OP
B

Bobnoxious32

Well-known member
Joined
Feb 21, 2016
Messages
54
Location
Ireland
I had a spare cheap rotating Aldi vice that was taking up space on the floor. Made up a receiver tube mount for it.
Tapped the baseplate, welded up the receiver tube and it slots in nicely both sides of the bench.
Handy alternate mount for work holding during welding.
 

Attachments

  • 20200426_140708.jpg
    20200426_140708.jpg
    434.5 KB · Views: 24
  • 20200426_160919.jpg
    20200426_160919.jpg
    474.2 KB · Views: 22
  • 20200426_161014.jpg
    20200426_161014.jpg
    521.5 KB · Views: 24
  • 20200426_163711.jpg
    20200426_163711.jpg
    614.8 KB · Views: 23
  • 20200426_163717.jpg
    20200426_163717.jpg
    666.6 KB · Views: 24
  • 20200426_163721.jpg
    20200426_163721.jpg
    582 KB · Views: 25
  • 20200524_173148.jpg
    20200524_173148.jpg
    754.4 KB · Views: 30
OP
B

Bobnoxious32

Well-known member
Joined
Feb 21, 2016
Messages
54
Location
Ireland
Paint & Final Assembly:
I started off Painting some of the receiver tubes and the sub frame in grey spray paint.
Made the mistake of using Blue Acrylic paint on the Top Frame. Looked terrible. That took an age to wire wheel off.
Once back to bare metal and 4tins of white spray paint, it turned out fairly nice.
 

Attachments

  • 20210405_162735.jpg
    20210405_162735.jpg
    351.6 KB · Views: 17
  • 20220625_155336.jpg
    20220625_155336.jpg
    420.7 KB · Views: 17
  • 20220705_195147.jpg
    20220705_195147.jpg
    422.5 KB · Views: 17
  • 20220706_073522.jpg
    20220706_073522.jpg
    582.4 KB · Views: 16
  • 20220719_073257.jpg
    20220719_073257.jpg
    482.7 KB · Views: 15
  • 20220719_073302.jpg
    20220719_073302.jpg
    515.3 KB · Views: 16
  • 20220726_214646.jpg
    20220726_214646.jpg
    543.2 KB · Views: 17
  • 20220726_221001.jpg
    20220726_221001.jpg
    500.3 KB · Views: 20
  • 20220726_223609.jpg
    20220726_223609.jpg
    605.9 KB · Views: 21
  • 20220729_095204.jpg
    20220729_095204.jpg
    564.1 KB · Views: 29
To avoid these ads, REGISTER NOW!
Top Bottom