You are using an out of date browser. It may not display this or other websites correctly.
You should upgrade or use an alternative browser.
You should upgrade or use an alternative browser.
VISE REPAIR 101 all vise repairs, lubricants, sources for parts and the tricks to fix
- Thread starter drivesitfar
- Start date

AngryBeaver
Well-known member
nice work getting it apart. I have a feeling that set screw into the lead screw was someones bush fix... I've had a bunch of M3s and never seen one threaded into the lead screw.... that would make the lead screw weaker.....
Shiftless
Well-known member
nice work getting it apart. I have a feeling that set screw into the lead screw was someones bush fix... I've had a bunch of M3s and never seen one threaded into the lead screw.... that would make the lead screw weaker.....
Thanks and thanks for responding A.B.
I have no experience with these later model Columbian Reeds but when I saw the threaded hole I was suspicious and thought of the factors you mentioned. I’m sure you’re right.
After sanding off the rust the new inch and an eighth collar from McMaster-Carr slipped right on.
When the paint is cured a bit more, I’ll assemble it and drill or grind a divot to accept the set screw in the right position.
I see that there should be a washer between the collar and the casting. Is that brass? Does it matter?
.
Last edited:
Shiftless
Well-known member

AngryBeaver
Well-known member
I see that there should be a washer between the collar and the casting. Is that brass? Does it matter?
.
there is a bronze washer between the spindle and the jaw, not between the collar and the casting.
some people will add washers to take up backlash and retain the factory divot for the set screw.
wiltons were steel, so were reeds..... it doesn't matter.
Shiftless
Well-known member
there is a bronze washer between the spindle and the jaw, not between the collar and the casting.
some people will add washers to take up backlash and retain the factory divot for the set screw.
wiltons were steel, so were reeds..... it doesn't matter.
Thanks again A.B.
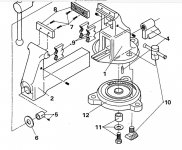
I found this exploded parts diagram online.
When I took mine apart, the washer was on the inside. But obviously, this vise had spent a lot of time in the hands of less than top notch users. I’ve never seen so many hammer marks on a handle. Outside of cleaning, I’m leaving them in place. The handle is still straight.
(The vise I’m working on came out of a scrap pile)
Attachments
Last edited:
Shiftless
Well-known member
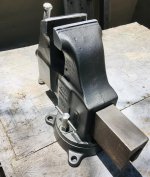
Here is my Reed 3CA
Rescued from a scrap heap.
Finished in Rustoleum Soft Iron color.
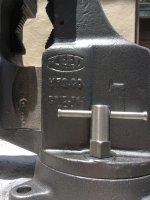
The KMScott made swivel locks are here shining in the sun. Thanks again Kevin!
Edit: In the last pic I just added, there is a worn old plate with numbers. The last 2 digits are pretty clear and it looks like 14
Maybe this vise is 6 years old?
What say you Angry Beaver ??
Rescued from a scrap heap.
Finished in Rustoleum Soft Iron color.
The KMScott made swivel locks are here shining in the sun. Thanks again Kevin!
Edit: In the last pic I just added, there is a worn old plate with numbers. The last 2 digits are pretty clear and it looks like 14
Maybe this vise is 6 years old?
What say you Angry Beaver ??
Attachments
-
 CC6B1F45-D13F-47BB-ADAB-F5A72408004F.jpg147.1 KB · Views: 29
 -
 E57686AF-4C9A-46D8-9AEB-824F0EEC13FD.jpg123.9 KB · Views: 27
 -
 B297C6FB-6054-44F9-8320-E2EE1BC49C2D.jpg145.9 KB · Views: 26
 -
 0C2B4167-3BFC-444A-A43D-3971AD931400.jpg154 KB · Views: 31
 -
 F5B77415-38B3-4545-B0AE-B30738A79606.jpg124.9 KB · Views: 30
Last edited:
I found the GJ vise thread while looking for hints on vise restoration. I've been lurking as a guest for a while and finally joined about a week ago to be able to see the before, in between, and after pictures.
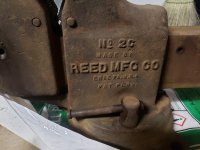
I have a Reed 2C that was my father's; I got it from his estate in 2005. He was a farmer and the vise was on a work bench under a shed. I don't know when he got it or how old it is; I do remember using it as a teenager in the early 60's and it looked old then.
I took only one picture before I got started. My goal is to bring it back up to 'snuff' and then install it on a work bench I'm planning.
I'm reading through the thread (currently on page 259) to learn the ins and outs of restoration. Before I started reading here I had no idea of the mechanics of a vise or how to disassemble one. The information here gave me the confidence to begin on my vise.
CHRIII
I have a Reed 2C that was my father's; I got it from his estate in 2005. He was a farmer and the vise was on a work bench under a shed. I don't know when he got it or how old it is; I do remember using it as a teenager in the early 60's and it looked old then.
I took only one picture before I got started. My goal is to bring it back up to 'snuff' and then install it on a work bench I'm planning.
I'm reading through the thread (currently on page 259) to learn the ins and outs of restoration. Before I started reading here I had no idea of the mechanics of a vise or how to disassemble one. The information here gave me the confidence to begin on my vise.
CHRIII
Attachments
Last edited:
va.grouseman
Well-known member
CHR, welcome to the Journal.---Would like to see more pics of your 2C.---That is a very coveted vise on this thread, especially if it has the 4 pinned pipe jaws, and I think it does.
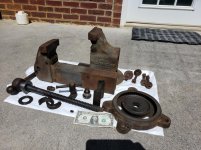
VA: Thanks for the welcome. Yes it has four pins for the pipe jaws. I've attached some pictures of it after I disassembled it. I was only going to see if I could pull the dynamic jaw out, then I wondered if I could get the base off, then ... I'm almost embarrassed how easy it was compared to the trials and tribulations some here have had.
Attachments

Last edited:
AngryBeaver
Well-known member
Nice looking 2c. It appears in the pics that it was made between 1947 and 1957 . it will be date stamped click the link in my thread to learn more about where they stamped them.
Shiftless
Well-known member
CHR:
Yes, that’s an obviously used but well cared for 2C. A big plus is the fact that it’s a family heirloom.
The split nut design for adjustability in the front is a very good feature. Pair that with the adjustment screw on the back of the main nut and the overall quality and weight of the castings and you have just about the best vise ever.
Welcome to the group. I bet this won’t be the last vise you aquire and renovate.
.
Yes, that’s an obviously used but well cared for 2C. A big plus is the fact that it’s a family heirloom.
The split nut design for adjustability in the front is a very good feature. Pair that with the adjustment screw on the back of the main nut and the overall quality and weight of the castings and you have just about the best vise ever.
Welcome to the group. I bet this won’t be the last vise you aquire and renovate.
.
Last edited:
Angry: Good to know an approximate DOB for the vise!
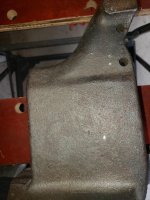
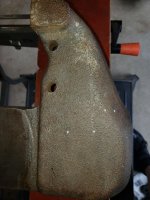
I checked the dynamic and static castings and could not see any date stamps. I used a bright LED light at an angle while looking.
I've attached pictures of the castings in hopes your calibrated eyeball could see what I could not.
Thanks!
CHRIII
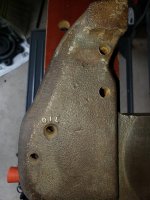
I checked the dynamic and static castings and could not see any date stamps. I used a bright LED light at an angle while looking.
I've attached pictures of the castings in hopes your calibrated eyeball could see what I could not.
Thanks!
CHRIII
Attachments

Tinkerer2
Well-known member
As you've probably read in my other posts, I have a Columbian 804 vise that was my grandfathers. I'm restoring it.
I've read about 50 pages in this thread (some at the beginning and some at the end) and can not find info on getting a set of jaws made. I have PM'd KMScott about making some but he has retired.
The jaws do not look like anything special. Bar stock actually - no special cuts, shapes, etc. Dimensions are approx. 4 X 0.7 X 0.4. If anyone could make a pair for me I could send these to them to get the screw holes in the proper place. I would like for them to be a little aggressive.
I've read about 50 pages in this thread (some at the beginning and some at the end) and can not find info on getting a set of jaws made. I have PM'd KMScott about making some but he has retired.
The jaws do not look like anything special. Bar stock actually - no special cuts, shapes, etc. Dimensions are approx. 4 X 0.7 X 0.4. If anyone could make a pair for me I could send these to them to get the screw holes in the proper place. I would like for them to be a little aggressive.
Attachments


Outlawmws
Well-known member
Those jaws don't look terrible? clean them up, hone the high spots off, and see where you are...
Shiftless
Well-known member
Those jaws don't look terrible? clean them up, hone the high spots off, and see where you are...
I agree with outlaw.
Plus, unless you’ve already removed those 4 screws and reinstalled, I'll say that most old vises have stuck screws. Many of us have had to drill out stuck screws. If you can just clean them up in place, you don’t have to hassle with stuck screws. And realize that many vise jaw screws aren’t easily replaceable because of their unique shapes.
Clean up what you’ve got.
You can get some jaw covers with aggressive grip.
Last edited:
Tinkerer2
Well-known member
Those jaws don't look terrible? clean them up, hone the high spots off, and see where you are...
I agree with outlaw.
Plus, unless you’ve already removed those 4 screws and reinstalled, I'll say that most old vises have stuck screws. Many of us have had to drill out stuck screws. If you can just clean them up in place, you don’t have to hassle with stuck screws. And realize that many vise jaw screws aren’t easily replaceable because of their unique shapes.
Clean up what you’ve got.
One screw head in each jaw is really messed up. "Hone the high spots" - not sure what you mean by that. And what tool would be needed.
Should the diagonal cuts be recreated where they are missing? If so, how is that done?
EDIT: Where can jaw covers be found?
Outlawmws
Well-known member
Literally, use a fine hone/whetstone and oil, flat on the surfaces that are supposed to be flat. Try to keep it on the high spots until they are reduced, then stop.
Shiftless
Well-known member
Search eBay for vise jaw covers.
Ones like these will give you a strong grip on items and not leave marks like many sharp, aggressive jaw surfaces.
You can find some the exact length you need but it’s also easy to cut a 6 inch down to size.
What kind of work are you planning to do with that vise?
Ones like these will give you a strong grip on items and not leave marks like many sharp, aggressive jaw surfaces.
You can find some the exact length you need but it’s also easy to cut a 6 inch down to size.
What kind of work are you planning to do with that vise?
Attachments

Tinkerer2
Well-known member
Thanks. I'll look into those covers. Is that rubber/plastic?
This will be a general use vise around the home.
EDIT: Never mind I found them. Thanks
This will be a general use vise around the home.
EDIT: Never mind I found them. Thanks
Last edited:
Outlawmws
Well-known member
On the original grooves, Those were probably not cut with power tools but filed. Use a fine triangular file, get lined up well and simply re-cut. don't get too aggressive, and use controlled cuts.
txlonghorn1989
Well-known member
- Joined
- Feb 27, 2017
- Messages
- 2,786
Thanks 2oolhound
Yes, that sounds like an excellent application for Fluid Film. I have an aerosol can of the stuff so it’s easy to just squirt it on something and smear it around with my fingers.
Shiftless, what does that Fluid Film feel like to the touch? Is it sticky feeling? Reading their website it states it stays in a gel like form after application. Just doesn't sound like what you expect when you grab the handle on a vise. The properties of the product sound great though for preventing rust.
Thanks!
Outlawmws
Well-known member
He wouldn't be able to tell! His fingers are coated with the stuff!
Shiftless
Well-known member
He wouldn't be able to tell! His fingers are coated with the stuff!
Ha ha!
I have been using the same aerosol can of that stuff for several years. A tiny squirt of it goes onto the surface and then I smear it around with my fingers resulting in a very thin coating. It dries and forms a protective barrier that works well for me.
I use it on garden and woodworking tools too. After cleaning and sharpening pruners, I smear on some Fluidfilm. Steel drywall tools and putty knives stay rust free that way too.
I have read reports of fellows who spray the entire underside of their car or truck with the stuff each fall to protect from road salt corrosion. That’s where you WANT it to stay gooey. The FF undercoating is a different product.
.
Attachments

Last edited:
Tinkerer2
Well-known member
I'm restoring my Columbian 804. It is a swiveling vise. I've read about using anti-seize on the "screw". Does this work well because I do have some? I also have Red & tacky grease but that is "tacky" and thus is the issue.
And for the area between the vise and the base it swivels on. What should be used there? Is anti-seize ok there too?
EDIT: And what is the red paint everyone uses? Brand and color please.
And for the area between the vise and the base it swivels on. What should be used there? Is anti-seize ok there too?
EDIT: And what is the red paint everyone uses? Brand and color please.
Last edited:
Shiftless
Well-known member
I'm restoring my Columbian 804. It is a swiveling vise. I've read about using anti-seize on the "screw". Does this work well because I do have some? I also have Red & tacky grease but that is "tacky" and thus is the issue.
And for the area between the vise and the base it swivels on. What should be used there? Is anti-seize ok there too?
EDIT: And what is the red paint everyone uses? Brand and color please.
Quite a few of us vise guys use Mobil One synthetic grease. Any lubricant is better than nothing but realize that anti seize on moving parts may lead to wear because of the particles in the anti seize.
Is this going to be an outdoor user kind of vise?
Regarding red paint... I like Rustoleum Regal Red. A brighter red is Sunrise Red which is pretty close to the paint on red Snap On boxes.
txlonghorn1989
Well-known member
- Joined
- Feb 27, 2017
- Messages
- 2,786
Ha ha!
I have been using the same aerosol can of that stuff for several years. A tiny squirt of it goes onto the surface and then I smear it around with my fingers resulting in a very thin coating. It dries and forms a protective barrier that works well for me.
I use it on garden and woodworking tools too. After cleaning and sharpening pruners, I smear on some Fluidfilm. Steel drywall tools and putty knives stay rust free that way too.
I have read reports of fellows who spray the entire underside of their car or truck with the stuff each fall to protect from road salt corrosion. That’s where you WANT it to stay gooey. The FF undercoating is a different product.
.
Thanks but what does it feel like to the touch?
Shiftless
Well-known member
Thanks but what does it feel like to the touch?
I wipe on a thin coat and it dries/hardens to a protective film. It feels like bare steel.
Another option is Boiled Linseed Oil. Apply to warm surfaces and wipe excess off. Depending on weather and general conditions, it may take a spree days or weeks to harden. After that it’s a nice rust inhibiting finish that slightly darkens the metal which looks good especially on vintage equipment. Some guys bake it on using an old electric smoker. I wouldn’t use your kitchen oven. The stuff has a smell that not everyone loves.
Some guys just spray on clear coat. That’s another option. But that may chip.
Tinkerer2
Well-known member
.... but realize that anti seize on moving parts may lead to wear because of the particles in the anti seize.
Is this going to be an outdoor user kind of vise? .....
I have Bostik Never Seez. It contains aluminum, copper and graphite particles. Is that too harsh for the swivel base and screw?
It will be an indoor vise. Going to my daughter who MAY use it a few times a year. This would have belonged to her great grandfather. She also has a rather large (think coffee table height and over 3 ft. wide) wooden tool box that he built. These are the only 2 items that I ended up with from him.
ClappedOutBport
Well-known member
- Joined
- Mar 30, 2016
- Messages
- 998
What's wrong with Red and Tacky?
Tinkerer2
Well-known member
If you're asking me, I know it is tacky and will collect dust, dirt, filings, etc. but it would also stick on the screw and stay in between the vise and base instead of leaking out - maybe. I don't know if it breaks down over time or not.
txlonghorn1989
Well-known member
- Joined
- Feb 27, 2017
- Messages
- 2,786
I wipe on a thin coat and it dries/hardens to a protective film. It feels like bare steel.
Another option is Boiled Linseed Oil. Apply to warm surfaces and wipe excess off. Depending on weather and general conditions, it may take a spree days or weeks to harden. After that it’s a nice rust inhibiting finish that slightly darkens the metal which looks good especially on vintage equipment. Some guys bake it on using an old electric smoker. I wouldn’t use your kitchen oven. The stuff has a smell that not everyone loves.
Some guys just spray on clear coat. That’s another option. But that may chip.
Thanks Shiftless! Was just hoping the FF wasn't sticky feeling. I've used BLO and like it. Trying to have an idea though as to other options.

bagged89s10
Well-known member
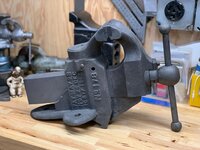
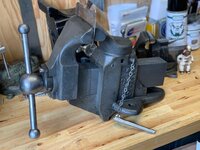
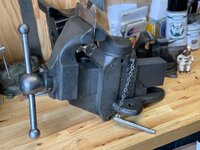
Here is a fast restoration. It was really dirty and frozen. I dunked it in my electrolysis tank over night and it freed right up. I dunked it in simple green for 1 day. Rinsed it, then dunked it in electrolysis for a day so it wouldn’t flash rust. Then, 2 thin coats of a 50/50 mix of Boiled Linseed Oil and Mineral Spirits applies with a brush. The excess of each coat was burnished and wiped off after about 10min. The Mineral Spirits helped it dry fairly quickly compared to straight BLO. 2 coats of Sculpt Nouveau Clear Guard once the BLO/mineral spirits was dry. I let the clear dry, then I put a coat of Sculpt Nouveau metal wax and buffed out to call it done. Dry graphite lube was used on the screw and nut and the swivel jaw although I could have just used was for the swivel jaw.




Attachments
-
 d65d54fc763729c253389f6844a0a66f.jpg138.6 KB · Views: 3
 -
 eda32fad6284c11721dabc10b4c9e9e5.jpg115.3 KB · Views: 2
 -
 2d229ee3899f59fa77a26df08459bac7.jpg118.2 KB · Views: 2
 -
 6d04c831ecdeff73f438f68a81014345.jpg112.8 KB · Views: 2
 -
 6cb43aa8bd30228288fadbd1bb7551b2.jpg120 KB · Views: 2
 -
 76000571f3f3869c42457cb5f8af1502.jpg94.6 KB · Views: 2
 -
 84c1b0c94194243ef12b7a4d3a4986d0.jpg143.6 KB · Views: 2
 -
 437f96946455258af85b5e2ae40954fa.jpg132.6 KB · Views: 2
 -
 7a419708b569f1a5431ad349f38ecb4e.jpg110 KB · Views: 2
Tinkerer2
Well-known member
I'm almost ready for primer but I'm wondering if primer should be used on the mating surfaces between the vise and the swivel plate? And for that matter, should the final paint also be applied to those areas?
Before and After cleaning photos
Before and After cleaning photos
Attachments


RTM
Well-known member
I personally would not paint any mating / sliding surfaces.
va.grouseman
Well-known member
I personally would not paint any mating / sliding surfaces.
That's a
 ---Never prime or paint surfaces that are friction prone and need to move freely.---Primer and/or paint will just cause drag and will eventually ware off anyway.---Just grease or oil those surfaces real good and regrease or oil as needed in the future.
Tinkerer2
Well-known member
I personally would not paint any mating / sliding surfaces.
That's a
Thanks!
Tinkerer2
Well-known member
I was able to prime the vise today. I used Rustoleum Self-Etching Primer. It's supposed to rain tonight and for the next few days. When I get back to this project, can I just spray the top coat on or should I wet sand with 600 first? Or is there a different prep that I should do?
I'm thinking about Rustoleum Regal Red or Sunrise Red (Thanks Shiftless) but I want to see the cap colors for final decision. Should I get the rattle can or a quart and brush it on?
And does it need clear coating afterwards?
I'm thinking about Rustoleum Regal Red or Sunrise Red (Thanks Shiftless) but I want to see the cap colors for final decision. Should I get the rattle can or a quart and brush it on?
And does it need clear coating afterwards?
Last edited:
pyrostick1
Member
Does anyone happen to have measurements for a Chas Parker 436 swivel bolt? It's the bolt that holds the swivel base to the static jaw base.
I bought this vise, and it had been spot welded to a little metal cart, and the swivel mech was seized, so I had no idea that it was missing. Turns out to be a difficult part to come across.
My wife's dad runs a machine shop back home, so I just need the bolt measurements to get another made.
Any help would be greatly appreciated!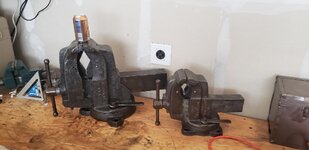
Sent from my SM-G960U using Tapatalk
I bought this vise, and it had been spot welded to a little metal cart, and the swivel mech was seized, so I had no idea that it was missing. Turns out to be a difficult part to come across.
My wife's dad runs a machine shop back home, so I just need the bolt measurements to get another made.
Any help would be greatly appreciated!
Sent from my SM-G960U using Tapatalk