To avoid these ads, REGISTER NOW!

Between 485 & 705 SQ/FT Denver MCM garage expansion

Workspaces between 485 and 705 squarefeet.

gearhead1960

ALLIANCE MEMBER
Joined
Mar 21, 2019
Messages
1,862
Location
Manassas, VA, a small blot in history
Thanks for the comments
The last coat of finish went onto the credenza yesterday so we moved it into the house. We need to make a few adjustments but here it is in it's finished state.
attachment.php

Nice job! Love the clock. Don't have that exact one, but we have 4 different versions. My wife is obsessed with these...:lol_hitti
 
To avoid these ads, REGISTER NOW!

Arclitgold

Well-known member
Joined
Dec 20, 2017
Messages
317
Holy moly that’s gorgeous. That shot in the house belongs in a magazine


Sent from my iPhone using Tapatalk
 

Jo3l

Well-known member
Joined
Jul 25, 2018
Messages
187
Location
Phoenix
Wow, looks great! Well done, looks like it fits right in with the rest of the decor :)
 
OP
K

kwyjibo

Well-known member
Joined
Apr 8, 2008
Messages
743
Thanks guys!
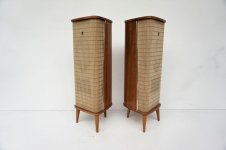
Steve - funny you should mention that. I don't have a clue about speaker design but I've been keeping an eye out for a set to cannibalize to make something like these vintage Grundig floor units.
attachment.php
 

Attachments

  • grundigfront.jpg
    grundigfront.jpg
    27.7 KB · Views: 1,582

smschriefer

Well-known member
Joined
May 28, 2009
Messages
842
Location
Yorktown, VA
I'd bet someone on here is good at speaker design and could assist with a build design for you. The ones in the link below look very small, but they are similar in design to your cabinet and kind of what I was thinking about. I also saw a set of 70's speakers that looked good, but the front edges of the speaker weren't plain.

https://denver.craigslist.org/ele/d/aurora-sanyo-speakers-2/7116935379.html
 

Brian_P

Well-known member
Joined
Jan 27, 2017
Messages
47
Location
Georgia
Try watching Audiogon - it's a slippery slope when you get into that stuff, but older speakers come along and usually aren't too expensive. Might be able to find a good set vs. keep/refinish cabinets and replace the drivers.
 

Mpower5266

Well-known member
Joined
Dec 23, 2013
Messages
2,759
Location
Newnan, GA
Wow that came out great. My wife and I buy and sell a lot of MCM furniture but we haven't had anything that nice.
 

Bakafish

Well-known member
Joined
Feb 7, 2017
Messages
477
Location
Tokyo
That cabinet came out great!

As far as speakers, why not reskin or cannibalize those Polks? Really old speakers (like the Grunnies pictured above) are rarely very good, have high impedance and low power handling. Your cabinetry skills are proven :) nice Walnut veneer, some retro feet and custom grills and you are way ahead of the game. If you want to build your own cabinets, as long as the internal volume is the same you can reuse the Polk components/crossovers.

Back in the day I sold Polk Audio, one of the first dealers on the west coast. They really are a good value and have proven components (their dome tweeters and 6.5" drivers) that they iterated for decades.
 
OP
K

kwyjibo

Well-known member
Joined
Apr 8, 2008
Messages
743
Thanks for the comments and compliments. I appreciate your taking the time to follow along.
The speakers would be a project of opportunity - it would happen only if the perfect donor set showed up. I'm not confident enough to mess with the current set and the only reason to is because they don't "match'. In the meantime I can do some research into speaker design....
I took a couple days off to work on a few small projects and clean the garage. At the start of the quarantine I modified the connecting rod T-shirt design for one of the local Porsche groups. The multicolor version for my garage (back a few pages) is still not printed but these new shirts and decals showed up:
attachment.php
 

Attachments

  • DSCN6053.jpg
    DSCN6053.jpg
    99.2 KB · Views: 1,507

gearhead1960

ALLIANCE MEMBER
Joined
Mar 21, 2019
Messages
1,862
Location
Manassas, VA, a small blot in history
Thanks for the comments and compliments. I appreciate your taking the time to follow along.
The speakers would be a project of opportunity - it would happen only if the perfect donor set showed up. I'm not confident enough to mess with the current set and the only reason to is because they don't "match'. In the meantime I can do some research into speaker design....
I took a couple days off to work on a few small projects and clean the garage. At the start of the quarantine I modified the connecting rod T-shirt design for one of the local Porsche groups. The multicolor version for my garage (back a few pages) is still not printed but these new shirts and decals showed up:
attachment.php

Nice....looking forward to Gulf colors....:beer:
 
OP
K

kwyjibo

Well-known member
Joined
Apr 8, 2008
Messages
743
I've been taking it easy for the past few days. Went on a drive. Morning coffee with the guys. Ordered take out...
So the only update is the surprise delivery of a box this morning.
attachment.php
 

Attachments

  • DSCN6063shirt.jpg
    DSCN6063shirt.jpg
    129.4 KB · Views: 1,301
OP
K

kwyjibo

Well-known member
Joined
Apr 8, 2008
Messages
743
I've been taking it easy and planning for a few days

First, I had the 911 home to change the oil and finally install a pedal that I bought a few years back. I always had trouble with heel-and-toe in this car because of the pedal positions. The 917/RSR replica pedal has a convex shape that brings the middle of the pedal further out. The brushed aluminum looks blingy with the mostly black interior
attachment.php


Now, the work has begun
When we moved into the house, the garage was a 1+1. A previous owner walled in the carport side of a detached garage+carport. Unfortunately they just built the walls on top of a slab that ran from the house, across the breezeway and into the carport. This means that any water that collects on the 400sqft slab would run away from the house (good) but into the new wall (bad). Not surprisingly the bottom of the wall is now having some problems because of rot and rust.

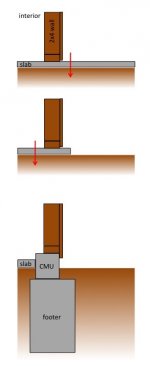
So... I came up with a plan (see the diagram). First attempt was to cut the slab (red arrow in top image) as close to the garage wall as possible so that less water could collect. From the decreased size of the puddles in the garage for the past few years, this helped.
attachment.php

Here's the slab ledge left at the bottom of the wall after cutting. The saw could get about 1.5" from the wall.
attachment.php

But about 20years of water damage took its toll so I decided to completely rebuild the wall as a permanent solution. After talking with a couple concrete guys, the plan, shown at the bottom of the diagram, is to construct a code-compliant foundation without replacing the slab. Basically, 1) jack the roof 2) demo the walls 3) cut (red arrow in bottom middle image) and demo the edge of the slab 4) trench and pour footer 5) course of CMU and 6) rebuild the wall
This will also allow me to replace the slab at a later date without disrupting the wall.
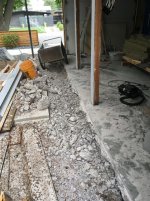
Here's how it looked yesterday when I quit for the day.
attachment.php
 

Attachments

  • DSCN6081.jpg
    DSCN6081.jpg
    149.4 KB · Views: 1,147
  • DSCN6072.jpg
    DSCN6072.jpg
    101.3 KB · Views: 1,138
  • Slide2.jpg
    Slide2.jpg
    24.4 KB · Views: 1,141
  • DSCN6088.jpg
    DSCN6088.jpg
    155.1 KB · Views: 63
Last edited:
OP
K

kwyjibo

Well-known member
Joined
Apr 8, 2008
Messages
743
I haven't updated for a while because work has been going painfully slow. First up was cutting the concrete. I bought a Makita saw a few years ago when I cut up the back patio. It has definitely been worth it considering the amount of concrete I've cut. Then came the jack hammering. I had a Home Depot rental and was determined to get the job done in a day. What I didn't count on was that the slab was anywhere from 7" to 14" thick. I guess it was cheaper in the 1950s to pour extra concrete than to bother filling and leveling the site? All I know is that it was a pain (literally) to break it up. With a bit of help, we got it done just as a thunderstorm rolled in.
attachment.php


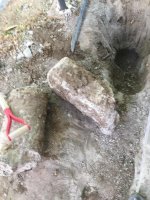
Time to dig a trench... but then I discovered the next surprise. There was still concrete in the ground?!?!! After some digging and poking, I realized that there were four caissons under the slab right in line with where I was planning on building the foundation. I got two of them out of the ground. The bottom of the larger one was 32" below grade. What's interesting to me is that the slab seemed to be resting on top of them, not connected.
attachment.php
 

Attachments

  • IMG_0524 copy.jpg
    IMG_0524 copy.jpg
    148.1 KB · Views: 883
  • 966E copy.jpg
    966E copy.jpg
    135.5 KB · Views: 885
Last edited:
To avoid these ads, REGISTER NOW!

hewey

Well-known member
Joined
Sep 5, 2014
Messages
1,681
Location
Blue Mountains, Australia
The credenza looks amazing, nice job. For the speakers, would it work to build a box that they could sit within? So match the timber to the credenza and that cloth on the front, and your existing speaker sits inside and is hidden? Might be an option that doesnt require cannibalising the existing speaker.
 
OP
K

kwyjibo

Well-known member
Joined
Apr 8, 2008
Messages
743
Thanks Hewey. When I spoke to a custom stereo guy in town about building my own speakers, I asked about hiding some small off-the-shelf speakers in a custom enclosure. I got a 20 minute lecture about why it would sound terrible. I can't say that I agree with him because I just don't think that I could hear the differences that he can - and I don't think it's worth the $600 kit (+ wood and my labor) that he was pushing. I'm happy with what I have now so speakers are down the priority list.

Update on foundation: the trench is done and I need to pick up some rebar. also I found a concrete supplier willing to deliver a small load. To kill time when it was too hot to dig, I started on the posts for the wall. I'm using the same Simpson concealed post ties that I used on the pergola so the posts need some work before they're usable. Here is the first one temporarily held in place with some 1/2" bolts
attachment.php
 

Attachments

  • DSCN6122.jpg
    DSCN6122.jpg
    148.2 KB · Views: 1,489

gearhead1960

ALLIANCE MEMBER
Joined
Mar 21, 2019
Messages
1,862
Location
Manassas, VA, a small blot in history
Thanks Hewey. When I spoke to a custom stereo guy in town about building my own speakers, I asked about hiding some small off-the-shelf speakers in a custom enclosure. I got a 20 minute lecture about why it would sound terrible. I can't say that I agree with him because I just don't think that I could hear the differences that he can - and I don't think it's worth the $600 kit (+ wood and my labor) that he was pushing. I'm happy with what I have now so speakers are down the priority list.

If you're going to spend that type of money, you might at well buy some vintage speakers like these. My dad had these and they were always an amazing set of speakers. I have a set of these that I found at a moving sale for $35 and had them restored..... Just a thought.

BTW, thanks again for the "werkes" T-shirt. Love it....:bowdown:
 
OP
K

kwyjibo

Well-known member
Joined
Apr 8, 2008
Messages
743
Thanks guys! and you're welcome, Mark - but really, thank you for helping me get to the minimum number needed for the order.

No updates on digging, but it is still going on....
I've been slowly bringing home parts for the '71 Targa because I'm aiming to get working on it by the end of July. In other words, I'm hoping to get the garage buttoned up by then. To get a head start, I'm looking into things that I need to outsource and could take a while, like sending out engine components for some machining.

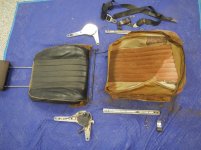
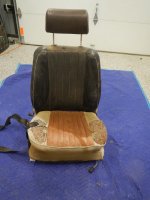
Next up: what to do with the Frankenseats? I have a matching pair of mismatched "comfort" seats. These were the base-level seats for all longhood 911s from '65 through '73. These particular seats are not correct for my car, but most people wouldn't know the difference unless I pointed it out. They (or at least some parts) probably came from a '69-70 car. The headrest is brown leather, the seatbacks are black vinyl and the bottoms look like they're covered with velour and woven fabric from 70's sofa.
attachment.php

and the parts laid out
attachment.php

I found some of the same material under the hinges so it looks like the seatbacks were once covered with the same material as the bottoms
attachment.php

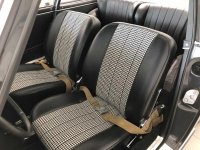
I need to talk with an upholstery shop to get estimates on how much it will take to get them to look something like this:
attachment.php
 

Attachments

  • DSCN6119 copy.jpg
    DSCN6119 copy.jpg
    140.7 KB · Views: 1,417
  • DSCN6115 copy.jpg
    DSCN6115 copy.jpg
    150.3 KB · Views: 1,408
  • DSCN6108 copy.jpg
    DSCN6108 copy.jpg
    88.9 KB · Views: 1,398
  • untitled 2.jpg
    untitled 2.jpg
    130.1 KB · Views: 1,410

ODIS

Well-known member
Joined
Apr 30, 2012
Messages
2,110
Location
Pacific Northwest
Maybe do the work yourself with covers ordered from Autos International. Have been following Mike M's YouTube channel on the 911 he is restoring. You have more than likely seen his work. At this point in the restoration, he has just completed the back seats, so just guessing, the next video may be about the front seats. Really like the look you are going for and may do similar on the 911T here.


All the best to you.
 
OP
K

kwyjibo

Well-known member
Joined
Apr 8, 2008
Messages
743
Thanks, I didn't know of Mike M. I did go through a few threads on earlyS and diy recovering didn't look too bad. I sent some messages out to get costs on the home recovering kit, having a shop recover and, if all else fails, aftermarket seats.

I went on a mountain drive with a couple friends this morning. The cold air felt great.
attachment.php
 

Attachments

  • IMG_0548.jpg
    IMG_0548.jpg
    146.9 KB · Views: 1,343

bdbecker

ALLIANCE MEMBER
Joined
Nov 18, 2015
Messages
5,574
Location
Iowa
Finally blasted my way through your build thread (stayed up way too late last night). I was keeping up when you first started the thread, but never subscribed and lost track. Inspiring work and I'll be sure to keep up on future updates!

How I got back onto your thread was because Nick (nicholam77) mentioned you were using Penofin to treat all your cedar. I recently treated my deck using the same product and am going to build a fence and gate that will need to be oiled as well. A quick question related to fence and siding application - do you just use the brush on/soak for 20-30 minutes/wipe off excess method? I was wondering if there were any issues with runs or streaking, or if you were applying it differently.

Finally, while I know its a low priority project, when you do dig into those speakers that go with that beautiful console you built, you might be interested in Justin's (rattle_snake) shop sound system build thread. I think he might know a thing or two about building speaker boxes.

https://www.garagejournal.com/forum/showthread.php?t=436574

Keep up the great work!
 
OP
K

kwyjibo

Well-known member
Joined
Apr 8, 2008
Messages
743
Finally blasted my way through your build thread (stayed up way too late last night). I was keeping up when you first started the thread, but never subscribed and lost track. Inspiring work and I'll be sure to keep up on future updates!

How I got back onto your thread was because Nick (nicholam77) mentioned you were using Penofin to treat all your cedar. I recently treated my deck using the same product and am going to build a fence and gate that will need to be oiled as well. A quick question related to fence and siding application - do you just use the brush on/soak for 20-30 minutes/wipe off excess method? I was wondering if there were any issues with runs or streaking, or if you were applying it differently.

Finally, while I know its a low priority project, when you do dig into those speakers that go with that beautiful console you built, you might be interested in Justin's (rattle_snake) shop sound system build thread. I think he might know a thing or two about building speaker boxes.

https://www.garagejournal.com/forum/showthread.php?t=436574

Keep up the great work!

Basically, I've been doing just as you describe: brush on, wait a while, wipe off excess and repeat.
A few random thoughts from my experience with Penofin
I was told that it's important to give it enough time to let the oil soak in, which is why you don't want to do it when it's too hot - the Penofin gets tacky when hot. Also, if you don't wipe off the excess, it'll be sticky when it "dries".
I usually wait a day or two before giving it a second coat. Before you wipe the excess off, you can see the differences where the grain is still absorbing vs. not. Some boards get additional treatments.
I've also made it a springtime ritual to re-apply Penofin to all the cedar (and in the Fall, put on another coat for the decks). I don't know if it's the Colorado sun or dryness, but the wood definitely looks dry beforehand.
Bottomline - Penofin looks good, but it's high maintenance.
Let me know if I wasn't clear about something or if you have other questions. Thanks for reading and thanks for pointing out rattlesnake's thread. I like how he painted the cabinet and speakers to match the other cabinets.
 
Last edited:

bdbecker

ALLIANCE MEMBER
Joined
Nov 18, 2015
Messages
5,574
Location
Iowa
...Let me know if I wasn't clear about something or if you have other questions...

Nope, that's pretty much what I had in mind. The salesman at The Woodsmith Store warned me about not applying it in hot/humid weather, that must be why.

Penofin might require regular maintenance, but I don't think its any more effort than you'd put into any other outdoor wood coating. Nothing is going to last long in our climates, so I figure I might as well pick a product that requires a little freshening up each year instead of one that requires a complete overhaul every few years.
 
OP
K

kwyjibo

Well-known member
Joined
Apr 8, 2008
Messages
743
Nope, that's pretty much what I had in mind. The salesman at The Woodsmith Store warned me about not applying it in hot/humid weather, that must be why.

Penofin might require regular maintenance, but I don't think its any more effort than you'd put into any other outdoor wood coating. Nothing is going to last long in our climates, so I figure I might as well pick a product that requires a little freshening up each year instead of one that requires a complete overhaul every few years.

exactly my thoughts. I ruled out the varnish type finishes because it would need to be sanded off when refinishing while the oil just gets reapplied. When I was researching oils, Penofin kept coming up as a top recommendation - even by guys that didn't sell it. Good luck with your project
 
OP
K

kwyjibo

Well-known member
Joined
Apr 8, 2008
Messages
743
I realize that some posts disappeared from GJ a few weeks back. I had replied to a post by nicholam77 (also disappeared) and I don't know if he saw it. I recovered a draft of my reply which I'll post below because it had some info that may be useful to others.


I didn't want to use plastic tracks, like the ones that come in the kits:https://www.rockler.com/european-style-sliding-door-hardware
So, I picked up the individual rollers and guides. This may not be the actual source that I used for them, but I have used this site before https://www.thehardwarehut.com/catalog-product.php?p_ref=294688
I was happy with the aluminum channels that I used for the tracks on the garage cabinets so I picked up more of the same (but see note below)https://www.orangealuminum.com/bar-stock/channels.html
This is also where I sourced the dual T-tracks for the hanging doors on the desk/bench and the "shelf stiffeners" that I used to make the pull handles for all the garage cabinets
Here are links to the General Finishes products that I used. I decided to use these based on conversations with the guys at the local Woodcraft store. I told them that I was looking for a finish that looked like something that would have been done in the 50's or 60's. A key bonus is that I didn't need a spray gun or dust-free booth to get a nice finish.
https://generalfinishes.com/wood-finishes-retail/oil-based-wood-stains-sealers/gel-stains
https://generalfinishes.com/wood-finishes-retail/oil-based-topcoats/oil-based-gel-topcoat

I'm happy with things overall. The finish is much nicer than I thought it would be for how easy it was to use. If I were to do this again, I would find a different source for the aluminum tracks. There is too much slop in the door: the guides are too narrow for the channel/the channel is too wide for the guides. I bought the narrowest channel they offered so that's why I say that I would find someone that sold narrower channels.
I bought Europly (https://www.columbiaforestproducts.com/product/europly-plus/) through Home Depot. I was surprised that they showed up without major damage, because they just tossed the 2'x8' sheet into a cardboard box and sent it through UPS. It looks like the price went up almost 50% since I bought them last year, but here is the link:https://www.homedepot.com/p/Columbi...anel-Free-Custom-Cut-Available-3790/207004226
 
OP
K

kwyjibo

Well-known member
Joined
Apr 8, 2008
Messages
743
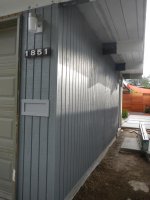
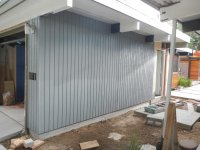
I've neglected GJ for long enough, but it's not for a bad reason. I've been busy rebuilding a wall of the single garage and I'll try to catch up on a few weeks worth of updates. I've been working alone most of the time and didn't stop for photos, so there isn't much photo documentationFirst thing is where the garage stands now: the wall is almost complete, just need to finish the trim and paint. On the inside, the electrical is almost done (I need to decide on the location for an outlet) and most of the insulation is in. I painted the front part of the wall as soon as it was up so that I could put up the mailslot, address plate and light.
attachment.php

You can see about halfway down the wall that the T1-11 changes. I bought the first two sheets last year, I bought the others from the same lumberyard last week. Not only is the new batch thicker, but the horizontal saw marks are more pronounced. I'll be re-using the old exterior siding on the inside. You can also see the paint border on the beams where the wall was before I moved it inward.
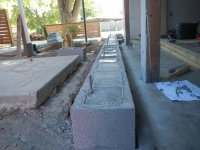
I was still digging the trench for the foundation in the last update. After I made a rebar framework and forms, I ordered 2 cu yds of concrete in a mini-mixer. Luckily my wife and a friend were free that morning so I enlisted their help. I was surprised that we emptied the mixer in less than an hour. It wasn't the prettiest pour but it works. I did learn that you can't have too much support for the forms - even though I thought that I over-engineered it, the concrete pushed the forms out about 1/2" in a couple places. I never set cmu blocks before this foundation, but I learned enough from harassing the mason I hired last year to build a reasonably straight stem wall.
attachment.php

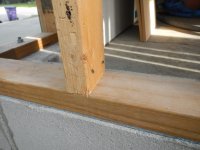
Next, I hadn't done any framing for about thirtyfive years when I had a summer construction job in high school but now this is the second time framing in the last year. It was easier this time around because I borrowed a nailer, but it was also made more difficult because I'm trying to re-using most of the old lumber.
attachment.php

attachment.php
 

Attachments

  • DSCN6187.jpg
    DSCN6187.jpg
    85.1 KB · Views: 1,048
  • DSCN6182.jpg
    DSCN6182.jpg
    150.8 KB · Views: 1,040
  • DSCN6151.jpg
    DSCN6151.jpg
    150.8 KB · Views: 1,046
  • DSCN6156.jpg
    DSCN6156.jpg
    135.6 KB · Views: 1,048

nicholam77

Well-known member
Joined
Dec 18, 2016
Messages
2,673
Location
Minneapolis, MN
Thanks for reposting the details about the cabinet! I had seen it and responded, but I guess that got deleted, too. I actually came back looking for it the other day. That is very helpful. The Europly looks like a good option for me.

P.S. I had a suspicion those channel tracks were Orange Aluminum even before your post :D
 

Arclitgold

Well-known member
Joined
Dec 20, 2017
Messages
317
Wow the wall is looking good! That’s a big job! Nice work


Sent from my iPhone using Tapatalk
 
OP
K

kwyjibo

Well-known member
Joined
Apr 8, 2008
Messages
743
Thanks guys! I'm trying hard to stay motivated.

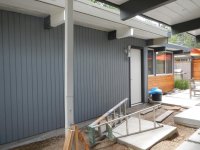
The trim around the door is done. Whenever possible I like to paint the pieces before nailing in place to get the best lines possible. I'm starting on prepping the overhangs and the beams for paint. I'm still debating on the color for the door. The door directly across, going into the house, is orange. The future door that will secure the area between the house and garage will be lime green. I'm thinking the door into the garage should be yellow or red, any comments on this are appreciated.
attachment.php

here's a close up of the trim. I could never get these lines with masking tape
attachment.php

I have moved the piles of unused lumber, insulation, etc around the garages for a few years now. This time the piles moved from the single garage back into the tandem to give me room to work on the interior and to give my wife back her parking spot. The long-term goal for the garages was that the single side is for "normal" garage use (parking and storing household items) while the tandem garage is dedicated hobby space. I'm leaving a 4x8 opening in the T1-11 for a slatwall hanging system that you can see on the left side of the photo below.
attachment.php

I cut a few inches off the rear legs of an old IKEA shelving unit to clear the stem wall and painted to match the trim. The shortened end unit holds a plastic bin to collect mail from the slot.
Lastly, the targa will be moving into the tandem garage soon. My friend and I have ended the lease on the rental garage
 

Attachments

  • DSCN6208.jpg
    DSCN6208.jpg
    148.6 KB · Views: 783
  • DSCN6210.jpg
    DSCN6210.jpg
    56.7 KB · Views: 786
  • DSCN6205.jpg
    DSCN6205.jpg
    150.4 KB · Views: 790

Matt Johnson

Well-known member
Joined
May 2, 2014
Messages
59
Location
Washington State
My Vote -


Sans the Arrow.

With Green door handle escutcheon.
I'd give the same treatment to both the "Arrow" door & the exterior door.
Or maybe just the tribute door & the exterior door gets the orange... I'm torn.

The blue is subtle enough to not grab your eye/blend in when walking through.
Also keeps the "focus" on the Orange main entry point to the living quarters.
And of course ties to the overall interior 908/3 Gulf tribute.

Matt
 
To avoid these ads, REGISTER NOW!
Top Bottom