To avoid these ads, REGISTER NOW!

rattle_snake's random shop projects v0.1

nsula_country

Well-known member
Joined
May 23, 2013
Messages
1,534
Location
Northwestern Louisiana
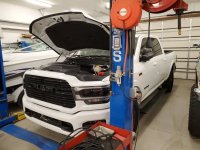
I was able to install the front drive shaft, but I failed to do basic engineering and due diligence regarding angles. I did the math on the rear and decided to run a double cardan given the angles, and just assumed that since that was already the plan on the front it would be OK.

Well it's not. I have onset of drive line bind at ride height. Angles are extreme, 26 at TC and 18 at pinion. There are a few things I can do to mitigate but the axle really needs the 'C's cut off and clocked about 8-10* to bring pinion up. This would require complete disassembly of axle and affects the position of all the brackets. Poo. Doable but a major pain.
The other option is to lower ride height and give up some up travel, and use limit straps to limit down travel. Coilover springs are already too long so I can't lower it any further at this time. I guess 'smaller' tires (38/39s) could be an option as I got these 40s used/cheap mainly for mock up purposes.

I set caster at 6*, so I can back that down to 4, and use a set of 2* ball joint sleeves to further move pinion up. This gets TC to 23 and pinion to 10* but only allows for 1.5" of down travel. Even if I lower ride height, down travel is limited.

Another option is a bluetooth front driveshaft like you see on Bro bling trucks at SEMA. A decent solution for the mall parking lot though.

Along those line the front shaft isn't needed to get motor started or first lap around the block so it's not really a blocking item. Just irritating and depressing, but that is how custom fab goes. Adapt and overcome.

The cross member does clear at ride height so it could be worse. May have to clearance at full droop.
ACtC-3f5yUmQX_93eNhjEcRgTMzqId1aL2gMKkiVsG3qoK8u1SoXKgA7vFGLI6ymvW8X_UFh8pePeL94nACqGvaI4vkvYO6xWM9sgci5LQyvSTuIPSYGDTBlatAtqloejxropv7WidBs95F4UOx1ZyUkS44g=w951-h713-no


ouch
ACtC-3e0VCDnFDTXTNR_ZwPFXRNT1Oi7T9LcwGQg5tGjiWgERsrzaRVw3_R_cYOEB9ED0q-TGPNa0S2CcV0I7RbiWq4fi3YHfFl9uK5ZtySJEVqzjddgb4O4giCB0u60oTK1OX3MMcNKU-fl1ESCaX6EKPRC=w951-h713-no


There is also a horizontal offset that further eats into angles
ACtC-3dY72AVbhoMPqxquFm_h6dn7vg_T8If-kpObh4rWxk-B16cU3xRuojbvcain_6zLGQ7qWQlgDSMEyFCi4PA4B5pCgPKS6cJfthx8--3V-evgwM2km7b7a_SFwz4D80omlXliCrzIFIcsmRC16cEpd4T=w951-h713-no

OG Ranger and Voodoo for me too. Why mess with it? :dunno:

Dude... ***** that geometry is biting the ***. Make lemonade!

Get it running/driving. Shake it down. If have to cut perches and reset (likely) so be it. R&D. Ever not have to re-do a capitol project at your day job? I have. But only once :scared:...

I'm not going 4x4 crawler, but show/driver in 6 month window when I pull trigger. Will have OS moments. That I will share with the GJ audiance that chooses to follow.

Good luck bro!

PS, got you to page 41 :rocker: :beer:

CT
 
Last edited:
To avoid these ads, REGISTER NOW!
OP
R

rattle_snake

Well-known member
Joined
Jun 25, 2015
Messages
5,207
Location
Chandler, AZ
OG Ranger and Voodoo for me too. Why mess with it? :dunno:

Dude... ***** that geometry is biting the ***. Make lemonade!

Get it running/driving. Shake it down. If have to cut perches and reset (likely) so be it. R&D. Ever not have to re-do a capitol project at your day job? I have. But only once :scared:...

I'm not going 4x4 crawler, but show/driver in 6 month window when I pull trigger. Will have OS moments. That I will share with the GJ audiance that chooses to follow.

Good luck bro!

PS, got you to page 41 :rocker: :beer:

CT

Ya they should have left it alone like Sierra Nevada pale ale. Same for 40 years. Now the IPA market is clogged with hazy's and fruity's. Some good ones but also many that are over the top, poor balance.

I'm past denial & acceptance and on to engineering a solution. Since everything is clean and new the job won't take anywhere near as long. Nothing to figure out just hack off and replace. But still need to strip down to bare housing and buy/fab all new bracketry.

But yes, going to just remove front shaft and get it driving. Then go back and fix.
 
OP
R

rattle_snake

Well-known member
Joined
Jun 25, 2015
Messages
5,207
Location
Chandler, AZ
Got the rear driveshaft installed. I went with Tom Woods shafts, their customer support is fantastic. Real people who answer phone and know stuff. Built and shipped next day and was cheapest out of the 3 places I got quotes from. 1350 joints and 3.5" tubing.

I was finally forced to paint the gasket surfaces of the 205 before installing the drive flange and shaft.
ACtC-3e_T01qRrkqP_SZT5jxzM5IsH9zsXAv087_pVjXziB_7jSoNu90NNtEH_6DiBF4SWjlc_Z8f6_zu-5MLgrrbtSQklOGCEoScWCfxjrfp28YSc3ZIpXHW9TsTwA2zFAHRHjr-ODNx0U-PggBXyS0rEGu=w947-h710-no


I had already done the math and moved the spring perches to yield 1* up at pinion and an easy 7* at TC.
ACtC-3fHhteXj1lzypdVgnuDUgTnNFayC5_WX_nVuksJI0lrVpOgdWBD7E8Z6F5WemTr9CPnH7YGTfawhFLnl46brOyLoZgQfTSMx6TID5_3lYquqOis4WkGNOkQlCgeLT-a03JfkDU3TwzIdJ_esFc_izmN=w947-h710-no


Traction bar helps guard this long 62" shaft and keeps pinion angle constant.
ACtC-3ewFYPcEB5Bb2stKwa5YnabLRLai0ZBC8exllgsC5VcCBNY7kWXT8566nEcwJP0avi8J_1Vm9UXaEUKGGc0m74gxeWpWejnlygjI5a3KJ5Lob2lhCye3WvJ-_F3yoG2P7WP9axG2TWVTGNWm7HeMah2=w947-h710-no
 
OP
R

rattle_snake

Well-known member
Joined
Jun 25, 2015
Messages
5,207
Location
Chandler, AZ
Looks good.
Thanks boosted. Trying to be happy with what has gone right instead of focus on the negative.

Spent some time organizing my chaotic toolbox drawers. After completion of my Steevo bench I hastily threw all my **** in them. That was 2 years ago now and can't seem to find the desire to reorg. I bought some little clear divider bins awhile ago, now they are full, so I bough a bunch more.

In general, I have tools in toolbox and materials in the steevo bench. For toolbox, I reorganized many of the drawers and moved often used tools up into more easily accessible drawers. Similar for materials, and finally went though many of the odd fastener bins. Moved metric and SS into clear bins with more individual compartments. Now I have some empty space and bins to expand into.
 

LXCam

ALLIANCE MEMBER
Joined
Apr 23, 2013
Messages
19,132
Location
AZ
And now you’ll spend the next few weeks cussing trying to remember where you put the whatever.


Not that I’ve ever done that.
 
OP
R

rattle_snake

Well-known member
Joined
Jun 25, 2015
Messages
5,207
Location
Chandler, AZ
haha yes I figured I would but so far it has actually helped.

I figured I should do something I can't screw up like driveshaft. And I bought some more tools.
 
OP
R

rattle_snake

Well-known member
Joined
Jun 25, 2015
Messages
5,207
Location
Chandler, AZ
I moved the control box on the belt grinder again to be correct handed friendly. I have work piece in left hand, so need buttons on right. Reaching across to turn off is not best idea. Made a stand from 1x3 and ran wire in it to motor

20200820_181931.jpg
 
Last edited:

zmotorsports

ALLIANCE MEMBER
Joined
Oct 20, 2009
Messages
21,403
Location
Northern Utah
Justin, that ***** about the front axle. I wish I could give you an easy fix but as you remember, I had the same brain fart when I built my son's WJ a couple of years ago and ultimately just bit the bullet, yanked the front axle, disassembled it and corrected it properly by reclocking the "C's" to get the correct pinion to caster angle separation.

Two years later after my son has put some miles on it I'm glad we corrected it the right way as it has been trouble free and handles great with the correct pinion angle and caster angle. At this point I doubt you want to make it a mall crawler and fudge the numbers to be off on both pinion angle and caster as everything on the truck is done masterfully.

It wasn't easy but a long day and it was complete, maybe a bit more for some sanding and painting.

Good luck.
 
OP
R

rattle_snake

Well-known member
Joined
Jun 25, 2015
Messages
5,207
Location
Chandler, AZ
Hi Mike,
Yes I remember the WJ axle 'C' mod. How you did it so fast I don't know. At that time I was thinking 'I have lockouts, doesn't apply to me'.
:dunno:

Handling and stability are of highest concern, not only for safety but I want driving experience to not be fatiguing. The overall tall height and soft springs make matters worse, so having plenty of caster adjustability is key. I want to be ale to run 6*+. Also leaving in the neutral (0*) ball joint sleeves allows full camber adjustments if I need later.

After redoing the math with better accuracy, even with ideal pinion angle I'm limited to only 10.5" of travel up front, regardless of ride height. I wanted 12 usable out of the 14" coilovers. That said more shaft in shock is always good. Will need limit straps to protect driveshaft.
10.5 seems like a compromise, but I can still get 4.5" up/6" down which should be more than enough. Radius arms don't flex well by design and this is not a dedicated trail rig.

I did't put fluid in the diff yet so everything is new and clean. I can pull axle and blow it apart quick. I did cut up my axle stand, which became my press base, but now I have a new fab table that will lend itself well for the job. I can even steal your axle adapter design....
 

zmotorsports

ALLIANCE MEMBER
Joined
Oct 20, 2009
Messages
21,403
Location
Northern Utah
Hi Mike,
Yes I remember the WJ axle 'C' mod. How you did it so fast I don't know. At that time I was thinking 'I have lockouts, doesn't apply to me'.
:dunno:

Handling and stability are of highest concern, not only for safety but I want driving experience to not be fatiguing. The overall tall height and soft springs make matters worse, so having plenty of caster adjustability is key. I want to be ale to run 6*+. Also leaving in the neutral (0*) ball joint sleeves allows full camber adjustments if I need later.

After redoing the math with better accuracy, even with ideal pinion angle I'm limited to only 10.5" of travel up front, regardless of ride height. I wanted 12 usable out of the 14" coilovers. That said more shaft in shock is always good. Will need limit straps to protect driveshaft.
10.5 seems like a compromise, but I can still get 4.5" up/6" down which should be more than enough. Radius arms don't flex well by design and this is not a dedicated trail rig.

I did't put fluid in the diff yet so everything is new and clean. I can pull axle and blow it apart quick. I did cut up my axle stand, which became my press base, but now I have a new fab table that will lend itself well for the job. I can even steal your axle adapter design....

Sounds like a solid plan Justin.

I know overall travel seems to be king these days but for a weekend wheeler and daily driver I don't think 10.5" overall travel is really a compromise. That is actually pretty respectable.

I have right at 10" in the front with 4.25" uptravel and 5.75" droop and 9" travel rear with 4" uptravel and 5" droop and I am extremely pleased with how it wheels and still has great street manners.

Sometimes more droop can actually get you in trouble, especiall when climbing ledges as the tires can get into an undercut shelf whereas if it is strapped within a reasonable amount the axle will hang and be lifted up to where it can grab traction on the rock rather than lodged under it.

Granted there are exceptions but for the most part I think you will be quite happy with those numbers.

Best of luck in your modification.
 
OP
R

rattle_snake

Well-known member
Joined
Jun 25, 2015
Messages
5,207
Location
Chandler, AZ
Yes I agree it's more than enough travel for my application, but that's how I roll I guess. More power, bigger tires, and so on. :)

Have to figure out the best method for limit strap. Can also use winch to **** front axle up if I get into that situation. But skipping all that until it's running and driving.

I do want to be able to go WOT when front end is drooped out, for the dunes and such, so end solution needs to be robust.

Been working on high current wiring, main harness and fuel fill. Will post some pics when whey are further along.
 
OP
R

rattle_snake

Well-known member
Joined
Jun 25, 2015
Messages
5,207
Location
Chandler, AZ
My BIL recently moved with family to AZ and wants to get into camping and other redneck activities he didn't get to do growing up. He has been shopping trucks and travel trailers for a long time, long before Covid, which has upset the market considerably.

Step one was to get a truck, he ended up with a Ram 2500 w/ 6.4 gas motor. I gave him a crash course in trailer towing, he did well and has spent a fair amount of time researching all the other stuff needed to get down the road. We started with maneuver exercises in Suburban/horse trailer in tight parking lot. Then hooked up my parent's 30' TT to his truck and went for a test drive including backing up 300' to it's parking spot.
ACtC-3fwr_9frs9l5kNq-WvixCsyyHebrYv7UJlncNeLCzpCt0YO9jJ2ibqDsyr3CPX7RDIiVd5k75y4BE8PnyR9hw663OVouaSTedu0Sc9BvG_v_MAmaUPUA5FHD-kwF2_OhjXHLOool-VPn8aeQZSTO_XM=w907-h680-no


Also helped him install Amp steps. He hasn't done much mechanical work but was focused and determined. Took us 4 hours. I did 90% but he learned a lot.
attachment.php
 

Attachments

  • 20200830_145502.jpeg
    20200830_145502.jpeg
    98.1 KB · Views: 381
Last edited:

nsula_country

Well-known member
Joined
May 23, 2013
Messages
1,534
Location
Northwestern Louisiana
My BIL recently moved with family to AZ and wants to get into camping and other redneck activities he didn't get to do growing up. He has been shopping trucks and travel trailers for a long time, long before Covid, which has upset the market considerably.

Step one was to get a truck, he ended up with a Ram 2500 w/ 6.4 gas motor. I gave him a crash course in trailer towing, he did well and has spent a fair amount of time researching all the other stuff needed to get down the road. We started with maneuver exercises in Suburban/horse trailer in tight parking lot. Then hooked up 30' TT to his truck and went for a test drive including backing up 300' to it's parking spot.

Also helped him install Amp steps. He hasn't done much mechanical work but was focused and determined. Took us 4 hours.

20200830_145502.jpeg

Finally! Another person that realizes you can pull a TT with a 3/4T gasser! I pull a 27' TT with a 6.0L GM gasser. Can climb 7% grades, just at 4500 rpm!

Your BIL has a good Redneck teacher! Truck looks good, even if its a RAM (still a Dodge).

CT
 

zmotorsports

ALLIANCE MEMBER
Joined
Oct 20, 2009
Messages
21,403
Location
Northern Utah
No, I'd buy a Chevy before a Ram if I hit my head hard enough to do severe brain damage that could lead to such a poor decision.
:)

Was editing post see above

Nice. My FIL just bought the same truck to drag his 35' fiver around. Does great but not quite as good on the grades as his diesel that he traded it in on, but still pretty good.
 
To avoid these ads, REGISTER NOW!

OutlawDrifter

Well-known member
Joined
Jan 20, 2015
Messages
3,876
Location
KS
Well at least we can all agree mopars are at the bottom of the list :lol:

And +1 for skipping straight to the GMC :rocker:
 
OP
R

rattle_snake

Well-known member
Joined
Jun 25, 2015
Messages
5,207
Location
Chandler, AZ
Finished fuel fill fab for the 'burb tank with right side plumbing. I ended up abandoning the in-bed option, after I put the bed on the frame and realized I couldn't reach the fill location without a ladder. I wanted to install a door style fill, but to do it right is a lot of work and will delay the goal of run/drive so decided to go with a simple fill tube like factory. Step 1 was to cut a hole, I had my daughter help.
ACtC-3fyT2f17xElCl9Bj-GZL03xwovz1D55Y2RRVuihQJfEUcfB22FOFBM0xBzIP_yLRdbFcHQpmlST21R9KM0YaneLUkzwlhjDi6w987_KxIttax232flkpYDHOpBjzmSHxCIJgGsEiowEML3kXdQN1wkD=w511-h680-no

Next step was to cut out bed interior for fill tube clearance. I made it as small as possible.
ACtC-3cScdeXHF1EQrw8qIbBogwxnb2YIhrdVQrDJDalHEJQtmm8QPC-W1cKtT4EV9FTKIy-fpCpfYLqYAUkZbYO1itDdriMuoRBc2I4oYzz7Sukk4MGKnfED_yGU6pQIL611ik_cMTPRvwTey-t03NL9TcP=w511-h680-no


I ended up using the factory aux fuel tank fill tube for simplicity. Needed to adapted it from 2.25" to 1.75" and route to tank given constraints on underside of bed floor. Pressure tested and fixed pin holes so no fuel leaks.
ACtC-3fWa_PX9W_ZeDCxxm9d-Xw0wChrbGJSO746JkQm7M-xNqnN69-ktkbtKKHt8dknTx8jgkxeD6fKeS7nJGWSUBprG7ylYD3sVclpWAjg3hsnUpxATwooYCpcXJ20mFD4_zCNffXAYR1AM5iJkTjvZUQc=w907-h680-no


Instead of using factory cover from aux tank and filling hole (cut with torch from factory), I made a new piece from 18 ga. Bent in press and welded it in.
ACtC-3eOH_ClPOjJAQndY-Hk_vs3WgTEF_J703HJzKuU-AbXv4IAQdomCqPzVtqwBNs3oQQNFekTPzF8bH_PiOHIQpmvdiQ0a33uRmI8PAPflqytAHbsMkm9zkEOoRrdvHKWjX_1g8d-N6Wxq_-Nrv--aYpt=w511-h680-no


Came out OK with the parts I bought for the other method. One step closer to getting it running. Next step is get wiring run and pressure test fuel system.
ACtC-3eNTFTkpsDiI9xMTFwbX3wLKrIhxqJ3GBg4USCUSrKD93oGbjiQuuTVqQJ-PZrfgfBcZ4Ju1o8nFTKQp2_osD2x4hbsuRgYkg0qAY-JDqJhpiKvWNcTePCCMJzSxVt4gopAV6ozkDhgoWL7u0FvA2RF=w511-h680-no


Also got power steering cooler mounted. Not best location but need to move forward. From 'Yota taco.
ACtC-3cr9PJfteotS2JEEY8GuZuKvKLIul2ydvzR1cO0z0hq6S71aEjTwbFITwSzLbkv4vTQaNn0V3jBtNzySmvNuOlbrzVKPEl1oWfbgdu3mIHflScEuXlMKarTj4u4hEOuk4BA280fO7recb2NnFH6wIjT=w907-h680-no
 
OP
R

rattle_snake

Well-known member
Joined
Jun 25, 2015
Messages
5,207
Location
Chandler, AZ
Well at least we can all agree mopars are at the bottom of the list :lol:

And +1 for skipping straight to the GMC :rocker:

Ya it's good to see we can all come together and agree on truck brands.
:rolleyes:

Inspected Toyo MT tires on my 14 Ford as I'm getting bad vibes. Found one with broken belt again. They have 31k on them with about 20% tread left. I rotated every 5k, but 2 have more cupping, so the set is pretty much end-of-life. They have a hard life with hot temps and heavy camper, which voids warrantee. I ordered another set of the same, 37x12.50R20. This should get me another 4-5 years and will probably buy a new truck then. Will see how 7.3 gas motor turns out over that time. I think this is my last diesel, although it has never been back to dealer for any issues.
 

nsula_country

Well-known member
Joined
May 23, 2013
Messages
1,534
Location
Northwestern Louisiana
Ya it's good to see we can all come together and agree on truck brands.
:rolleyes:

Inspected Toyo MT tires on my 14 Ford as I'm getting bad vibes. Found one with broken belt again. They have 31k on them with about 20% tread left. I rotated every 5k, but 2 have more cupping, so the set is pretty much end-of-life. They have a hard life with hot temps and heavy camper, which voids warrantee. I ordered another set of the same, 37x12.50R20. This should get me another 4-5 years and will probably buy a new truck then. Will see how 7.3 gas motor turns out over that time. I think this is my last diesel, although it has never been back to dealer for any issues.

I am also eyeballing the new GM 6.6L gasser and the 7.3L Ford.

CT
 
OP
R

rattle_snake

Well-known member
Joined
Jun 25, 2015
Messages
5,207
Location
Chandler, AZ
Completed the main wiring harness. I decided to not make a secondary harness for all the aftermarkets additions, and just wrap them into the main. Here is a list of the modifications I did;
-Repaired all 'tap' splices by cutting wire and repair with heat shrink **** connector (at least 25x)
-Repaired heater fuse thermal damage and reconnected factory wiring
-Added relay for switched power for all aftermarket devices on it's own circuit
-Integrated trailer brake controller.
-Added switched trailer charge circuit
-Integrated radio wiring
-Added 10ga wire to power heater/AC system in future (to bypass factory power)
-Added theft deterrent circuit to prevent under-hood and under-dash hot-wire.
-rewired non-fused brake warning circuit as a - input to new cluster (won't catch on fire)
-Added fuel pump circuit
-Integrated all wiring into factory firewall plugs so no wires on outside of firewall.
-Converted fuel level circuit to differential
-Removed all unused wiring (old gauges and so on)
-Repurposed ammeter wires into tack and a/c controls
-Support for 3G alternator, EFI, MSD, etc.
-Provisions for adding more aftermarket equipment in future

I used all waterproof/heat shrink crimp connections, like factory, no solder. Wrap is non adhesive vinyl, like factory, removable/re-workable. New connectors are weather pack

I studied the factory schematic to consider the different power domains and fusing. Many functions do not have any fusing, for example;
Ignition
head, turn & park lights
charging
gauges
wipers
No fuse to ignition switch, light switch, or anything on crank/run. That is a lot of unprotected wiring going through firewall multiple times.

In today's vehicles, pretty much everything is protected including critical systems like ECU and ignition. I don't like the idea if a non-fused high current power entering passenger compartment with no way to shut off/isolate, so plan to add a 50A thermal breaker on the factory power wire. Other circuits will get fused in the box I added, except high power audio.

The MDS box will not get a fuse. Why? Because they said so without reason? No, because I researched until l understood and made my own decision. You can fuse and many have.
The reason is related to the 'captive discharge' topology. The main capacitor that stores all spark energy and drives coil is charged to 550V, it discharges through the main red power wire on shut down, as other side is common gnd. So 550V dead short into battery, very high current but for short time.

Got the harness installed. Only the high power main speaker wiring to doors is outside of main harness. It comes from audio amp behind seat so didn't make sense to integrate.

But instead of working on the rest of wiring to get it running, I focused on the most critical system, the stereo. Temporarily hooked up the amp power and the others to make it all work.

It occurred to me that this vehicle had lost it's soul (well, brain, heart, motor, everything) and had not had the key put into ignition for over a year. So it was a satisfying milestone to get audio system working. Tested with some AC/DC, it's brutally loud, as it should be.
I also made significant improvements to high current grounds including the cab, so the amp's power supply isn't collapsing on each bass note. Fiddled with tuning until I was half deaf and beer was empty. Made some motor noises behind the wheel dreaming of the day when it moves on it's own
:)

So if the new motor spins a bearing, flattens the cam or trans won't move, at least the stereo works.
ACtC-3e6tZZr1-rFfrXcMbSU7BsV3VafN6bY9T1zBnLR-h0n2cKLAgOvvRE6dm2cxSvCsPj8-BgZr3DQw58dcMFuwccG_dn27XdycIcmUrrj45_XhHekWDjImcIKoROl5QeWOLzPtXPjfScGSjhxbp2fXqSK=w907-h680-no
 

OutlawDrifter

Well-known member
Joined
Jan 20, 2015
Messages
3,876
Location
KS
Justin, top shelf run down on the wiring.

Bon Scott or Brian Johnson era AC/DC?

Congrats on the milestone!
 

Monza Harry

Well-known member
Joined
Dec 29, 2018
Messages
1,433
Location
Windsor ON
Justin I am not sure if the "Ferd" does this or not but that era of General Motors vehicles have a circuit breaker in the headlight switch. I found this out when as an under advised [and unsupervised I might add] late teen that with 4 X 100 watt Cibié head lights after about 30 seconds in they go strobe for you. (DOH!) So I then did what I should have done in the beginning and added a relay to the lights. Oh I also had 2 X 100 Watt driving and 2 X 50 Watt fog lights. Yes I could see for Miles! 5 miles of stop sign reflexions to be exact. I could rarely use them as the other people thought they were allowed to use MY road! :lol: I am sure FoMoCo must do sumtin' similar. Also GM has fusible links hidden in their harnesses that are only found when looking after a "Lucas moment" [Lucas invented darkness FYI for those whom never had the pleasure of british car wiring experience] Harry
 
OP
R

rattle_snake

Well-known member
Joined
Jun 25, 2015
Messages
5,207
Location
Chandler, AZ
Justin, top shelf run down on the wiring.

Bon Scott or Brian Johnson era AC/DC?

Congrats on the milestone!
Thanks. I spent the time and money to have all the materials, tools and what not I need to do a quality job. Non-trivial.

Brian Johnson, For those about to rock....


Justin I am not sure if the "Ferd" does this or not but that era of General Motors vehicles have a circuit breaker in the headlight switch. I found this out when as an under advised [and unsupervised I might add] late teen that with 4 X 100 watt Cibié head lights after about 30 seconds in they go strobe for you. (DOH!) So I then did what I should have done in the beginning and added a relay to the lights. Oh I also had 2 X 100 Watt driving and 2 X 50 Watt fog lights. Yes I could see for Miles! 5 miles of stop sign reflexions to be exact. I could rarely use them as the other people thought they were allowed to use MY road! :lol: I am sure FoMoCo must do sumtin' similar. Also GM has fusible links hidden in their harnesses that are only found when looking after a "Lucas moment" [Lucas invented darkness FYI for those whom never had the pleasure of british car wiring experience] Harry

I don't think 'Ferds do. Sounds like quite the lighting setup!
The only fusable link in the system was in between the alternator rectifier and the battery.
Many brake warning light circuits have caught fire on these era Fords.
 

OutlawDrifter

Well-known member
Joined
Jan 20, 2015
Messages
3,876
Location
KS
Thanks. I spent the time and money to have all the materials, tools and what not I need to do a quality job. Non-trivial.

Brian Johnson, For those about to rock....

...we salute you! :rocker:

Yes, the for the last few years I've overspent on my wiring tools, components, and projects. I'd rather have it done right the first time and have it last.
 
OP
R

rattle_snake

Well-known member
Joined
Jun 25, 2015
Messages
5,207
Location
Chandler, AZ
I figured you would complete the title.
:)

In an effort to complete a particular task, it's temping to use something 'almost good enough', to move on to the next step.
Today's procurement with AI and robots is pretty handy if you can wait just a few hours or days. I ran out of 2 pin weather pack connectors. Order some from 'Jeff' and they showed up in less than 3 hours.

I don't think you can really 'overspend' on tools. Pretty sure that is not only allowed here but encouraged.
 
OP
R

rattle_snake

Well-known member
Joined
Jun 25, 2015
Messages
5,207
Location
Chandler, AZ
Installed my fancy gauges and buttoned up dash wiring. The modified main harness looks like the original. Far cry from some of the the spaghetti incidents I have see.
The panel is quite thick so the gauge brain/controller would not fit behind. The factory instrument panel wiring was fairly short, didn't wan to extend all the wires a short distance so ended up mounting on bottom of dash using a strap to one of the pad studs. Easy to remove.
The windshield wiper linkage (aka wire-pincher) is right behind so have to use care to secure all wiring across the back of the dash. The stereo is tight and pushes it's wiring into linkage if not careful.
irU8ShISnV6xep8QP31YENM4-x=w907-h680-no?authuser=0.jpg

I repurposed the engine harness' firewall plug for the instrument wiring bundle and hooked up all the wiring. At that point I had to see how it would look.
eW6dDyGvqIDISM6Xxjk_uHl0wl=w907-h680-no?authuser=0.jpg
 
OP
R

rattle_snake

Well-known member
Joined
Jun 25, 2015
Messages
5,207
Location
Chandler, AZ
Spent a lot of hours on underhood wiring. Still have a way to go. Trying to make everything modular and serviceable, like well written code. No zip ties were harmed in this install. I want to be able to remove any harness or component (alt, starter, TB, etc) without cutting anything, like factory. PITA now but I know a project of this complexity WILL HAVE ISSUES and need trouble shooting & modifications. I'm trying to leave the harness unwrapped until it is running, but I think I know what will happen.

Wires are ugly and clutter the view of my 'Murican muscle, so I made a small bracket to hold the EFI wiring connector up under the cowl. I shaved the head down on some 6-32 screws to secure the connectors to the bracket, and it attached to the firewall with one screw.
ACtC-3fTiOvPSRwiTsuFFNIWt7klfR1GH0lxf4kwg7vhOnVUrcSS-66fwCxnb6PkBWV1_MM-uVP_77WrUlWvgvD2jpF1a04mtU3mUwzG-ONkR-QLSSOzLNBjmbqCyRd2pPaG3tyKSM9lwi9hty-XbAMyX3EJ=w907-h680-no

ACtC-3edI7OIpujkVpm7mKLpd4ZUvaCJpUtbE2MrZ4G4QL-tR81v2bvm2cI3UaWXAI7FQOdReOU_oy1VKiea0BocXgeO3D47wac-VkDovIKW0dQ2jU01B8WQqnUjDAz8ugeHhPshgUlovpo5vdMkDqKlFcQ1=w907-h680-no


Made good progress on right fender wiring. Still need to wire to fuse/relay box. Space is tight with hood hinge. I added 3 weather pack connector to main harness so it can be removed back through firewall hole. I also turd polished MSD wiring and added the one more connector needed. Alternator and starter have their own harness. The EFI harness disconnects from the main, but both have many wires that will go to the fuse/relay block. No plan to connector-ize it, all terminals can be removed separately if/when needed.
ACtC-3dn-UfiyTSSZUUz6MYCR8nKTCCeTaZMkzu2UMY2xlJS3GMll-0T39QV8tMgvhrPyEoYz_aVMDkuBDpiOWwPI9tFKGT6rMAlGE5wW8L4NVMmnvNYDi8nR6jPt9YQp59VyvVkddlP9XDGz6Yc5mzlIX0Y=w907-h680-no


I added a 50A breaker (real Buss/cooper not cheap ****) on the main harness power line. Plan to replace the Audio's AGU fuse holder with another breaker at 60A.
ACtC-3dADRS6CKwPml5JHSMHzrK05Z79HAXU-0OxOZiLv1kQROPQiZUWVg57lN0qvyn-y0aY-wvmTuTax1TwQDwJOIwDKfH0JZP3I3Wxt3TdbEZWB3p7wSGmUA5FtXoYe2vcjnr4r79tPCQU6g0KZM71_U8T=w907-h680-no
 

bradpac

Well-known member
Joined
Sep 8, 2013
Messages
721
Location
Central TX
Beautiful work on the wiring. Making it right, but keeping it looking factory. Not some tacked on box and tons of spaghetti everywhere or runs of plastic loom.
 
OP
R

rattle_snake

Well-known member
Joined
Jun 25, 2015
Messages
5,207
Location
Chandler, AZ
Man, I really like that setup, the "analog look" works well.

This particular model/color is the closest looking to the original. Other than price it's great. Plus 3 extra gauge functions in same space (tach, volt, trans temp)

I made some motor noises and pretended it was running.
 
OP
R

rattle_snake

Well-known member
Joined
Jun 25, 2015
Messages
5,207
Location
Chandler, AZ
Beautiful work on the wiring. Making it right, but keeping it looking factory. Not some tacked on box and tons of spaghetti everywhere or runs of plastic loom.

Thanks brad. It is a lot of work to make it robust, pleasing to the eye and maintainable. I tried to half-*** in a few place to move forward but ended up going back the next day to 'fix' (aka turd polish, waste time)

I'm using braided loom instead of the old standard of corrugated plastic. The OEMs still use the plastic for abrasion resistance but not much else. The expandable braid takes some forethought as it must be assembled from one end. The other type is a split braid so wires can more easily exit wherever.
 
To avoid these ads, REGISTER NOW!
Top Bottom