To avoid these ads, REGISTER NOW!

Between 485 & 705 SQ/FT A Garage Rehabbed

Workspaces between 485 and 705 squarefeet.

zanyad

ALLIANCE MEMBER
Joined
Apr 26, 2018
Messages
2,779
Location
NE Ohio
It's just the front door. Actually, I sealed up a window that the shed blocked.

Thanks for the quick reply. Another question: is that shed a kit? If so, can you share more information about it? I didn't see much detail about its construction in a quick search of this thread, though I admittedly didn't go through every page.
 
To avoid these ads, REGISTER NOW!
OP
B

-Brent-

Well-known member
Joined
Dec 23, 2009
Messages
4,709
Location
Utah
Thanks for the quick reply. Another question: is that shed a kit? If so, can you share more information about it? I didn't see much detail about its construction in a quick search of this thread, though I admittedly didn't go through every page.

It's a Tuff Shed. It's a custom size that we ordered direct. All I did was prep a base on the side of the garage and they came in and assembled it. I believe it was built at their local facility (where we ordered it), unlike the Home Depot Tuff Sheds.

With this one you can add on options and such, I did add some things, like full ice and water under the shingles and 16 on center studs. I should have gone another 2 or 3 feet in length. Also, it needs a vent installed. I only think about that when I open the door, though... haha.
 

bdbecker

ALLIANCE MEMBER
Joined
Nov 18, 2015
Messages
5,564
Location
Iowa
Brent! You're alive!

I've been looking at lean-to Tuff Sheds like that to tack on some storage space to the back of my garage. I take it you were pleased with the process? I think they use independent contractors to install so there could be some variability there, but otherwise you were happy with the process/purchase? Each time I start adding up the time and materials of what it would take to DIY it, the Tuff Shed seems like a more appealing option.
 
OP
B

-Brent-

Well-known member
Joined
Dec 23, 2009
Messages
4,709
Location
Utah
Brent! You're alive!

I've been looking at lean-to Tuff Sheds like that to tack on some storage space to the back of my garage. I take it you were pleased with the process? I think they use independent contractors to install so there could be some variability there, but otherwise you were happy with the process/purchase? Each time I start adding up the time and materials of what it would take to DIY it, the Tuff Shed seems like a more appealing option.

Hey man!

I looked at sheds from the big box stores and they didn't compare to what you could get from the local shed companies. At the time, I remember Tuff Shed being the only one that had a decent delivery date, which is why I went with them.

I've been happy with the quality of the shed. On my end, I could do a few things to help keep it a bit organized, as it's a shared space (lawn stuff, kid stuff, etc.).

I just remembered, I attached some expanded metal to the base (it's got galvanized floor framing) to keep out critters. I don't mind them having a place to live but I have neighbors who've given up on things the past 4-5 years and they have rodents. Fastening the mesh helped keep them away, immediately. I did run the hose under the shed to scare the one guy out to give him a chance so he wasn't sentenced to death and jailed in. My daughter thought that would be cruel.
 
OP
B

-Brent-

Well-known member
Joined
Dec 23, 2009
Messages
4,709
Location
Utah
So I'm looking at your avatar, and see your toy, but what's the building it's in?

That's my friend's shop in Rockford, Ill. Like many older structures in Rockford, it has a lot of character and manufacturing history.

attachment.php


It's a neat place. He's put a lot of love into it.
 

Attachments

  • Last Night in Ill 5.jpg
    Last Night in Ill 5.jpg
    162.6 KB · Views: 844
Last edited:
OP
B

-Brent-

Well-known member
Joined
Dec 23, 2009
Messages
4,709
Location
Utah
You're in Utah, and he's in Illinois. Bit of a hike to have the car worked on.

You're right. But, he and I are on the same page and that matters to me. We're deeply interested in the same era. We'd chatted about him doing the chassis for a couple years and having a pal who "gets it" was far more important than the distance.

I've never been scared of a road trip. I love them, actually.
 

CJGLLY

Member
Joined
Jul 30, 2012
Messages
5
Awesome Thread Brent! I really enjoy it, I too love the old era correct hot rods. You gotta make a trip out to The Race of Gentleman in Wildwood NJ one year.
 
OP
B

-Brent-

Well-known member
Joined
Dec 23, 2009
Messages
4,709
Location
Utah
Awesome Thread Brent! I really enjoy it, I too love the old era correct hot rods. You gotta make a trip out to The Race of Gentleman in Wildwood NJ one year.

Thanks!

The roadster is now in Switzerland but I would love to get back to TROG sometime.
 
OP
B

-Brent-

Well-known member
Joined
Dec 23, 2009
Messages
4,709
Location
Utah
attachment.php


Cleaned up the "gym" a bit this weekend (barely!). I need the room so I can get after it these next 101 days and close out 2020 right.
 

Attachments

  • Gym View.jpg
    Gym View.jpg
    147.2 KB · Views: 601

skully67

Active member
Joined
Nov 8, 2009
Messages
33
Location
PNW
I haven't been on this site in a couple years. Can't sleep and got on here and read this whole thread in one sitting. Good job on the garage overhaul. The pallet wood looks great.
 
OP
B

-Brent-

Well-known member
Joined
Dec 23, 2009
Messages
4,709
Location
Utah
I haven't been on this site in a couple years. Can't sleep and got on here and read this whole thread in one sitting. Good job on the garage overhaul. The pallet wood looks great.

Wow! That's a lot of reading. Thanks for the kind words, I appreciate it. I've been thinking about this thread (and the Garage Journal) as I've been out in the shop a bit more, lately. I'm glad to have documented the project because it makes a lot more sense than the folders of saved pics. It's neat to come back to.

Ah, a Samurai build, now theres something I could stand to see more of...

I really need to get this thing done. I've been terrible about letting it sit for so long.
 
OP
B

-Brent-

Well-known member
Joined
Dec 23, 2009
Messages
4,709
Location
Utah
So you're going to get both of them done by the end of '20? :lol_hitti

Going to try to get the Sammy done. I've worked on it here and there and the list is pretty short. I'm starting with all the stuff that doesn't cost anything.
 
Last edited:
To avoid these ads, REGISTER NOW!
OP
B

-Brent-

Well-known member
Joined
Dec 23, 2009
Messages
4,709
Location
Utah
Hey All, it's been a while!

For the last few months, I've been working on the garage. There were some changes I needed to make, some fixes and updates, and other "stuff" I'd been putting off.

It's been a lot of fun and it's especially rewarding because most of the changes are useful/helpful.

I'll post the updates over a few days when I can sneak them in.

Today's post is one of those things that just wasn't right from day one (5 years ago, haha!).

attachment.php


I made this barn door shutter for the window and the hangers (repurposed from meat-hook trolleys - the posts are somewhere in the 500s) were straight up and down as the door hung when I mocked it up. But when I finished the door and made it square and glued and clamped it... the hangers were off. I was at that point where I needed to be done and stop nitpicking, so I angled them and put it off as one of those someday projects.

attachment.php


Recently, I had a pal fill in the old holes and I put new ones in. It took a little file work to get them adjusted to where they matched up square.

attachment.php
 

Attachments

  • Finished Barn Door Shutters 2017.jpg
    Finished Barn Door Shutters 2017.jpg
    70.9 KB · Views: 638
  • Barn Door Shutters Fixed 2021.jpg
    Barn Door Shutters Fixed 2021.jpg
    128.2 KB · Views: 639
  • Barn Door Shutters Fixed 2021 - 1.jpg
    Barn Door Shutters Fixed 2021 - 1.jpg
    116.8 KB · Views: 641
OP
B

-Brent-

Well-known member
Joined
Dec 23, 2009
Messages
4,709
Location
Utah
Nice ... My brother just did something like that over his garage windows

Nice job. I see why you put the shutters on.

There's 10-12 feet between the house and garage. I never thought about these shutters for blocking that view of the wall (the perspective of the pic, does just look like a brick wall, haha). Really, I put the shutter to keep from seeing in and as a safety measure mostly.

Looks great Brent.

Good to see ya posting again. Hope all is well with you and your family.

My man! Thanks.
 
Last edited:
OP
B

-Brent-

Well-known member
Joined
Dec 23, 2009
Messages
4,709
Location
Utah
One project that I completed a while back was to put up a shelf for project parts. Back in the old days of this garage, I used to store way too much stuff in here and I didn't want to store anything more than I needed to.

attachment.php
 

Attachments

  • Project Parts Shelf.jpg
    Project Parts Shelf.jpg
    140.2 KB · Views: 505
OP
B

-Brent-

Well-known member
Joined
Dec 23, 2009
Messages
4,709
Location
Utah
I got to the point where being cheap was costing me. I'd been out in the garage a lot of 2020 since the gyms were closed. For heat, at least to take the bitter edge off, I was using my old kerosene/diesel torpedo heater and the last time I used it, I had run it for an extended time and it left me with a hangover type of headache and general sick feeling for about 2 days. CO is not something I wanted to mess with anymore. I think it really bit me.

My wife urged me to finally put heat out there and I gave in.


attachment.php


After asking around, doing some reading, and having my spaced assessed, I picked up a Mr. Cool DIY 36k.

The space I had planned (the wiring had already been done when I was remodeling the shop) and the requirements of the head unit meant that I was going to have to redo some tool storage.

My cool, old red & gray mint condition Craftsman stack and the grinders were going to have to go. That lead to the first domino being tipped... haha.

attachment.php


I pulled the stack and the Craftsman base box that I was using as a pedestal and posted them for sale. The installation of the head unit was simple. That hole is ABSOLUTELY the most expensive hole I've ever drilled after renting a hammer drill and having to buy the proper-sized core bit. Home Depot's rental selection was too big or too small.

attachment.php


I pressed through the hole liner and trimmed the excess.

attachment.php


On the outside, I popped the cap on and ran the lines through. I did have a blowout when I drilled the hole for main power, so that needed patching.

attachment.php
 

Attachments

  • No Room For Minisplit, Boxes Have to Go.jpg
    No Room For Minisplit, Boxes Have to Go.jpg
    101.1 KB · Views: 494
  • Mr Cool Minisplit Boxes.jpg
    Mr Cool Minisplit Boxes.jpg
    126.9 KB · Views: 495
  • Minisplit Mount.jpg
    Minisplit Mount.jpg
    147.8 KB · Views: 494
  • Trimmed.jpg
    Trimmed.jpg
    137.1 KB · Views: 494
  • Minisplit Lines Run.jpg
    Minisplit Lines Run.jpg
    144.2 KB · Views: 494
OP
B

-Brent-

Well-known member
Joined
Dec 23, 2009
Messages
4,709
Location
Utah
Then it all installed fairly simply. I did need a hand getting the outside unit lifted. There were some hiccups when the lineset that came with the kit was found to be damaged. After a week or two of BS, it got handled.

attachment.php


attachment.php


The red/gray stack and the other base box sold quickly and they paid for the HF44 and the end cabinet. When I loaded the new box, I ended up nearly emptying one of the other of the stacks I had on the other end of the wall.


attachment.php
 

Attachments

  • HF 44 and End Cabinet in Place f Craftsman Boxes.jpg
    HF 44 and End Cabinet in Place f Craftsman Boxes.jpg
    136.9 KB · Views: 490
  • Minisplit Final Install.jpg
    Minisplit Final Install.jpg
    146.9 KB · Views: 491
  • Minisplit Inside.jpg
    Minisplit Inside.jpg
    136.5 KB · Views: 490
Last edited:

slodat

ALLIANCE MEMBER
Joined
Feb 6, 2010
Messages
3,682
Location
Central-ish, WA
Looks great, Brent. I bought several of the HF boxes last year. Really cleaned up my shop.

What minimum ambient temperature does the mini split work down to?
 
OP
B

-Brent-

Well-known member
Joined
Dec 23, 2009
Messages
4,709
Location
Utah
At that point, the shop was getting a whole new vibe. I listed all the other boxes for sale and in a matter of a few days, they were all sold.

It took me a little while to get used to seeing the wall of boxes to actually seeing the wall.

Before:

attachment.php


After:

attachment.php


Before:

attachment.php


After:

attachment.php


I love the heat. Love it. It's quiet and the bill has only raised about $22 in the cold months. I haven't had it all that long, so I don't know about what the cooling bill will be like. Really though, the cooling is an added benefit. More than anything, heat was what I wanted.

The boxes and organization are an absolute upgrade, for sure. I do plan on making some stainless tops. And, if/when we move, I'd likely connect the boxes for 10' of worktop space.
 

Attachments

  • Old Craftsman Wall.jpg
    Old Craftsman Wall.jpg
    101.2 KB · Views: 485
  • HF 44 in place of Cman Wall.jpg
    HF 44 in place of Cman Wall.jpg
    139.2 KB · Views: 488
  • shop done.jpg
    shop done.jpg
    111.5 KB · Views: 484
  • Clean Shop Straight On.jpg
    Clean Shop Straight On.jpg
    153.3 KB · Views: 488
OP
B

-Brent-

Well-known member
Joined
Dec 23, 2009
Messages
4,709
Location
Utah
Looks great, Brent. I bought several of the HF boxes last year. Really cleaned up my shop.

What minimum ambient temperature does the mini split work down to?

If I remember correctly, this new generation can run down to 5 or 15*F. We rarely get down there though. It runs a lot because the building bleeds heat. But this thing running a lot is a much better than the kerosene heater 10000%.

I've learned a bit about them since I had a few issues. Mr. Cool has a great tech line. They helped get the pro straightened out.

Also, how the hell are you, man? Good to see your name!
 
OP
B

-Brent-

Well-known member
Joined
Dec 23, 2009
Messages
4,709
Location
Utah
Oh, and I want to add because I was so dang impressed with these Craftsman boxes... they paid for every HF box and allowed me to put money in the bank. How cool is that?
 
OP
B

-Brent-

Well-known member
Joined
Dec 23, 2009
Messages
4,709
Location
Utah
Over the last year, I have taken on purging any and all stuff that I don't need, don't like or that clutters. From clothes to tools, cars, projects, junk, random stuff that's collected, etc. Every day I get rid of or sell at least one thing, most days it's multiple. One month I got rid of the number of items that matched the day of the month; so day 1 was one item and day 31 was thirty-one items.

I've learned a lot about myself. When I felt good about what was left in the house, I turned my sights on the garage and storage. There some stuff that has taught me this methodology, "If I haven't used it in 10+ years, I don't need two of them." So, something like 3/8" and 1/2" drive speed wrenches, they go. I went through my sockets and I had an absurd amount of duplicates. I got rid of them and guess what, I still have too many sockets! Haha.

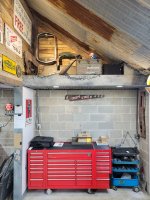
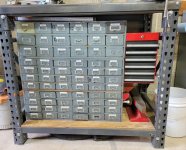
One day I was up in the attic of the garage and I passed by this neat little Craftsman side drawer. I had gotten it in an estate sale with a load of tools and boxes and such and kept it on my old bench. When I redid the place, I put it up in the attic to use "someday."

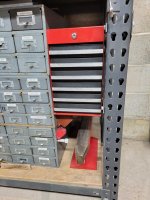
The day I hooked my eyes on it up in the attic, was that someday. Either it's time was up or I had to use it. I figured if I used it, I could get rid of the old HF magnet tray under the workbench that I had pencils and markers on. It looks better, it's better organization, it's actually being used, and dang-it - it fits as it belongs there!

attachment.php


I had some scrap steel that I popped a couple of holes in. As well, I already had some hardware and even the paint to finish the job on the brackets. It's like I'm a grown-up! :lol_hitti

attachment.php


attachment.php


That's about it, for now.

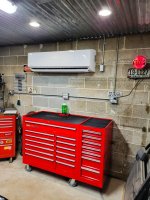
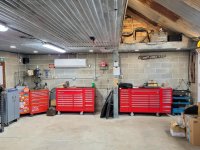
The plan is to keep the shop clean and organized while I knock some bigger projects out. I admire those of you who clean up after every mess.
 

Attachments

  • Craftsman Side Drawer Installed Under WorkBench (2).jpg
    Craftsman Side Drawer Installed Under WorkBench (2).jpg
    153 KB · Views: 467
  • Craftsman Side Drawer Installed Under Workbench.jpg
    Craftsman Side Drawer Installed Under Workbench.jpg
    105.5 KB · Views: 460
  • Craftsman Side Drawer Under Workbench.jpg
    Craftsman Side Drawer Under Workbench.jpg
    108.9 KB · Views: 464

zmotorsports

ALLIANCE MEMBER
Joined
Oct 20, 2009
Messages
21,405
Location
Northern Utah
Lookin' good Brent.

I would usually conduct an annual 5S audit at my last shop to purge things or at least relocate. I've only done a couple in the new place as I am still finding the "optimum" locations for things. I think I about have it nailed for work flow but will continue to tweak things and get back to annual 5S events.

It's a good feeling after a good cleanup though, isn't it?
 
OP
B

-Brent-

Well-known member
Joined
Dec 23, 2009
Messages
4,709
Location
Utah
It's a good feeling after a good cleanup though, isn't it?

Feels great!

The more I pare down, the easier it is to clean.

The attic is next on the list. It's not finished. There are still sheets of ply and insulation to put up... and there's stuff in the way and it's a small space. I put all my shipping boxes up there so it's one of those logistical issues, sell more and then finish or make a mess elsewhere and finish the attic so I can be completely organized on site???
 
OP
B

-Brent-

Well-known member
Joined
Dec 23, 2009
Messages
4,709
Location
Utah
Looks like you've been super busy.

I keep busy... but all this work had been spread out over a month or so. I try to spend at least an hour a day getting some sort of work done out there. Now I try to put all my focus on getting that Samurai done.

Of course, there's always something that can sidetrack me. Like stuff like this:

attachment.php


Back in February this old hand-lettered/painted wooden sign out of a local Chevy/Olds dealer popped up on a local classified site for $25. Somehow I was the first guy to contact the seller.

attachment.php


attachment.php


It had been hanging in the grandad's garage since the late 60s early 70s and it looked like a $25 piece of wood, but even as I was carrying it out to the truck in the rain/snow, I could see the colors popping through as the wet snowflakes landed on the dusty/grimy surface.

After I wiped it down I was even more psyched. It was in much better condition than I had expected. It fits right in, too, as my hot rod has both Chevy and Olds/Pontiac parts on it. And, of course, my taste in signs is a bit on the junky/odd/weathered side.
 

Attachments

  • Riverton Chevy Olds Sign.jpg
    Riverton Chevy Olds Sign.jpg
    118.7 KB · Views: 384
  • Riverton Chevy Olds.jpg
    Riverton Chevy Olds.jpg
    98.6 KB · Views: 388
  • Riverton Chevy Olds Sign Hung.jpg
    Riverton Chevy Olds Sign Hung.jpg
    148 KB · Views: 390
To avoid these ads, REGISTER NOW!
Top Bottom