To avoid these ads, REGISTER NOW!

Between 485 & 705 SQ/FT Mid-Century Moto Mecca Makeover

Workspaces between 485 and 705 squarefeet.
To avoid these ads, REGISTER NOW!
OP
S

sakurama

Well-known member
Joined
Oct 10, 2010
Messages
1,458
Location
Portland - the cool one.
Really? Knitting? I am not so sure about that. Nothing against sakurama but knitting would be were I draw the line.

I'm just going to leave this here...

DIY CNC Knitting machine

We have jumped many sharks here - Evel would be proud - but the only weaving I want to do is with the Tig welder. I had a brief period in college where I wanted to make my own clothing and I was going to have a tailor make me farmers overalls in a Harris Tweed herringbone fabric but I never followed through.

I think I dodged a bullet there on a few levels.

Last week I contemplated buying a newer sewing machine to make curtains for the trailer but then I came to my senses and found the right size curtains on Amazon.

So no knitting unless I'm spinning a yarn. (sorry, I'm a dad so I get a free pass on that sort of thing)

Gregor
 

lilscorpion

Well-known member
Joined
Mar 15, 2010
Messages
3,600
Location
Colorado
I'm just going to leave this here...


DIY CNC Knitting machine


So I know many of you are haters on knitting. Gotta say - CNC anything...knitting, quilting, or toilet bowel cleaning is bad ***. No matter which, watching is satisfying so it’s cool in my book.
 

OopsClunkThud

Active member
Joined
Apr 20, 2014
Messages
39
Location
San Francisco
knitted kevlar is actually a thing, and how cool would a carbon/kevlar houndstooth weave be?

I'll not push it any further as I want to see more bike projects.
 

iamthejoker

Member
Joined
Sep 6, 2020
Messages
9
Location
In the near future - Melbourne
Hey Gregor

I'm sorry to say that I'm not handing in my GJ V-card here, but not far off.

I read this thread back when it was first posted on buildthreads.com and was *only* 60 pages or so.
I found my way back again as I'm in a position to buy my first property and wanted some garage inspiration.
Anyway, I just finished catching myself up on the 150 odd pages since then and I have to say it's a great story. It makes me want to learn metalworking, wood working, build a bike, and get an old Land Cruiser or something to go exploring in.

I also enjoyed the youtube spin-off.

Spotify did serve me up a well timed treat, Handy by Weird Al came on just as I was finishing up, and I couldn't think of a song that sums up this thread any better.
 

bunks-tj

Well-known member
Joined
Jan 16, 2013
Messages
138
Location
Manassas Va
Last week I contemplated buying a newer sewing machine to make curtains for the trailer but then I came to my senses and found the right size curtains on Amazon.


Gregor

please, on this thread you'd have to restore an old singer, then use it to make curtains.
 

Choirboy

Well-known member
Joined
Apr 18, 2013
Messages
178
Location
SE Iowa
please, on this thread you'd have to restore an old singer, then use it to make curtains.

For Singer I'd recommend a 15-91, don't have one but I'm told they work well as a makeshift upholstery machine as well, and are common. I'm not finished with my 201 restoration yet (too much on my plate) but I expect it to be a fantastic machine when done. Though, if you want something different, my old White Family Rotary is a freaking beast, I would imagine it would do vinyl upholstery as well as fine curtains (mine is a treadle in a quartersawn oak cabinet and I've done everything from a light cotton dress for my wife to a stupidly thick multi-layer wool cape for her). No walking foot available for the White, though, which is why I'd go with the Singer.

But, back to regularly scheduled programing... done any work cleaning up/installing the drill press? I know you said you got the BMW back together but did I miss the final photos of the swingarm polishing job? Or did you leave it semi-polished?
 
Last edited:
OP
S

sakurama

Well-known member
Joined
Oct 10, 2010
Messages
1,458
Location
Portland - the cool one.
So one of the things that I distinctly remember about the Gravely was it's propensity to hit rocks and sticks and launch them at lethal speeds. I can still see my dad waving me away when I wandered into the danger zone.

i-ckzdtgx-X2.jpg


The front guard on the rotary brush cutter is pretty bent up and I was going to take it off and try to bend it back to straight but when I ordered some parts from one of the Gravely graveyards (ironic) I discovered that they made a chain guard that would help to protect against launching things. Seeing as the area I wanted to cut was both next to the main road and also of unknown make up I figured a guard was a good idea.

i-cWCh6pF-X2.jpg


It showed up and was in good shape but pretty rusted. I didn't want to try to wire brush it and it was way too large to consider doing the phosphoric acid dip so I figured the time had come for me to try a new method. One you most likely know but might not have tried.

Electrolytic rust removal.

I bought a giant tub from a box store and watched a few videos. Basically it's a very simple concept but a lot of the videos and articles make it seem complex. It's not.

The gist is this: Part goes in a tub of water, water gets an electrolyte of some kind - usually Sodium Carbonate or washing soda that you can get at any hardware store - and then you put a piece of metal in the tub to attract the current (positive), your anode, and the part gets the negative lead. Attach an old (dumb) battery charger or DC power supply to leads or wires and then leave it.

Since I was skeptical I didn't want to buy anything.

i-cVpJTBC-X2.jpg


I tried a battery charger but it turned off because it was a "smart" charger. So I dug in my old wires drawer and found a hard drive power supply which was 12v and 6 amps. Sure.

i-bQ4FQJ4-X2.jpg


I cut a welding wire in half and attached it to a long piece of scrap steel and to the guard.

i-Bfp7M5X-X2.jpg


I knew the positive was the middle of the jack so I just stuck it on the welding rod and used a alligator clip to jump the negative to the wire that went down to the the rusty guard.

I tossed in about a cup of washing soda and plugged it in.

i-nvcT42g-X2.jpg


Within a minute it was bubbling away and after an hour rust covered the sacrificial metal anode. Huh, seems to work.

i-4bXLCXh-X2.jpg


By the end of the day it was pretty gross and very bubbly.

i-zWHnD8x-X2.jpg


By the next day we'd made a lovely rust soup...

i-J2cmTq4-X2.jpg


I removed it and pressure washed the left side to see what happened. I have to say I'm very impressed with this method - it's slow but very effective. The pressure washer took most of the old paint off and the rust that remained just washed away.

i-3StSbRJ-X2.jpg


I put it in a second time because there was still rust on the chains which were the worst offenders and the thing I didn't want to have to physically try to de-rust or wire brush.

i-4gpNcdv-X2.jpg


With the bulk of the rust gone I decided to avoid letting this get banged and bent like the original guard. Not sure why they only welded a few spots on this but I clamped the gap together, tacked it up and then welded all the seams together.

It just seemed like what you should do.

i-KgTmvjF-X2.jpg


So overall I'm pretty impressed with the method. I'm glad I tried it in a simple no fuss way. Now that I know it works so well I'll maybe find a better power source so that I can change the amperage. I've heard that people have done car frames in swimming pools this way and it does zero damage to the base steel even if you leave it go so it seems like a no brainer to continue with. The only disadvantage is that it's relatively slow. Which isn't much of a disadvantage really.

I'll get this primed and painted and then give it a whirl this weekend.

Gregor
 

Brian R

Well-known member
Joined
Dec 1, 2009
Messages
591
Location
Chestertown, MD
I've heard of this method but like you said never tried it.

I've used Evapo-Rust with mixed results.

I'm definitely trying this method next time.

And of course this post reminds me that one of the first times I mowed the yard as a kid (begging at first and then realizing it's more of a chore and takes more time than you realize once your wish is granted) I ran over a golf ball. Mower split it in have and it ended up stuck in neighbors wooden fence. That learned me to be much more careful when I mow.
 
OP
S

sakurama

Well-known member
Joined
Oct 10, 2010
Messages
1,458
Location
Portland - the cool one.
I've heard of this method but like you said never tried it.

I've used Evapo-Rust with mixed results.

I'm definitely trying this method next time.

And of course this post reminds me that one of the first times I mowed the yard as a kid (begging at first and then realizing it's more of a chore and takes more time than you realize once your wish is granted) I ran over a golf ball. Mower split it in have and it ended up stuck in neighbors wooden fence. That learned me to be much more careful when I mow.

Yeah, I have visions of this thing shattering windshield or something and causing a huge accident. Especially with the 3/8" blade with it's unstoppable mass.

And as for this method - so easy and simple. I can see it being a pain with a lot of small parts but for large things I can't imagine how else you'd do it. For sure it's worth trying.

Gregor
 

DPG

Well-known member
Joined
Feb 9, 2014
Messages
473
Location
Western Colorado
Your comments of the Gravely throwing stuff everywhere reminded me of this Craigslist ad from a few years ago. I think someone on GJ posted it before but it is a good read. I hope it is not a repost as I have only read a few pages back.


Originally Posted: 2015-11-10 14:17
print
Gravely Dog Eater Snowblower Attachment
Used Gravely dog eater snowblower attachment for sale. This is just the attachment, you'll need your own Gravely.

This is a two-stage blower. That means that there are augers that grab snow, ice, pets, twigs and garden hoses into the maw of the machine. The augers spin just fast enough for you to see what is happening, and too fast to do much about it. Then there is a high-speed impeller inside. The impeller chops, slices, dices, purifies, blends, purees and blows it out the top at what seems supersonic velocity. If you get in the blast, and assuming you can keep your balance you will look like the abominable snowman, covered head to toe in a layer of quickly-freezing snow crystals.

In working condition. Needs paint to be perfect. Easy to maintain. (Yes, an item that gets maintained. Who'da thunk?) There is a grease fitting at the collar and the gearbox is kept filled with 90 weight gear oil. (It does not leak.)

90 weight. Now there is a manly lubricant viscosity. Not like some 0 weight oil-taking Prius, driven to Whole Foods. (Ever driven a Prius in the snow? You'll need this dogeater to carve you a path to safety.)

Very early model with the curved brackets for the swivel wheels. Extremely desirable, extremely dangerous. Use at your own risk. This snowblower is so tough, it does not even need a 'Semper Fi' decal. Rambo might be able to take on the Russian army single-handed, but we have never seen him attempt to wrangle a dogeater.

This is the snow blower that people who blow snow dream about. It will send a column of snow up into the air, across the street and into the middle of your neighbor's front yard. The plume of snow is manly, clear-the-Rockies-so-the-train-can-get-through strong, not puny like your neighbor's snow diddler that looks like a baby spitting up.

Have a problem with a not-so-stray cat coming over to your property? This unit will send that feline right back into its own yard.

This snow blower has little in the way of safety features compared to the units produced today. The auger is exposed. That's why it is called a 'dogeater'. Deal with it - this is the way things were made in the 60s - I'll bet Chuck Norris worked on the assembly line.

Do not use a dog eater unless you are confident in your abilities. But if you do, children will cheer, women will weep and men will envy you.

Would you like to see a dogeater in action? Of course you would. OSHA or Consumer Reports, not so much. Here's a YouTube video I found. This is not me, it's someone else's dogeater. Someone else who belongs to the Super Secret Elite Manly Gravely Brotherhood Guild:

The only thing this snow blower does not have is a laser beam. I guess you could just strap a laser beam to your head. But why bother? The dogeater will chew its way through any obstacle all by itself.

Have you ever spent hours shoveling your driveway by hand, only to have the Town snowplow a five-foot high wall of frozen slush right across, sealing you in? If this thing can eat dogs, think of what it does to that solid ice wall. It spits on it. It's got your ice wall, right here. Not only will it chew through it, but it will send the pieces right across the street to entomb your neighbor's car. Yep, that neighbor. The one who borrowed your chain saw and returned it with a bent bar and burnt chain. You know who I'm talking about.

'Hey', you might wonder, 'if this thing is so good, why are you selling it'? Well, it's because I found an even bigger snowblower attachment for my Gravely. It's called a 'snow cannon'.

Don't even get me started on that one.
 

zenocchio

Member
Joined
May 28, 2014
Messages
18
Your comments of the Gravely throwing stuff everywhere reminded me of this Craigslist ad from a few years ago. I think someone on GJ posted it before but it is a good read. I hope it is not a repost as I have only read a few pages back.


Originally Posted: 2015-11-10 14:17
print
Gravely Dog Eater Snowblower Attachment
Used Gravely dog eater snowblower attachment for sale. This is just the attachment, you'll need your own Gravely.

This is a two-stage blower. That means that there are augers that grab snow, ice, pets, twigs and garden hoses into the maw of the machine. The augers spin just fast enough for you to see what is happening, and too fast to do much about it. Then there is a high-speed impeller inside. The impeller chops, slices, dices, purifies, blends, purees and blows it out the top at what seems supersonic velocity. If you get in the blast, and assuming you can keep your balance you will look like the abominable snowman, covered head to toe in a layer of quickly-freezing snow crystals.

In working condition. Needs paint to be perfect. Easy to maintain. (Yes, an item that gets maintained. Who'da thunk?) There is a grease fitting at the collar and the gearbox is kept filled with 90 weight gear oil. (It does not leak.)

90 weight. Now there is a manly lubricant viscosity. Not like some 0 weight oil-taking Prius, driven to Whole Foods. (Ever driven a Prius in the snow? You'll need this dogeater to carve you a path to safety.)

Very early model with the curved brackets for the swivel wheels. Extremely desirable, extremely dangerous. Use at your own risk. This snowblower is so tough, it does not even need a 'Semper Fi' decal. Rambo might be able to take on the Russian army single-handed, but we have never seen him attempt to wrangle a dogeater.

This is the snow blower that people who blow snow dream about. It will send a column of snow up into the air, across the street and into the middle of your neighbor's front yard. The plume of snow is manly, clear-the-Rockies-so-the-train-can-get-through strong, not puny like your neighbor's snow diddler that looks like a baby spitting up.

Have a problem with a not-so-stray cat coming over to your property? This unit will send that feline right back into its own yard.

This snow blower has little in the way of safety features compared to the units produced today. The auger is exposed. That's why it is called a 'dogeater'. Deal with it - this is the way things were made in the 60s - I'll bet Chuck Norris worked on the assembly line.

Do not use a dog eater unless you are confident in your abilities. But if you do, children will cheer, women will weep and men will envy you.

Would you like to see a dogeater in action? Of course you would. OSHA or Consumer Reports, not so much. Here's a YouTube video I found. This is not me, it's someone else's dogeater. Someone else who belongs to the Super Secret Elite Manly Gravely Brotherhood Guild:

The only thing this snow blower does not have is a laser beam. I guess you could just strap a laser beam to your head. But why bother? The dogeater will chew its way through any obstacle all by itself.

Have you ever spent hours shoveling your driveway by hand, only to have the Town snowplow a five-foot high wall of frozen slush right across, sealing you in? If this thing can eat dogs, think of what it does to that solid ice wall. It spits on it. It's got your ice wall, right here. Not only will it chew through it, but it will send the pieces right across the street to entomb your neighbor's car. Yep, that neighbor. The one who borrowed your chain saw and returned it with a bent bar and burnt chain. You know who I'm talking about.

'Hey', you might wonder, 'if this thing is so good, why are you selling it'? Well, it's because I found an even bigger snowblower attachment for my Gravely. It's called a 'snow cannon'.

Don't even get me started on that one.


Loved it!
 

Sham

Well-known member
Joined
Jan 29, 2013
Messages
76
Location
Antibes, France
So I know many of you are haters on knitting. Gotta say - CNC anything...knitting, quilting, or toilet bowel cleaning is bad ***. No matter which, watching is satisfying so it’s cool in my book.

Wait, what?!
.
.
.
.
Oooooooh, gotcha! You meant "toilet bowl"... At first read I thought you meant "CNC bowels cleaning". Which is, indeed, the perfect recipe for a bad ***. :evil:

I'll see myself out, thank you.
 

BORING HOP YARD

Well-known member
Joined
Jan 13, 2007
Messages
1,104
Location
Boring Oregon
I used Electrolytic rust removal when I restored a 1947 Ferguson plow, I used a plastic 55 gallon drum. I just wanted to add that I used carbon gouging rods for my sacrificial anodes.
 
To avoid these ads, REGISTER NOW!

smschriefer

Well-known member
Joined
May 28, 2009
Messages
842
Location
Yorktown, VA
Of course, you do realize that now you have the basic skills to electroplate? Go buy some zinc and you can do a nice zinc plating before you paint it. (Laughs an evil laugh of leading Sakurama down another rabbit hole...)
 

Prometheus

Well-known member
Joined
May 17, 2006
Messages
104
Electrolysis is great. Trick for small parts - put them in a metal basket and connect your wire to the basket. As long as the part isn't crazy rusty it'll still work.

You can get pretty creative with it - table saw tops in kiddie pools is a good one. I've seen people use the pallet sized liquid containers for big stuff (I think Abom did that on youtube IIRC). I use a cheap HF battery charger. Works great, is cheap enough that if it lets the smoke out I don't care, and has multiple amperages you can use. I've used mine for going on a decade and it's still kicking.
 

dchasins

Well-known member
Joined
Apr 2, 2014
Messages
58
Location
Western NC
Nice work. Electrolysis is the only way to go--been using it for years with great success.

You can have a much cleaner, and more effective electrolysis tank using something with higher carbon content, such as graphite plates for your anodes. I found perfect material for minimal cost with a little searching on eBay. Position more than one anode around your tank--the work between the anode(s) and the part(s) is accomplished by line-of-sight, or more accurately line of current, so having multiple angles to the part is much more efficient, especially for something big like your chain guard. For a down home tutorial on this, to see what really works, check out Shop Dog Sam on YouTube.
 
OP
S

sakurama

Well-known member
Joined
Oct 10, 2010
Messages
1,458
Location
Portland - the cool one.
For Singer I'd recommend a 15-91...

But, back to regularly scheduled programing... done any work cleaning up/installing the drill press? I know you said you got the BMW back together but did I miss the final photos of the swingarm polishing job? Or did you leave it semi-polished?

There's one local but it's in a giant cabinet - I don't have space for that sort of thing. I need a machine that can be put on a shelf.

As for the drill press - I ordered a couple of parts on ebay and they came in this week. I tried a couple of things to clean it but haven't found a cabinet yet so I've held off diving in. But I need time in the shop this weekend so cleaning it will be on my agenda.

And the kids have asked to go ride motorcycles. So that needs to happen.

Gregor
 

jake28

Well-known member
Joined
Aug 28, 2018
Messages
488
Location
SF, CA
Gregor, this may be heresy given the rest of your tools, but I love and swear by this singer model, readily available on Amazon.

SINGER 4423 Sewing Machine, white https://www.amazon.com/dp/B003VWXZQ0/?tag=atomicindus08-20

Three friends and I designed our own backpack and soft goods-making class in grad school, and we each had one of these. Even with high end Jukis available, these little singers were less fickle, quieter, and easier to use for novice sewers. Mine chewed through vinyl, leather, canvas, and webbing without issue. Highly recommended.
 

jimkinney

Well-known member
Joined
Jan 3, 2009
Messages
302
Location
Florida's Space Coast
So one of the things that I distinctly remember about the Gravely was it's propensity to hit rocks and sticks and launch them at lethal speeds. I can still see my dad waving me away when I wandered into the danger zone.

Nice job.

You could also enclose the deck and turn it into a mulching mower. But then finding a mulching blade may be a problem.
 

tuned

New member
Joined
Apr 15, 2011
Messages
2
So I've had a CraigsList search for a Clausing Drill Press going on 3 years now. Running searches like this is something I learned from LiL Scorpion and it's a pretty great trick. I set a low price and then wait.

Could you or lilscorpion provide a little guidance on your advanced Craigs-searching techniques or "app"s. I've always been aggravated by the standard search options available and/or getting 1375 results for something there could only be 12 of in existence.

Been following your adventures since Ugly Goose into Eagle of Zeus (is it still anywhere in your que?) and have enjoyed every rabbit hole since.

Alan
 
OP
S

sakurama

Well-known member
Joined
Oct 10, 2010
Messages
1,458
Location
Portland - the cool one.
My current job has me working from 3am to 9pm and while those are pretty brutal hours I am gladly accepting the few weeks of pain in exchange for the payout. That said the weekend is a chance to shut off and spend the day in the shop.

i-ZhQHXM4-X2.jpg


I ordered a few parts for the Clausing off ebay. The feed handle, while not functionally in bad shape, had the arms welded by a person who clearly had never heard of Loctite. I get that having a handle unscrew on you is frustrating but the stick welder seems an extreme solution.

i-KCjqhkX-X2.jpg


The other part that was missing was the speed dial's plate and the ball handles.

i-RhdgvcL-X2.jpg


Neither essential but when I found a Clausing front plate on ebay I made a low ball offer and lucked out. I'll sell it again after harvesting my parts and probably break even.

i-5XxvkCw-X2.jpg


i-3dCPdFc-X2.jpg


i-mZ6dG8F-X2.jpg


I've found that cleaning an old machine requires few things: WD40, a degreaser of some kind, Scotchbrite, a sponge, a rag and a toothbrush. That's basically all I use.

i-8FjKw24-X2.jpg


Degreaser gets rid of the dirt, WD40 gets rid of the grease and rust. Elbow grease takes care of the rest. I was wrong on the table, there are a few small marks that must have been covered in grime - no big deal though.

i-wgZxCfh-X2.jpg


i-Vps94jR-X2.jpg


Unless a machine has been horribly repainted or the original paint is gone I prefer to keep the original patina and paint and will just leave the parts clean and perhaps with a bit of a wipe down with LPS3 to protect them. I've found the best way to prevent a machine from rusting is to use it.

i-FKx44BC-X2.jpg


i-XMrggRt-X2.jpg


I spent my Saturday between the Clausing and the Gravely but only completed one of them.

i-Dxx5mSX-X2.jpg


I ordered some ball ends for the feed handle from McMaster but due to the fires all shipments to the PNW and along the west coast have been delayed. Nonetheless they're coming and the rest of the machine is cleaned up. There's a few more small things to do but it's nice to see the change.

i-VvBbnQS-X2.jpg


So above is the "before" and below is your "after" and I'm pretty satisfied with the clean up. I'd like to order a new belt and give the insides a cleaning but for the moment I'll take this small victory.

i-bZV2rGL-X2.jpg


i-D5LLnGd-X2.jpg


I have to fix the lift handle and then find (not build - thank you very much lil'scorpion) a base cabinet and then do a bit more shuffling along the window wall to find the place for it. It feels like it should be next to or near the Bridgeport since they're both machines that would use drill bits and make holes so keeping the tooling together or close seems efficient.

That can wait for the cabinet. Given the current state of things it was therapeutic to just spend an afternoon keeping my hands busy and my mind empty.

Gregor
 
Last edited:

YoungMedic

Well-known member
Joined
Jul 10, 2012
Messages
170
Location
Florida
I've found that cleaning an old machine requires few things: WD40, a degreaser of some kind, Scotchbrite, a sponge, a rag and a toothbrush. That's basically all I use.

i-8FjKw24-X2.jpg


Degreaser gets rid of the dirt, WD40 gets rid of the grease and rust. Elbow grease takes care of the rest. I was wrong on the table, there are a few small marks that must have been covered in grime - no big deal though.

Gregor
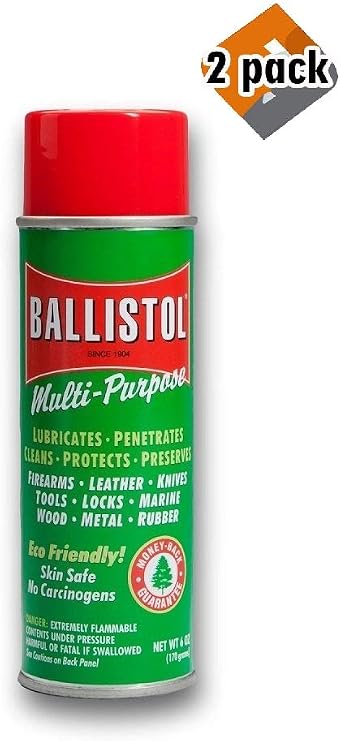
Sounds just like working on old typewriters. I've seen this stuff used too for guns, vintage guitar amps, and typewriters.. seems like it would be good for anything mechanical

511aocby6gL._AC_SY741_.jpg
 

bdbecker

ALLIANCE MEMBER
Joined
Nov 18, 2015
Messages
5,580
Location
Iowa
...So overall I'm pretty impressed with the method. I'm glad I tried it in a simple no fuss way. Now that I know it works so well I'll maybe find a better power source so that I can change the amperage...

I came across this video from The Post Apocalyptic Inventor when I was doing research and setting up my own rig. He did some interesting testing using a weld power source. If a guy could find the right deal on a secondhand unit, having that kind of amperage and duty cycle could really speed things up.


You'd definitely want to only run it outside though. When he really cranks it up, I can't imagine how much hydrogen is bubbling out the tank.
 
OP
S

sakurama

Well-known member
Joined
Oct 10, 2010
Messages
1,458
Location
Portland - the cool one.
I came across this video from The Post Apocalyptic Inventor when I was doing research and setting up my own rig...


You'd definitely want to only run it outside though. When he really cranks it up, I can't imagine how much hydrogen is bubbling out the tank.

That was one of the best videos that I watched on the topic. It's hard to not trust a german person who has a wall of electronic test equipment behind his set up. Maybe it's my BMW bias.

So during the week I don't have time to do any shop work at all but I did get a bit more done on the Gravely last weekend.

i-qntLDtM-X2.jpg


Since I wanted to replace the front guard I needed to remove the one that was on there. Unsurprisingly the bolts were either rusted or mangled and several needed to be cut off.

i-FcqzrH8-X2.jpg


The Gravely doesn't have a lot of horsepower - only 5.5 - but it's power is derived from the mass of the whole setup. Not just the crank and 500cc piston but the transmission is essentially the drive chain and the 3/8" blade is over 10lbs which is a lot of mass when spinning at about 1000rpm's and it can do some serious damage to itself.

i-75N63dD-X2.jpg


I feel bad that here is a gap in photos. The decks serious dings and distortions in what was about 3/16" steel were not coming out with a hammer. I knew I needed to heat them to get them to bend and the only option was my oxy-acetylene set up.

i-sSfhtpQ-X2.jpg


I've owned this set up for maybe 3-4 years and I picked it up because I know that heat is just another tool in the shop and just like the Bridgeport or the lathe or the welding table - bigger is better when it comes to metal. I really don't have any experience with torch heating aside from a basic course in a community college welding class so while I've owned it I've not used it. My only other experience with oxy-acetylene was when we had a shop in NJ and there was a massive explosion a few blocks away. At the time it was thought to be a terrorist bomb but it turned out a plumber had tanks in his car's trunk and they leaked. He got in the car and lit a cigarette and the car was found a block away and left a crater about 10' deep.

Hearing that explosion has stayed with me and made me extremely nervous about using the setup. I added new flashback valves to the hoses and then checked the hoses and fittings for any leaks - for probably the fourth or fifth time.

I watched a few more videos (again) on the safety procedures of using the set up and nervously lit up the torch and heated the deck and beat it all back into shape.

And didn't blow myself up!

I would like to learn to tig braze bronze fillets and become more comfortable with the setup so I can use it without the fear that I have and that will just come with time.

i-pCmvggV-X2.jpg


Once I had beaten the deck mounts back to square I tig welded them full length along the edge and then welded up any seams that I found that weren't welded or where the welds were cracked. It's really satisfying to weld tractor parts - anything beyond a bad mig weld is a giant improvement and you're dealing with thick steel so there's not much delicacy required.

i-pGcHWsC-X2.jpg


Once I'd gotten everything welded and straight I scuffed up the surface and gave it a coat of POR-15. Now that I've used POR-15 a few times I don't treat it like a paint anymore but more like an epoxy glue with a short shelf life once open.

i-vgjcDsB-X2.jpg


The first time I used it was on the van bumpers and I bought a full quart and only used about half. The second half sat for months before I wanted to use it again at which point the lid had fully glued itself to the can and had to be destroyed to get it off. Once open I found the stuff had skinned so thick I just tossed it.

Now my plan is to buy the smallest size I can get and when I've finished using it I take plastic wrap from the kitchen and press it down onto the surface so there's no air at all on the stuff. This is the same trick you use to keep your guacamole from turning brown except that I didn't squeeze any lime onto the top before covering it - you know that trick right? Keep it in your back pocket.

The plastic wrap glues itself to the lip but this method has gotten more than a few months out of a can which works for me.

i-7VWjvsZ-X2.jpg


I know they say to do a minimum of two coats of POR-15 but I've been getting away with one for a while and have yet to see any issues. I kept knocking the chains as the dried to keep them from gluing themselves together.

i-hmQjP8v-X2.jpg


I didn't bother to paint the inside of the deck. It gets so much abuse I doubt it makes any difference and honestly I didn't really want to mess with it. While it was dry to the touch in a few hours I have just left it as I've found that while it seems dry it's just not for at least a few days so I'll wait until the weekend to bolt it all back together.

So in a few days I'll get to do some weed eradication which should be a good antidote to a week behind the screen.

Gregor
 
Last edited:

zmotorsports

ALLIANCE MEMBER
Joined
Oct 20, 2009
Messages
21,440
Location
Northern Utah
Nice job on the deck Gregor.

I do the same thing on the POR-15 with the saran wrap and it works great to prolong the shelf life of the product. I too have only been using one coat with great results so I don't add a second even though the directions suggest it.
 

tomstin

Well-known member
Joined
Apr 11, 2005
Messages
294
Location
Wake Forest, NC
For the POR15, I purchase the 6 pack of the little cans. The saran wrap helps, but shoot a little welding gas in before you close the can. It will displace the O2 and really seems to help the POR15 last from use to use.
 

Modern Jess

Well-known member
Joined
Jan 2, 2011
Messages
1,362
Location
Bay Area, California
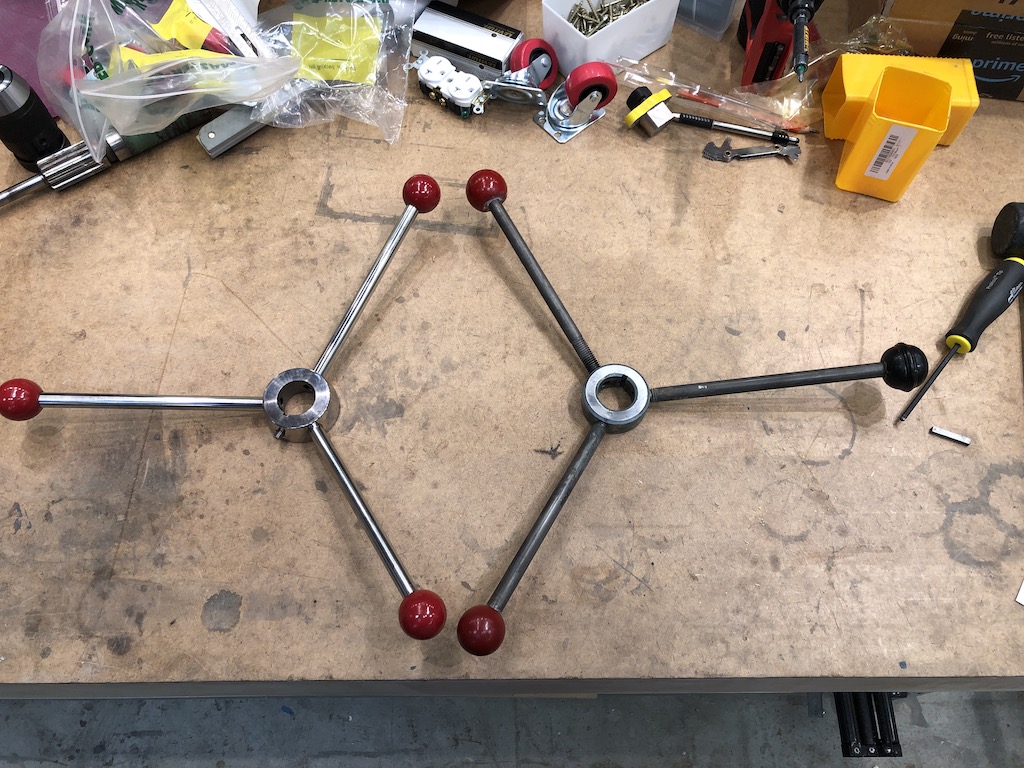
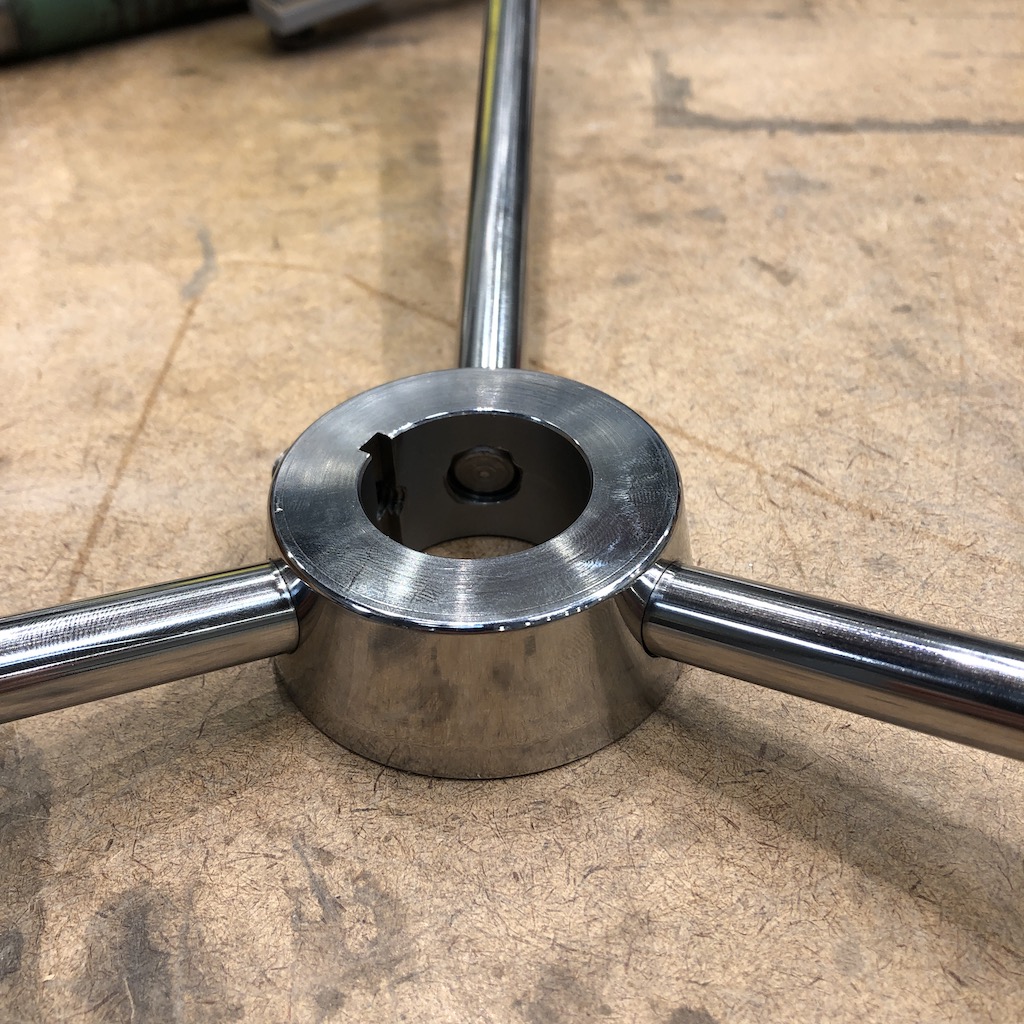
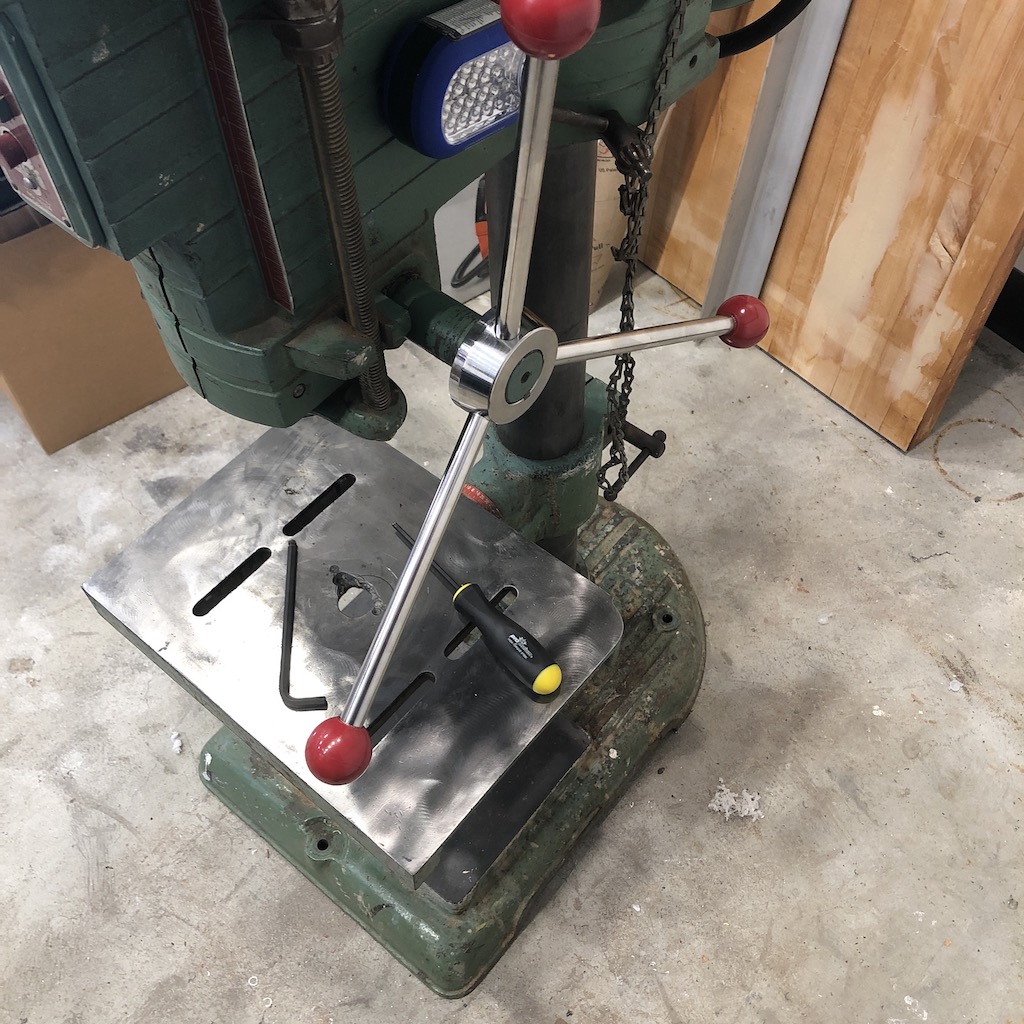
I had a similar issue with the feed-arm on my PowerMatic DP. Each of the balls were different, and one of the arms was clearly replaced with a part from something else. To make matters worse, the threads had a weird taper to them that didn't match any known threading.

So I made a new one. Or, more precisely, I bought some materials and walked them over to my friend the master machinist. He knocked it out in an afternoon. Stainless, natch.

The hardest part was the keyed slot -- he didn't have the right size broach, and had to borrow one from a friend of his.

dp-feed-arm-1.jpeg


dp-feed-arm-2.jpeg


dp-feed-arm-3.jpeg
 
OP
S

sakurama

Well-known member
Joined
Oct 10, 2010
Messages
1,458
Location
Portland - the cool one.
So today was a day to not be in front of the computer - well, you know, aside from right now. I got the Gravely all back together and finally did some brush hogging.

i-QRCJ3C4-X2.jpg


This is the area on the other side of the fence - fully overgrown. Some of the blackberry bushes are about 6' tall or higher. It took a while and I'm exhausted but...

i-RnpHpp5-X2.jpg


...this would have been really hard to do any other way aside from chemicals and I'm not really down with that.

Sadly, I suffered my first breakdown. Or rather the tractor did. I've suffered many. Nothing new there.

i-PtGW9Js-X2.jpg


The shaft that comes out of the engine and engages the magneto somehow backed out and I lost the key in the shaft. Not sure how and I didn't understand the mechanism.

i-vPQhRrB-X2.jpg


It took a while to figure it out and at first I thought it was my kill switch that shorted out since I had no spark.

i-Zmt5NrZ-X2.jpg


i-CPhW8z2-X2.jpg


It's so primitive.

I got it back together and running but the timing is off so I'm going to need to work on that.

Nonetheless I'm exhausted and a lot of brush has been slayed. A good day.

Gregor
 

Brian R

Well-known member
Joined
Dec 1, 2009
Messages
591
Location
Chestertown, MD
Even with the mechanical failure the before and after has to be worth it.
Good job.
I’ve got some land to clear so I’ve been checking craigslist. Never heard of Gravelly and now intrigued.
 
To avoid these ads, REGISTER NOW!
Top Bottom