To avoid these ads, REGISTER NOW!

3rd wire add to cut the original or not

tearapin

Well-known member
Joined
Jun 5, 2016
Messages
223
I have a Suzuki King Quad 750 in the garage. A notorious problem on it is the rectifier ground. Some genius figured out that if you splice into the 4 wire rectifier harness ground wire and run it to the frame it makes the charging system work as it should. At minimum better. More juice going to the battery for charging.

So, this is not a King Quad question but more of a fundamental question in terms of electrical. I know there are a lot of gurus here so....

Method one would be to strip insulation from the middle of the original wire. The wrap a wire around the bare spot and solder it. Finish with some sort of tape wrap.

Method two would be cut the wire, slide some shrink tube on and solder the three together. Then shrink the tube.

The questions comes from many posts on this mod. Almost all say, "Do not cut the wire!" So basically opting for method one as the only method.

I feel method 2 with the shrink tube would be more secure in terms of water resistance. I do not like Scotch locks.

So why the "Do not cut the wire advice"? Any ideas here?

TPin
 
To avoid these ads, REGISTER NOW!

Lassen Forge

Well-known member
Joined
Apr 26, 2014
Messages
15,380
Location
The romantic hills of central Umbria, Italy,
Supposedly a in-line joint is stronger than toing a cut and 3 way, but I've done both and had no problems, as long as (a) you make a solid MECHANICAL joint, and (b) you do a good, ho-soldered joint.

People think doing the 3 way is weaker, and if your mechanical joint is bad, then sure, it's weaker... If you're competent, you'll be fine. The main thing is to get a better GROUND connection, as the single ground supplied by Suzuki is pretty iffy.
 

theoldwizard1

Well-known member
Joined
Feb 22, 2011
Messages
43,243
Location
SE MI
This is how I do it

• Cut the wire
• Take a short piece of the new wire (blue), bared, twist with one side of the old wire, (red) bared, and crimp an inline splice, one size larger, on it

View media item 34812
• Cut off the sort piece of the new wire (blue) at the splice
• Take the new wire (blue), bared, twist it with the other end of the old wire (red), bared and crimp to the open end on the inline splice. Don't forget to install the dual wall heat shrink before crimping

View media item 34813
• Completed

View media item 34814
 
OP
T

tearapin

Well-known member
Joined
Jun 5, 2016
Messages
223
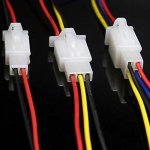
It is a connector much like this where the wire would be added to at the point where the wire goes into the connector.
 

Attachments

  • connec.jpg
    connec.jpg
    16.7 KB · Views: 14

HenryAZ

MEMBER EMERITUS
Joined
Sep 18, 2012
Messages
1,054
Location
South Congress AZ
This is how I do it

You can get uninsulated **** connectors with two different sized ends, for joining different gauge wires, or for doing as in your example. I have some that are marked yellow (12-10) on one end and blue (16-14) on the other. Del City or Waytek.
 
To avoid these ads, REGISTER NOW!

MikeF2316

Well-known member
Joined
Dec 29, 2012
Messages
9,605
Location
Thornhill, ON
What is wrong with just running an additional wire from the ground point of the rectifier wire to the frame? Or is the problem the rectifier wire itself, not the grounding point?

I believe in modifying original wiring as little as possible, so I wouldn't cut the wire.
 
OP
T

tearapin

Well-known member
Joined
Jun 5, 2016
Messages
223
I am wondering if the original wire length may be the concern. As there is little slack the plastic connector may not reach the rectifier if the wire is cut and the third wire is added. Now if I could only find that exact connector. I would redo the whole thing the right way.
 
OP
T

tearapin

Well-known member
Joined
Jun 5, 2016
Messages
223
You can get uninsulated **** connectors with two different sized ends, for joining different gauge wires, or for doing as in your example. I have some that are marked yellow (12-10) on one end and blue (16-14) on the other. Del City or Waytek.

That is an excellent idea there. Thank you for the post I had no idea that step down connectors existed. :beer:
 

theoldwizard1

Well-known member
Joined
Feb 22, 2011
Messages
43,243
Location
SE MI
You can get uninsulated **** connectors with two different sized ends, for joining different gauge wires, or for doing as in your example.

You learn something new every day !

Capture.JPG

Also available with insulation, including heat shrink insulation.
 

theoldwizard1

Well-known member
Joined
Feb 22, 2011
Messages
43,243
Location
SE MI
Yet another way to do it using a "parallel crimp". The example below is a "1 to 3". I think I need to buy some of this style crimps.
 

Attachments

  • Capture.JPG
    Capture.JPG
    33.2 KB · Views: 21
  • Capture2.JPG
    Capture2.JPG
    31.9 KB · Views: 18
  • Capture3.JPG
    Capture3.JPG
    28.8 KB · Views: 20
To avoid these ads, REGISTER NOW!
Top Bottom