To avoid these ads, REGISTER NOW!

Leveling a subfloor

branimal

Well-known member
Joined
May 31, 2016
Messages
1,943
I'm almost at the end of my renovation project. Just floors and kitchen to go more or less.


The subfloor is white pine boards (100 years old). Total building measurement is roughly 19'x57'. Joists are rough cut 3-4" actual by 20'.


I went around with a laser and marked a level line with masking tape. I found the high spot and calculated the lower spots from there.


I took a rough floorplan and highlighted the high spot and all other reference marks in red font along the edges of the building. I also took some measurements in the center. (Kitchen is not installed yet).


I haven't gotten around to checking bowing yet. Will update the thread with that tomorrow.


I plan on using 3/4" hardwood flooring. I know the floor needs to be flat not level, but after all the work I've done on this reno, I'd like to get it sort of close to level if not dead on.


I know I'm going to get **** for not leveling the floors before I started putting up walls etc. I understand NOW why I should have done that before. Lesson learned. (I did level the bathroom floors).


What should my game plan be here?


Thanks
 

Attachments

  • 3rd Floor layout U-shaped Kitchen leveling.jpg
    3rd Floor layout U-shaped Kitchen leveling.jpg
    90.6 KB · Views: 165
Last edited:
To avoid these ads, REGISTER NOW!

Armorpoxy

Well-known member
Joined
Aug 18, 2013
Messages
3,735
Location
NJ
Hi, we own a floor prep company and the way to do this (by the way, excellent diagram) is to 'pin' the floor by hot gluing golf tees upside down and you trim them to the height that you want. In other words if you need 1.5" then you glue a 1.5" tee to the floor. Each area gets a tee that is trimmed for that area. ( We don't use tees, we use commercial pins that we trim lol)

Then you pour a self leveler onto the floor bringing the height right up to the top of the pin, burying the pin in the leveler. Problem solved and floor will be dead level!
 

acer66

Well-known member
Joined
Dec 4, 2010
Messages
4,418
Location
Western North Carolina
Hard to read but looks like you have up to 2&1/2” differences.
If so another option could be to cut out the existing subfloor, sister the joists and reinstall the old subfloor.
 

The Cobbler

Super Moderator
Staff member
Joined
Oct 24, 2013
Messages
25,967
Location
Niagara Region, Ontario, Canada
Hard to read but looks like you have up to 2&1/2” differences.
If so another option could be to cut out the existing subfloor, sister the joists and reinstall the old subfloor.

sometimes that is the easiest solution. I would go as far as replace the subfloor too, if the old id a PITA to glean up.

making it "level" vs "flat" may be tough to, depending on doors etc . sometimes you gotta compromise on old stuff.
 

johnnyradiant

Well-known member
Joined
Mar 27, 2017
Messages
833
Location
Vancouver, BC
Here we would generally rip that kind of subfloor up and sister on leveling 2x4 to the joists if not sister another joist on if the joists were too small or we found a cracked one or three. Not an uncommon occurrence as code 100 years ago isn't what it is today but fortunately a lot of homes of that era typically didn't have large open spans either. Is the subfloor diagonal to the joists? Does it flex and or squeak and groan? Without dealing with the flexing, squeaking and groaning floor I wouldn't want to trust pouring on a leveller and expect it to eliminate the squeaks and groans and not eventually crack which can add to the flexing, groaning problems. We would rip it up and put down 5/8" t&g ply with glue and screws but not before a thorough joist inspection to make sure we don't leave any squeaks and groans from where they maybe nailed somewhere with now loose nails or nail holes.
 
OP
B

branimal

Well-known member
Joined
May 31, 2016
Messages
1,943
I did some rough calculations on what would be required to use a self leveling compound. Not including the bathrooms, stairwell and fireplaces, and splitting the drop-off into quartiles. It would require 143 cu ft of material. That's 319 bags of Henry self leveling compound (each bag covers 0.45 cu ft). At $40 a bag, this is a non starter.

The subfloor (4" wide x 7/8" thick white pine boards) runs perpendicular to the joists. The floor is rock solid. No squeaks. There were some loose boards here and there. I've screwed those into the joists.

I don't think there are any cracked / notched joists. There were a few in the bathroom area which I sistered with 2x8's.

I know ripping the boards up and laying ripped 2x4 to level would be an ideal solution. I think that would be a lot of work. Walking on joists, etc. Maybe I'm wrong. Plus I've got everything framed out, walls painted, etc.


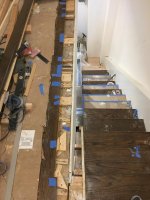
I saw a video where a guy used sleepers (essentially ripped 2x4 to level) on top of his subfloor. Once he got everything level he layed down a sheet of t&g plywood. I could mark 2x4's to level using a laser. And then cut them on the table saw with a taper jig. Screw these giant shims into the joists thru the existing pine boards. And then glue & screw a plywood deck on top. Would this work?


I think that's less work than ripping up the pine boards.... not sure though.

Now that I think about it, this is how they leveled the floors in my NYC condo. It was an old factory building built in ~1910. It was converted to condo's in 1983. But it was done half-***. The contractor that converted the condo layed down a plywood deck on top of the joists and then put sleepers on top of the plywood. Then he put 3/4" red oak on top. He never covered the sleepers with plywood. That floor squeaked like crazy. It must have been because the guy who installed the hardwood floors didn't hit the sleepers on every nail shot. And that squeaky-ness is consistent throughout the building.

I know this is how it was done bc I ripped out a pony wall for a staircase landing and replaced it with cable rail system. In the process I had to rip out some of the old flooring to install a stair nose moulding. And that's where I saw the sleepers. Didn't put 2 and 2 together till just now.

First pic is the sleepers.

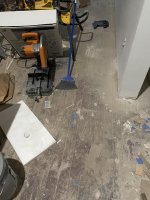
Second pic is a pic of what my existing subfloor looks like. Cleaning up today so I'll have a better picture of the subfloor. It's pretty darn solid from what I can tell.
 

Attachments

  • IMG_1811.jpg
    IMG_1811.jpg
    93.8 KB · Views: 124
  • IMG_9182.jpg
    IMG_9182.jpg
    119.1 KB · Views: 106

duneslider

Well-known member
Joined
Jan 20, 2013
Messages
2,268
Location
Riverton, Utah
The problem with the sleepers is you will still be adding 3/4"plywood to the entire house, can you afford that much increase in the whole house?
 
OP
B

branimal

Well-known member
Joined
May 31, 2016
Messages
1,943
duneslider; said:
The problem with the sleepers is you will still be adding 3/4"plywood to the entire house, can you afford that much increase in the whole house?


Ceilings are 12’ in the front half of the building. And 10’ from where the kitchen starts toward the back 2 bedrooms. So not a significant loss.
 

acer66

Well-known member
Joined
Dec 4, 2010
Messages
4,418
Location
Western North Carolina
sometimes that is the easiest solution. I would go as far as replace the subfloor too, if the old id a PITA to glean up.

making it "level" vs "flat" may be tough to, depending on doors etc . sometimes you gotta compromise on old stuff.

Yeah, was thinking about high lumber prices.
The old wood could make for a lot of shop or art etc. projects.
I have a bunch of real 1x and 2x leftover from renovating a 1901 farmhouse waiting to be turned into all sort of projects.
 
OP
B

branimal

Well-known member
Joined
May 31, 2016
Messages
1,943
acer66; said:
Yeah, was thinking about high lumber prices.

The old wood could make for a lot of shop or art etc. projects.

I have a bunch of real 1x and 2x leftover from renovating a 1901 farmhouse waiting to be turned into all sort of projects.


I was thinking that too when cobbler said replace the subfloor. These boards could be used for a lot of things. But I’m packed to the gills with stuff I’m planning on using someday.
 
OP
B

branimal

Well-known member
Joined
May 31, 2016
Messages
1,943
egdede; said:
A spray-foam adhesive would cut down the squeaks were one to use 'sleepers'.

https://energyconscious.com/product...MIps6I5fH67AIVyB-tBh280wxDEAQYAiABEgIxZPD_BwE


Interesting. I’d love to use this buy I can only find cases of 12 online. I’ll call my local building supplier.

Do you use them both under and over the sleepers or just between the sleeper and the new plywood deck.

A friend lent me his spray foam gun for these sized cans. It’s a total game changer. Total control of the amount of foam released and no mess or need to use the whole can in a single day.
 
OP
B

branimal

Well-known member
Joined
May 31, 2016
Messages
1,943
duneslider; said:
The problem with the sleepers is you will still be adding 3/4"plywood to the entire house, can you afford that much increase in the whole house?

So your point got me thinking on how I could save myself 3/4" in height throughout the house. This might save me additional work when it comes time to installing the door jambs and doors. I might not need to cut them to fit with the raised floor.

The front of the house (bay windows) is the high point and it drops off very quickly by 3/4" (within 40") heading toward the back.

If the high point is 0 at the front of the house, I can run sleepers perpendicular to the joists from the front to the 40" mark. No plywood installed on top of these sleepers. (I'll probably run some strips of wood parallel to the joists to make sure my finished floor is fully supported.)

At the 40" mark, I can start installing sleepers as needed with 3/4 plywood on top.

That would save me 3/4" throughout the house.

A little bit more brain damage.... but it might save me some work down the road.

I attached a pic of the floor at the front of the house.


Here's a video on the guy using sleepers and plywood decking. It's 2 parts. I thought it was informative if anyone else is interested.


Attachments

  • IMG_9188.jpg
    IMG_9188.jpg
    148.1 KB · Views: 57

egdede

ALLIANCE MEMBER
Joined
Dec 20, 2009
Messages
2,103
Interesting. I’d love to use this buy I can only find cases of 12 online. I’ll call my local building supplier.

Do you use them both under and over the sleepers or just between the sleeper and the new plywood deck.

A friend lent me his spray foam gun for these sized cans. It’s a total game changer. Total control of the amount of foam released and no mess or need to use the whole can in a single day.

https://www.amazon.com/dp/B0115ZH8N0/?tag=atomicindus08-20

This product is available 'by the can'. I've used both, both seem good. They stay flexible unlike Great Stuff spray foam.
 
OP
B

branimal

Well-known member
Joined
May 31, 2016
Messages
1,943
Made a little shim cutting jig for the table saw. The idea is I can cut 8' long shims from paper thin to whatever height I need by adjusting a little screw on the jig. Right now I have it built with scrap pieces. Will get a proper 8' by 3/4 piece of plywood for the final jig.

But the PROBLEM is my floor doesn't exactly fall in a linear progression in the front of the building at least. For example it drops 9/16" from 0 to 16". 3/8" from 16" to 32" and then 3/16" from 32" to 48". And so on. From 80" to 96" the fall is only 1/16".

I might have to draw the fall line onto a 2x stud and connect the dots. And then cut it with a circular saw.

Do you guys advise 3/4" plywood? Or will 5/8" suffice? Not worried about the cost. It's carrying 28 sheets up 2 flights of stairs (plus tight turns) that my back is complaining about. Might hire some day laborers for that job.

Here are some links for the video's on how I built the jig. Pretty cool.


Attachments

  • IMG_9195.jpg
    IMG_9195.jpg
    123.6 KB · Views: 38
  • IMG_9196.jpg
    IMG_9196.jpg
    110.8 KB · Views: 32

wrenchguy

Well-known member
Joined
Sep 22, 2011
Messages
4,698
Location
NW Indiana
But the PROBLEM is my floor doesn't exactly fall in a linear progression in the front of the building at least. For example it drops 9/16" from 0 to 16". 3/8" from 16" to 32" and then 3/16" from 32" to 48". And so on. From 80" to 96" the fall is only 1/16".

This maybe because your planning on putting your taper sleepers perpendicular to the joist? Try ciphering how much more or less difficult it'd be with taper sleepers running with/over joist.
 
To avoid these ads, REGISTER NOW!
OP
B

branimal

Well-known member
Joined
May 31, 2016
Messages
1,943
wrenchguy; said:
This maybe because your planning on putting your taper sleepers perpendicular to the joist? Try ciphering how much more or less difficult it'd be with taper sleepers running with/over joist.

Nailed it. Running the sleepers over and parallel to the joist there is very little variation. +-1/16" in most spots. Occasionally +-1/8. So far I can essentially run flat sleepers. No need to taper them. Lets see what I run into further back.


Thank you!!!
 

Attachments

  • IMG_9204.jpg
    IMG_9204.jpg
    151 KB · Views: 42

egdede

ALLIANCE MEMBER
Joined
Dec 20, 2009
Messages
2,103
You like this stuff more than regular subfloor adhesive?

Some would say foam adhesives are regular now! I assume you mean caulking tube type construction adhesives. IDK how sub floor adhesive performs long-term (over decades) when it flexes. I have had the benefit of seeing how some things worked out long term on a home that stayed in the family 45 years of my helping out dad/working life. We never took up a sub-floor.

With that said, I have seen how construction adhesives used elsewhere seem to get so hard as to not flex. I have used urethane foams and observed them to remain flexible over decades. I focus on flex because I was talking how to best stop squeak.
 

egdede

ALLIANCE MEMBER
Joined
Dec 20, 2009
Messages
2,103
You like this stuff more than regular subfloor adhesive?

IDK how sub floor adhesive performs long term over years when it flexes. I have had the benefit of seeing how some things worked out long term on a home that stayed in the family 45 years of my helping out dad/working life. We never took up a sub-floor.

With that said, I have seen how construction adhesives used elsewhere in that house seemed to get so hard as to not flex. All this assumes 'flex' is good because I was talking how to best stop squeak.
 

wrenchguy

Well-known member
Joined
Sep 22, 2011
Messages
4,698
Location
NW Indiana
Nailed it. Running the sleepers over and parallel to the joist there is very little variation. +-1/16" in most spots. Occasionally +-1/8. So far I can essentially run flat sleepers. No need to taper them. Lets see what I run into further back.


Thank you!!!

Pay attention to joist sag, some will and some not so much. Of course it'll be worst near center of span. Get your drylines correctly installed, don't pay to much attention to short levels &staight edges. good luck with ur project.
 
OP
B

branimal

Well-known member
Joined
May 31, 2016
Messages
1,943
Update:

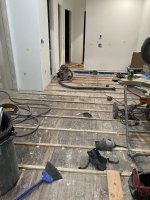
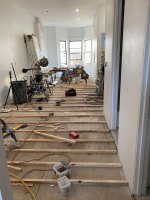
The project is going pretty well. I've shimmed up most of the space to level. Just a few small areas to finish off. I ditched the small levels and relied on my laser and a target stick jig. The jig is a level with a post level on it and a plastic ruler taped to it. If the laser hits zero its level. If the laser hits greater than zero, I know how big the shim needs to be. At first I was using a tape measure, but I found I wasn't holding the tape plumb.

I did pick up an 8' empire level to check my work. So far it's pretty darn close to dead level.

The floor was off level in so many directions, that I couldn't cut shims greater than 40" or so to run the span of the joists.. I ended up shoving 1/16" and 1/8" shims underneath my sleepers to get smooth transitions. All the shims are screwed down with screws long enough to reach the joists underneath. Tedious work. But I've gotten a bit faster as the project progressed.

I also found that the joists aren't necessarily square to the building and not always 16" OC.

Here are some pics.
 

Attachments

  • IMG_9261.jpg
    IMG_9261.jpg
    102.6 KB · Views: 60
  • IMG_9262.jpg
    IMG_9262.jpg
    127.7 KB · Views: 64
  • IMG_9259.jpg
    IMG_9259.jpg
    108.4 KB · Views: 75
OP
B

branimal

Well-known member
Joined
May 31, 2016
Messages
1,943
The Cobbler; said:
:shocking::shocking::lol_hitti

that's shocking !LOL
nice prrogress

Haha. I learn something new everyday.

I guess I'll be cutting sheets on slight angles to get them to sit properly on the shims.
 
OP
B

branimal

Well-known member
Joined
May 31, 2016
Messages
1,943
I’ve got a decent amount of the plywood decking laid out and it’s all dead level. Working my way into the bedrooms.

I’ve got one bedroom where I laid out my sleeper shims on the joists at 22” OC. Now there is probably a joist somewhere in between the 22” oc. Is it worth the extra work to go say 11” oc?

I’m using 3/4” advantech subflooring material. Advantech literature says you can go up to 24” oc.

Will there be an unacceptable amount of deflection?

8d6dfcac65f2e5a6eaeba9fc7d9f6853.jpg
 

Attachments

  • 8d6dfcac65f2e5a6eaeba9fc7d9f6853.jpg
    8d6dfcac65f2e5a6eaeba9fc7d9f6853.jpg
    39.9 KB · Views: 4
Last edited:

nadogail

Well-known member
Joined
Jan 23, 2009
Messages
32,044
Location
Coronado, CA
I once lived in an old house in Honolulu where the owner had covered the old termite eaten flooring with Masonite sheets.
 

larry4406

Well-known member
Joined
Jan 27, 2006
Messages
19,562
Location
Northern Virginia
I hope you glued the shims and nailed/screwed them together - squeak prevention. I personally would go not less than 19.2" oc for the Adventech and would go 16" if was me.
 
OP
B

branimal

Well-known member
Joined
May 31, 2016
Messages
1,943
larry4406; said:
I hope you glued the shims and nailed/screwed them together - squeak prevention. I personally would go not less than 19.2" oc for the Adventech and would go 16" if was me.


Shims are all screwed down every 10” inches and nailed down in between.

Advantech is screwed down and glued with advantech spray foam adhesive. Seems to be cheaper and easier to dispense than subfloor adhesive.

I’m still debating going minimum 16oc for the shims.

Thanks
 
OP
B

branimal

Well-known member
Joined
May 31, 2016
Messages
1,943
And I’m using 3/4” hardwood flooring on top of it makes any difference
 

wrenchguy

Well-known member
Joined
Sep 22, 2011
Messages
4,698
Location
NW Indiana
Update:
I also found that the joists aren't necessarily square to the building and not always 16" OC.

Never are with masonry and balloon framing.

Maybe you should've ran your sleepers squared up splitting up measurement difference over each joist. Would've been close enough and carried fine.

3/4” hardwood flooring over Advantech with larger sleeper spacing is a +.

What did you end up doing near the bay window? Blend in, or over the top?
 
OP
B

branimal

Well-known member
Joined
May 31, 2016
Messages
1,943
wrenchguy; said:
Never are with masonry and balloon framing.

Maybe you should've ran your sleepers squared up splitting up measurement difference over each joist. Would've been close enough and carried fine.

3/4” hardwood flooring over Advantech with larger sleeper spacing is a +.

What did you end up doing near the bay window? Blend in, or over the top?


Hey Mike - I used plywood only in spots where the drop off from the high point is 3/4” or greater. This turns out to be 95% of the area. The highest points (bay windows) are on the perimeter of the building so it’s working out fine.
 

TractorJeff

Well-known member
Joined
Dec 8, 2013
Messages
3,309
Location
Elkhorn, WI
LOL! Sounds like the Barn conversion, we live in! When it was converted 50 years ago, they put 2x4 shims in also. Wish screws were more popular back then as the floor has some squeaks now from loosening nails! The second floor always had carpet, we tore it out thinking of installing hardwood flooring. No Go! Too many years of Hay caused an inch & half sag that the previous owners never took care of. Vinyl Flooring flexes and follows the contours of the floor and look decent!
 
OP
B

branimal

Well-known member
Joined
May 31, 2016
Messages
1,943
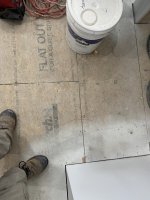
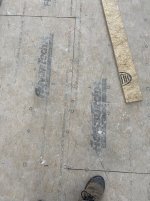
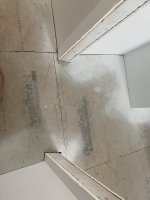
I'm getting ready to install hardwood floors on top of the shimmed up subfloor. (Quick background: I shimmed up my old pine subfloor with 2x strips cut on on the tablesaw. I laid 3/4" 4x8 OSB on top).

In a few spots when I step down on the subfloor I hear a subtle crunch. If I step on it immediately after to reproduce the sound, I can no longer hear the crunch. If I come back a few hours later and step down on the spot, the subtle crunching sound is back.

I went around and marked the "crunch spots" with a red crayon. I've found about 10 spots.

These "crunch spots" are all on tongue and groove joints of the subfloor.

I tried pulling out the existing screws and replacing with longer screws. Problem still exists.

I used Advantech subfloors and their spray foam adhesive product on the 2x shims. And I followed their screwing schedule.

The one thing I didn't do was spray the adhesive into the T&G joints. I'm wondering if that's the issue.

I think one possibility is the Senco collated screw gun I used was cracking some of the shims.


But.... I tried to replicate hardwood floor over these "crunch spots" by laying a piece of 3/4" x 5" wide strip of OSB on top of them. When I stepped on the OSB strip, I can't hear any noise. So maybe I'll be ok.

Pics of crunch spots marked with a red X.

Any ideas of what's causing this, how I can fix it or should I just forget it and keep working?
 

Attachments

  • IMG_9973.jpg
    IMG_9973.jpg
    107 KB · Views: 18
  • IMG_9974.jpg
    IMG_9974.jpg
    146.2 KB · Views: 15
  • IMG_9975.jpg
    IMG_9975.jpg
    74.8 KB · Views: 14
Last edited:
To avoid these ads, REGISTER NOW!
Top Bottom