To avoid these ads, REGISTER NOW!

ZMotorsports Shop Projects 2.0

mercracing

Well-known member
Joined
Feb 14, 2015
Messages
156
Thanks for the detailed explanation! Very helpful in learning how you do it! It’s great being able to put your descriptions with your pictures!


Sent from my iPad using Tapatalk
 
To avoid these ads, REGISTER NOW!
OP
Z

zmotorsports

ALLIANCE MEMBER
Joined
Oct 20, 2009
Messages
21,381
Location
Northern Utah
Thanks for the detailed explanation! Very helpful in learning how you do it! It’s great being able to put your descriptions with your pictures!


Sent from my iPad using Tapatalk

Thank you.

I edited my original post to put the descriptions with the corresponding pictures so I hope that helps.
 

casmurbax

Well-known member
Joined
Sep 25, 2012
Messages
2,758
Location
Wilton, NY
That is one thing never lacking in this thread, detail.

Having been down a similar road, you make it look easy.

Have a safe and happy holiday.
 

Jeff Ivers

Well-known member
Joined
Apr 9, 2010
Messages
2,556
Location
Oklahoma
Thank you for the detailed explanation. Based on your info, it seems this is not a technique for an amateur to try with a MIG welder. Particularly an old fart like me that does not have a very steady hand!
 

Monza Harry

Well-known member
Joined
Dec 29, 2018
Messages
1,433
Location
Windsor ON
I call the technique Mike used for the bolt extraction, "Building Snow Men" this is also commonly used for broken tap extraction, usually in steel for us, very little Aluminum used for our kind of tooling now. The computer and other prototyping techniques have replaced aluminum prototype tooling now. Some guys use nuts but I find with taps that they seem to break down the length [like one of the four flutes], and as a result the newly applied end breaks off after only a small part of a turn, [the broken ear tries and lock it up with "cam action"] until you can get it above the mating face and you can get the pieces better fused together, so I grab a fubared screw and weld that on so I can re-attach multiple times, the nuts are a onetime thing. Also useful is to heat let cool then as Mike said Lather, Rinse, Repeat, the heat cool process crushes the rust and or chips to make the fight a little easier. I am just trying to add another use for the process he highlighted above not steal his thunder, (like we could :D). Harry
 

Duker

Well-known member
Joined
Sep 25, 2010
Messages
10,861
Location
Livingston, TX
Mike just wanted to drop in and say Merry Christmas. I hope you and your family have a great holiday and an even better New Year! Looking forward to next year’s projects!


Sent from my iPhone using Tapatalk Pro
 
OP
Z

zmotorsports

ALLIANCE MEMBER
Joined
Oct 20, 2009
Messages
21,381
Location
Northern Utah
Tonight I made more progress on the White Mountain ice cream maker.

Made a collar to grasp the splined shaft in the 6-jaw chuck.
d33b125a3f087907b79bae4f9b32605c.jpg

ebc0c3ef9557fae483b0f89d565292cf.jpg

Facing the splined shaft to length.
456e8d892cb36d546f71678b76eddbd3.jpg

Machined to length and turned down to the minor diameter. I left the minor diameter slightly oversized to compensate for the wear in the housing.
8fa3566c00719656c0f6c8663bcb21f3.jpg

Perfect fit with no play.
3b5ffbb4f385d2bed26e65b8edf6f344.jpg

This part is completed and ready for assembly.
7858588147c4efb8524fe874b8b829fd.jpg

After welding up the output gear with silicon bronze I chucked it up in the 6-jaw and turned to diameter and faced.
1287c01ea0f9b20a86ec799418bc66e1.jpg

e0f97720274e31f913af54e316e22e51.jpg

0e86da5dd3a51dc56fc7bfe9fdfbb9cb.jpg

Ready to start cutting teeth.
6083b0f8b854991a6916f61c3e1fbcfb.jpg

Scrap piece to make a mandrel to space the gear out away from the chuck in the dividing head.
5cae6ac6803d25e5f80414fe12b70daf.jpg

Mandrel faced, drilled and tapped to hold the output gear.
2b8080f24be8f9af0301bc2c4d32011d.jpg

4ec89612480d10db2d51bd45ead5cbae.jpg

Set up in the dividing head on center and to the correct depth.
242f5d8f5cabd0faba2eeb188d20ae84.jpg

Now to calculate the tooth count and I’m ready to cut some teeth and finish this project up and return to owner.
 

Attachments

  • 242f5d8f5cabd0faba2eeb188d20ae84.jpg
    242f5d8f5cabd0faba2eeb188d20ae84.jpg
    87.5 KB · Views: 0
  • 8fa3566c00719656c0f6c8663bcb21f3.jpg
    8fa3566c00719656c0f6c8663bcb21f3.jpg
    132.7 KB · Views: 0
  • 3b5ffbb4f385d2bed26e65b8edf6f344.jpg
    3b5ffbb4f385d2bed26e65b8edf6f344.jpg
    107.1 KB · Views: 0
  • 7858588147c4efb8524fe874b8b829fd.jpg
    7858588147c4efb8524fe874b8b829fd.jpg
    127.5 KB · Views: 0
  • 1287c01ea0f9b20a86ec799418bc66e1.jpg
    1287c01ea0f9b20a86ec799418bc66e1.jpg
    99.1 KB · Views: 0
  • e0f97720274e31f913af54e316e22e51.jpg
    e0f97720274e31f913af54e316e22e51.jpg
    89.5 KB · Views: 0
  • 4ec89612480d10db2d51bd45ead5cbae.jpg
    4ec89612480d10db2d51bd45ead5cbae.jpg
    96.1 KB · Views: 0
  • 2b8080f24be8f9af0301bc2c4d32011d.jpg
    2b8080f24be8f9af0301bc2c4d32011d.jpg
    62.8 KB · Views: 0
  • 5cae6ac6803d25e5f80414fe12b70daf.jpg
    5cae6ac6803d25e5f80414fe12b70daf.jpg
    80.9 KB · Views: 0
  • 6083b0f8b854991a6916f61c3e1fbcfb.jpg
    6083b0f8b854991a6916f61c3e1fbcfb.jpg
    101.6 KB · Views: 0
  • 456e8d892cb36d546f71678b76eddbd3.jpg
    456e8d892cb36d546f71678b76eddbd3.jpg
    124.6 KB · Views: 0
  • ebc0c3ef9557fae483b0f89d565292cf.jpg
    ebc0c3ef9557fae483b0f89d565292cf.jpg
    95.8 KB · Views: 0
  • d33b125a3f087907b79bae4f9b32605c.jpg
    d33b125a3f087907b79bae4f9b32605c.jpg
    68.8 KB · Views: 0
  • 0e86da5dd3a51dc56fc7bfe9fdfbb9cb.jpg
    0e86da5dd3a51dc56fc7bfe9fdfbb9cb.jpg
    131.6 KB · Views: 0
Last edited:
OP
Z

zmotorsports

ALLIANCE MEMBER
Joined
Oct 20, 2009
Messages
21,381
Location
Northern Utah
Thanks guys. I love little projects like this when they come through the door of the shop. This one allowed me the opportunity to learn to cut gears and even get a new tool that I've been wanting for a while.:D
 

Bodj Built

Well-known member
Joined
Feb 3, 2016
Messages
1,165
Location
Moorpark, CA
Hah this is something you'd see on This Old Tony! I'm always fascinated by lathe work, and he makes it seem like the work goes quickly (yes I know it's sped up in his videos lol)
 
OP
Z

zmotorsports

ALLIANCE MEMBER
Joined
Oct 20, 2009
Messages
21,381
Location
Northern Utah
I finished up the ice cream maker project today so I can get it returned to its owner.

I then did a thorough deep cleaning of the shop before calling it a day and year.

Final cut on the output gear.
8bf6d7c1ebddb57f1400a49272a788b5.jpg

Deburring and cleaning the teeth up with a little hand filing.
4e62d79e2aeae7bd2e5f6e477a4af92e.jpg

Test fit and turned by hand to ensure everything spins smoothly.
e4e4a51a27bf04d3bb624fd0c9231c79.jpg

Old grease removed, housing cleaned, new grease applied to gears and reassembled.
ada2ce39827c2eb578cdcfadf1fc3622.jpg

Test ran for over ten minutes to make certain no issues and ready to return to the owner.
da821c2cf86a908455ca06381341189d.jpg

Next was a deep cleaning of the shop including the workbenches and machinery.
11a28667933db532386d4628c23341b7.jpg

743ab243b23b669a93da38479fb46356.jpg

7df3fbe624ae27b898dde749e9c3824b.jpg

1556062af8cbbf331390ca4ede694a61.jpg

6f5187b59c9e4069255d263e3bc94bbd.jpg

f339b94504ff53a78562dfdb00968096.jpg

Thanks for looking and I would like to wish everyone a safe, prosperous and Happy New Year.
 

Attachments

  • e4e4a51a27bf04d3bb624fd0c9231c79.jpg
    e4e4a51a27bf04d3bb624fd0c9231c79.jpg
    108.5 KB · Views: 1
  • f339b94504ff53a78562dfdb00968096.jpg
    f339b94504ff53a78562dfdb00968096.jpg
    89.1 KB · Views: 0
  • 6f5187b59c9e4069255d263e3bc94bbd.jpg
    6f5187b59c9e4069255d263e3bc94bbd.jpg
    97.2 KB · Views: 0
  • 1556062af8cbbf331390ca4ede694a61.jpg
    1556062af8cbbf331390ca4ede694a61.jpg
    94.6 KB · Views: 0
  • 7df3fbe624ae27b898dde749e9c3824b.jpg
    7df3fbe624ae27b898dde749e9c3824b.jpg
    79.7 KB · Views: 0
  • 743ab243b23b669a93da38479fb46356.jpg
    743ab243b23b669a93da38479fb46356.jpg
    67.7 KB · Views: 0
  • 11a28667933db532386d4628c23341b7.jpg
    11a28667933db532386d4628c23341b7.jpg
    59.3 KB · Views: 0
  • da821c2cf86a908455ca06381341189d.jpg
    da821c2cf86a908455ca06381341189d.jpg
    87.9 KB · Views: 0
  • ada2ce39827c2eb578cdcfadf1fc3622.jpg
    ada2ce39827c2eb578cdcfadf1fc3622.jpg
    109 KB · Views: 0
  • 4e62d79e2aeae7bd2e5f6e477a4af92e.jpg
    4e62d79e2aeae7bd2e5f6e477a4af92e.jpg
    81.7 KB · Views: 0
  • 8bf6d7c1ebddb57f1400a49272a788b5.jpg
    8bf6d7c1ebddb57f1400a49272a788b5.jpg
    102.3 KB · Views: 0
To avoid these ads, REGISTER NOW!

DennisK

Well-known member
Joined
May 2, 2009
Messages
145
Thanks for getting my shop cleaned.NOT!!!!!!!! Can I post your clean hop pic?
 
OP
Z

zmotorsports

ALLIANCE MEMBER
Joined
Oct 20, 2009
Messages
21,381
Location
Northern Utah
Today I tore into the dash on my Jeep.

On Christmas Eve as I was leaving work and started the Jeep I heard that ugly Chrysler click, click, clicking sound coming from under the dash.

I have replaced several of the blend door actuators on the Jeep JK’s so I swung by my local NAPA and picked one up but haven’t had time to tear into it until today.

After pulling it into the shop and cycled the blend door and realized it wasn’t the blend door actuator. I switched the modes and it wasn’t the mode door actuator either. I then hit the recirculating switch and BINGO, there’s the noise. ****! That’s the hardest one to access.

30e8cde9cbb578491a1c4a56ee0eeccc.jpg

Access is less than ideal, especially for a big guy with large hands. I don’t know why they didn’t mount the actuator on the left side of the HVAC box where there’s plenty of room. But NO, they put it on the right side between the HVAC box and the right kick panel where there’s a whopping 3 inches of space.

Start by removing the glove box and the right dash speaker.
429632699853c5c782eee845a1b70cbd.jpg

And this is where the culprit resides.
ccdecbe049f2c91b587115d1270900cf.jpg

After a long removal process I opted to open the original one and see which gear is stripped.
6601aba36bf95c2d0d8dfc8a9babac54.jpg

Sure enough, there’s the broken tooth. See pick pointing to the broken gear.
fbb007c7a2ddd31763132ac8d97912b5.jpg

Reassembled, cleaned, wiring put back in place and new cabin filters installed.
97a17a1bf2636a8f2429cc7ed2dae09d.jpg

Project completed and dash functions properly and quietly again.
Thanks for looking.
 

Attachments

  • 97a17a1bf2636a8f2429cc7ed2dae09d.jpg
    97a17a1bf2636a8f2429cc7ed2dae09d.jpg
    89.4 KB · Views: 0
  • fbb007c7a2ddd31763132ac8d97912b5.jpg
    fbb007c7a2ddd31763132ac8d97912b5.jpg
    94.5 KB · Views: 0
  • 6601aba36bf95c2d0d8dfc8a9babac54.jpg
    6601aba36bf95c2d0d8dfc8a9babac54.jpg
    162.8 KB · Views: 0
  • ccdecbe049f2c91b587115d1270900cf.jpg
    ccdecbe049f2c91b587115d1270900cf.jpg
    123.9 KB · Views: 0
  • 429632699853c5c782eee845a1b70cbd.jpg
    429632699853c5c782eee845a1b70cbd.jpg
    91.4 KB · Views: 0
  • 30e8cde9cbb578491a1c4a56ee0eeccc.jpg
    30e8cde9cbb578491a1c4a56ee0eeccc.jpg
    78.9 KB · Views: 0
Last edited:

OutlawDrifter

Well-known member
Joined
Jan 20, 2015
Messages
3,876
Location
KS
Mike, it's kind of like the blower fan resistor on an 88-98 GM pickup...takes small hands even if you hold your tongue right :lol_hitti
 

quadrcr87

Well-known member
Joined
Jul 5, 2013
Messages
1,036
Location
Travelers Rest, SC
I wish I lived in Utah so I could drop of my wife’s Jeep GC for some door lock actuator replacements. These are the type of jobs I try to avoid.
 

Temaweaver

Well-known member
Joined
Dec 28, 2012
Messages
467
Location
Manheim, PA
Mike. Have you had issues with plugged heater cores? My son in laws had issues. It was replaced 4 yrs ago, and now once again there was little heat on the drivers side. I did a simple reverse flow with a garden hose. It’s about 50% better now. I saw some have done a clr flush. What do you think?
 

Bigblue&Goldie

Well-known member
Joined
Mar 12, 2009
Messages
10,674
Location
AZ
I did one on my F150 a few weeks ago. I got lucky that it was the "mode" door actuator and actually accessible without dismantling anything.
 

protegeV

Well-known member
Joined
Apr 18, 2018
Messages
13,363
Location
DFW
Anyone else as shocked as me that Mike didnt just machine a new gear out of aluminum? :D
 
OP
Z

zmotorsports

ALLIANCE MEMBER
Joined
Oct 20, 2009
Messages
21,381
Location
Northern Utah
Mike, it's kind of like the blower fan resistor on an 88-98 GM pickup...takes small hands even if you hold your tongue right :lol_hitti

I wish I lived in Utah so I could drop of my wife’s Jeep GC for some door lock actuator replacements. These are the type of jobs I try to avoid.

Thanks guys. Yes, those small jobs can be a PITA but I especially despise interior work for some reason.
 
OP
Z

zmotorsports

ALLIANCE MEMBER
Joined
Oct 20, 2009
Messages
21,381
Location
Northern Utah
I did one on my F150 a few weeks ago. I got lucky that it was the "mode" door actuator and actually accessible without dismantling anything.

Go ahead Ryan, rub it in.... I wish mine would have been the mode door as it is staring you in the face as soon as you pull the glove box out. No such luck though.


Anyone else as shocked as me that Mike didnt just machine a new gear out of aluminum? :D

That's what my wife said. She said you should be a pro at machining gears, why did you buy a new actuator.:dunno: For the $25 dollars and piece of mind, I just bought one and stuck it in. Call me crazy.
 

jalbrecht55

Active member
Joined
Jun 5, 2011
Messages
41
Location
Silverdale, WA
Mike, random question for you, what brands and models of screwdrivers do you use and prefer? I’m tired of the crappy old craftsman ones I have (mine are even the old USA variety) and ready for an upgrade—but not sure what to get or where to get it.
 
OP
Z

zmotorsports

ALLIANCE MEMBER
Joined
Oct 20, 2009
Messages
21,381
Location
Northern Utah
Mike. Have you had issues with plugged heater cores? My son in laws had issues. It was replaced 4 yrs ago, and now once again there was little heat on the drivers side. I did a simple reverse flow with a garden hose. It’s about 50% better now. I saw some have done a clr flush. What do you think?

I haven't had cooling system restriction issues for quite some time now. Many years ago on the farm we had issues but that was solely due to neglect to the cooling systems. My dad was under the philosophy if it ain't broke, don't fix it which also went towards preventive maintenance. Once I started exchanging coolant on a regular basis and using distilled water I ceased having many cooling system issues.

Any of the modern plugged cooling systems that I have worked on over the past decade or so have been due to neglect, ie. lack of coolant exchange.
 

ttpete

Well-known member
Joined
Mar 8, 2011
Messages
6,737
Location
Dearborn, MI
Thanks guys. Yes, those small jobs can be a PITA but I especially despise interior work for some reason.

There's an old joke saying that all under-dash metal was made by Wilkinson Sword. The one I remember most was replacing the dash wiring harness on a 1961 Lincoln. My hands were a mess for a few weeks afterwards.
 
OP
Z

zmotorsports

ALLIANCE MEMBER
Joined
Oct 20, 2009
Messages
21,381
Location
Northern Utah
Mike, random question for you, what brands and models of screwdrivers do you use and prefer? I’m tired of the crappy old craftsman ones I have (mine are even the old USA variety) and ready for an upgrade—but not sure what to get or where to get it.

My go-to screwdrivers are the Snap-on with the Instinct handles. Those are hands down my favorite followed distantly by a toss up between my Proto Duratek's, old plastic handled Snap-on and my really old MAC screwdrivers.
 

Jehannum

Well-known member
Joined
May 3, 2012
Messages
1,360
Location
Albuquerque, NM
Anyone else as shocked as me that Mike didnt just machine a new gear out of aluminum? :D
Having done a few of these jobs for cars that don't have ready replacements available anymore (think 90s Japanese cars), if you do that and replace a gear with one that isn't likely to break under strain, you chase the problem to the next weakest place.

In my case, it's likely that the gear stripped because there's a jammed or corroded mix door hinge somewhere that needs attention paid before I chase another mix actuator down the tubes.

I've done acceptable replacements with FDM nylon 3D prints though. They're about as strong as the originals, and likely not to damage other parts before they strip out themselves.
 
OP
Z

zmotorsports

ALLIANCE MEMBER
Joined
Oct 20, 2009
Messages
21,381
Location
Northern Utah
I thought I would follow up with some tips for anyone replacing a recirculation actuator in a Jeep Wrangler.

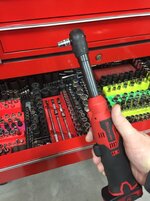
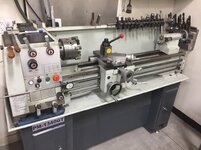
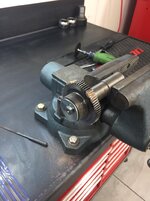
First I hate interior work but I’ve found that this little 1/4” extended length ratchet is the magic bullet for interior work. It has the long neck allowing access without the body of the tool getting in the way, it allows one handed removal of fasteners and has enough torque to perform the job but not so much that it strips the plastic bosses out nor too fast where it over-runs the threads pulling plastic threads out.
3bb42d01b6b0b738dc3794e41149668a.jpg

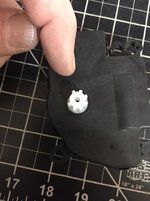
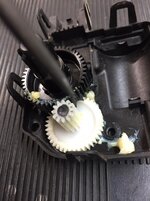
When installing the new actuator it is critical for proper spline alignment or the HVAC actuator will not calibrate. This is why I had to pull mine back out and re-clock the splined last night as it wouldn’t calibrate.

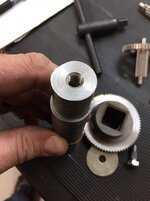
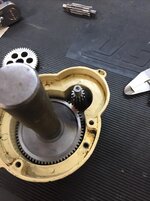
Upon removing the actuator from the package this flat spot on the output shaft should line up directly with the raised line on the body.

See two pictures below.
9fd1ee781d63cc81aba63f55e5d0466f.jpg

cafc7c13e2aa80cb0d4aee00e7cbfe5c.jpg

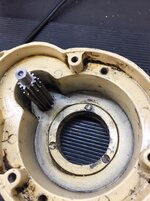
To do that the recirculation damper door must be fully raised (open) before installing the actuator assembly. Mine was raised but dropped slightly as I was engaging the splined originally. It must be pushed upwards then instal the actuator into the splined damper door for proper positioning.

Lastly after replacement a bi-directional scantool will make life easier by running a calibration cycle.
a4ca58caa2dd403cb0eb348572d7fdb2.jpg

For the Snap-on tools the test is under HVAC system, then special tests and lastly actuator recalibration. Thus will run all actuators through their range to calibrate. After a successful calibration or passed message you can complete reassembly of the dash.

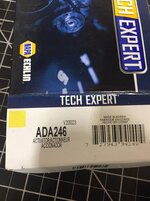
Lastly here is the part number for the Jeep actuator motors.
f80a7086956742fe8c18fbf9d65706a7.jpg

Dorman also makes one that is popular but the NAPA one is made by Echlin and I prefer it.

***On EDIT, I would advise against using aftermarket actuator motors. I had hear horror stories about the Dorman ones so I used the Echlin from NAPA and also had issues. Within a couple of weeks of replacing it the HVAC module would not be able to get consistent current reporting feedback from the actuator and therefore would have to re-sink with nearly every ignition cycle.

I replaced the Echlin with an OEM Mopar actuator and problem solved. OEM Mopar actuator part number is 68018109AA.

The Mopar OEM actuator does cost more but save yourself some time and frustration by only doing the job once. It's not worth it using an aftermarket and gambling on whether or not it will work on this job.

Thanks for looking.
 

Attachments

  • a4ca58caa2dd403cb0eb348572d7fdb2.jpg
    a4ca58caa2dd403cb0eb348572d7fdb2.jpg
    99.3 KB · Views: 0
  • cafc7c13e2aa80cb0d4aee00e7cbfe5c.jpg
    cafc7c13e2aa80cb0d4aee00e7cbfe5c.jpg
    67 KB · Views: 0
  • 9fd1ee781d63cc81aba63f55e5d0466f.jpg
    9fd1ee781d63cc81aba63f55e5d0466f.jpg
    69.5 KB · Views: 0
  • 3bb42d01b6b0b738dc3794e41149668a.jpg
    3bb42d01b6b0b738dc3794e41149668a.jpg
    101 KB · Views: 0
  • f80a7086956742fe8c18fbf9d65706a7.jpg
    f80a7086956742fe8c18fbf9d65706a7.jpg
    90 KB · Views: 0
Last edited:

komalakustoms

Well-known member
Joined
Dec 23, 2020
Messages
69
Location
Ohio
Hey Mike,

Long time viewer, first time commenter. Always loved following your shop build and projects. I love the craftsmanship and quality you put into your work. Hard to come by these days.

If you don't mind me asking, what trade is your career in? I took a 4 year tool and die apprenticeship and worked in the field for about 7 years before moving into engineering at my "day job". I love seeing other do this kind of stuff as well. My new shop being built will include machinery to better broaden the work scope of my business since moving to a new home with no shop and nowhere to move all my equipment.

Keep up the good work!

Alex
 
OP
Z

zmotorsports

ALLIANCE MEMBER
Joined
Oct 20, 2009
Messages
21,381
Location
Northern Utah
Hey Mike,

Long time viewer, first time commenter. Always loved following your shop build and projects. I love the craftsmanship and quality you put into your work. Hard to come by these days.

If you don't mind me asking, what trade is your career in? I took a 4 year tool and die apprenticeship and worked in the field for about 7 years before moving into engineering at my "day job". I love seeing other do this kind of stuff as well. My new shop being built will include machinery to better broaden the work scope of my business since moving to a new home with no shop and nowhere to move all my equipment.

Keep up the good work!

Alex

Thank you for the comments and for following along Alex. Congrats on your new shop, hope the build goes well and you can get everything you want out of it.

My full-time job is in the Industrial Maintenance industry, followed by my second job that was running my speed shop for 20 years out of our previous home's shop.

I started as an Apprentice Industrial Maintenance Mechanic back in 1988 at the ripe 'ole age of 19 and worked up to Master Mechanic by around 1992. Then continued wrenching throughout my career up to lead and then Supervisor. I finally brought my tools home in 2015 when I stepped to a Maintenance Manager's position and stopped wrenching at my full-time job but still continue to wrench at my home shop. I am heavily involved in all aspects of Maintenance in my current position but on a larger scale in terms of projects.

My wife, son and I had a speed shop/business at our home shop from 1997 through the beginning of 2017 when I closed it down after moving.

Basically I am a mechanic who learned how to fabricate/weld and do some machining, still learning actually.:bounce:
 
To avoid these ads, REGISTER NOW!
Top Bottom