To avoid these ads, REGISTER NOW!

Above 1200 Sq/FT Cleaning Up My Shop

Wokspaces above 1200 squarefeet.
OP
O

oldironfarmer

Well-known member
Joined
Jun 25, 2016
Messages
6,664
Location
Terlton, Oklahoma
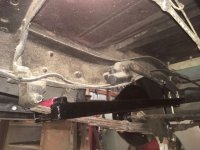
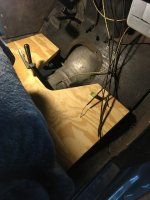
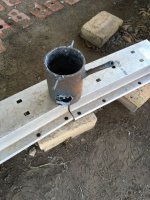
The new floorboard being test fitted.

attachment.php


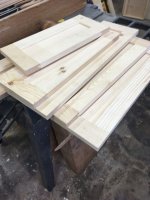
About the same time I was making drawer fronts.

attachment.php


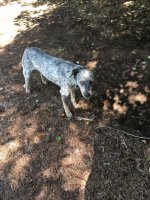
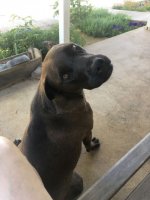
And spending some breakfast time with Hershey.

attachment.php


When I let her inside she goes and sits in front of Sharon's chair. She misses her too.

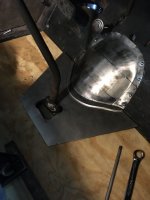
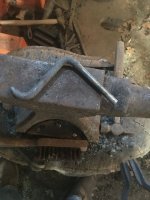
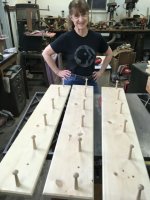
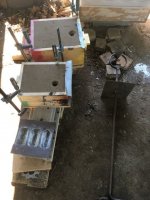
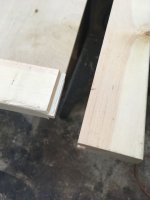
And door assembly. Lots of pieces, and with my helper everything was sorted properly and there were no hiccups upon assembly.:thumbup:

attachment.php


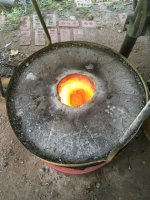
Return with me now to yesteryear. Anybody remember when I switched from a stainless steel crucible to clay-graphite? Yeah, me neither. What happened was I was trying to melt the glass out of aluminum left over from the glass flasks exercise. The glass would just not separate and float like I thought it should. I finally took the crucible out of the furnace, hot, and it ruptured on the way to set it down. Hot aluminum everywhere.

attachment.php


Fortunately my safety precautions were sufficient and I wasn't burned. But I was concerned and quit using steel crucibles.
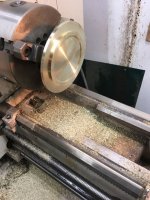
Cleaning Up My Shop

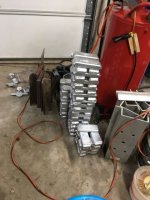
I spent some time sorting and stacking aluminum ingots I've made for future casting. The dark ones are pure copper, and there are two brass ingots.

attachment.php


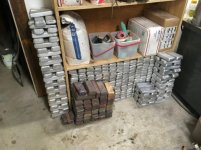
Just a few more to go:lol_hitti

attachment.php


Thanks for stopping in. There will be more progress on the 32 Chevy. It eventually makes it out of my shop and back to the lonely owner and his grandkids.
 

Attachments

  • IMG_0229.JPG
    IMG_0229.JPG
    46.6 KB · Views: 900
  • IMG_3071.JPG
    IMG_3071.JPG
    52.8 KB · Views: 890
  • IMG_3070.jpg
    IMG_3070.jpg
    52.1 KB · Views: 889
  • IMG_3067.JPG
    IMG_3067.JPG
    79 KB · Views: 900
  • IMG_0243.JPG
    IMG_0243.JPG
    55.3 KB · Views: 905
  • IMG_0242.JPG
    IMG_0242.JPG
    39.3 KB · Views: 901
  • IMG_0234.JPG
    IMG_0234.JPG
    45.9 KB · Views: 900
To avoid these ads, REGISTER NOW!

jbmatth

Well-known member
Joined
Jun 3, 2013
Messages
5,685
Location
Northern Ok.
As usual it is nice to hear from you again Andy. I'll be stuck in a TA for a couple months this spring, I need to swing by for a day if you still accept shady visitors.

JB
 

shortykorte

Well-known member
Joined
Sep 1, 2014
Messages
8,039
Location
Tallahassee, Fl
Glad I was not there helping you melting that batch.


Flip flops are possibly somewhat insufficient in protection.


Good to see the updates.


I helped with a couple of those. You have to have official Florida Safety shoes.


Andy looks like you’re staying busy. Hershey needs a bone.


Sent from my iPhone using Garage Journal
 

drivesitfar

Well-known member
Joined
Oct 23, 2013
Messages
36,028
Location
Pacific Northwest
Andy: your new part you made with the sand mold and aluminum really looks great and it's hard to tell which one was the original. your skills have really improved sir.

nice pile of ingots there so looks like more fun projects in your future.

did you ever get the granddaughters Studebaker/Dodge (forgot the nickname) finished or did she get one of your yellow FJ's?

mid 40's and sunny so dry and no wind. it's a great day for sure.

take care
 
OP
O

oldironfarmer

Well-known member
Joined
Jun 25, 2016
Messages
6,664
Location
Terlton, Oklahoma
Hi Andy,
Glad you're back posting, knew you were absent but didn't realize it had been a whole month. Hope 2021 is good to you.
Scott

Thanks, Scott!

Glad I was not there helping you melting that batch.

Flip flops are possibly somewhat insufficient in protection.

Good to see the updates.

So are you flip flopping on safety gear?

Yay , Andy's back to posting:thumbup:

Thanks, Rick!

As usual it is nice to hear from you again Andy. I'll be stuck in a TA for a couple months this spring, I need to swing by for a day if you still accept shady visitors.

JB

Yes, I really miss turnarounds. Managing them, anyway.:bounce:

I've put a moratorium on visitors. Until morning. Come on when you can!

I helped with a couple of those. You have to have official Florida Safety shoes.


Andy looks like you’re staying busy. Hershey needs a bone.


Sent from my iPhone using Garage Journal

OK, I gave Hersh one bone.:bounce:

Dang, that's a lot of metal. As usual, all your work looks really good.

Thank you.

Andy: your new part you made with the sand mold and aluminum really looks great and it's hard to tell which one was the original. your skills have really improved sir.

nice pile of ingots there so looks like more fun projects in your future.

did you ever get the granddaughters Studebaker/Dodge (forgot the nickname) finished or did she get one of your yellow FJ's?

mid 40's and sunny so dry and no wind. it's a great day for sure.

take care

The Studekota is on hold. But soon...

Thanks for stopping by Drives!
 
OP
O

oldironfarmer

Well-known member
Joined
Jun 25, 2016
Messages
6,664
Location
Terlton, Oklahoma
Back to the salt mine. Assembly of the cabinets went pretty quickly after all the measuring, cutting, and sanding. Here are some of the small doors.

attachment.php


The one big door, 80" x 30", was a challenge.

attachment.php


Only the corners are glued so the panel is free to expand and contract with the seasons.

attachment.php


attachment.php


It goes on the side of this cabinet to make a pantry. This cabinet fits over the refrigerator.

attachment.php


A little more fitting of the floor board and it's time to final fit the fabricated hump. It was pounded out of one piece of sheet metal with no welds. I was pleased with the results.

attachment.php


The bracket shown earlier was welded up to hold the end of the original brake and clutch pedals shaft away from the transmission. the end on the transmission side only took a small bracket.

attachment.php


Thanks for stopping by, guys!
 

Attachments

  • IMG_0265.JPG
    IMG_0265.JPG
    55.7 KB · Views: 711
  • IMG_0253.JPG
    IMG_0253.JPG
    42.4 KB · Views: 715
  • IMG_0248.JPG
    IMG_0248.JPG
    27.5 KB · Views: 715
  • IMG_0247.JPG
    IMG_0247.JPG
    45.9 KB · Views: 710
  • IMG_0246.JPG
    IMG_0246.JPG
    26.9 KB · Views: 705
  • IMG_0245.JPG
    IMG_0245.JPG
    36.7 KB · Views: 705
  • IMG_0244.JPG
    IMG_0244.JPG
    48.7 KB · Views: 706

Vieux

Well-known member
Joined
Jan 31, 2014
Messages
2,525
Location
Russia
Any work that Andy does always turns out great! :thumbup:
Happy to see you in the New Year!
 

jbmatth

Well-known member
Joined
Jun 3, 2013
Messages
5,685
Location
Northern Ok.
The trans hump looks great Andy, I vaguely remember the one you made for the Studekota, this is a bit smoother. ;)

JB
 

tj675

Well-known member
Joined
Apr 9, 2019
Messages
905
Location
The Mitten
Andy,

Love the vast amount of knowledge that you are sharing with us. Thank you for taking the time to do so.

TJ
 
OP
O

oldironfarmer

Well-known member
Joined
Jun 25, 2016
Messages
6,664
Location
Terlton, Oklahoma
Nice hump Andy!
Pete

That's what she said. I was tickled to be able to make it without welding.


Thanks!

Any work that Andy does always turns out great! :thumbup:
Happy to see you in the New Year!

Thanks Vladimir. You do better work.

The trans hump looks great Andy, I vaguely remember the one you made for the Studekota, this is a bit smoother. ;)

JB

Do you suppose one can make progress from job to job?

Thanks JB.

Andy,

Love the vast amount of knowledge that you are sharing with us. Thank you for taking the time to do so.

TJ

:lol_hitti Or at least half-vast!

Thanks for the kind words.
 
OP
O

oldironfarmer

Well-known member
Joined
Jun 25, 2016
Messages
6,664
Location
Terlton, Oklahoma
Removing the torque tube meant building traction bars for the car.
As I mentioned earlier, the axle has a sleeve bearing where it ties to the spring making it free to rotate.
In later years the axle was bolted to the spring but up to 1948 all of the torque was taken in the torque tube.
Then eventually they decided the spring alone would hold the torque.

attachment.php


We started with just one u-bolt each side but that was inadequate and slipped so we had to weld to the axle to take the torque.

This is where the job started. Sorry about the fuzzy picture but the car is back with it's owner. The axle extension was longer than I first thought it would have to be to accommodate the existing input shaft, adapter, and stub input shaft from a late model Chevrolet. There is a standard seal and tapered roller bearing inside the addition.

attachment.php


Here's the brake casting installed.

attachment.php


This is final layout for the hump screwed to the toe board. 90 year old plywood so we only want to install it once. Easy enough to make a new toe board but I really like to preserve as much of an old car as we can and still be safe and functional.

attachment.php


Another guy had a race car axle he wanted to change gear ratio. Here is the ring gear being tested for correct contact with the pinion. This is a job where you really want to take your time and get it right.

attachment.php


A side note, my nearest town only has an O'Reilly's for auto parts. They guys there are pretty good so I established an account "Blackjack Forge and Foundry". There is a discount on behind the counter type parts and I've found friends and family can use my account too. All they need is the name, and they have to pay but it's nice for them to get the discount too.

Thanks for stopping by!
 

Attachments

  • IMG_0297.JPG
    IMG_0297.JPG
    43.3 KB · Views: 515
  • IMG_0337.JPG
    IMG_0337.JPG
    48.5 KB · Views: 515
  • IMG_0273.JPG
    IMG_0273.JPG
    19.5 KB · Views: 516
  • IMG_0271.jpg
    IMG_0271.jpg
    35.8 KB · Views: 518
  • IMG_0270.JPG
    IMG_0270.JPG
    53.2 KB · Views: 521

drivesitfar

Well-known member
Joined
Oct 23, 2013
Messages
36,028
Location
Pacific Northwest
Amazing work on that old car. I bet you could maybe make a car from scratch if you wanted to, but I bet you have more interest in fixing friend's cars and finishing the StudeDakota.

Seattle Drizzle is on here and so far 2 days almost 24/7 and close to another week in the forecast. when it does clear up if we are not flooded out i sure will be clean around here.

cheers and keep up all the great work!!:thumbup:
 
OP
O

oldironfarmer

Well-known member
Joined
Jun 25, 2016
Messages
6,664
Location
Terlton, Oklahoma
Amazing work on that old car. I bet you could maybe make a car from scratch if you wanted to, but I bet you have more interest in fixing friend's cars and finishing the StudeDakota.

Seattle Drizzle is on here and so far 2 days almost 24/7 and close to another week in the forecast. when it does clear up if we are not flooded out i sure will be clean around here.

cheers and keep up all the great work!!:thumbup:

Thanks for the visit Drives! Clear and 40's here with no wind for the last few days. We get a few stiff breezes when a front comes through but not much winter wind.

Building a car from scratch would be a tall order.:lol_hitti
 
To avoid these ads, REGISTER NOW!
OP
O

oldironfarmer

Well-known member
Joined
Jun 25, 2016
Messages
6,664
Location
Terlton, Oklahoma
OK, I'm only up to June, 2020.
A warm morning I was having breakfast on the porch with my faithful companion. Hershey hates this picture, says it makes her nose look big. :headscrat

attachment.php


My CPA/Zumba instructor came over to make soffits for her windows. These are not coat racks, curtains with loops hang from the pegs.

attachment.php


Local junk dealer dropped by. Cool car, JB!

attachment.php


Back to the old forge. This time to make a bell crank for shift linkage for the 32 Chevy.

attachment.php


I first turned a bearing surface to go into a bushing block then bent it to give the proper movement of the shift lever.

attachment.php


We got the original 1932 Chevrolet transmission with other parts from the previous shop. I couldn't bear to cut up the old shift lever to go on the automatic transmission so I cut up a 1948 Farmall M shift lever. It was about the same size, a little heavier, and they are plentiful. It's welded to a flange whose mate is welded to the forging. Small bolts hold a split steel bushing block with grease zerk. Sorry no pictures. Then a link goes from the crank to the transmission shift clevis. It works pretty good. Park is all the way forward close to the dash which gives you some clearance. The reverse, neutral and drive are normal H pattern location fore and aft although in a straight line, of course. Then low is back toward the seat. I discovered that pulling the lever back to low when slowing down does a great job of assisting the mechanical brakes.:D We also hooked the clutch up to the kickdown cable so if you're struggling up a hill just hit the clutch like you're going todownshift and it does.:willy_nil

attachment.php


Had a stray show up. I told Hershey to drive her away or she'd be eating her food. Hershey kind of liked her so we have a new member of the houshold.

attachment.php


I'm not sure what she did but she always looks guilty. Very guilty.

I named her in honor of my favorite Shakespearian quotation: Spot

More later!
 

Attachments

  • IMG_0366.JPG
    IMG_0366.JPG
    107.3 KB · Views: 730
  • IMG_0363.JPG
    IMG_0363.JPG
    36.8 KB · Views: 726
  • IMG_0347.JPG
    IMG_0347.JPG
    49.8 KB · Views: 731
  • IMG_0345.JPG
    IMG_0345.JPG
    53.4 KB · Views: 733
  • IMG_0309.JPG
    IMG_0309.JPG
    74.7 KB · Views: 731
  • IMG_0298.JPG
    IMG_0298.JPG
    51.4 KB · Views: 734
  • IMG_0278.JPG
    IMG_0278.JPG
    45.1 KB · Views: 729

TwoBytes

Well-known member
Joined
Mar 14, 2014
Messages
790
Location
Canberra, 'Stralia
To build from scratch I'd have to forge a crank, cast a block, and build a carburetor. :willy_nil

I suppose I could do that. :willy_nil:willy_nil:willy_nil

Building a tractor seems more your style, something like Vladimir is doing...

If you haven't got enough tractors already :bounce:

I'm sure you could handle the engine parts, the tyres could be tricky though, how are your rubber vulcanising skills?
 

jbmatth

Well-known member
Joined
Jun 3, 2013
Messages
5,685
Location
Northern Ok.
Building a tractor seems more your style, something like Vladimir is doing...

If you haven't got enough tractors already :bounce:

I'm sure you could handle the engine parts, the tyres could be tricky though, how are your rubber vulcanising skills?

Why not just make steel wheels like old farm tractors, then no need for a rubber tree farm? :wtf:

Junk dealer indeed Andy, thanks for letting me visit.

JB
 
OP
O

oldironfarmer

Well-known member
Joined
Jun 25, 2016
Messages
6,664
Location
Terlton, Oklahoma
Junk dealer indeed, and a new stray......

You know how to choose them Andy.

Torture instructor is kinda cute though.

Hmmm, they choose me.

Torture instructor indeed. She prepares my taxes.:evil:

That's a real nice job on the trans tunnel and the crank. That's a unique way to hang curtains.

Thank you.

Apparently the curtain thing is a new style. She purchased the curtains premade although she is an excellent seamstress.

Poor Spot. Doesn’t get to ride in the show truck.

Sent from my iPhone using Garage Journal

I quote Shakespeare every time Spot sets for in the shop:

"Out, out damn spot."

Rat poison in the shop so dogs have to stay out.

Building a tractor seems more your style, something like Vladimir is doing...

If you haven't got enough tractors already :bounce:

I'm sure you could handle the engine parts, the tyres could be tricky though, how are your rubber vulcanising skills?

I couldn't compete with Vladimir. He's an ace.

I can however, vulcanize. I have a hundred or more tires laying around self vulcanizing as we speak.

Nice progress and cute pup!

Thanks!

Why not just make steel wheels like old farm tractors, then no need for a rubber tree farm? :wtf:

Junk dealer indeed Andy, thanks for letting me visit.

JB

Steel wheels! Rough Riders!:rocker::rocker::rocker:

I have more junk for you...
 
OP
O

oldironfarmer

Well-known member
Joined
Jun 25, 2016
Messages
6,664
Location
Terlton, Oklahoma
My son has dual ground source heat pumps for his house.
I happened to be there the day he found a leak.
the heat pumps have circulating pumps in a dual pump setting and he has four of the pump modules.
He only needed six pumps so he has two pump locations with a blanking plate. One of the cast iron blanking plates had corroded through.
I offered to cast him a couple of brass plates. Here's the mold for a blanking plate.

attachment.php


Results of a day's casting from left to right: Spot logo a friend cut out of foam learning about lost foam, a sleeve for radiator hose reduction on the 32, blanking plate with stub for turning, brass hammer, blanking plate.

attachment.php


Sunrise 13 July 2020

attachment.php


Gasket surface turned on blanking plate

attachment.php


Hose fitted on reducing sleeve

attachment.php


Ingots in brass hell. I guess that makes me the devil...:pimpflash

attachment.php


Molds ready for hot metal to be reborn as something useful.:lol_hitti

attachment.php
 

Attachments

  • IMG_0378.JPG
    IMG_0378.JPG
    84.1 KB · Views: 632
  • IMG_0377.JPG
    IMG_0377.JPG
    70.1 KB · Views: 634
  • IMG_0376.JPG
    IMG_0376.JPG
    73.6 KB · Views: 636
  • IMG_0373.jpg
    IMG_0373.jpg
    13.7 KB · Views: 630
  • IMG_0371.JPG
    IMG_0371.JPG
    82.7 KB · Views: 636
  • IMG_0370.JPG
    IMG_0370.JPG
    66.4 KB · Views: 631
  • IMG_0379.JPG
    IMG_0379.JPG
    58.2 KB · Views: 633

xtremek

Well-known member
Joined
Apr 13, 2012
Messages
11,603
Location
St. Johns, Mi
Nice job on the castings. Question on the blanking plates. Why did you put the nubs for the lathe to grab facing up? I would have thought they would have less chance of porosity had they been on the bottom. I get that they're just going to get removed, and definitely not questioning your wisdom, just trying to understand the process.
 

drivesitfar

Well-known member
Joined
Oct 23, 2013
Messages
36,028
Location
Pacific Northwest
now that you've been casting for a while do you still have any issues with pour quality or maybe a bad metal product?

I love seeing you take scrap, make ingots, make castings and then take a fresh cast piece and machine it. OMG that is AWESOME!!

in case you didn't hear we had 60 mph wind here the night before last and if the boys in Florida are getting 2 times that hard during a Hurricane it's hard to believe why they'd live there. since we don't have a lot of underground wiring it knocked out power to close to half a million homes around the PNW.

sunny and calm yesterday and again today so I guess it's true.

have a great day!!
 

Guster

Well-known member
Joined
Mar 11, 2012
Messages
1,543
Location
Auckland, New Zealand
Andy you old brass devil! Happy to see you casting again. Brake cover came out very well. Looks like a thin casting and those brass caps are so pretty!


The transmission hump cover came out a treat too. Love the sheetmetal work. Little hot tuck shrink work at the top? Chevy is coming along nicely.
 
OP
O

oldironfarmer

Well-known member
Joined
Jun 25, 2016
Messages
6,664
Location
Terlton, Oklahoma
Great to see all the production. Well done Andy!

Thank you!

Reminds me of good times this past November

Sent from my iPhone using Garage Journal

Just a normal day in the neighborhood...

Beautiful Sunrise Andy. Glad to see you posting.

Bret

Thanks, Bret!

Nice job on the castings. Question on the blanking plates. Why did you put the nubs for the lathe to grab facing up? I would have thought they would have less chance of porosity had they been on the bottom. I get that they're just going to get removed, and definitely not questioning your wisdom, just trying to understand the process.

Good question. Flat on bottom casts better. Anytime the metal falls there is a chance of washing sand or creating a vortex cavity. The sand is porous and lets the air out nicely as the pour progresses. So the goal here was to flood the bottom then let the metal rise up filling the mold. The defects were at the far side of the bottom where I got a little cold shut on one casting but it machined out. Don't presume I'm wise, I'm just learning and struggling each step of the way. Each success is luck!:rocker:

Now I really want to get back to GJ. Nice work Andy as usual. I have been busy, really!

Funny, since I've been gone I didn't notice you were gone.:bounce:

Nice work, Andy! I always look forward to your updates.

Thanks Tim.

now that you've been casting for a while do you still have any issues with pour quality or maybe a bad metal product?

Thanks for stopping by, Drives. I continually have issues with bad castings and keep trying to improve. The "Quality Shed Time" castings were very consistent but I made 80 or so of them, and used a match plate so every mold was consistent. Still there were variations based on sand moisture and inconsistencies ramming the sand. Sometimes there was sand coming out with the pattern so the mold had extra flashing to be cleaned off. Some of the lettering on the back was better than on others.
I love seeing you take scrap, make ingots, make castings and then take a fresh cast piece and machine it. OMG that is AWESOME!!

I love taking scrap, making ingots, castings, and machining them. Especially to make something I couldn't buy and maybe in less time than it would take to run to town and back anyway. It is great fun. Thank you.
in case you didn't hear we had 60 mph wind here the night before last and if the boys in Florida are getting 2 times that hard during a Hurricane it's hard to believe why they'd live there. since we don't have a lot of underground wiring it knocked out power to close to half a million homes around the PNW.

sunny and calm yesterday and again today so I guess it's true.

have a great day!!

Whew, weather!! I'm with you, I find it hard to believe people want to live in either place unless forced to do so by employment. I lived in Indonesia to work, but was glad to come home. I've worked in Bellingham and Anacortes. Beautiful places when the sun was shining. I don't have the mentality to endure the overcast weeks. Fortunately we are all different and have different desires. Most people can't understand why I like having all my rusting iron setting around. They would have it hauled off to scrap. I have lived all over the world save Antarctica. I prefer the old oak timberland of NE Oklahoma even better than NW Arkansas, SW Missouri (where I was born), or SE Kansas. I have a choice and I choose to live here. East Tennessee was nice but the sides of the houses would turn green. I appreciate the arid climate here with enough rainfall, about 30 inches per year. And, tornadoes keep the wimps away.:lol::lol::lol:

Andy you old brass devil! Happy to see you casting again. Brake cover came out very well. Looks like a thin casting and those brass caps are so pretty!

The transmission hump cover came out a treat too. Love the sheetmetal work. Little hot tuck shrink work at the top? Chevy is coming along nicely.

Brass melts in my presence...

Thanks for the good words.

I did get the top flange of the hump at too sharp of an angle. The screws would have held it down to the toe board but I'm trying to learn. Shrinking it was the only way to bring it back in line. Cold shrinking wasn't working so I did a little heat and water. More later...
 

shortykorte

Well-known member
Joined
Sep 1, 2014
Messages
8,039
Location
Tallahassee, Fl
Drives, we endure 100 mph winds here in Florida because following the hurricane is sun, following the sun are bikinis.


Sent from my iPhone using Garage Journal
 
To avoid these ads, REGISTER NOW!
Top Bottom