To avoid these ads, REGISTER NOW!

30x48 garage stem wall elevation variation

rhejohnstone

Member
Joined
Aug 4, 2018
Messages
14
Location
Fox lake
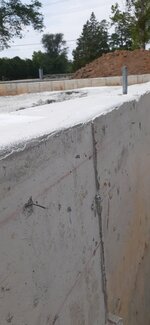
Looking for advice on a stem that was that slopes down 2- 2.5" to rear.

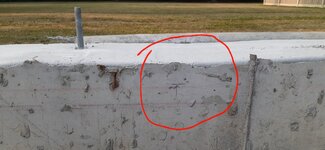
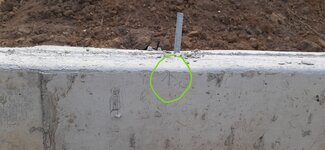
The wall forms were marked the night before the pour using a Bosch GLL100-40G and yard stick indicating the top off the wall. I showed 1 of the marks on the morning of the pour to the contractor to let him know this was the elevation i wanted. The contractor also has the proper tooling to check the elevation, i figured the elevations would be checked during the finshing and pouring process... I guess not.

To my surprise when the wall forms were removed my pencil marks placed before the concrete was poured transferred to the walls clearly indicating the elevation difference.

I've lost confidence in the concrete contractor at this point and not sure the the best way to proceed.

Large metal shims with no shrink grout forthe mud sill?

Build with the wall as is and cut each stud to match the desired elevation?

Have the wall cut or ground down?
 

Attachments

  • 20210725_230138.jpg
    20210725_230138.jpg
    244.5 KB · Views: 126
  • 20210724_151637.jpg
    20210724_151637.jpg
    261.6 KB · Views: 117
  • 20210720_143259.jpg
    20210720_143259.jpg
    470 KB · Views: 130
To avoid these ads, REGISTER NOW!

Michigan Mike

Well-known member
Joined
Sep 12, 2012
Messages
449
Location
Kalamazoo Mi.
Have a concrete cutting company come out and cut it. Deduct the cost from the concrete contractors bill. I would not shim it. I would not let the concrete contractor cut it.
 

PCustoms

Well-known member
Joined
Jul 23, 2011
Messages
22,748
Location
VT
Why wasn't the form level?

As far as I know, they set the form, fill it and screed along the top. It looks like your pencil marks were inside the form, leaving them no way to screed the surface.
 

ConCretin

Well-known member
Joined
Jan 20, 2011
Messages
3,378
Location
Central Maine
That is some shoddy workmanship to be sure. It's common to mark grade on the forms and finish the concrete to that point. Chalk lines, grade nails, or something similar are usually used to indicate grade. Some skill and diligence in finishing is required, which was obviously lacking in your case. The contractor is clearly responsible for the repairs although getting them done to your satisfaction may be a challenge.

You could cut down the high spots on the wall but unless your concrete guy happens to have the gear and the skill to use it, you'll need a specialty contractor or rental equipment. This is definitely an option if you can figure out the logistics.

I'd be inclined to level the top of wall by filling the low areas. I'd shoot a grade line 6" down from the highest spot. Rip 6" strips of plywood and Tapcon them to the wall aligning the lower edge with the grade line. Use an appropriate repair mortar and fill level with the top of the plywood. Given the price of plywood, you could do this in sections. I wouldn't use non-shrink grout - it would be difficult to work with. There are repair mortars that can accommodate fairly thick fills, feather out well and have a compressive strength in excess of the concrete below. I can recommend one if you'd like.
 
OP
R

rhejohnstone

Member
Joined
Aug 4, 2018
Messages
14
Location
Fox lake
Why wasn't the form level?

As far as I know, they set the form, fill it and screed along the top. It looks like your pencil marks were inside the form, leaving them no way to screed the surface.
I only showed him one mark on the form and it was up to him to do what he is being paid to do and reference that mark around forms with his laser. The other pencil marks were for me to check and make sure we would have enough form for a level wall. The contractor did snap a chalk line and nalils along the chalk line to establish the top of wall around the perimeter of the forms. The nails are poping out of the concrete on the high spots...
 

Attachments

  • 20210724_120754.jpg
    20210724_120754.jpg
    186.1 KB · Views: 94
  • 20210724_120805.jpg
    20210724_120805.jpg
    194.5 KB · Views: 73

kelpaso1

MEMBER EMERITUS
Joined
Sep 28, 2009
Messages
3,962
Location
New Brunswick
Why do bad concrete jobs seem to be a weekly thing here on GJ? Seems like you guys have the crappiest concrete guys there. Is there even courses or school for concrete installers there?
 

Michigan Mike

Well-known member
Joined
Sep 12, 2012
Messages
449
Location
Kalamazoo Mi.
The contractor obviously missed even his own grade nails as shown by your picture of one sticking out of the concrete. I would take LLWIllysfan's offer of a recommendation for a repair mortar. He is definately the concrete guru on this forum.
 

billconner

Well-known member
Joined
Jul 20, 2021
Messages
6,964
Location
Thousand Islands NYS
I'm with LLWillysfan. Make sense and should function fine. Appearance if not covered will suffer a little. I have to wonder if setting new top of concrete an inch higher than high spot would eliminate very thin areas of the repair mortar.

I'm not sure why top of form was not top of wall and screed to that, but another story I'm sure.
 
To avoid these ads, REGISTER NOW!
OP
R

rhejohnstone

Member
Joined
Aug 4, 2018
Messages
14
Location
Fox lake
That is some shoddy workmanship to be sure. It's common to mark grade on the forms and finish the concrete to that point. Chalk lines, grade nails, or something similar are usually used to indicate grade. Some skill and diligence in finishing is required, which was obviously lacking in your case. The contractor is clearly responsible for the repairs although getting them done to your satisfaction may be a challenge.

You could cut down the high spots on the wall but unless your concrete guy happens to have the gear and the skill to use it, you'll need a specialty contractor or rental equipment. This is definitely an option if you can figure out the logistics.

I'd be inclined to level the top of wall by filling the low areas. I'd shoot a grade line 6" down from the highest spot. Rip 6" strips of plywood and Tapcon them to the wall aligning the lower edge with the grade line. Use an appropriate repair mortar and fill level with the top of the plywood. Given the price of plywood, you could do this in sections. I wouldn't use non-shrink grout - it would be difficult to work with. There are repair mortars that can accommodate fairly thick fills, feather out well and have a compressive strength in excess of the concrete below. I can recommend one if you'd like.
My only concern would be how well the thin spots would hold up and geting a good bond to the wall. Do you thing installing large metal spacers at the anchor bolts and filling around the open areas would be a option? What type of mortar would you suggest?
 

Attachments

  • Screenshot_20210726-134117_Chrome.jpg
    Screenshot_20210726-134117_Chrome.jpg
    231.8 KB · Views: 84

Daniel Dudley

Well-known member
Joined
Sep 4, 2009
Messages
3,546
I'm with LLWillysfan too. Plywood and tapcons is something anyone can do, and it will be super easy to adjust the level to perfection. Drop your siding if you want it to disappear. Your plate has to be flush or slightly overhang to do this properly, but that is common knowledge.
 
OP
R

rhejohnstone

Member
Joined
Aug 4, 2018
Messages
14
Location
Fox lake
I'm with LLWillysfan. Make sense and should function fine. Appearance if not covered will suffer a little. I have to wonder if setting new top of concrete an inch higher than high spot would eliminate very thin areas of the repair mortar.

I'm not sure why top of form was not top of wall and screed to that, but another story I'm sure.
I agree the footer should have been poured level .Just a sloppy job. I work full time, I wish I had taken time off for the pours to make sure everything was where needed to be. I was told to trust the process, should have trusted my gut.
 

billconner

Well-known member
Joined
Jul 20, 2021
Messages
6,964
Location
Thousand Islands NYS
BTW, footings should not usually slope. They should be stepped. Is it backfilled? If so any photos? I'd have an engineer review. Worth a few hundred I think.
 

ConCretin

Well-known member
Joined
Jan 20, 2011
Messages
3,378
Location
Central Maine
My only concern would be how well the thin spots would hold up and geting a good bond to the wall. Do you thing installing large metal spacers at the anchor bolts and filling around the open areas would be a option? What type of mortar would you suggest?
While I haven't seen a topping job quite as bad as yours, we have had similar situations arise over the years where the guys didn't get the wall as flat as they should have. in other cases we've done walls that support panelized wall systems where the flatness tolerances are just about impossible to meet with hand finishing and we've had to go back and level things up.

In most if not all cases, we've used the plywood method I described previously to guide both the grinding and filling operations. The result is a perfectly flat wall. We've never had so much a crack. I don't recall the name of the product we used most recently but I'll look it up tomorrow and post the info.
 

ConCretin

Well-known member
Joined
Jan 20, 2011
Messages
3,378
Location
Central Maine
The product we most recently used for this type of application was Silpro TDQ. Worked great. It is approved for thicker repairs but feathers out nicely.
 
OP
R

rhejohnstone

Member
Joined
Aug 4, 2018
Messages
14
Location
Fox lake
Is it standard practice with a sloped natrual grade to use back fill at the low areas to achieve frost protection at 42"? I noticed my rear footers were only at 36" to bottom of footing. Im sure it will be fine but is this correct?
 

billconner

Well-known member
Joined
Jul 20, 2021
Messages
6,964
Location
Thousand Islands NYS
I believe the bottom of a footing is required to be a minimum of 12" below the frost line, or be frost protected. Most garages built recently around here - 48" frost depth - are on shallow frost protected foundations.
 

The Tool Tyrant

ALLIANCE MEMBER
Joined
Dec 19, 2011
Messages
2,182
Location
Bonita, Ca. (San Diego)
If it were MINE, and being as I framed for 32 years, I'd snap a straight line on the slab to represent the top (layout) plate line, then square and snap lines for the two ends studs. Shoot top of your stem walls to verify height difference at both ends. Measure and mark that difference on the two end stud snap lines, now connect those two marks with a snap line witch will indicate your bottom stud cut line.
Nail the top (layout) plate to all of the studs, double check & line-up the snap lines with the plate and end studs. Transfer the lower snap line marks to the top of the end studs, then snap a line across the bottom of the studs (or you can just square across the stud face down to the snap line. Cut the studs and nail on the bottom plate. Done...easy-peezy.
 

ConCretin

Well-known member
Joined
Jan 20, 2011
Messages
3,378
Location
Central Maine
Is it standard practice with a sloped natrual grade to use back fill at the low areas to achieve frost protection at 42"? I noticed my rear footers were only at 36" to bottom of footing. Im sure it will be fine but is this correct?
Frost protection is provided by soil depth regardless of whether it is native soils or fill. As long as you have 42" cover from finish grade, you'll be fine.

Presumably your slab will also require some fill material to provide a level base? If so, make sure they remove any organic material including topsoil and compact a granular material in lifts.

Btw, ToolTyrants suggestion ain't bad.
 

andyvh1959

Well-known member
Joined
Feb 15, 2020
Messages
2,597
Location
Green Bay WI
While I agree with the framing adjustment to make it work out, still need to plan siding to cover over the sill plate and extend low enough to present a level siding line on the outside.

What really stinks is paying a contractor, paying a "professional", to do what can be termed as expected competency (like an implied warranty that brakes are expected to stop a vehicle) only to have sloppy don't give a **** results. My wife has said "why don't you just pay someone to get it done?" Too which, I can recite results that were far less than even the standard quality I'd expect to pay a pro to provide.

For certain, anything I do hire out, I am on site checking the basics before the work progresses, and requiring adjustments/corrections before the critical work is done.
 
OP
R

rhejohnstone

Member
Joined
Aug 4, 2018
Messages
14
Location
Fox lake
Frost protection is provided by soil depth regardless of whether it is native soils or fill. As long as you have 42" cover from finish grade, you'll be fine.

Presumably your slab will also require some fill material to provide a level base? If so, make sure they remove any organic material including topsoil and compact a granular material in lifts.

Btw, ToolTyrants suggestion ain't bad.
The plan was for pea gravel for inside wall backfill and floor area.
 
To avoid these ads, REGISTER NOW!
Top Bottom