To avoid these ads, REGISTER NOW!

The VINTAGE toolboxes of Garage Journal!

Graeme

Well-known member
Joined
Sep 30, 2021
Messages
152
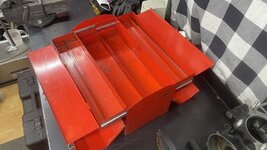
The autopro top box is rough, rusty inside, and needs some welding (rear of lid has split, hole bottom left front, spot weld gone on top front corners).
I don't think this will get away without 're paint.

20211005_134458.jpg

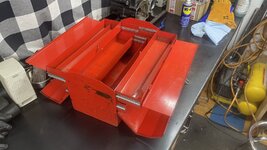
The Gray top box is pretty good, but the front has had flames, a name, and various other stuff scratched in it. Alot of sticker fade too. Top is rough but I could live with it.

20211005_134416.jpg20211005_134422.jpg

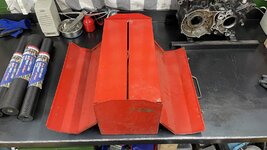
The mid box is just generally worn, and a little bent.
20211005_134430.jpg

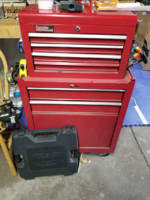
And the base cab is generally scratched, sticker damage, cement (which I will hopefully get off)
20211005_134438.jpg20211005_134451.jpg

That last image is after a bit of a polish.
All the black marks are rust.

I'm in two minds to be honest. I'm not normally one for painting stuff unless it really needs it.

I'll probably try polishing it more first, but I really want to use the autopro top box and if that gets painted, the rest will need to be done to match!
 
To avoid these ads, REGISTER NOW!

Graeme

Well-known member
Joined
Sep 30, 2021
Messages
152
Great looking stack. I really like the Beach-made boxes.

Personally, I'd leave it alone. Stripping, sanding, painting, properly reattaching hardware.....LOTS of work and that stack wouldn't warrant it from me. To each his own though. Reattaching the hardware properly isn't that difficult to source or execute and isn't that much when compared to how crappy pop rivets, rivnuts, etc look (again, to each his own).

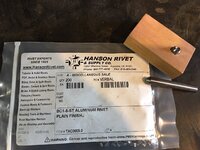
I use Hanson Rivet and Supply (pic with contact info attached). If you get a cheap digital caliper, you can measure the thickness of drawer pull along with the thickness of the metal you're attaching it to. Call Hanson with that info, along with the diameter of the rivet you need and they'll hook you up. Rivets aren't that expensive but you'll need to buy the setting tools as well. There's a few different routes you can take with that, the Hanson rep can walk you through it.

With all the work involved with disassembling that for a repaint, it's worth the investment to put it back together correctly. Best of luck and let's see it when you're done.

NOTE: The rivets in the picture are NOT the size you need for those drawer pulls. IMG_0042.jpg
I'm in the UK, so rivet stuff is harder to source. Not impossible though.
I have calipers to measure for the rivets, it's the diameter I won't know untill I remove one.
As for the setting tools, I have a lathe (quite nice actually, 1902 Drummond, maybe I should do a thread on it one day), so I've thought about making a die, maybe even making a squeezer.

Once I know what size rivets, I'll buy some, see if I can make a tool, practice, and if it goes well I'll think more about painting the boxes.

Apart from the rough box, which will probably get painted anyway. As I say, I could always use rivnuts and machine screws if I really needed to.
 

Graeme

Well-known member
Joined
Sep 30, 2021
Messages
152
Looking at the pics I've posted, it still doesn't look THAT bad.
I look at my pics and think I'll leave it, then I see it in real life and I'm not so sure.
 

Tynee

Well-known member
Joined
Sep 19, 2016
Messages
1,006
Location
In the Heart of the Bluegrass
Looking at the pics I've posted, it still doesn't look THAT bad.
I look at my pics and think I'll leave it, then I see it in real life and I'm not so sure.
My suggestion, since you've got 2 top boxes, is to refinish the one you are less likely to end up using. Learn a thing or 3, use it as practice and to decide if you think the level of effort for the rest will be worth the results you feel you are capable of achieving. I know it ends up adding significantly to the total level of effort, but it's a good way to make the decision, and it's just more time spent on your hobby, right?

Of course, if this is not a hobby, rather something you're doing out of necessity for whatever reason, the above advice is bunk. Ignore it with impunity....
 

Graeme

Well-known member
Joined
Sep 30, 2021
Messages
152
My suggestion, since you've got 2 top boxes, is to refinish the one you are less likely to end up using. Learn a thing or 3, use it as practice and to decide if you think the level of effort for the rest will be worth the results you feel you are capable of achieving. I know it ends up adding significantly to the total level of effort, but it's a good way to make the decision, and it's just more time spent on your hobby, right?

Of course, if this is not a hobby, rather something you're doing out of necessity for whatever reason, the above advice is bunk. Ignore it with impunity....
That's the plan.
My favourite is unusable as it is and the welding it needs will mean it will definitely need paint.

I'll start a thread on it when I get going.
 

RTM

Well-known member
Joined
May 13, 2019
Messages
13,392
Location
SF Bay Area
Looking at the pics I've posted, it still doesn't look THAT bad.
I look at my pics and think I'll leave it, then I see it in real life and I'm not so sure.
Oh man the standards we all set. Around here, that's a shining star. I've got to be below 50% usable paint before I repaint (did I mention I hate spray paint & cans?). I have a small Snap-on box where the bottom is almost bare. I removed some rust, gave it a coat of clear matte finish, just so I don't have to paint it. Mine are users, not show pieces. Just need to keep the rust at bay living within sight of the great Pacific rust generator.

The top, as found
PXL_20210911_003833944-X2.jpg

The bottom, before derusting abrasively, and clear coat.

PXL_20210912_223803100-X2.jpg


Did I mention I hate spray paint?
 

Graeme

Well-known member
Joined
Sep 30, 2021
Messages
152
Oh man the standards we all set. Around here, that's a shining star. I've got to be below 50% usable paint before I repaint (did I mention I hate spray paint & cans?). I have a small Snap-on box where the bottom is almost bare. I removed some rust, gave it a coat of clear matte finish, just so I don't have to paint it. Mine are users, not show pieces. Just need to keep the rust at bay living within sight of the great Pacific rust generator.

The top, as found
PXL_20210911_003833944-X2.jpg

The bottom, before derusting abrasively, and clear coat.

PXL_20210912_223803100-X2.jpg


Did I mention I hate spray paint?
Now if it looked like that, I'd probably leave it be!
I've only played around at polishing it, it may come up better.
Your box there looks great and wears it's age well.
These just look tatty. It's the sticker damage and scratched graffiti that annoy me.

No decisions have been made yet though.
 

fnlow

Member
Joined
Jan 28, 2015
Messages
12
Location
Australia
The autopro top box is rough, rusty inside, and needs some welding (rear of lid has split, hole bottom left front, spot weld gone on top front corners).
I don't think this will get away without 're paint.
20211005_134458.jpg

The Gray top box is pretty good, but the front has had flames, a name, and various other stuff scratched in it. Alot of sticker fade too. Top is rough but I could live with it.
20211005_134416.jpg20211005_134422.jpg

The mid box is just generally worn, and a little bent.
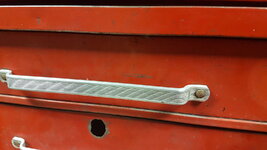
20211005_134430.jpg

And the base cab is generally scratched, sticker damage, cement (which I will hopefully get off)
20211005_134438.jpg
Try some acetone on a rag and wipe down. It might need some extra effort on the paint spills. I think you will be impressed with the results.
 

beatcad

Well-known member
Joined
Sep 15, 2013
Messages
4,520
Location
NOVA
I scored this about a month ago but haven't shared it.. the favorite summer find made me show it.
It's an early National tool chest. National was the Gerstner economy(cheaper) line of chests. It's the same model chest that got me into the wooden chest thing. But it's earlier. Maybe 40s? Not much research or collective knowledge on these. And yes, I'm up to 20 or 21 wooden chests now16335719528846389223099063550089.jpg16335719990386541155213110756619.jpg
 

Blackwolfe

Well-known member
Joined
Sep 28, 2016
Messages
53
Location
Sunset MI
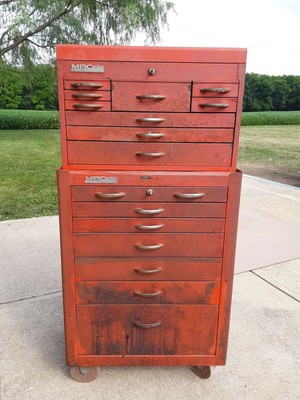
No dog in this hunt, but stumbled on this on EB for anyone that might be interested. MB Century top and roller. Was $195 yesterday and now $185. If I had the time and space for it, I'd probably go for it. Pick up only, about 25 miles west of Indy.


Blackwolfe

Well-known member
Joined
Sep 28, 2016
Messages
53
Location
Sunset MI
Nice old box, but i have to ask. And I admit I'm totally 'off thread' and expect to be told off.. But... What is the crop in the field behind it in the photo's?

That's nice!
Shame it's 3912 miles away from me.
About 200 miles from me and round trip would be a full day, but if I had room, and the time I'd make the trip. Have invested more for less in the past. Besides I have far too many unfinished projects.
Nice old box, but i have to ask. And I admit I'm totally 'off thread' and expect to be told off.. But... What is the crop in the field behind it in the photo's?
It's Indiana, so my guess is corn.
 

Graeme

Well-known member
Joined
Sep 30, 2021
Messages
152
About 200 miles from me and round trip would be a full day, but if I had room, and the time I'd make the trip. Have invested more for less in the past. Besides I have far too many unfinished projects.

It's Indiana, so my guess is corn.
Sometimes you just have to go to where the stuff is.
My recent beach tool box purchases were 4 boxes, from 4 different sellers. Took 9 hours driving round in a big loop picking them all up in one go.

I should get that box put in the back of a pick up, import the truck, sell the truck when it gets here and make a profit as well as getting a free box.

Loads of effort though!
 

Farmer J.

Well-known member
Joined
Sep 18, 2016
Messages
1,997
Location
UK, Cornwall/Hertfordshire.
I should get that box put in the back of a pick up, import the truck, sell the truck when it gets here and make a profit as well as getting a free box.

Loads of effort though!
Nah, don't bother mate, I tried that when I was a teenager. I had a nice 18,000 mile drive but then the stuff in my truck got stolen in Baltimore docks before it was even shipped, and then UK fuel prices and a thirsty US vehicle left me no profit ! The experience was fun though, and I met some nice girls there.
 
To avoid these ads, REGISTER NOW!

Dennis Leigh Henry

Well-known member
Joined
Apr 8, 2013
Messages
6,302
Location
South Central, IN USA
Havent posted here in a while.. but landed these this past weekend at an auction. Second one in the collection. Heavy hoss ..

full


full
 

mikedodge

Well-known member
Joined
Jun 27, 2017
Messages
2,911
This is my newly acquired beach/autopro/Gray set.
I have an autopro branded 6 drawer top box too.
It could probably do with a repaint but there are 2 things I'm struggling with.
I have to order the paint, which means I need to know a ral or bs paint code that will match well. I really like the colour so don't want to end up more orange.
Does anyone know what works? I can't find anywhere local I can go and look at charts.
Secondly, the handle rivets.
Sorting out proper semi tubular rivets is looking tricky and by the time I've bought tooling too, it may get expensive.
I'm going to try and do it properly though. I want to practice before drilling the old ones out though, does anyone know the diameter and length of rivet used?
I'd no can't sort proper rivets I have 2 choices. Pop rivets, or rivnuts and slotted screws. If I need to go with one of those, which would you choose?

20211003_184925.jpg
I was going to say that looks like one tall box, then suddenly realised that it's similar to mine except that mine has craftsman beach intermediate and top boxes with black drawers and the Craftsman style handles.
 

old_smokey

Well-known member
Joined
May 16, 2018
Messages
412
Location
Manitoba
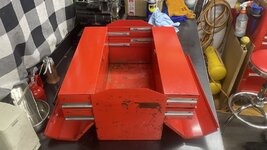
I picked up this old Mastercraft box for a couple dollars today on a gamble. The thing looked super rough and was all jammed up.

mastercraft is a pretty budget line of tools in Canada. But I have an amazing full stack badged as mastercraft, but made by Beach Industries. This box is super heavy and well made, but I can’t find any model number or anything on it other than the Mastercraft deboss on the lid. Any ideas?

I brought it home and got to work. After spending 30 minutes scrubbing, cleaning slides, vacuuming, bending metal back into shape and so on, I have a reasonably useable box that’s pretty unique.

the one thing I couldn’t bring back was the top/lid paint. It’s really rough from rust under it. I could strip it all and repaint, but i dunno if that’s in the cards. I’ll use this as my trail box for dirt biking I think.
 

Attachments

  • CEABFC8D-93E5-4220-B4BD-C34EE91D1CD1.jpeg
    CEABFC8D-93E5-4220-B4BD-C34EE91D1CD1.jpeg
    277 KB · Views: 53
  • D2E427DC-EFE0-4C1A-9B9B-D71ADF6D389C.jpeg
    D2E427DC-EFE0-4C1A-9B9B-D71ADF6D389C.jpeg
    250.8 KB · Views: 53
  • 85ADBC02-89A0-402D-A6EF-9328A347B4CB.jpeg
    85ADBC02-89A0-402D-A6EF-9328A347B4CB.jpeg
    249.2 KB · Views: 51
  • 3D0EAE7A-25CB-4C76-A1AE-8541D07F1B4D.jpeg
    3D0EAE7A-25CB-4C76-A1AE-8541D07F1B4D.jpeg
    262.6 KB · Views: 48
  • 684FA918-392F-41D9-A291-2FAEF9432E91.jpeg
    684FA918-392F-41D9-A291-2FAEF9432E91.jpeg
    265.4 KB · Views: 49
  • 1175A551-4237-43BC-9961-70509D5A7AB8.jpeg
    1175A551-4237-43BC-9961-70509D5A7AB8.jpeg
    241.7 KB · Views: 56

flyingwolf

Active member
Joined
Nov 3, 2019
Messages
44
Location
Northern Kentucky
Oh man do I have a few for this thread!
I will get pics of all of them tomorrow, but here is my daily driver.

Been with me for longer than my wife, more reliable too...

Only thing missing is that darned 4th drawer silver trim piece, I have been looking for a replacment set everywhere and cannot find one anywhere.

1634098218070.png

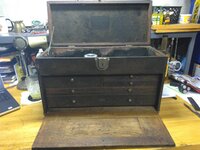
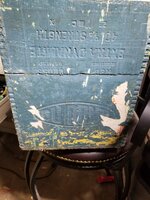
I found this old box gathering dust in the back corner of the garage, it is going to be turned into a nice benchtop box. It is an old DuPont dynamite box. And since regular dynamite isn't a big enough boom, this one is 40% stronger!

I am going to just clean it up and seal it, leave the years of different paint and wear on it, I like the look.

20211002_205655.jpg
 
  • Like
Reactions: 555

Private Lugnutz

Well-known member
Joined
Mar 30, 2012
Messages
30,923
Location
The Authentic Jersey Shore
Thats a cool box!
:+1:
Any ideas?
None! I don't recall seeing any box that style before. I want one! A different approach than the cantilevers, with a similar result. I'm curious about two things, though. What is the depth of that main compartment (underneath the sliding drawers)? And how sturdy are the slide mechanisms? I'm thinking you'd have to limit the weight in those compartments.
 

old_smokey

Well-known member
Joined
May 16, 2018
Messages
412
Location
Manitoba
:+1:

None! I don't recall seeing any box that style before. I want one! A different approach than the cantilevers, with a similar result. I'm curious about two things, though. What is the depth of that main compartment (underneath the sliding drawers)? And how sturdy are the slide mechanisms? I'm thinking you'd have to limit the weight in those compartments.
The bottom main compartment measures as 18" long, 8.5" wide, and 4.25" tall. A decent size for larger hand tools, organizer bins etc.

The slides themselves are pretty robust. They're the same exact slides as my full-size Beach stacks, just shorter. The 'female' sides are spot welded to the box frame. The male sides are riveted to the bins, two rivets per compartment. I wouldn't have any issue loading them up with a full socket set or something comparable.

The bigger issue is total weight of the box plus tools. Even empty it's quite substantial. Lifting it 'loaded' will be a challenge!
 
Last edited:

Modern Garage

Well-known member
Joined
Mar 26, 2015
Messages
589
Location
Southern Minnesota
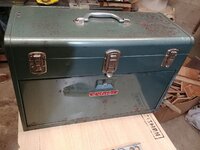
I found this box on FB for $20. Belonged to the sellers father who used it for electronic parts storage. All metal, 20 1/8 tall, 13 1/2 wide, 8 1/2 deep. In good shape overall, very clean interior and green felt still nice in all the drawers and top, but significant rusting (cosmetic not structural) on the top and RH bottom. Soap and water and rubbing compound had no effect so I stepped up to wet 600 grit paper and then back to compound and a good rubbing with wax. I'm happy with it now. It certainly doesn't look new but it feels good to the hand and I think it looks a little like green granite. I'm used to rusty spots turning white when waxed but the 600 grit smoothed it enough to prevent that. The chrome on the latches is beyond help so I may find a tiny wire brush or flap wheel for the Dremel and see what I can do.
Joe
 

Attachments

  • 1013211406.jpg
    1013211406.jpg
    328.1 KB · Views: 71
  • 1012211836.jpg
    1012211836.jpg
    291.5 KB · Views: 80
  • 1013211405.jpg
    1013211405.jpg
    308.8 KB · Views: 75

Username already in use

Well-known member
Joined
Sep 4, 2015
Messages
2,177
Location
Ohio
Well, it started a few years ago with a Remline 3D top box. Then back in August of this year, I spied a Remline center/intermediate box from a FB Marketplace ad.
I was building this stack from the top down, it would seem.
Yesterday, I'm browsing Marketplace.... (I should really stop doing that), and I spied a Remline bottom box for $20! Needless to say, it's followed me home.
I was hoping for a Remline bottom box with more drawers, but for $20, I'm not going to complain!

Here's the top two boxes again.

img_2874-jpeg.1507078


And the roller with the crappy repaint. Hopefully, one day, it will look as nice as @Gunfighter556 's box.

IMG_4181.jpg
B631E6E5-886D-40B9-8205-02A5EDBFDFA9.jpeg
 
Last edited:

Tynee

Well-known member
Joined
Sep 19, 2016
Messages
1,006
Location
In the Heart of the Bluegrass
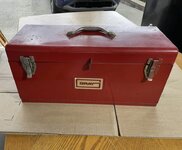
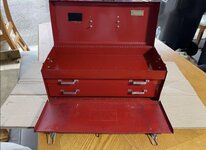
I scratched the itch today. Found this one on FB while traveling in Pittsburgh for work. I thought his $20 asking price was fair. Wouldn’t say I “need” it, just thought it was cool, and I’ve never seen a Gray toolbox, much less one like this 221E6393-174F-4150-A4E7-439F90C2F901.jpeg
06EBBFF6-A0F9-4777-9AF4-8AEDA2105156.jpegBD41264A-9CFF-4F36-B444-DABDA41BAFBC.jpeg
 

bmwrd0

Well-known member
Joined
Nov 7, 2010
Messages
5,555
Location
Beaver Fever Oregon
51608756778_65fe9dcce5_c.jpg
I picked this up over the weekend,

51607718147_b2031a520f_c.jpg
51608538996_0b919db6ee_c.jpg
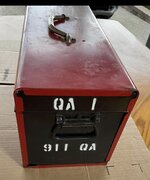
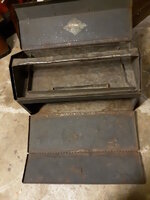
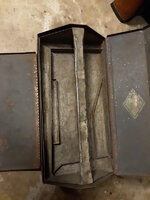
Has a very interestingly laid out tray, with lots of organizing dividers. There are some in the main compartment for 3/4" sockets.
51609443825_a4bb4cb221_c.jpg
You can just make out the former owner's name after a bit of lite cleaning; McConnell. So this won't get a repaint.

51593363031_12558c1950_c.jpg
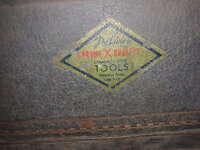
It was made for Western Auto's trade brand ChromeXquality, and can be seen in this shameless eBay snip on the top right:
51608982506_e8654559f6_c.jpg
It also appears in the '38 Duro catalog, pg 31. Here you get a list of everything that could be in it, which was quite a lot. I would hate to have to lift this beast fully laden. I will keep an eye out for CXQ sockets and wrenches, but In the meantime, I will put my Duro/Indestro stuff in there. Not sure where I am going to keep it though...
 
To avoid these ads, REGISTER NOW!
Top Bottom