To avoid these ads, REGISTER NOW!

Above 1200 Sq/FT Swiss Garage / Workshop / House Build

Wokspaces above 1200 squarefeet.
To avoid these ads, REGISTER NOW!

rixtrix1

Well-known member
Joined
Aug 25, 2013
Messages
3,010
Location
Chandler, AZ (from west NE)
Wow, the garage and your storage looks great. I was a high school senior when the 240Z came out and I got to drive the first one the dealer got( nice to have friends in the right places. Excited to see how your's turns out!
 
OP
J

JDMjunkies.ch

Well-known member
Joined
Dec 27, 2016
Messages
447
Location
Switzerland
Today is the second day of my covid-related home-vacations. I decided to finalize my workshop with a few things i had planned for long. so i started to plan everything months ago to be ready when i'm at home. Unfortunately it didn't quite turn out as expected. But lets start from the beginning...

First i got myself a workshop press:
DSC_3611-Kopie-rotated.jpg

Ignore the dirty floor. i'll get that done when the rest is finished...
DSC_3907-Kopie-rotated.jpg

So far so good. Yesterday i changed all the conventional digial switches in the garage area to the Loxone smarthome switches we have.
DSC_3903-Kopie-1.jpg

Why? you might wonder? well first of all we now have the same style of switches in the whole house. which makes it easier to unerstand the concept. Second it's much smarter. aside from 5 different touch areas (center and each corner), it can be used for many things. for example the two switches on the right side are to control the radio, the two on the left for the garage door. the center (single, double, triple-click or even a long-click) allow for various light scenes, alarm etc..
But. the most important to me is: these things also measure humidity and temperatureand send it to the smarthome logic. So now i have track of that in my app and can use the values for whatever i want.
Screenshot_20210608-071445-Kopie.png

So why would anybody want that, you ask? Aside from keeping all your stuff under control. the real reason is what showed up at the door today:
DSC_3912-Kopie.jpg

A heavy duty industrial dehumidifier and air cleaner, which can be controlled by the values measured by the smarthome:
dh60-ps-10-7b43.jpg

Unfortunately what showed up today was completely damaged and unuseable. after almost two months delivery time, i guess i have to wait a lot more..
DSC_3915-Kopie.jpg

The problem is i have a lot of new stuff ready to go on the wall, but i want the lager dehumidifier to go up there first, so i can do all in once (need help to get it up there) and secondly i want to make sure everything has enough space...
Still got the datsun sign to hang on the wall, but also a lot of new decoration, like this OS-giken poster:
DSC_3428-scaled.jpg

Or this super-fancy rare swiss vintage Datsun promotional jackets which i put in a frame:
DSC_3901-Kopie.jpg

But also a fire extenguisher:
DSC_3908-rotated.jpg

At least i could hang these lift-ramps (for low cars, like my honda) to the lift-post with some magnets :)
DSC_3909-Kopie-rotated.jpg

Thats it for now. hope to be able to finalize the garage soon. too bad it won't be this week... And after that, i really hope to work on the cars again...
 

cros13

Well-known member
Joined
Sep 29, 2014
Messages
496
Location
Sydney, Australia
Poster looks great! Are you planning on getting A OS-GIKEN twin cam head?

I read they are doing a new run of them. But you have to buy a entire engine from them. rated to 400hp and rev to 10-12k RPM. only cost 62,000 Euro! ha!

Rudi.
 
OP
J

JDMjunkies.ch

Well-known member
Joined
Dec 27, 2016
Messages
447
Location
Switzerland
Poster looks great! Are you planning on getting A OS-GIKEN twin cam head?

I read they are doing a new run of them. But you have to buy a entire engine from them. rated to 400hp and rev to 10-12k RPM. only cost 62,000 Euro! ha!

Rudi.
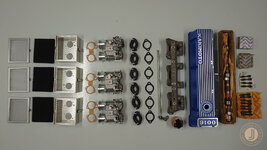
Hi Rudi, yeah you can buy the OS TC24B1Z engines now as a complete, built motor. If you buy it, you have a variety of options and bolt-ons to purchase or not. I'd love to have one, but honestly i think it's impossible to get it street legal in my car without investing a serious amount of money. Switzerland is really complicated when it comes to engine modifications registering. Also the Engine itself is not exactly cheap, but an absolute engineering marvel!
 
OP
J

JDMjunkies.ch

Well-known member
Joined
Dec 27, 2016
Messages
447
Location
Switzerland
I have some news, so it's time for another update, i guess :)

Since i’m now completeing my business education, my progress with the car is a bit slow until – after two years – my exams are completed in April next year.
Then i plan to get that damn car back on the road as soon as possible. in the meantime i only have limited time and mostly like to spend it for research and buying stuff.
I therefore decided it’s time to upgrade my workshop a bit, so i can get some work done by myself in future. The first pallette arrived a few days ago:
DSC_4535-Kopie.jpg

Yes, a cheap Sandblasting cabinet, which is the perfect choice for someone who will rarely use it :)
DSC_4538-Kopie.jpg

Today finally the second pallete showed up, with (after 3 more months!) seems to be a complete dehumidifier (see few posts earlier for details). I'm happy its finally here and looking good, but still not exactly thrilled it took them a half year to get me an undamaged unit:
DSC_4552-Kopie.jpg

What else is going on? I bought a "Barn-find" Lot of NOS and used (partially super rare) Datsun 240Z parts. And don't ask me - nothing is for sale (most is sold already, the rest i keep for myself):
DSC_3263-Kopie-1.jpg

Speaking of old "Barn find" Lots. I also helped my friend who is currently restoring a rare swiss Datsun 240K-GT (aka the Kenmary skyline) get a similar Lot of rare old european Parts: (btw: cars from left to right: C110 (Kenmary skyline), C10 (Hakosuka skyline), Laurel C30 and RX-7 FC3 (with a 1JZ Swap) - quite the collection in europe, although the red car is a customer project):
WhatsApp-Image-2021-05-19-at-12.57.54-Kopie.jpg

It's already a few months ago, but but somehwere inbetween we also took a little detour over the fantastic Julierpass:
IMG-20210309-WA0018-Kopie.jpg

And i've been starting to write a big multi-part story about Datsun switzerland and it's history, which is very interesting.
Check it out here if that's your type of thing:
https://www.jdmjunkies.ch/wordpress...story-of-prince-datsun-nissan-in-switzerland/

And therefore i've started to collect (aka hoard) vintage Datsun Switzerland documents:
DSC_3800-Kopie.jpg

This includes a ton of old brochures and catalogues, from the early years:
DSC_4315-Kopie.jpg

And many press releases:
DSC_4519-Kopie.jpg

Including a ton of old press photos. Some of them showing very rare swiss cars with swiss numberplates:
DSC_4526-Kopie.jpg

The pictures only show a very small fraction of what i've collected lately. In the link above, about my story, you can see much more of the stuff, and especially in the upcoming parts of the story...

Next steps will include installing the dehumidifier, sandblasting cabinet and the Datsun sign in the garage. so i should be ready to get back to the project whenever time allows :)

Oh and i have a pallette full of cool stuff on the way from Japan (currently somewhere on a vessel) and reserved two super rare vintage JDM tuning parts from a friend which i will be able to pick up in a few weeks :)
 
Last edited:

cros13

Well-known member
Joined
Sep 29, 2014
Messages
496
Location
Sydney, Australia
Great update!

I spot some parts in your pile I want for my Z....

I want those JDM headlight covers please! ha! I'm keeping my eyes peeled for a set too.

Are they the ones that have the Chrome trim on the outer edge, they are the very rare ones.

I see your friends Kenmary is a 4 door? Did they sell the 2 door model over there? We had them here in Australia, and "back in the day" everyone hated them. The popular Datsun's here in the 70's-90's were 1200 ute, 1600 sedan and 180B SSS stanza.

No one liked the 240k, we got the 2 door coupe here too. for many many years they were a 300-600 Euro car. junk.

I remember as a kid, going to watch dirt track racing, and they were used to push start sprint cars, and in the demolition derby. They were used as paddock beaters on the farm.

And now, with the rise of JDM cars for gen Y, everyone wants a KenMary GTR replica.

Now people are asking 12000 Euro for a complete wreck of a car that is swiss cheese with rust. And 35000 Euro plus for a restored one.


Don't worry, that sand blasting cabinet will come in handy more than you think. I thought about buying one when I needed to clean and restore my suspension. But I didn't buy one, because I thought I would never use it after that job was done.

I was wrong, I should have bought one.

Rudi.
 
OP
J

JDMjunkies.ch

Well-known member
Joined
Dec 27, 2016
Messages
447
Location
Switzerland
Hi Rudi,
Thanks for your kind words...

Yeah those are with the chrome trim, but unfortunately sold already. see details of the "barn find" lot and story here:
https://www.jdmjunkies.ch/wordpress/2021-02-23/240z-the-big-barn-find-parts-lot/

The Kenmary was only sold as 4-door (aka the "yonmeri") as far as i know, but i'm not a specialist on that topic.
At least the original swiss sales brochure i have only lists the 4-door:
DSC_4541-Kopie.jpg

Same here, most of the datsuns where cheap "ricebowl" cars nobody wanted. Now even the old sunny's are sought after cars. Happy i got my dastuns before prices where skyrocketing...

Regarding the blasting cabinet - i thought the same. There is so much more to use it for, than just sandblasting car parts. In our company they even use such a cabinet in the IT department to de-dust Computer hardware *lol*
 
OP
J

JDMjunkies.ch

Well-known member
Joined
Dec 27, 2016
Messages
447
Location
Switzerland
OK, i thought it's time for a little update again. before we (hopefully) finalize it soon:
1) My father in law (who is the owner of the garage entrance part of the house) still refuses to put stones at the garage entrance. It doesn't make a lot of sense to me, but i'm absolutely OK with it, since he cleans the garage every now and then. At least he decided to put a bit of sand there, so the driveway is more densly packed now and feels harder compared to the moving gravel before:
DSC_5092-Kopie.jpg

And i'm working on finalizing my garage with the last touches i had in mind for a while (well i guess the project never ends, but you know...). so i assembled the blasting cabinet and modified it a bit, thanks to the inputs from this forum. thanks :)
DSC_5074-Kopie.jpg

and here it's done:
DSC_5076-Kopie-rotated.jpg

Then yokohama Switzerland kindly sponsered me with a nice free Banner, which naturally had to go to the tire shelve:
DSC_4007-Kopie.jpg

And i finally managed to get my vintage Datsun Switzerland Jacket framed and hung to the wall, as a bit of decoration :)
DSC_4002-Kopie-rotated.jpg

Finally i also managed to sort out the dehumidifier thing and install it on the wall (here the mounting bracket is installed, as you can see stupid my drilled the holes wrong first, so i had to do a second attempt.
DSC_4016-Kopie-rotated.jpg

Thanks to a little help of some friends, the dehumidifier is now up on the wall and working flawlessly after hooking up electricity and the water hose to the sewage lines:
DSC_4027-Kopie.jpg

Naturally everything is connected to my smarthome system and it now keeps humidity in the Garage and workshop area constantly at around 55%, which was said to be perfect for storing cars (dryer would make plastic and rubber pieces brittle, and more humid increases the speed of corrosion...).
2021-11-14-09_18_49-Loxone.png

Then i found a set of rare blow-through Turbo surge tanks here in switzerland for the Datsun L-Series.
One JKC "Japan King charger" and one Sanyo Kiki "SK-Compo turbo" (including a set of Japanese vintage tuning magazines, which advertize all those products):
DSC_4040-Kopie.jpg

Who am i to turn down such an offer? I won't use them at all for my project. but beeing rare and cool japanese datsun tuning history, i just had to get them and now they're proudly hangig at my wall as a bit of decoration below the free space under the dehumidifier
DSC_4070-Kopie.jpg

So we're almost there. the last thing on my to-do list now is to hang the vintage swiss Datsun dealer Neon-sign (now retrofitted with LED tubes) on the wall and get it hooked up the the switching relays and hang the old datsun banner at a different place, since it used to hang where the sign will go now.
DSC_4069-Kopie.jpg

Things are a bit hectic now business wise and with my eductation, but i hope to work on that next week. then my garage is completed, as far as plans go for now...
In a few weeks there will also be glass-fiber internet available in our area, so this means a small update on the hardware side to switch to high-speed internet (it isn't exactly slow now, but, you know, faster is always better :) )
 
OP
J

JDMjunkies.ch

Well-known member
Joined
Dec 27, 2016
Messages
447
Location
Switzerland
OK Guys, time to wrap things up. because THIS PROJECT IS OFFICIALLY FINISHED! (As long as such a project ever CAN be finished).
I'm one who loves to complete stuff, and so i've really been longing to finalize things. this means i finally don't have the garage project on my mind anymore and can focus on other stuff. While for some the garage itself is the project, for me the cars are, and the garage was always only planned as a side-project, to be able to complete my car projects easier and more comfortable.

But let's start at where we ended the last post.
I never felt quite happy with the Aluminum-flex-tube "chimny" i used for my smoker. it created a huge smelly mess with the condensed smoke in the tube and i wasn't able to close the shed-door while smoking. I wasn't really motivated to cut a whole in the still-new wall, but then decided to just do it and build a damn proper chimny for the smoker.
So i got myself some heat proof tubes and started:
DSC_0199-Kopie-rotated.jpg

Luckily things went much smoother than expected:
DSC_0200-Kopie-rotated.jpg

Shortly thereafter the first smoke came out there. Now only the "top hat" thing (rain protection) is missing. it has been ordered, but is delayed, as everything is atm. Meanwhile i also installed some tube-mounting brackets to secure things and keep em straight, but forgot to take pictures.
DSC_0204-Kopie-rotated.jpg

Nevertheless, the first results were delicous (Wild boar raw ham, cold smoked for 4 days, dry aged 21 days with plum wood):
DSC_0195-Kopie.jpg

Next on my holiday to-do list was to swap the last remaining conventional lamp in our house to a smart LED lamp, which is integrated in our smarthome and has various sensors integrated (left old lamp, right new one). unfortunately this meant i had to spend re-wiring a few things this morning and then change the control-program of our house, but actually it was worth the work:
DSC_0447-Kopie.jpg

talking about lamps. One of the bigger topics which remained open after the last post, was the installation of the old Datsun dealer sign (now also LED-tube Retroftited): First i installed some brackets
DSC_0001-Kopie.jpg

and then up it went:
DSC_0002-Kopie.jpg

All wired up and working:
DSC_0010-Kopie-rotated.jpg

Shot from above, while the ladder was there anyway:
DSC_0035-Kopie.jpg

That's it. all done and my to-do list is empty.
So, today i spent some minutes to clean all up (at least a bit) and get some nice pictures from the "finished" product:
1) The workshop (future improvement idea here is definitely to have some lighting directly above the workbench)
DSC_0454-Kopie.jpg

DSC_0040-Kopie.jpg

Soldering and electronics workbench corner:
DSC_0457-Kopie.jpg

Parts (& beer) storage room:
DSC_0456-Kopie.jpg

And the garage / workspace:
DSC_0463-Kopie.jpg

Here with all my current cars:
DSC_0465-Kopie.jpg

And here a view on the "full" garage including my wifes and in-laws cars:
DSC_0472-Kopie.jpg

For me, the project officially ends here and i'm happy i can focus on other things now. especially the cars.
Also i've heard rumors that my father-in-law wants to have tarmac on the garage entrance way done next spring. That sounds great :)

Thanks all for following this project and for all your valuable inputs. And i'll definitely update it whenever there are some news.
Have a nice holiday season and happy new year to all! Cheers!
 

scramboleer

Active member
Joined
Feb 3, 2013
Messages
37
Location
San Francisco
Congratulations and Happy New Year. Nice work.

Herzlichen Glückwünwch und einen guten Rutsch ins Neujahr, wenn mein sehr verröstetes geschriebenes Deutsch noch ein bissler verstehbar ist.
 

cros13

Well-known member
Joined
Sep 29, 2014
Messages
496
Location
Sydney, Australia
The final result in the garage is perfect!

Please keep us updated with anything car project related.

My garage build finished a long time ago too, but everyone on my thread still enjoys my Datsun updates and seeing how big my daughter is getting LOL.

Rudi.
 
OP
J

JDMjunkies.ch

Well-known member
Joined
Dec 27, 2016
Messages
447
Location
Switzerland
The final result in the garage is perfect!

Please keep us updated with anything car project related.
My garage build finished a long time ago too, but everyone on my thread still enjoys my Datsun updates and seeing how big my daughter is getting LOL.
Rudi.
Hey Rudi,
thanks and well - ok. Here we go then. a little update on the cars :)
Honestly not much happened, since i wanted to complete the garage first and i have my federal exams in April, so until then im studying a lot. nevetheless, i decided to give my EK9 a little update and got a pallete delivered from Japan:
DSC_0339-Kopie.jpg

I have plans to give it a bigger overhaul and a small upgrade for the summer 2022 season. see the things unpacked here, i'f interested:
https://www.jdmjunkies.ch/wordpress/2021-12-18/ek9-big-parts-delivery-from-japan/
DSC_0361-Kopie.jpg

The package also contained a few vintage japanese "Autolook type A" seats which fit the Z much better then the one's i've orgiginally planned:
DSC_0384-Kopie.jpg

I've also completed the intake side of the L-series. at least when it comes to puzzling together a fancy setup. full of rare parts:DSC_0210-Kopie.jpg

And luckily i was able to find another NOS stock from an nissan dealer who cleaned out his old parts stock. excellent. some of the stuff you don't come by very often anymore...
DSC_0398-Kopie.jpg

Over the next days i plan to write more parts of the Datsun / Nissan / Prince switzerland story. And prepare to kickstart the datsun restauration after my exams. which means saving some money, finding a new bodyshop to complete the shell, collect some missing parts, etc... I'll try to keep you updated. on my blog www.JDMjunkies.ch (or on my facebook page) you find regular and much more detailed posts about the project), if anyone is interested.
 

Attachments

  • DSC_0210-Kopie.jpg
    DSC_0210-Kopie.jpg
    401.2 KB · Views: 12
Last edited:

littlebean

Well-known member
Joined
Mar 7, 2018
Messages
774
finished, what madness is this????
seriously it's been it's been great to follow your progress through the whole build and you've ended up with a great place (really envious of all you've achieved)
 
OP
J

JDMjunkies.ch

Well-known member
Joined
Dec 27, 2016
Messages
447
Location
Switzerland
finished, what madness is this????
seriously it's been it's been great to follow your progress through the whole build and you've ended up with a great place (really envious of all you've achieved)
Haha thanks a lot. I'm pretty sure i find a lot of things to "improve" over the years. but that's the initial plan i had.
Thanks for your kind words. i'm really happy with the result and hope i can utilize it soon :)
 
To avoid these ads, REGISTER NOW!
OP
J

JDMjunkies.ch

Well-known member
Joined
Dec 27, 2016
Messages
447
Location
Switzerland
So, just a few minutes ago, and completely unexpected, the chimney top hat showed up at my doorstep and i had to install it directly:
DSC_0468-Kopie.jpg

With this piece everything from my to-do list is officially completed. What a satisfying way to end the year.
And since i got some fresh salmon-trout from my friend, i fired up the smoker and put the fish in there on cherrywood, just in time for the newyears brunch. See you all next year. cheers :beer:
DSC_0458-Kopie.jpg
 

cros13

Well-known member
Joined
Sep 29, 2014
Messages
496
Location
Sydney, Australia
Its always great receiving packages from Japan isn't it!

What did that pallet cost you for shipping half way around the globe?

When I bought my XXR longchamps, I only got a pair, without tyres, and it was close to $300 ( 190 euro) to air freight to me. They did arrive within 1 week though!

I also bought a rear Fujitsubo Exhaust, the old school over under duel tip exhausts all our S30's and the hako's had back in the day, I had only bought the cat back section, and that was about $450 (290 Euro) to ship it to me.

I also inquired about seats, and my parts supplier was saying currently the only person freighting international was DHL, and they were going to charge about $600 (380 euro) postage for 1 seat!!!!! (I am after some old school recaro seats for my Z)

crazy when you think Japan is only a 8 hour flight from Australia.

Rudi.
 
OP
J

JDMjunkies.ch

Well-known member
Joined
Dec 27, 2016
Messages
447
Location
Switzerland
Its always great receiving packages from Japan isn't it!
Rudi.
Hey Rudi. Yeah it is :)
Fortunately it wasn't that expensive. the seafreight was aroun 460.- or so which is not too much above average and really surprised me, since i knowo t hat a usual sea freight container is currently about 10 times the costs it had a year ago.
Then i have to pay additional aroun 300.- or so for the customs, import taxes and delivery from the port in netherlands to my home in switzerland. ain't cheap but still OK. Usually i would to air freight as well, but, as you said, currently nobody can afford it :)
 
OP
J

JDMjunkies.ch

Well-known member
Joined
Dec 27, 2016
Messages
447
Location
Switzerland
Just a small update of what happened recently. Because i managed to complete / finish several long term projects:

1) I completed my management studies and passed my exams. Nothing directly to do with my projects, but after two years of sitting in school every saturday and doing home-studies nearly every evening, i've finally got something like free time again. Time to get some projects done :)

2) Speaking of projects, i finally found the time to complete my "complete swiss Prince / Datsun / Nissan Story". If this is your thing. it's an 8-piece story with many rare and cool historic inside photos and details about prince and Datsun in switzerland, and how they became nissan later. Quite the story :) check it out here. if that's our thing:
https://www.jdmjunkies.ch/wordpress...story-of-prince-datsun-nissan-in-switzerland/

3) Jepp the garage needed a small update. After i tested my sandblaster, i realized my old compressor is way to small. Luckily my father-in-law offered me to swap the compressors, as his one was too large for what he uses it for:
DSC_1151-Kopie.jpg

What can i say? It's still to small, but better than the old one:
DSC_1153-Kopie.jpg

At least it allowed me to get some small parts blasted and slowly starting up the 240Z project again...
DSC_1168-Kopie-rotated.jpg

Speaking of that. the 240Z has some progress again. The car got loaded and delivered to (a new) bodyshop again, and they promised me to complete the shell and body by the end of the year:
DSC_1142-Kopie.jpg

WhatsApp-Image-2022-05-20-at-07.59.00-Kopie.jpg

So what's next? I'm currently trying to catch up with my backlog on my to-do list. but the first time in 5 years or so (after planning a big wedding in a foreign country, buying a property, building a house with a big garage, moving up the career ladder and being in a higher education for two years and then the covid lockdowns, etc...) i have the feeling i have some free time and also free space in my head to have some progress on my least importartant, but most cool caar projects.

I plan to get my EK9 a little overhaul this summer and get some things done for the 240Z, while it's a the bodyshop.
 

meathooker

Well-known member
Joined
Dec 10, 2013
Messages
254
Location
Iowa
Congrats on school completion! i went back for a masters deg when I was 29 and it was good long term but seemed to take forever at the time! Enjoy the new food free time to work on personal projects.
 
OP
J

JDMjunkies.ch

Well-known member
Joined
Dec 27, 2016
Messages
447
Location
Switzerland
Sooo, time for another update:
When planning my workshop, i made a little mistake and put the light tubes in the middle of the room. This would of course cast a shadow of yourself on the workbench when standing in front of it. So basically i never really liked working on the workbench, because that meant you work more or less in a relatively dark area. Well time to fix that :)
I got myself the latest version of the already installed Thorn PopPack LED Tubes (52W 6400lm 4000K 1500mm each): 20221202_113039-Kopie.jpg

So up with the housings:
20221202_161244-Kopie.jpg

Drilling some holes in the housings for the wiring and doing the wiring itself:
20221203_112742-Kopie.jpg

And done!
20221203_133412-Kopie.jpg

A little comparison. Before:
20221202_151456-Kopie.jpg

After. The camera auto-adjusts the brightness of the photo, of course, so you cannot really see a big difference, but if you check the brighness on the workbench tabletop you get the idea. The room is really much brighter now and feels much nicer to work.
20221203_134409-Kopie.jpg

What else happened meanwhile? We have (protected) house martins nesting under our roof every year. Luckily the do it in a nice place. Unfortunately the nest falls down every year. Most probably because of an added Moss protection in the facade paint. As we like the birds returning every year, i decided to build them a house.
20221030_151551.jpg
Naturally a 4-hour project ended up beeing a 2 month project with full scaffolding and all, as it would be tricky to install something safely up that high with heavy tools... Unfortunately i didn't take any pictures of that... But here's the result. I hope they like it when they return in spring :)
20221101_163525.jpg

It's also smoking and ham season again. Bacon first, then 3x Wild boar, smoked garlc (excellent for a french speciality soup), and the two white things at the end are a new experiment with Penicillium funghus (similar as seen on many "white" salamis). I've tried the small one and it is delicous :) I cannibalized my in-laws old house basement, which turns out to be excellent in terms of humidity and temperature as well as ventilation for aging meat. love it.
20221106_140050.jpg

And this year i extended my butcher skills to sausages as well. These are not finnished, so ignore the airbubles, which were removed later.
Christmas sausages 2022: Venison / Deer with Juniper & Gin seasoning. will try my first ones today:
20221202_103951.jpg

Car wise, the Honda got a long overdue Overhaul and feels like new again. Also installed some small upgrades. Before season start in 2023, i have also scheduled a visit to the paintshop to get my front end repainted, as there are a few battle-scars, meanwhile...
20221128_141441-Kopie.jpg

For the Datsun i managed to find another few stashes (only one shown) of rare NOS (New-Old-Stock) parts stockpiles and got them, of course:
20221126_125122-Kopie.jpg

The 240Z Shell is currently waiting at the new bodyshop to get the work started. The old one didn't do a lot anymore on the car and i got sick of pushing him al the time. At the end we somehow both lost motivation to work together, i had the feeling so i chose a new one, which works on a more professional level, has all the tools required and is not a one-man show.
Unfortunately, my new Panelbeater had an accident and had to postpone the work. He promised me they will work with three people fulltime on the car starting in march 2023 so i expect the shell to be ready in late spring / early summer 2023.
Then it will go straight to the paintshop and then the fun begins :)
WhatsApp-Image-2022-05-20-at-07.59.00-Kopie.jpg

That's it for the time beeing. i'm really happy with the recent progress.
 

Oldbear

Well-known member
Joined
Aug 31, 2011
Messages
620
Location
Linden, Alberta, Canada
I'm a strong believer in more light is never bad. I've got under-cabinet lighting for above my workbench. A few task lighting options (desk lamps and magnifying lamps) and I installed LED strip lights on the ramps of my four-post lift. Plus I wear headlamps when working - my eyes aren't getting any better with age.
 

Bob Heine

ALLIANCE MEMBER
Joined
Oct 24, 2009
Messages
10,707
Location
Boca Raton, Florida
Nils, thanks for the update. The lights over the workbench make such a difference. My bench in the garage has cabinets above so mine are pretty bright -- perfect for my vintage eyeballs. It's good you have the smoked meat in your in-laws basement. If it were hanging in yours, drooling while working on your projects would be a constant risk.
 

cros13

Well-known member
Joined
Sep 29, 2014
Messages
496
Location
Sydney, Australia
Great to see an update!
Smoked meats look delicious, I am salivating from here, although I was getting a little concerned when I accidently misread you say:
"I cannibalized my in-laws in the basement, they turned out great!"

Ahhh! The old body shop promise.
When you said: "The new shop I took the Datsun to has said they will have it done by Christmas" I can only say, I hope so but we will see. And then you confirmed it, pushed back a extra year possibly.
Yes yes, my body shop promised "We will start the car in 3 weeks and there is about 3 weeks worth of work on it" And then it was stuck in that shop for 2 years! :cry:

I hope you don't end up having the same experience as me. I knew 2 others with their cars in the same shop as me, and we all had the full amount agreed upon ready to go and pay.
If he would have done 1 week straight of work, I would have paid him 1 weeks labour.
It was a restoration shop, but they still took on alot of insurance work, and for 2 guys only, I don't know why.
I had my €13,000 it cost me ready to go upfront and was always asking him to work on my car, I have money ready for you! Do you not want my money???

Paint prison is a real thing!

-Rudi.
 
OP
J

JDMjunkies.ch

Well-known member
Joined
Dec 27, 2016
Messages
447
Location
Switzerland
Ahhh! The old body shop promise.
When you said: "The new shop I took the Datsun to has said they will have it done by Christmas" I can only say, I hope so but we will see. And then you confirmed it, pushed back a extra year possibly.
Yes yes, my body shop promised "We will start the car in 3 weeks and there is about 3 weeks worth of work on it" And then it was stuck in that shop for 2 years!
Well yeah. i know a similar story from my previous panelbeater, that's why i switched to a new one. The old one was a one-man show who didn't have all the metal rolling tools and always would have to go to another shop to get it done. he was an expert, but very slow.
The new one has a very good reputation and he was honestly very sorry and apologized a 100 times for beeing late. I have a good feeling they will really do it in spring. I also heard from several people that once the start, they usually finish it in one go. but time will tell.
The good thing is i haven't paid a cent yet to the new shop, i asked them, but they said they don't need to buy any material in advance (i have everything ready for them), so they don't need to have any money in advance. i thought that was a good sign. Let's see how it goes.
 
OP
J

JDMjunkies.ch

Well-known member
Joined
Dec 27, 2016
Messages
447
Location
Switzerland
Today i made a great deal. After getting my Datsun Dealer sign for my workshop, i thought it would be nice to get one from Honda for the Civic too, but really didn't want to spend a fortune. I put a Search advert online and then forgot about it. A few weeks later, while looking for something else on the website, i realized that some guy had just answered me the day before and said he had an original Honda Dealer sign.
A few messages back and forth and today i was able to pick up the sign an hour away from my home:
20230205_161505-Kopie.jpg

It is a bit rough around the edges, but otherwise really nice. especially the TypeR red colour of the honda sign which will fit my EK9 perfectly. The same guy also offered me a bunch of original workshop manuals for the EJ / EK series car and workshop service schedule planner.
20230205_161718-Kopie.jpg

I still yet have to find out where i hang it, or put it, but i will surely find a nice spot for it after a bit of a cleanup.
20230205_161731-Kopie.jpg

I'm a bit busy in the following weeks. but i hope soon i'll be able to post a nice update from the Honda Corner and i'm still expecting bodywork on the Datsun to restart in March in full swing. Fingers crossed.
 
OP
J

JDMjunkies.ch

Well-known member
Joined
Dec 27, 2016
Messages
447
Location
Switzerland
A few days ago i picked up this Nice old Honda dealer sign without any big plans. I thought to give it a quick wash and hang it somewhere nice on the wall. As usual, the project quickly escalated in a full restauration project.
First i thought i'd take out the Plastic signage covers from the frame, to see the inside, just because i wanted to know how the frame was intended to be mounted to the wall, and because i was curious how such a sign generally is constructed.
20230211_174320-Kopie.jpg

Well, turns out the sign once was lit up inside with not less than 5 FL tubes, despite the fact that the seller said it never had lights :). Free lighting i guess. Well kind of "free", because it seems the lighting was once broken and one previous owner made a funky H4 Halogen (Car) lamp backyard-engineering retrofit :)
20230211_174444-Kopie.jpg

This is how it all looks disassembled. An aluminum frame with the Lighting installed and the two Honda sign plastic covers.
20230211_174708-Kopie.jpg

The reason for t his "retrofit" was quickly found: The FL tubes are completely beyond usage and the brackets for the tubes are so brittle, they fell apart immediately when i tried to remove the tubes. I guess these tubes don't have any gas inside anymore :)
20230211_175316-Kopie.jpg

The frame was quite dirty. OK for me but i still thought i'd give it a little cleanup:
20230212_163939-Kopie-rotated.jpg

And i'm pretty happy with the result. It took me an hour or so to clean the frame and the rest, but it looks much cleaner. It still has some visible wear and patina, but that just makes it more authentic. But it's clean now :)
20230212_171853-Kopie.jpg

Same with the plastic honda sign covers:
20230212_200554-Kopie.jpg

And the inside as well. (those coloured paper dots are confetti, which most probably comes from a fashing / Carneval parade that most probably went on the main street next garage where the sign came from, as very common here)
Before:
20230213_154253-Kopie.jpg

And after:
20230213_154849-Kopie.jpg

Two corners once got a hit, so they had a small crack. To prevent them from further cracking, i decided to put some industrial grade plastic glue on the inside:
20230213_155113-Kopie.jpg

And this is how things look by now:
20230212_202024-Kopie.jpg

I decided to give it a full LED retrofit on the inside, which means i will kick out the FL-tube starters, the inverters (maybe they're broken anyway) and the tubes them self - Including the funky H4 bulb installation.
I will also replace all brackets and wiring because it's old and since i can do that better myself easily. It's a quick job when everything fits, so finger crossed. Knowing my luck it will require some engineering skills.
Material has been ordered, and hopefully you'll see Part two of this restauration here soon. Hopefully with a complete, lit up and nice sign at the end. Then i only need a good place to hang it and wire it up...
 
OP
J

JDMjunkies.ch

Well-known member
Joined
Dec 27, 2016
Messages
447
Location
Switzerland
So, after we left in Part one here, it's time to finish the work up. After the cleaning, i realized that parts of the sign were a bit dull, so i thought i'd give it a gentle manual polish.
Before:
20230214_182843-Kopie.jpg

Some manual towel polish:
20230214_183020-Kopie.jpg

Worked out pretty well. Not perfect, but also withou looking too worn:
20230214_183752-Kopie.jpg

Then it was time for the LED retrofit. I decided to remove the old FL-tube inverters, because honestly they looked toast.
20230214_184908-Kopie.jpg

And out with all the brittle tube mounts, stiff wires, rusty and heavy inverters and the "hot glue" isntallation and the starters:
20230214_185136-Kopie.jpg

Here we are with a fully empty canvas:
20230214_190023-Kopie-rotated.jpg

And here's what is going in: A set of brand new mounting / wiring brackets and inverterless LED tubes.
20230220_192915-Kopie.jpg

Brakets fit perfectly and all tubes are in:
20230220_193020-Kopie-rotated.jpg 20230220_193704-Kopie-rotated.jpg

Wiring done too (will add some zip-ties later, since my initial idea of using cable-channels proved to be useless)
20230220_194449-Kopie-rotated.jpg

Quick mockup with a power cable and LED there be light!
20230220_195246-Kopie.jpg

Installed one side of the sign just to see how it looks and i'm pretty happy with the turnout:
20230220_195400-Kopie.jpg

Here i installed the other side, just to see how both s ides look with the lighting. Backside is open in both pictures. Will install it somewhere on the wall soon. Pretty happy with the result.
I surely will miss the buzz and flickering of the original FL-tube lighting but this is much more safe, and way less energy-consuming.
20230220_200016-Kopie-rotated.jpg
 

Finallygotit

ALLIANCE MEMBER
Joined
Jul 6, 2013
Messages
4,088
Location
Tucson, AZ
If you are so inclined, you could take a thin sheet of translucent white acrylic and sandwich them on either side of the lights. Those will help distribute the light more evenly across the Honda signs.

:beer:
 
OP
J

JDMjunkies.ch

Well-known member
Joined
Dec 27, 2016
Messages
447
Location
Switzerland
So, after we left with a finished Sign on the table in part two, it was time to install it somewhere. I wasn't sure where to put it. So i tested it in various positions. My initial plan to have it close to the Honda proved to be not the best location, because of the low ceiling height in that area.
20230304_130449-Kopie.jpg

At the end i decided to put it high up on the wall Next to the workshop entrance...
20230304_130925-Kopie.jpg

So first i removed everything again, installed it at the highest possible point:
20230304_140546-Kopie.jpg

Then got the LED tubes and Honda logo covers back in:
20230304_141722-Kopie.jpg

Had everything hooked up and wired to my smarthome controls (relay outputs)
20230307_183322-Kopie.jpg

And here we go: we have light:
20230307_183425-Kopie.jpg

Quite happy with the result. The Mobile phone camera tends to over-saturate photos a bit. in reality the lighting is much more even and not that pink-ish.
More car-related updates to come soon :)
 
To avoid these ads, REGISTER NOW!
Top Bottom