To avoid these ads, REGISTER NOW!

Between 265 & 485 SQ/FT Nick's Two-Car Detached Vdub Garage

Workspaces sized between 265 and 485 squarefeet.

Bakafish

Well-known member
Joined
Feb 7, 2017
Messages
477
Location
Tokyo
I wish I could definitively identify the issue, but I strongly suspect a motor issue or something with the extrusion. I doubt very much this is a cooling issue, until you have this solved messing with a fan shroud is likely unproductive. I also suspect it is inconsistent which is complicating your ability to identify it. None of these prints look like 100% healthy, and the issue is just going to come back with a vengeance when you are printing the most critical part ever. It is like the filament path is experiencing varied resistance, the extruder is slipping or a stepper is losing steps (getting overloaded.) The layer shift is a sign of a mechanical issue, caught cable or jumped belt. Even if it isn't happening again, it points to something wrong somewhere that has likely not been corrected.

Bowden tube designs depend on 'retraction' when the flow needs to be reduced (to turn a corner or start a new segment) and so it pulls the filament backwards a few mm to help create a small negative pressure wave. In those trouble area's it is like it is experiencing lag, like the bowden tube is loose, kinked or the filament gears are slipping. You really need to analyze every moving part of the system, tug on the two bowden tube termination fittings to see if they move or are firmly gripping the tube. Check the belt tension and motion, the wheels, etc. I personally would disassemble everything so each component could be isolated and inspected to confirm it is working as expected, each wheel was turning freely and there was no piece of stray filament or loose nut occasionally contacting a moving part. It will help you to better understand the machine and is the most likely path at this point to discovering the core issue.

You are going to need to think about what it should be doing and watch and listen to it when it is printing those critical sections we know it is having trouble with. Put your fingers on the filament leading into the extruder motor section and feel what it is doing, if it is retracting, if it is having trouble reapplying pressure after retraction.

Lastly, the FW update was the first thing to try, it isn't clear if you've done that yet. I don't think it is the issue, but it is such low hanging fruit it really needs to be done so it can be eliminated from the possibility list. It ***** that this isn't working right, I don't think this is typical. I hope that we can figure this out and you come out with a better understanding of the system that will be beneficial in the long run.
 
To avoid these ads, REGISTER NOW!
OP
N

nicholam77

Well-known member
Joined
Dec 18, 2016
Messages
2,672
Location
Minneapolis, MN
I wish I could definitively identify the issue, but I strongly suspect a motor issue or something with the extrusion. I doubt very much this is a cooling issue, until you have this solved messing with a fan shroud is likely unproductive. I also suspect it is inconsistent which is complicating your ability to identify it. None of these prints look like 100% healthy, and the issue is just going to come back with a vengeance when you are printing the most critical part ever. It is like the filament path is experiencing varied resistance, the extruder is slipping or a stepper is losing steps (getting overloaded.) The layer shift is a sign of a mechanical issue, caught cable or jumped belt. Even if it isn't happening again, it points to something wrong somewhere that has likely not been corrected.

Thanks @Bakafish for your continued help with this machine!!

The reason I thought cooling, is the fan duct is one-sided, and I tried printing the XYZ cube in two orientations. The "Y" was still on the Y-axis plane in each, but I did one on the side away from the fan duct and the other towards it. The cube pointed away had the more distorted Y relief. Same with the corners of the cube, and features on other prints... consistently on the side of the model away from the fan duct.

And it seems to be worse on smaller models or shorter layer times.

I would say that issue is fairly consistent.

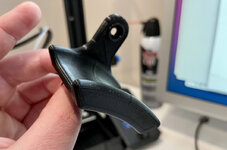
I agree that none of the prints look 100% perfect, but as of now they are much better. For some reason they look worse in my photos than in hand. I think the higher extrusion temp and shinier finish is amplifying every little detail on camera. And they aren't disastrous, I've been printing stuff that's passable here and there like this tool holder:

IMG-5537.jpg

IMG-5539.jpg

Headphone hook:

IMG-5542.jpg

Maybe not perfect but that could still be slicing settings, too, right?

As far as the layer shifts, I have repeatedly checked the belt tension and v-roller tension. The belts definitely are not slipping. Also, the layer shifts have not occurred at all since I reduced the stepper motor voltages. That coincided with the Y motor casing no longer being scalding hot, and I believe the Y-axis is where most of the shifts were occurring. I'm fairly confident that reducing the voltages fixed the layer shifts. I found many anecdotes online saying the same thing, either the motherboard/drivers overheating or the motors themselves and the fix was either to cool the board better, reduce the voltages, or replace the board with the new 4.2.7 board which supposedly Creality acknowledges fixes an overheating problem on some late-batch 4.2.2. boards.

You are going to need to think about what it should be doing and watch and listen to it when it is printing those critical sections we know it is having trouble with. Put your fingers on the filament leading into the extruder motor section and feel what it is doing, if it is retracting, if it is having trouble reapplying pressure after retraction.

I have done this, but haven't really noticed anything abnormal (by my judgment, but then again I'm no expert). The filament moves, seems tight, even during retractions. Bowden fittings seem tight. I did take the Bowden apart at the hot end a few prints back and clean it out.

As far as resistance in the filament path or extruder slipping, while I haven't really felt or seen anything, I'm going to print that Bowden hot end fix you told me about, and I've also ordered the Capricorn PTFE tubing as well as an aluminum extruder from Creality just to see. They are cheap enough. My extruder does have some little flecks of shavings on the bearing so maybe it is part of the problem. Again, this is a thing where I don't know what's normal. The extruder gear teeth seem pretty clean, but is your whole setup perfectly clean? Should I expect it to look pristine?

IMG-5541.jpg


FYI my current retraction settings in Cura are 6mm/s distance, 40mm/s speed. Now printing at 215°C. I still need to do a temperature tower and retract tower.

I doubt I am going to unbuild the whole machine anytime soon, just due to life. But I will eventually if it comes down to it. For now though I feel like I have more stones to turn over still, such as the aforementioned calibration models, upgrading the extruder pathway, doing the Bowden fix, trying new filament (mine just ran out!), etc.

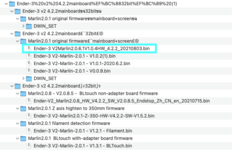
I have not done the firmware upgrade yet, but agree about giving it a try. Maybe you can help me with this — I went to Creality's website and downloaded a few but am unsure which to load:

Creality-firmware-choices.png

The more recent one says "BLTouch and filament detection compatible", but does that mean I have to have a BLTouch to use it? That one just had one file in the download:

2021-03-26.png

The slightly older one from Jan 28 2021 had way more files in it. I would think I'd pick the below but wondering what you think, or if I should do the Mar 26 2021 that has BLTouch in the name.

2021-01-28.png


As always, thanks for any insight!
 
OP
N

nicholam77

Well-known member
Joined
Dec 18, 2016
Messages
2,672
Location
Minneapolis, MN
This is the v2 of the one I printed. It pretty much incorporates what I did to the file I originally downloaded. It works really well. It uses all the original hardware. I've been running mine printed in PLA for a long time with no problems. Like years.

Awesome, thank you @kaymccampbell

I really like how it's minimal, some of them are so big. I wonder if it would work for the 3v2.
 

bj383ss

Well-known member
Joined
Sep 29, 2011
Messages
3,166
Location
TX
Nick I will chime in here. When I did my firmware update I did I believe the one without BLtouch. You do need to have the BLtouch to use that firmware. I think that is the basis of it.

I don't want to stiffle you but I experienced some of what you are after I did the firmware update. My machine was working flawless and I decided to update the firmware and my machine lost its' home location. It would go all the way to the top of the z axis everytime a print started. It wouldn't stop. The stepper would just keep going and skip on the gears. Freaked me out and I would have to turn the machine off and back on. I think I had some wrong code in the Prusa program for the firmware I installed. I wish I could remember which one of those it was. All that stuff can be so confusing.

I think I actually installed the wrong firmware and had to go back to original. And then I started using Cura slicer instead of Prusa and that fixed all the problems I was having. I never had any layer shifting. My just would print crazy and not set the first layer down right. It was very frustrating. I eventually found the youtuber who teaches you all about Cura and with his tips I was able to get my machine back to working. Sorry I know that doesn't help you much.

Its funny one of my good friends has a Ender 5. He upgraded everything and messed with his so much he can't get a decent print and he just went on Amazon and bought our machine. He promises he is just going to set it up and print and not mess with anything. He is super jealous and how dialed in my machine is and I didn't really do anything to it. I always say keep it stock as long as possible. Applies to vehicles and engines too! :ROFLMAO:

Bret
 

Bakafish

Well-known member
Joined
Feb 7, 2017
Messages
477
Location
Tokyo
That tool holder looks spiffy! Those prints look good, but you may see the issues return since I'm not confident the root cause was ever identified. :dunno:

I use a customized version of the Hero-me fan shroud with a single 24v 5015 style blower. I never use more than 30% and my understanding is that the factory fan, as simple as it is, mostly works fine. Obviously it was what you were using initially, so I can't see why it would suddenly change its efficiency. It's good that the stepper is running cooler, I hope that is resolved.

The slightly older one from Jan 28 2021 had way more files in it. I would think I'd pick the below but wondering what you think, or if I should do the Mar 26 2021 that has BLTouch in the name.

Yes, the file "Ender-3 V2Marlin2.0.6.1V1.0.4HW_4.2.2_20210803.bin" looks like the latest precompiled binary they have for your machine. But it is old enough that it may be the same version that is installed already, from your Octoprint console execute the '
Bash:
M115
' command to print out what is currently installed on the machine.

I think the Capricorn stuff is very good, but I currently use it for only the small 'fix' segment (where the higher temperature resistance is important) as the looser fitting factory tubing seems to be less restrictive and works well enough for me. A direct drive 'all-metal' hot end is still on my todo list, but mine is working well still so I haven't got a big incentive to make the change.
 

patlun

Well-known member
Joined
Apr 12, 2015
Messages
242
Location
Värmland, Sweden
I think those prints is "good enough". To get them better i would start with calibration of the hardware, I saw that you have found Teaching Techs site. Install that new extruder before calibrating. The extruder bearrings on both my Ender 3 an CR-10 is clean To swap to a new one when you already have it will give you a clean start (pun intended)

When you have get that as good as you can it is time to start upgrading firmware and other things. Maybe compile your own Marlin
 
OP
N

nicholam77

Well-known member
Joined
Dec 18, 2016
Messages
2,672
Location
Minneapolis, MN
Nick I will chime in here. When I did my firmware update I did I believe the one without BLtouch. You do need to have the BLtouch to use that firmware. I think that is the basis of it.

Thanks, Bret. That's kind of what I was thinking but then they threw in the word "compatible" making it seem like it could go either way. I agree it's confusing, whoever formatted that Creality download page was not consistent at all!
My machine was working flawless and I decided to update the firmware and my machine lost its' home location. It would go all the way to the top of the z axis everytime a print started. It wouldn't stop.

Yikes! I had that happen just once after one of the Teaching Tech calibrations. Started a print and the extruder shot straight up to the moon and printed a spaghetti monster. Freaked out that I couldn't stop it and flipped the power off. Realized I forgot to return a G-Code setting.

Btw I did watch that Cura video you pointed me to and tried most of those settings. To be honest I think I'm in the ballpark. Need to do the temperature and retract towers but the rest of it doesn't seem to make a big impact (other than maybe print speed).

Its funny one of my good friends has a Ender 5. He upgraded everything and messed with his so much he can't get a decent print and he just went on Amazon and bought our machine. He promises he is just going to set it up and print and not mess with anything.

Ha, if Reddit is any example it seems like a lot of people spend a lot of time "fixing" their 3v2s from mods. So I think that's good advice. I don't plan on changing anything major, as long as it's working ok I'm happy.

That tool holder looks spiffy! Those prints look good, but you may see the issues return since I'm not confident the root cause was ever identified. :dunno:

Thanks, got tired of taking the tools out of the little drawer... they get used often enough to be out in the open I think.

Yeah, you're right, I still don't know what caused the initial freak out or layer shifts. My guess is the board overheating and/or the driver voltages. I found a good amount of people online say the same thing... printing fine for awhile and then all of a sudden the same thing happened. But hard to prove and time will tell.

Thanks for the pointer on the firmware file. I am a bit scared it's going to brick the printer or something if I screw it up, but hopefully I'll have the guts to try it soon.

I think those prints is "good enough". To get them better i would start with calibration of the hardware, I saw that you have found Teaching Techs site. Install that new extruder before calibrating. The extruder bearrings on both my Ender 3 an CR-10 is clean To swap to a new one when you already have it will give you a clean start (pun intended)

When you have get that as good as you can it is time to start upgrading firmware and other things. Maybe compile your own Marlin

I agree with this. I suffer from perfectionism to a certain degree (maybe not as much as Baka 😁 ), but at the end of the day I mostly got this printer to make garage doo dads. Yes I want the prints to look nice, but a lot of times they just need to be functional.
As I've said I've gone through some of the Teaching Tech hardware calibration but not all of it. A lot of steps and I have minimal time to futz with it, but working towards completing everything.

____________________________________________

I did get the extruder swapped out. The old one did have some shavings and dust as mentioned. I don't think it was affecting the performance, but it is a little concerning it has that amount of gunk after two months and 1 roll of filament?

IMG-5548.jpg

Taking apart the original plastic extruder bracket and arm, I did not notice any cracks or anything like I've read can happen. But dirty.

My v-roller wheels tend to attract lint and fuzz, too.

IMG-5552.jpg

Stepper motor had a few plastic shavings on it.

IMG-5553.jpg

I'm sure you three (@Bakafish @bj383ss @patlun ) know this, but for anyone else reading along, replacing the extruder was really easy.

IMG-5554.jpg

IMG-5557.jpg

I was a little disappointed it came with the same brass extruder gear as the original instead of a stainless one. But it did come with a beefier Bowden coupling for some reason.

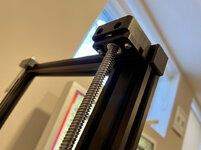
Another small bit I ordered is a lead screw stabilizer:

IMG-5565.jpg

IMG-5567.jpg

Yes, I know these can be printed, but this one was barely more than the bearings would have cost me, and it's adjustable in case the rod position needs to be dialed in.

I didn't get this for any particular reason. If it makes things worse I'll just take it off, it wasn't a huge investment.

I haven't been able to try the printer with these additions because I'm waiting on new filament from Amazon. My first roll was Inland PLA from Microcenter. This time I got Overture PLA. Looking forward to trying a fresh roll and brand and see if that helps anything, too.

Also got the Capricorn PTFE in the mail but waiting for more filament to print the spacer for the Bowden fix.

One positive impression of the extruder already is the filament seems to load smoother. Sometimes I had trouble inserting it with the old one.
 

loganb

ALLIANCE MEMBER
Joined
Dec 29, 2011
Messages
5,578
Location
Omaha, NE
Excited to hear how she does after this work!

And Microcenter.....I miss them! Had one 5 minutes away from us in Chicago...now I think closest is 3 hours away

Curious...have you ever tried a different slicer? I have a few things that Prusa Slicer didn't like but Cura did just fine....it was more related to the model and the slicing of it/supports etc but wasn't sure if a different slicer was giving the same end result or not here?
 

Bakafish

Well-known member
Joined
Feb 7, 2017
Messages
477
Location
Tokyo
That's a bit more debris than I would expect, but you may have had slipping issues during calibration or some print failure. Make sure that your tension is cranked up, you really want to avoid slipping.

One positive impression of the extruder already is the filament seems to load smoother. Sometimes I had trouble inserting it with the old one.

Yeah, I ended up drilling out the coupler and putting a small inner chamfer on the entrance of the aluminum and the boden tube. I also added a tiny piece of bowden tube, cut with a deep double fishmouth that fits between the exit of the extruder gear and the body. It keeps the (softer) filament from kinking, and makes swapping filament a little easier. I'm pretty sure there is a recess molded into the body for that, but I may have drilled it myself. I also have a little Staedtler #513 85 pencil lead sharpener to put a point on the filament if it's being really recalcitrant.

I used a ~30mm piece of thin tube (I used some of the protective plastic that was shipped with mine), loosely fit over the Z axis lead screw. It just rides up and down with the gantry by itself and keeps the grease from the screw off of the filament if it rubs there.
 
OP
N

nicholam77

Well-known member
Joined
Dec 18, 2016
Messages
2,672
Location
Minneapolis, MN
Excited to hear how she does after this work!

And Microcenter.....I miss them! Had one 5 minutes away from us in Chicago...now I think closest is 3 hours away

Curious...have you ever tried a different slicer? I have a few things that Prusa Slicer didn't like but Cura did just fine....it was more related to the model and the slicing of it/supports etc but wasn't sure if a different slicer was giving the same end result or not here?

Ha, me too! I got the new roll of Overture PLA from Amazon delivered this morning... have an XYZ cube printing now! I curse that little cube, but it's sort of a baseline for me now.

I have only used Cura. I did print a cube with the G-code straight from the Teaching Tech website, about the same results. Suppose I could try a different software, though. Although now I'm starting to feel more familiar with Cura.

Microcenter is great. Got the printer there, actually. Only 1 store in Minnesota, and it's a block from our daycare. I drive past it every morning. That's why I knew it was only a matter of time before I broke down and caved in to get a printer. :ROFLMAO:

That's a bit more debris than I would expect, but you may have had slipping issues during calibration or some print failure. Make sure that your tension is cranked up, you really want to avoid slipping.

By tension cranked up, do you mean on the extruder arm spring?

Yeah, I ended up drilling out the coupler and putting a small inner chamfer on the entrance of the aluminum and the boden tube. I also added a tiny piece of bowden tube, cut with a deep double fishmouth that fits between the exit of the extruder gear and the body. It keeps the (softer) filament from kinking, and makes swapping filament a little easier. I'm pretty sure there is a recess molded into the body for that, but I may have drilled it myself. I also have a little Staedtler #513 85 pencil lead sharpener to put a point on the filament if it's being really recalcitrant.

I'm always fascinated by your ingenuity.

I used a ~30mm piece of thin tube (I used some of the protective plastic that was shipped with mine), loosely fit over the Z axis lead screw. It just rides up and down with the gantry by itself and keeps the grease from the screw off of the filament if it rubs there.

Hmmm, smart! I think I threw all my packaging away but I'm sure I could find something.
 
OP
N

nicholam77

Well-known member
Joined
Dec 18, 2016
Messages
2,672
Location
Minneapolis, MN
The Plot Thickens

Excited to see how the new filament worked, I completed an XYZ cube with my most current settings that were providing pretty good, but not perfect, results:

IMG-5575.jpg

IMG-5574.jpg

The bottom, top, sides, and corners look really nice. But still warping / deformation on the triangle of the Y and on the right side of the X!!

In fact it's slightly worse than where I left off with the Inland brand PLA.

I monitored the print through the problem areas, felt the extruder working, listened to the machine etc. Didn't notice anything odd.

Ok. I told myself enough of this XYZ cube nonsense it's time to dial in the temp and retract settings once and for all.

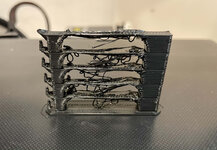
Prepared a Teaching Tech temperature tower at 200, 205, 210, 215, 200 °C. And this is how it came out:

IMG-5572.jpg


OMG that's bad! That's with 6mm/s retract distance, 40mm/s retract speed. So much worse than the cube. But I started thinking about the features of this model vs. the cube, and how this one requires bridging and some small spikes and overhangs. And literally every temperature is equally bad.

My mind went back to the part cooling. Is my fan working? I looked up the Gcode to turn on the part cooling fan, M106 I believe. I thought I heard it turn on (just as I do after the first layer on every print.

But putting my finger around the duct I was just feeling the slightest amount of airflow. Didn't seem like enough to cool plastic. The hot end fan was running, too, and I got the sense it was just some air pushed down from that.

Then I remembered reading something wacky that the motherboard fan only comes on when the part cooling fan comes on. Turning the fans on and off with M106 and M107 I realized what I was hearing is the motherboard fan!

Because the part cooling fan is hidden behind the fan shroud and the duct, I couldn't really tell if it was spinning, other than lack of airflow. So I took it apart.

And sure enough. IT. IS. NOT. SPINNING. When it's supposed to be on.

IMG-5573.jpg

Now I need to figure out why. But my current thoughts are:

1) The layer shifting was resolved with the stepper driver voltage adjustment, and a separate issue from the print defects I'm seeing

2) The lack off part cooling is causing the warpage on the cube and terrible bridging on the temperature tower

It's interesting because the bridging on my Benchy's wasn't that bad, and I have printed a retract model in the past with no stringing. But I really have no idea at what point this fan stopped working.

Annoyed by this, but if it's the cause, then I'm thankful I found it.
 
OP
N

nicholam77

Well-known member
Joined
Dec 18, 2016
Messages
2,672
Location
Minneapolis, MN
Had a chance to crack open the board and do some testing.

IMG-5579.jpg

Sadly the printer has been in this orientation too many times :ROFLMAO:

On the plus side I am learning how to use my multimeter. Sort of.

I checked the continuity of the part cooling fan wires (pins on the connector to the soldered terminals on the fan, and both wires beeped and checked out.

So then I checked the DC volts on the motherboard connector. Without the part cooling fan command enabled, both pins were reading ~24V. Then I sent the M106 Gcode (turn on part cooling fan), and checked again, with black lead on a ground and the red lead touched to the pins. This time it made a spark once or twice. Couldn't tell if it was one pin or the other. Anyone know why that happened? Was that a faux pas?

Last thing I did was swap the part cooling fan plug and the motherboard fan plug, because both fans are 24V and 0.10A, I figured they could be interchanged. And since I knew the motherboard fan was working it would be a good test.

IMG-5580.jpg

The part cooling fan still did not run in the motherboard fan (known to be giving power) connector. And the motherboard fan DID run in the part cooling fan connector.

So, seems like the port on the motherboard is fine. The multimeter says the wiring is fine. I don't see any obstructions and can turn the fan blade by hand without resistance. But something in it must be broken?

Any suggestions on a replacement? Official Creality? Something else? I'd like to stick with 24V so it's plug and play. These are the specs:

IMG-5578.jpg
 

T-handle

Well-known member
Joined
Jun 17, 2019
Messages
440
Location
Northern Ostrobothnia Finland
Hi Nick! Damn that printer is keeping you busy.. But hey! Buying a semi-finished product makes you an expert of the subject. And that's a good thing.. right:LOL:

I've had a lot of residue in the extruder when printing wood composites. I noticed that you had a made in China filament one of your pictures. I've read some problems with those "overseas" filaments but have no experience. That could be one source of debris. I have installed a all metal extruder also and I'm happy with it. I don't keep it super tight, just snug enough so you can barely see the teeth marks on your filament. If your nozzle clogs up it just eats thru your filament.

If your cooler fan is broken it explains a lot. Do you have any change to test it out of the machine with a 24v transformer. I have noticed that almost all of the ready coded products I have printed has a cooling ramp up after few layers of the print. So no cooling in start to get a good adhesion. I have try to change it from settings during the print but no effect. I guess the machine obeys the code first.

I hope that you had the Monday version of this machine and the fan is broken. Is there any possibility that the spaghetti monster got it's way in to the fan and maybe jammed it?

Good luck Nick!
 

Bakafish

Well-known member
Joined
Feb 7, 2017
Messages
477
Location
Tokyo
Well, no parts cooling would certainly be an issue. Your isolation seems correct, the fan would appear to be bad... it would explain a lot.

I use all updated fans on my machine (I guess that's not going to be a surprise...) I replaced the stock part cooling fan with a larger SanAce (Sanyo Denki) 5015 blower (PN# 109BC24FC7-1) and the hot end cooling fan is a SanAce 4020 axial fan (PN# 109P0424F601) These are mounted to an older version of the Hero-me modular cooling duct (no idea if this is still the 'best' design) that I made changes to to improve the printability as that older version was not really very realistic when it came to actually printing it cleanly. Hopefully the newest versions are better in that respect, I don't know. You are in a bit of a chicken and egg situation as you can't print a new fan duct cleanly without a working fan duct, so I'd get a basic replacement fan first (it will likely be very very cheap on Amazon.)

These San Ace fans are oversized, but they are their lowest airflow versions for the size making them easy for the board to supply current to them and relatively quiet. They are also kind of expensive and you certainly could substitute cheaper units from other manufacturers. My printer is very close to my working area, so I've tried to minimize noise generation, bigger fans at slower speeds is the key for this, again your needs may be different. As long as your fans are 24v and the amperage rating is lower or equal to what you are replacing, you will be fine.
 
OP
N

nicholam77

Well-known member
Joined
Dec 18, 2016
Messages
2,672
Location
Minneapolis, MN
Hi Nick! Damn that printer is keeping you busy.. But hey! Buying a semi-finished product makes you an expert of the subject. And that's a good thing.. right:LOL:

Hey Tapio! Yes, keeping me busy indeed! I've definitely learned some things which is great, and historically I don't mind tinkering, but I'm at a stage in my life with minimal free time where I'm finding I like things to just work haha. I guess that comes at a higher price point for 3D printing.

I noticed that you had a made in China filament one of your pictures. I've read some problems with those "overseas" filaments but have no experience. That could be one source of debris.

Hmmm, yes the Inland brand seems to be made in China. Not sure about the Overture. I would imagine a lot of them are? I definitely wanted to try a different filament to see. What brand do you use?

If your cooler fan is broken it explains a lot. Do you have any change to test it out of the machine with a 24v transformer. I have noticed that almost all of the ready coded products I have printed has a cooling ramp up after few layers of the print. So no cooling in start to get a good adhesion. I have try to change it from settings during the print but no effect. I guess the machine obeys the code first.

Not sure if I have a spare 24v transformer. All the stuff I'm printing I've sliced myself, with the part cooling fan to come on full blast on layer 2. The motherboard fan comes on then... so it appears the code is working. Same with the manually entered M106 command. I also checked Cura machine settings and the fan is labeled '0' which I believe is correct.

I hope that you had the Monday version of this machine and the fan is broken. Is there any possibility that the spaghetti monster got it's way in to the fan and maybe jammed it?

Good luck Nick!

Same! It would be great if this is the main fix, then I know what the problem is and can dial it in from here. The fan looked clean... not sure why it failed!

Well, no parts cooling would certainly be an issue. Your isolation seems correct, the fan would appear to be bad... it would explain a lot.

Yes, it seems promising. I guess I should have listened to you and take things apart earlier. 😁

You are in a bit of a chicken and egg situation as you can't print a new fan duct cleanly without a working fan duct, so I'd get a basic replacement fan first (it will likely be very very cheap on Amazon.)

Had the same thought. I've already ordered the Creality OEM replacement (comes with hot end and part cooling fan with correct cable length and connector for about 8 bucks).

My printer is very close to my working area, so I've tried to minimize noise generation, bigger fans at slower speeds is the key for this, again your needs may be different. As long as your fans are 24v and the amperage rating is lower or equal to what you are replacing, you will be fine.

Less noise is appealing, mine is on my home office desk. Good to know about bigger + slower. My goal is to get it working properly with the stock setup, and then if everything is pretty good I might look at a cooling duct. I've still read good things about the HeroMe but I found a few minimal, easier to print ones that use the stock fans. I might start there. Can always switch it up later!

Thanks again for reading along and helping me figure stuff out. Definitely have learned some things!
 
OP
N

nicholam77

Well-known member
Joined
Dec 18, 2016
Messages
2,672
Location
Minneapolis, MN
What's that in the background?

LOL!! You almost caught me. Technically, it has a Windows XP sticker on the front, and was shipped to me with XP installed from eBay. An HP Compaq w/Pentium 4 inside and a whopping 512mb of RAM. :ROFLMAO: But @Bakafish is right, I used it to toy around with Linux. It's long been defunct, but I used to run it as a headless xubuntu fileserver, ftp server, and backup machine for my Macs, and to practice BASH scripting haha. That boot drive is still in there, but later I moved to NAS4Free running from a USB stick, and set up the storage as a media share for XBMC (now Kodi I believe?).

Later I moved my media library to PLEX and just run that off a Mac Mini now, via some attached RAID storage. But that died on me. Yes, embarrassingly both slices. Need to get some more drives! File server and backup duties have migrated to a Synology DS218.

A Linux box, one would hope :cool:

Bingo bango! 🤓
 

Trapps

ALLIANCE MEMBER
Joined
Feb 10, 2017
Messages
2,003
Location
The Detroit Zoo
LOL!! You almost caught me. Technically, it has a Windows XP sticker on the front, and was shipped to me with XP installed from eBay. An HP Compaq w/Pentium 4 inside and a whopping 512mb of RAM. :ROFLMAO: But @Bakafish is right, I used it to toy around with Linux. It's long been defunct, but I used to run it as a headless xubuntu fileserver, ftp server, and backup machine for my Macs, and to practice BASH scripting haha. That boot drive is still in there, but later I moved to NAS4Free running from a USB stick, and set up the storage as a media share for XBMC (now Kodi I believe?).

Later I moved my media library to PLEX and just run that off a Mac Mini now, via some attached RAID storage. But that died on me. Yes, embarrassingly both slices. Need to get some more drives! File server and backup duties have migrated to a Synology DS218.


Bingo bango! 🤓
🤯

I'm sorry, but first 3D, and now this ridiculous new language? How's a curmudgeonly old dude supposed to keep up?

🤪
 
OP
N

nicholam77

Well-known member
Joined
Dec 18, 2016
Messages
2,672
Location
Minneapolis, MN
I'm sorry, but first 3D, and now this ridiculous new language? How's a curmudgeonly old dude supposed to keep up?

Ha! Sorry for the mumbo jumbo. The 3D printer stuff is new to me, too, and I'm basically just regurgitating YouTube. I had to get up to speed as well. Here's a key for you on the rest:

xubuntu — a linux distribution based on Ubuntu, but lighter weight for servers and older hardware
FTP server — you probably are familiar with this one, but used for transferring files between remote machines, was handy before Dropbox / Google Drive etc existed
BASH — this is a command line scripting language used in unix, linux, and MacOS. It's similar to the Windows DOS command prompt in some ways. A common way to interact with linux machines, by typing commands in a "shell" or "terminal" prompt. With text commands you can move, browse, sort, copy, and rename files, as well as edit text files (like config files), run "scripts" which are a series of pre-saved commands in a text file, and there is also a robust variable and logic syntax that lets you set up some pretty cool automations.
NAS4Free — an open source, free, operating system and GUI that let's you run Network Attached Storage. So basically a file server like a Synology, but open source and DIY / bring your own hardware.
XBMC — Xbox Media Center, an old open source media player and media server for Xbox. Basically I could play videos hosted on my computer through my local network on an Xbox. This was later forked and changed name to KODI, and works with more clients than Xbox. Essentially it's a home theater media server that runs on a computer. Like PLEX, but roll your own.
PLEX — a commercially developed, but free, media server
RAID — many types, but one use is to bond multiple hard drives so the same data set is written to more than one drive at once, for redundancy. With the idea being, if one drive, or "slice" fails, you have a backup copy. To the user and operating system, the drives appear as a single Volume.
Synology — A popular Network Attached Storage device. Let's me centralize files on it, accessible on my home network. Also back up computers to it. It can also act as a media server, security camera recorder, many, many things, really.

Not sure if that made things better or worse but there you go!
 
To avoid these ads, REGISTER NOW!

Matias

Well-known member
Joined
Feb 28, 2015
Messages
616
Location
Finland
Hi Nick, trying to catchup and all I see is XYZ cubes :unsure::D

It's awful when it doesn't work... Mine hasn't been used since the last part I showed in my thread, as all the parts keeps peeling off during printing. I know my plate is a potato field, nearly impossible to get calibrated corrected. Thought about the BL touch, but would need the actual sensor also which wasn't readily available then (within the EU). Maybe I'll have a second look soon.

But yeah, playing with temps, then started playing with the first layer speed, width etc. it's a nightmare to debug.

Good that your's still able to print some pieces, even with slight deformations but at least usable in places where it doesn't need to be 100% correct.

Not able to give any advice, but I wish you good luck with the fan and hopefully it gets it fixed!
 
OP
N

nicholam77

Well-known member
Joined
Dec 18, 2016
Messages
2,672
Location
Minneapolis, MN
Hi Nick, trying to catchup and all I see is XYZ cubes :unsure::D

Same, Matias! I've even been seeing them in my dreams. :ROFLMAO:

It's awful when it doesn't work... Mine hasn't been used since the last part I showed in my thread, as all the parts keeps peeling off during printing. I know my plate is a potato field, nearly impossible to get calibrated corrected. Thought about the BL touch, but would need the actual sensor also which wasn't readily available then (within the EU). Maybe I'll have a second look soon.

But yeah, playing with temps, then started playing with the first layer speed, width etc. it's a nightmare to debug.

Bummer, I feel the frustration. I've spent a lot of time looking up my issues which has led me to various communities including the r/ender3v2 subreddit on Reddit, and bed adhesion seems like the biggest problem people struggle with. It's so weird that for some it works well and for some it seems impossible to level or get a good first layer.

Couple ideas...

Have you verified your bed is pretty much flat, with a straight edge?

Which side are you using? I've been using the textured "carborundum" side, but maybe try the smooth glass side?

I've been using a bed temp of 60°C with PLA, and leveling with a piece of paper. I level almost every print. If you haven't upgraded the yellow bed springs yet it's cheap and worth it.

In my understanding, BL Touch would only help if your bed is not uniform and flat. Or to save you time doing it manually. Otherwise you should be able to get results leveling the four corners with paper.

Have you tried a helper like hairspray or glue stick?

Sounds like you haven't printed too much on it, but maybe give it a clean? With dish soap in the sink or a spray of alcohol?

Fan should be off for the first layer (or first couple of layers). Also slower first layers. I think mine is set to 25mm/s.

Good that your's still able to print some pieces, even with slight deformations but at least usable in places where it doesn't need to be 100% correct.

Not able to give any advice, but I wish you good luck with the fan and hopefully it gets it fixed!

Yes, at least it prints! Thank you, we'll see what the fan does, and I hope you get yours sorted, too!
 

Bakafish

Well-known member
Joined
Feb 7, 2017
Messages
477
Location
Tokyo
File server and backup duties have migrated to a Synology DS218.
I've used Synology NAS units for over a decade and really like them. I'm an enterprise server/storage guy, but I'm not stupid enough to want to do my day job supporting my home stuff, I want things to 'just work.' Synology does everything I could ever ask for, and via an incredibly responsive web based GUI.

Thought about the BL touch, but would need the actual sensor also which wasn't readily available then (within the EU). Maybe I'll have a second look soon.
I've been very pleased with mine. There are clones and fakes out there, and I've heard bad things about the reliability of those. The documentation wasn't great for beginners, and you will need to have a main board and firmware that supports it (meaning you may have to compile it yourself) but it does what it is supposed to do quite well.

In my understanding, BL Touch would only help if your bed is not uniform and flat. Or to save you time doing it manually. Otherwise you should be able to get results leveling the four corners with paper.
As I've said before, the Creality branded glass bed is really quite good. But if my deep dive into metrology has taught me anything it is that nothing is flat. Marlin's Unified Bed Leveling allows a very detailed (in my case 100 point) surface map to be generated with the probe. This map is then stored, and the utility of this is that when you remove the bed to help get a particularly adhered print off of it (or use one of those magnetically attached sheet beds) the map can be reapplied with as few as 3 automated probe points (to reestablish the plane and any offset.) I also have the bed essentially screwed down tight, so any flex from the adjustment springs is dialed out of the equation.

However, always start with the easiest stuff first:
  1. Creality Branded Glass Bed securely mounted to the aluminum heater plate (I tape mine at the four corners using Kapton tape.)
  2. Proper bed leveling when the bed is at print temperature, as the thin Aluminum is going to move when heated.
  3. Use an actual feeler gauge (they are cheap and way easier to use) instead of paper to establish the gaps and make sure the tension springs on the adjustment screws are highly compressed.
  4. Always wipe down the print area with 95%+ Isopropyl Alcohol to clean and activate the contact surface.
  5. Use a 'brim' or a thin glue stick layer if your part doesn't have a large contact area, or the design is prone to lifting corners (as most empty box shaped items lacking infill tend to do.)
First layer issues are frustrating, but there are good tutorials and test prints to get it set up properly. Do the calibration when you have time to do it, rather than when you really want to be printing something and are in a rush to just make the damn thing work. Probes can help, but you will need the fundamentals to all be in place before they can offer any improvement, they are not a magic wand at all.
 

givemethewillys

Well-known member
Joined
Sep 21, 2009
Messages
173
Location
New Kent, VA
Sometimes I think that I want a 3d printer, and then I go and read a thread like this, and decide, "ain't nobody got time for that". I have such limited time to tinker as it is, that it would kill me to spend it making little cubes or string monsters.

Good on ya for keeping with it, it looks like you found the problem! I look forward to seeing more of your wooden, plastic and vw projects
 

Bakafish

Well-known member
Joined
Feb 7, 2017
Messages
477
Location
Tokyo
Sometimes I think that I want a 3d printer, and then I go and read a thread like this, and decide, "ain't nobody got time for that". I have such limited time to tinker as it is, that it would kill me to spend it making little cubes or string monsters.
As we keep saying, if you want no-fuss turnkey 3D printing, the Prusa i3 is the way to go. You are judging the practicality of automobiles based on user experiences with a Chinese kit car. Most of us went in knowing what we were going to have to do, and willing to trade time for saving money. You have the benefit of knowing beforehand where that path could potentially lead. It may not make economic sense for you to get a Prusa 3D printer, but the struggles discussed above are easily avoidable if that's the thing holding you back.
 
OP
N

nicholam77

Well-known member
Joined
Dec 18, 2016
Messages
2,672
Location
Minneapolis, MN
Sometimes I think that I want a 3d printer, and then I go and read a thread like this, and decide, "ain't nobody got time for that". I have such limited time to tinker as it is, that it would kill me to spend it making little cubes or string monsters.

It's too late for me, but save yourself! :ROFLMAO:

Good on ya for keeping with it, it looks like you found the problem! I look forward to seeing more of your wooden, plastic and vw projects

Thanks! I don't like to admit defeat easily. Or waste money. If it's broken and I can't use it and can't sell it — not good. I don't like using up my precious time to fix it, but them prospect of not fixing it gives me some determination.

The namesake of the thread (the VW) is at a bit of an impasse right now. Likely no developments there anytime soon. To take it to the next level like I want to, I bet I'd need to put $5k into it. Tune, tires, clutch, fix the suspension. At this point I'm not willing to do that.

I hope to get back to some woodworking projects soon! The printer is getting frustrating and I need a change of pace.

Most of us went in knowing what we were going to have to do, and willing to trade time for saving money.

I had no idea haha. I expected some fiddling with the slicer settings to see what it likes, but I had no idea I'd be taking the machine apart, and certainly didn't expect that. Guess I should have spent more time on Ender forums first, but based on people with the same printer on here, reviews online and Youtube, mostly all favorable, I kind of expected it to work. I definitely didn't think doing things like adjusting the stepper driver voltages would something every Ender owner has to do.

Now I know.

¯\_(ツ)_/¯

________________________________

So, I received the fan replacement.

Popped open the board to test before routing everything. And... it didn't work.

WTF.

Tried it in the motherboard fan connector and it worked. So... at least I know it's functioning.

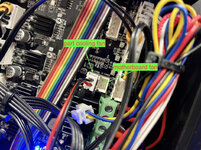
Took a closer look at the part cooling fan connector on the motherboard, and one of the pins is damaged / crushed / shorter than all the rest. Somehow the motherboard fan still powered up there, but it has a slightly different connector and I noticed I had to really push on it for it to stay powered. When I try to connect the part cooling fan that's supposed to go there, it must not be making contact.

IMG-5611.jpg

I could try to go the warranty route but I've heard Creality is bad to deal with. I'm guessing I probably broke or crushed it and didn't notice. It was hot glued in place originally. I still think the original fan is bad, because that's why I took it apart in the first place, and that one didn't work in either connector.

I don't know where to go from here. I could get the latest 4.2.7 motherboard and go to the trouble of swapping it out. It costs ~ $55 on Amazon.

I don't really want to keep spending money without a guarantee this thing is going to work for me. But I feel like I am so close and have spent many hours on it at this point. I printed a simple part recently that didn't require cooling, and it came out great.

I kind of wish I could go back in time and try the Prusa Mini+, but I don't know if the build volume would cut it. It's too late for that, anyways.

Decisions, decisions.

🤔
 

loganb

ALLIANCE MEMBER
Joined
Dec 29, 2011
Messages
5,578
Location
Omaha, NE
🤯

I'm sorry, but first 3D, and now this ridiculous new language? How's a curmudgeonly old dude supposed to keep up?

🤪

It just means he has earned many "Nerd Merit Badges" along the way!

I kinda figured it was a Linux box....but I had to nudge ya a bit on it....goodness a windows machine that old and actually still running windows....either a glutton for punishment or it does a very specific task and hopefully has no connection to the internet otherwise that machine is a hot mess! I've supported a couple factory machines running obsolete software on Win95 that we'd buy spare parts for on Ebay....ugh!

I also went down the Plex road for awhile...ended up not finishing that journey but have an external RAID array on the shelf in the closet behind me with probably 100 movies loaded on it....maybe someday I'll get that set back up for other storage purposes....

As to my thoughts on the cooling fan....if it was mine I'd cut the quick connect off the fan end, strip those ends and solder it right onto those pins on the connection. If that works and gets you going, you can then choose to either replace the board, replace just that damaged female quick connect(will require pulling the mobo out entirely and unsoldering stuff)....or leave that fan leads soldered in and if you have to replace it down the road you either unsolder it then or cut the wires you soldered to the pin header and either solder the new fan to that or put in a quick connect on the leads coming off the pins
 

kaymccampbell

Well-known member
Joined
Feb 27, 2015
Messages
29,584
Location
Upstate New York
It's too late for me, but save yourself! :ROFLMAO:


Thanks! I don't like to admit defeat easily. Or waste money. If it's broken and I can't use it and can't sell it — not good. I don't like using up my precious time to fix it, but them prospect of not fixing it gives me some determination.

The namesake of the thread (the VW) is at a bit of an impasse right now. Likely no developments there anytime soon. To take it to the next level like I want to, I bet I'd need to put $5k into it. Tune, tires, clutch, fix the suspension. At this point I'm not willing to do that.

I hope to get back to some woodworking projects soon! The printer is getting frustrating and I need a change of pace.


I had no idea haha. I expected some fiddling with the slicer settings to see what it likes, but I had no idea I'd be taking the machine apart, and certainly didn't expect that. Guess I should have spent more time on Ender forums first, but based on people with the same printer on here, reviews online and Youtube, mostly all favorable, I kind of expected it to work. I definitely didn't think doing things like adjusting the stepper driver voltages would something every Ender owner has to do.

Now I know.

¯\_(ツ)_/¯

________________________________

So, I received the fan replacement.

Popped open the board to test before routing everything. And... it didn't work.

WTF.

Tried it in the motherboard fan connector and it worked. So... at least I know it's functioning.

Took a closer look at the part cooling fan connector on the motherboard, and one of the pins is damaged / crushed / shorter than all the rest. Somehow the motherboard fan still powered up there, but it has a slightly different connector and I noticed I had to really push on it for it to stay powered. When I try to connect the part cooling fan that's supposed to go there, it must not be making contact.

IMG-5611.jpg

I could try to go the warranty route but I've heard Creality is bad to deal with. I'm guessing I probably broke or crushed it and didn't notice. It was hot glued in place originally. I still think the original fan is bad, because that's why I took it apart in the first place, and that one didn't work in either connector.

I don't know where to go from here. I could get the latest 4.2.7 motherboard and go to the trouble of swapping it out. It costs ~ $55 on Amazon.

I don't really want to keep spending money without a guarantee this thing is going to work for me. But I feel like I am so close and have spent many hours on it at this point. I printed a simple part recently that didn't require cooling, and it came out great.

I kind of wish I could go back in time and try the Prusa Mini+, but I don't know if the build volume would cut it. It's too late for that, anyways.

Decisions, decisions.

🤔
That's too easy. You steal a pin from another board, and solder it in the Ender board. PC mother boards, and large household appliances have a lot of those connectors.
 
OP
N

nicholam77

Well-known member
Joined
Dec 18, 2016
Messages
2,672
Location
Minneapolis, MN
I also went down the Plex road for awhile...ended up not finishing that journey but have an external RAID array on the shelf in the closet behind me with probably 100 movies loaded on it....maybe someday I'll get that set back up for other storage purposes....

Yeah I had ripped my whole blu-ray collection and now all the rips are lost. Haven't had the motivation to rebuild. Less important to me now, too, because of how prolific streaming media is. But I've been meaning to assemble a collection of important childhood and hard to find films that aren't available on Netflix for example. Back burner project.

As to my thoughts on the cooling fan....if it was mine I'd cut the quick connect off the fan end, strip those ends and solder it right onto those pins on the connection. If that works and gets you going, you can then choose to either replace the board, replace just that damaged female quick connect(will require pulling the mobo out entirely and unsoldering stuff)....or leave that fan leads soldered in and if you have to replace it down the road you either unsolder it then or cut the wires you soldered to the pin header and either solder the new fan to that or put in a quick connect on the leads coming off the pins

Good idea! It did not cross my mind because I don't have a soldering iron and haven't soldered since the one time I did it in a 7th grade shop class.

I imagine it's not that hard though? Can I just get a cheap iron/kit on Amazon or is there something you recommend? I know it's probably a handy tool to have, but my goal here is too keep costs down in relation to the printer. Otherwise I'm going to end up crossing the Prusa $$$ threshold and proving you right!

That's too easy. You steal a pin from another board, and solder it in the Ender board. PC mother boards, and large household appliances have a lot of those connectors.

Ha! Nothing is too easy with a toddler and baby in the house. :ROFLMAO: I think I slept a grand total of 1 hr last night from the baby waking at all hours, and this afternoon my 3-yr-old got a fever and barfed all over. Just the challenge du jour. Each little purchase and troubleshooting step with this printer is coming down to the same question of the initial purchase... the value of time vs. money. My time is pretty precious at the moment, but I hear what you and Logan are saying and it would save some money and teach me a new skill...
 

kaymccampbell

Well-known member
Joined
Feb 27, 2015
Messages
29,584
Location
Upstate New York
Yeah I had ripped my whole blu-ray collection and now all the rips are lost. Haven't had the motivation to rebuild. Less important to me now, too, because of how prolific streaming media is. But I've been meaning to assemble a collection of important childhood and hard to find films that aren't available on Netflix for example. Back burner project.


Good idea! It did not cross my mind because I don't have a soldering iron and haven't soldered since the one time I did it in a 7th grade shop class.

I imagine it's not that hard though? Can I just get a cheap iron/kit on Amazon or is there something you recommend? I know it's probably a handy tool to have, but my goal here is too keep costs down in relation to the printer. Otherwise I'm going to end up crossing the Prusa $$$ threshold and proving you right!


Ha! Nothing is too easy with a toddler and baby in the house. :ROFLMAO: I think I slept a grand total of 1 hr last night from the baby waking at all hours, and this afternoon my 3-yr-old got a fever and barfed all over. Just the challenge du jour. Each little purchase and troubleshooting step with this printer is coming down to the same question of the initial purchase... the value of time vs. money. My time is pretty precious at the moment, but I hear what you and Logan are saying and it would save some money and teach me a new skill...
We built a house, ran a business, maintained old cars, cut firewood, helped the in-laws, you name it, with two babies. It's wicked tiring, but can be done.
 

Bakafish

Well-known member
Joined
Feb 7, 2017
Messages
477
Location
Tokyo
I had no idea haha. I expected some fiddling with the slicer settings to see what it likes, but I had no idea I'd be taking the machine apart, and certainly didn't expect that. Guess I should have spent more time on Ender forums first, but based on people with the same printer on here, reviews online and Youtube, mostly all favorable, I kind of expected it to work. I definitely didn't think doing things like adjusting the stepper driver voltages would something every Ender owner has to do.
I'm not sure if all the things you did were really "required" or due to us not being able to identify the seriously odd issue you've found. I'll admit that I didn't expect you to have this much trouble, but we did say there would be some hand holding to get this running at 100% But hopefully this will be the last of the difficult stuff.

That pin looks melted, and if we are assuming that the cooling fan is the cause of the print issues and initially it was printing cleanly, then it likely didn't ship that way, right? So along with a dead fan, there looks like some kind of arc erosion or a short. I've honestly never seen that kind of failure, I would have expected the weakest point (lead wires or coils in the fan) to melt before a pin would. That makes me concerned that there may be other damage.

So before you replace the pin (which is the correct repair, if not the easiest) I would contact Creality and explain the order of the issues and the isolation steps you took and finally that picture. Don't talk about adjusting voltages, modifications or anything tangential, just:
  1. It printed great.
  2. It stopped printing great.
  3. I noticed no cooling fan.
  4. I bought a new Creality fan, it didn't work.
  5. I saw this pin looks melted, please send me a new board.
Whatever melted that pin may have caused other issues, and you should at least attempt getting a replacement before making changes that would preclude a replacement.

In the interim, order a bundle of "JST 2 Pin Micro Electrical Male and Female Connector Plugs" for a few dollars and make a little Y splitter to use the remaining connector for both fans. That way you don't have to do anything destructive to any of the parts. You could probably get away with no fan on the motherboard at all for shorter prints, but a Y cable should be easy enough to make even without a soldering iron.
 

loganb

ALLIANCE MEMBER
Joined
Dec 29, 2011
Messages
5,578
Location
Omaha, NE
As is usually the case...I agree with @Bakafish... at the least see if you can get the new board for free. Swapping looks to be a pain....ugh

And although it goes against the GJ ethos to not push down the path that requires new tools...a Y splitter from Micro Center will be easier and cheaper than an adjustable heat soldering station....
 

T-handle

Well-known member
Joined
Jun 17, 2019
Messages
440
Location
Northern Ostrobothnia Finland
Hey Nick you did it! Sneaky little fault on the pin, I would have missed that one.

That'a an easy fix. It looks like the minus pin is damaged, measure with your continuity tester if the mainboard fan uses the same ground (minus) circuit point. I bet it does cos they are in a row. If so stole the minus from the mainboard fan lead.
You can take the two pin connector apart and use only the metal pins from inside. Crimp it to the lead and use some heat shrink and you are ready to go. Maybe some tape or hot glue to secure the pins if you have in hand.

And if you are unhappy with your printer you can always go and read the Prusa I3 troubleshooting forum :LOL: Yes, those guys have similar problems too. In fact if I buy something new I always search the troubleshooting forums first to be sure that I can fix it myself:ROFLMAO:

Btw you asked previously what filament I use, I have used a real filament made in Holland and Form futura made in Netherlands which is same country as Holland:LOL: I bought some Flashforge filament (made in China) for test (cos cheap) and it's been doing fine too. I ordered red but it's more like dark orange, so some pigments missing there.

Have a great day Nick!
 

Mr. Roboto

Well-known member
Joined
Dec 11, 2012
Messages
2,160
Location
New Hampshire
Good catch on the pin! Is that connector an SMT component or through-hole? It's hard to tell exactly what the damage is from the photo, but you should be able to repair it. If it were me I think I would try and replace the header, or at least try and jury rig up the new fan to work. As T-handle suggested, if you can find a common ground, you can steal one from another location on the board... just splice it in to another negative wire and in theory you should be good to go. Much quicker than replacing the entire fan header.

I hear ya on the time/cost argument, though. Good luck, whichever path you take! You've come this far, so hopefully this is the last hurdle for you to get through.
 

patlun

Well-known member
Joined
Apr 12, 2015
Messages
242
Location
Värmland, Sweden
Just because everyone tell you it is easy to fix the pin, i will give you my 20 ören (about 2 cents)

I would investigate and buy a nice new main board, of course a 32 bit so you can run Marlin 2.0. Beside Creality 4.2.7 you have SKR E3 Turbo. Both have nice silent stepper drivers. I am looking at a board from SKR myself because they have support for klipper (instead of Marlin) if i choose to change. I am not sure about the klipper support for Crealitys boards.

The reason that i my choice is an upgrade is that i have two working printers, my Ender 3 is / will be a experiment machine where i test elastic filaments and other things. And the upgrades of that printer is delayed until my newest printer (Tronxy x5sa 400) is functional.
 

Bakafish

Well-known member
Joined
Feb 7, 2017
Messages
477
Location
Tokyo
Just because everyone tell you it is easy to fix the pin, i will give you my 20 ören (about 2 cents)

I would investigate and buy a nice new main board, of course a 32 bit so you can run Marlin 2.0. Beside Creality 4.2.7 you have SKR E3 Turbo. Both have nice silent stepper drivers. I am looking at a board from SKR myself because they have support for klipper (instead of Marlin) if i choose to change. I am not sure about the klipper support for Crealitys boards.

The reason that i my choice is an upgrade is that i have two working printers, my Ender 3 is / will be a experiment machine where i test elastic filaments and other things. And the upgrades of that printer is delayed until my newest printer (Tronxy x5sa 400) is functional.
His v4.2.2 board is already 32bit (STM32) and it should have Trinamic 2208 silent drivers as well, so Marlin 2.x and quiet printing should already be covered. If the board ever dies, I'd go with a 3rd party replacement rather than using a Creality board, but I don't see any reason to trash-can it for a single bad pin. If they won't replace it under warranty we will find a fix that doesn't overtax his time, equipment or abilities. The astute observation by @T-handle that it is actually a damaged ground pin makes it even easier to workaround.
 

patlun

Well-known member
Joined
Apr 12, 2015
Messages
242
Location
Värmland, Sweden
His v4.2.2 board is already 32bit (STM32) and it should have Trinamic 2208 silent drivers as well, so Marlin 2.x and quiet printing should already be covered. If the board ever dies, I'd go with a 3rd party replacement rather than using a Creality board, but I don't see any reason to trash-can it for a single bad pin
Single bad pin? I am not that sure about that. In my experience once one thing is wrong with a circuit board there is others so I scrap them and buy something new and better. Of course i would also check if i can get a new one on warranty, it is nice to have on in reserve (y)

I am not saying it is wrong to try to repair it, I am saying i would not bother to do it :)
 
Last edited:
OP
N

nicholam77

Well-known member
Joined
Dec 18, 2016
Messages
2,672
Location
Minneapolis, MN
Wow, lots of opinions on this :ROFLMAO: , thanks for chiming in everyone

Warranty claim has been submitted, in a free-form email to Creality after sales service. No idea how fast they'll get back or what they'll say.

Their website does state:

If the customer finds non-human damage within one week after receiving the goods, we will send the replacement parts free of charge.

So maybe I blame it on raccoons? Or Zombies?

In actuality, I'm embarrassed to say I'm pretty sure I melted the pin with my multimeter. I didn't put 2+2 together until @Bakafish said it looked "melted". I have not worked with electronics or electricity much, aside from some simple light fixture / light switches around the house.

Here's where I think I screwed up — when adjusting the stepper voltages, I followed this Creality video:


which said to put the black common lead on the SD card slot.

So when checking the fan connector voltage on the board, I did the same and put the negative lead on the SD card slot again. I didn't know the two pins where positive and negative. So I figured the SD card slot was a known place to put it. When I measured the pins with the red lead, both pins registered right around 24 volts. This was with the fan "off". No issue yet. But after giving the M106 command to turn the fan "on", I checked the same way, and when I touched one of the pins (must have been the negative) there was a spark and pop.

At that time I didn't know the pin was melted. Only after re-examining when trying to install the replacement.

So to school a dummy, I should have put the black and red leads one on each pin of the connector? Was it wrong to check by turning "on" the fan? Why was 24v showing on both pins when the fan should be "off". Please remember I am not experienced in this (probably shouldn't be learning on the printer!!), but I am a bit confused.

All that being said, I still submitted the warranty claim, because:

1) The layer shifting issue. I read a lot about this. I checked the belts and V-roller eccentric nuts, and all the nuts and bolts soooo many times. It wasn't that. It wasn't the nozzle hitting the print. There are many other accounts of late batch 4.2.2. boards overheating and causing the issue. Also the Y-motor was way too hot. So I believe there were mechanical issues before I ever opened the machine up.

2) The fan was definitely dead before I ever removed the hot glued connector on the motherboard. I first inspected it at the hot end, and it would not spin, even when M106 was enabled, and the hot end and motherboard fans were working fine. I think it was working initially, so something must have killed it.

So even though I'm probably to blame for the melted pin, I don't necessarily feel bad submitting a claim and see what they say, because I think there were some issues anyways.

All that being said, I do want to try to jury rig a solution in case Creality doesn't come through. Plus, besides the part cooling fan, it seems to be printing fine. I've successfully printed a handful of parts that don't have steep overhangs or bridging with good results.

@Bakafish I did order those connectors, but they are too small. I think they are "micro" connectors. Do you think these would work instead?

I'm probably more comfortable splicing wires together than the soldering or taking apart the connectors.

I also may try just routing the replacement fan, and plugging it into the motherboard fan (good) connector, and trying a shorter print with part cooling but no board cooling. Like I don't know... say... an XYZ cube?? 😁

Thanks to everyone for the replies... I don't have time to tackle it at the moment but I'll re-read everything and come up with a plan, and in the mean time wait on what Creality says.

🍻
 

Bakafish

Well-known member
Joined
Feb 7, 2017
Messages
477
Location
Tokyo
@Bakafish I did order those connectors, but they are too small. I think they are "micro" connectors. Do you think these would work instead?
Oh, damn, sorry I should have looked more carefully at the pin pitch. It is really hard to get a sense of scale from the pictures. The connector used is the JST-XH 2.5mm pitch, so the one you linked is also incorrect. I saw several premade sets of the JST-XH on Amazon, I agree that splicing (especially with those clever new heat shrink low temperature solder connectors) is easier and cheaper than getting a full soldering station setup (we'll put that on the future projects list.)

As far as the melted terminal, it isn't super clear to me how their PWM (pulse width modulation) circuit is set up, they need to vary the fan speed and they may be doing it by modulating the ground terminal rather than the 24v which might explain why you saw voltage on both pins when the fan was in the 'off' setting. In DC terms that differential is 0 volts. But your meter (in the voltage setting) shouldn't have allowed enough current to melt the pin, but if you weren't careful you could have easily accidentally shorted the two fan pins to each other with the probe tip when you switched it 'on' which absolutely would have had enough current to create the spark and melt it. This would seem to me to be the most probable root cause.

At this point I would just consider that connector dead and create the Y adaptor off of the known good one connected to the fan cooling the motherboard. I don't have that motherboard so I don't know if that remaining good connector still gives you fan control or not. If Creality refuses to replace it (they are going to be pretty dubious of this damage*) then you can decide how deep you want to go in testing and restoring it, or considering a replacement.


*This is why I wanted you to just focus on the basic points to them, and avoid any mention of what you worked on. The only plausible way this could have happened that was not user induced would be the fan shorting out and somehow instead of burning up the fan coil or the fan leads, it took out the pin. The only way that could happen is if the pin itself was somehow damaged from the factory in a way that it was the weakest point, so some kind of notch or abnormal shape. This is not impossible, but it is improbable. It would be critical to not plant the seed that you were fiddling around in there, saying you had to adjust the driver voltage or you tested the fan pins would be all the evidence needed to suspect that this wasn't a manufacturing defect but some inadvertent user error.

I have to say that as a support engineer I can empathize with Creality, and think it would be really hard for them
not to have a negative perception given their customer base. The Ender series is one of the most popular platforms to be modified, often by inexperienced users with questionable third party parts and YouTube tutorials that may not even apply to their hardware. They likely have a large percentage of issues that are due to these end users, who may not even understand how they are at fault and get mad when the machine no longer works or their parts replacements are refused. Creality support must be super suspicious of every warranty request, so that experience of being accusatorially questioned is going to be frustrating especially when there is no customer fault.
 
OP
N

nicholam77

Well-known member
Joined
Dec 18, 2016
Messages
2,672
Location
Minneapolis, MN
No worries, @Bakafish they looked the same in the Amazon picture to me too! Plus they were only 5 bucks and I can send them back. Thanks for helping identify the correct size.

I fully agree with everything you said. The pins are quite close together, and with the machine sideways in my lap, and not the best lighting, I'm sure I accidentally bridged the gap.

The remaining good connector that powers the board cooling fan seems to be tied to the bad connector. I've read that about Ender 3 v2. Basically the board cooling fan only comes on when the part cooling fan is enabled. So if you do a print that doesn't need part cooling... no board cooling. Common complaint against Creality I think. I have no idea if the board cooling fan is able to be speed modulated, but I would guess not. Although with the stock fan I probably want 100% speed for PLA anyways.

I agree that Creality is in a bit of a tough spot with warranty service, I'm sure they get bogus claims all the time. I guess I sort of did that, too. Because of that, and the nature of my pin damage, I do not have high hopes. But I'll still wait and see what they say.

If they say no, I'll likely build the Y-connector next. But I'm still considering the 4.2.7 board as a possible solve. The reason being, even though it's not big money we're talking, if I were to get the JST-XH connectors and solder connectors linked above, after tax that's about half the cost of a new board anyways. And I'm still suspicious about the existing board because of the layer shifts.

This isn't necessarily directed at you @Bakafish, but to anyone reading along, I dug up just a few posts about the issue with late batch 4.2.2 boards and layer shifting:

https://www.reddit.com/r/ender3v2/comments/lm2f3t

I found many, many examples of this. People who had the layer shifting issue, but only after 1 hr + prints (due to overheating), and after installing the new 4.2.7 board, problem went away. I know mine has stopped doing it since adjusting the VREFs, but I'm still worried there is an underlying problem.

It's not urgent, so I'm going to think it over some more.

Thanks for another thoughtful and helpful reply!
 
To avoid these ads, REGISTER NOW!
Top Bottom