To avoid these ads, REGISTER NOW!

taking apart a S-O ratcheting screwdriver

Butterman2473

Active member
Joined
Nov 28, 2020
Messages
36
Location
San Antonio, Texas
Just as a warning to those with the slightly older pistol grip ratcheting screw drivers. the shank/retention placement is extremely important. If it's off by even a little will not go back together. And even if you manage to rebuild it AND get it back together, one of the best features of the screwdriver, the thumb spinner at the top may have hardened, and shrunk over time, thereby negating it's purpose, and and will actually impede smooth rotation. I have not found a workaround for this problem...and and tons of lubricant only helps a little. My only idea to get it to work is to take the shank assembly apart an put some kind of spacer between the top of the ratcheting mechanism, and the thumb spinner. but as I previously mentioned, the tolerance is tight, probably too tight.

The screw driver in question:

View media item 33145

Necro post but chiming in anyway. I have an obsession with the SSDMRE4 and feel it's the best screwdriver ever made. I need to find the yellow for my collection to be complete.
But back to the subject. The "thumb spinner" on some of mine have gotten slightly crushed thus preventing smooth operation. The only workaround I've found is to slide the thumb spinner closer to the knurled part of the shank. On one I actually had to cut off some of the spinner as it was severely crushed. It's the orange one on the bottom of pic.

The red handle on the bottom is actually the TMRE4 1/4" socket driver.
 

Attachments

  • 20210105_000812.jpg
    20210105_000812.jpg
    74 KB · Views: 99
  • 20210105_001013.jpg
    20210105_001013.jpg
    93.7 KB · Views: 87
To avoid these ads, REGISTER NOW!

Butterman2473

Active member
Joined
Nov 28, 2020
Messages
36
Location
San Antonio, Texas
Just as a warning to those with the slightly older pistol grip ratcheting screw drivers. the shank/retention placement is extremely important. If it's off by even a little will not go back together. And even if you manage to rebuild it AND get it back together, one of the best features of the screwdriver, the thumb spinner at the top may have hardened, and shrunk over time, thereby negating it's purpose, and and will actually impede smooth rotation. I have not found a workaround for this problem...and and tons of lubricant only helps a little. My only idea to get it to work is to take the shank assembly apart an put some kind of spacer between the top of the ratcheting mechanism, and the thumb spinner. but as I previously mentioned, the tolerance is tight, probably too tight.

The screw driver in question:

View media item 33145

Necro post but chiming in anyway. I have an obsession
with the SSDMRE4 and feel it's the best screwdriver ever made. I need to find the yellow for my collection to be complete.
But back to the subject. The "thumb spinner" on some of mine have gotten slightly crushed thus preventing smooth operation. The only workaround I've found is to slide the thumb spinner closer to the knurled part of the shank. On one I actually had to cut off some of the spinner as it was severely crushed.

The red handle on the bottom is actually the TMRE4 1/4" socket driver.
 

Jfrary

New member
Joined
May 17, 2021
Messages
1
Location
Home
A couple of dumb questions here for someone who has a working pistol grip. I bought an orange pistol grip a few years ago that was in great shape but didn’t ratchet well due to high friction. I took it apart and couldn’t get it back together because the shank was bottoming out too early and forgot about it entirely. Recently I got it back together but have the issue where the orange cap around the selector cap is really tight and impedes ratcheting.

-Is the shank fixed to the orange thumb cap or should it be able to move freely?
-Is the orange thumb cap supposed to rotate around the aluminum selector cap? With the tight fit between the orange cap and the aluminum selector cap is basically eliminates all ratcheting function.
 

Butterman2473

Active member
Joined
Nov 28, 2020
Messages
36
Location
San Antonio, Texas
Refer to post #122.
Or get some large tweezers or needenose pliers and pry the thumb spinner up closer to the knurled part of the shaft / shank.
20210518_071839.jpg

Yes, it's supposed to rotate around the selector.
No, it's not supposed to move freely.
 

Attachments

  • 20210518_071839.jpg
    20210518_071839.jpg
    149.1 KB · Views: 78
Last edited:

exmaxima1

Well-known member
Joined
Jun 25, 2011
Messages
6,343
Location
Midwest
FINALLY!!!
I have found the Yellow SSDMRE4 and my collection of all colors is complete!
:rocker:
Not sure if it was ever offered as a standard color, but my SO bent handle is BLUE. It apparently was made as a promotional model for Champion, and I have never seen another blue one.
 

Attachments

  • soblue.JPG
    soblue.JPG
    470.9 KB · Views: 50

Highland

Well-known member
Joined
Feb 14, 2020
Messages
55
Location
Oklahoma
When disassembling a SO ratcheting screwdriver, do yourself a favor and clamp the screwdriver in a soft jawed vice, blade pointing up with the snap ring gap facing them.

Makes re-assembly a lot easier than chasing it around the bench or requiring three hands.

FWIW
 
To avoid these ads, REGISTER NOW!

Butterman2473

Active member
Joined
Nov 28, 2020
Messages
36
Location
San Antonio, Texas
Not sure if it was ever offered as a standard color, but my SO bent handle is BLUE. It apparently was made as a promotional model for Champion, and I have never seen another blue one.
Interested in parting with it?

I've been told there's also a grey w/ orange lettering promotional SSDMRE4 for either Stihl or Echo. The person that told me couldn't remember which.
 

Butterman2473

Active member
Joined
Nov 28, 2020
Messages
36
Location
San Antonio, Texas
If only you asked sooner....I listed on the auction site and it sold in 3 minutes. Must be rarer than I thought.
IMO, it's extremely rare because it's my first time hearing of it and I'd been on the hunt for the yellow for quite some time and not one single time did I encounter any promotional products.
Upon acquiring the yellow, I was informed by the seller of the Stihl or Echo SSDMRE4 and that my collection was in fact NOT complete.
I had to Jedi mind trick myself to not consider the promotional a must have.

I wonder if there are any others besides the Champion and Stihl / Echo.
 

Iridium rand

Well-known member
Joined
Sep 23, 2021
Messages
218
Ah now that’s a task I hope I never have to do again, getting that retaining ring back in place was painful to say the least

Shoulda known there was a guide on here it was all guesswork when I did it myself
 

Dohnkins

New member
Joined
May 20, 2024
Messages
1
Here is how to take apart a Snap-on ratcheting screwdriver for cleaning, greasing or converting to interchangeable blades/shanks.

Edit to add (4/23/18); The following applies to all ratcheting screwdrivers, 1/4 spinner handles and T handles branded for Snap-on, Williams, New Holland, Brownells (blue T-handle).

The mini ratcheting screwdrivers cant be disassembled that I know of.

You will need these type of pliers, mini needle nose.
pliers.gif


Here is the notch for the retaining spring.
retainingringnubs.gif

Step 1: Put screwdriver in locked position, mark/make note of retaining spring notch location. This will help in lining up when putting back together.

Step 2: Take fine needle nose pliers and squeeze retainer spring nubs together and lift cap up. The reverse cap shouldnt be on too tight to where you need to pry it off.
pliersonring.gif

Here is the cap removed with a shank in place
capremoved.gif

This is what you'll have with the fixed shank removed.
takenapart.gif

Step 3: Make sure you dont lose any internals. There is a plunger that likes to move or stay in the cap. pic has the soft grip and hard handle shown.
asfar as I can tell there is no differnce in the internals.
internals.gif

Step 4: If rebuilding, replace parts and skip to step5 If removing shank to allow multiple shanks/blades remove "spring ring retainer" from shank.(looks like a lock washer)
shankcomparison.gif

*Notice the soft grip handle has a rubber washer/bushing that fits in the reverse cap. This helps hold the interchangeable shank/blades in the handle. I need to find a source for these. It will work without it, but would hold the shank/blade better with it.
ruberwasherbushing.gif
Step 5: Reinstalling the reverse cap; find out where the notch for the retaining spring tabs go if you didnt mark the location. Place retaining ring on handle partof screwdriver squeeze the tabs together and place cap on screwdriver. Remove pliers and make sure cap is fully seated. *** similar to taking apart an S-K round head ratchet.

*This step is fairly difficult, it helps to have a third hand and/or a vise. It may take a few trys to get it right. I have taken all of mine apart several times and I still have some trouble once in a while.
reinstallingcap.gif

Notes.....
Taking out the pawl & gear for cleaning/greasing isnt difficult. Basically all parts just drop back in place. One thing that grease will do is quiet down the clicking noise. It does not take much.

The soft grip handle has a smaller notch for the retaining spring, therefore you may need smaller tip pliers.

The part #'s for the black end cap is: SSDMR4A200R 3.20$
The part # for the black reverse cap is: SSDMR4A6J 5.15$

The lime & black screwdriver I picked up off of ebay reasonable, it was missing the end cap and the reverse cap was shrunk from heat I think.
Anyway I replaced them and it looks kinda cool.

Handle size differnces
interchangeablehandles.gif

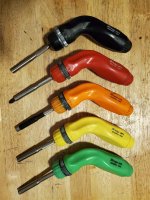
My ratcheting screwdriver collection.
ratchetingdrivercollection.gif


I think this should cover everything, unless I missed somthing....

Sorry about the pic's they were really good but somehow got to look cartoonish for some reason?
I just about popped a blood vessel trying to get the clip back in. With a pair of pliers, you'll need to compress the clip fully into the groove on the handle side. The clip should be fully seated in the groove and the pliers should almost close. Then, you can slide the cap all the way down into place and let go of the clip, being sure to alight the clip to the notch in the cap.
 
Last edited:
To avoid these ads, REGISTER NOW!
Top Bottom