To avoid these ads, REGISTER NOW!

What did you do "IN" your garage today?

To avoid these ads, REGISTER NOW!

Old Man Roger

Well-known member
Joined
Apr 6, 2017
Messages
17,833
Location
Palm Coast Florida
Somehow got a spec of metal embedded in my NEW rear brake rotor. Sorted with a whetstone. New EBC pads are suspected. Gonna drop the pads for IRAN tomorrow.
EBC and Galfer pads chew up rotors. I always liked OEM pads, and they usually lasted twice as long as aftermarket pads.

Granted, being a stunt rider, I was harder on brakes than most riders.

When I was first learning, it wasn’t uncommon to get a rear rotor glowing red. I’ve lost rear brakes from overheating the brake fluid.
 

welder4956

Well-known member
Joined
Apr 8, 2010
Messages
3,084
Location
Birmingham, AL USA
EBC and Galfer pads chew up rotors. I always liked OEM pads, and they usually lasted twice as long as aftermarket pads.

Granted, being a stunt rider, I was harder on brakes than most riders.

When I was first learning, it wasn’t uncommon to get a rear rotor glowing red. I’ve lost rear brakes from overheating the brake fluid.
I've learned that the hard way on my vehicles. Aftermarket pads do not last as long as the OEM pads, at least on the vehicles I drive. Same with rotors.
 

ZRX61

Well-known member
Joined
Aug 15, 2006
Messages
28,716
Location
Solar Blight Valley, SoCal
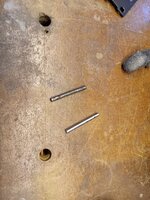
Pulled the pads, buzzed them on the belt sander & chamfered the edges a smidge. Polished the pins & reassembled all the gubbins. Brake works, doesn't drag at all & wheel spins like there's no pads in the caliper until I press the lever... so Ops Check OK at this point.

The pads with less than 90 miles on them:

IMG_20220608_093505742.jpg


IMG_20220608_093841089.jpg

One before, one after...

IMG_20220608_093402284.jpg

IMG_20220608_094132781.jpg
 

Old Man Roger

Well-known member
Joined
Apr 6, 2017
Messages
17,833
Location
Palm Coast Florida
Pulled the pads, buzzed them on the belt sander & chamfered the edges a smidge. Polished the pins & reassembled all the gubbins. Brake works, doesn't drag at all & wheel spins like there's no pads in the caliper until I press the lever... so Ops Check OK at this point.

The pads with less than 90 miles on them:

IMG_20220608_093505742.jpg


IMG_20220608_093841089.jpg

One before, one after...

IMG_20220608_093402284.jpg

IMG_20220608_094132781.jpg
I dont remember if yours has it or not, but some have a little anti rattle clip. It goes between the pads on the pins, it slightly pushes the pads away from the rotor when the brake is not applied.
 

ZRX61

Well-known member
Joined
Aug 15, 2006
Messages
28,716
Location
Solar Blight Valley, SoCal
I dont remember if yours has it or not, but some have a little anti rattle clip. It goes between the pads on the pins, it slightly pushes the pads away from the rotor when the brake is not applied.
Yup, people have a habit of installing them backwards so it wears the pads out faster.. mine are installed the correct way :)
 

kbeefy

Well-known member
Joined
Sep 14, 2013
Messages
3,458
Location
Harington, Eastern Washington
Been doing a kitchen remodel, finally got back at it after ignoring it far a month. Went to paint the last batch of doors and drawers and after priming my airless painter wouldn't prime. Thats weird, it was working fine this morning. Finally realized that I had cleaned/flushed the primer out with water, but it was an oil based primer. Doh! restarting a month old project can bite you sometimes.
Took it apart and it was all gunked up with dried paint.

0608221707a.jpg

Put it back together and it works great.

0608221707.jpg

Should get the final coat tomorrow.
 

welder4956

Well-known member
Joined
Apr 8, 2010
Messages
3,084
Location
Birmingham, AL USA
Cut seven pieces of 1/4" plate to 3-1/2"x3-1/2" with the abrasive saw and drilled a 1/4" mounting hole in each corner. Each piece is the base plate for a 1" square post to mount string lights on a friends back porch. Deburred all the holes and got everything ready to weld after work tomorrow. I need to cut a link of steel chain to weld near the top of each post to hang the lights from. I have some weld-on finials to cap the top.


2022-06-08 20_05_45-part# 810 Cast Iron Spears & Finials _ Steel Supply LP — Mozilla Firefox.jpg.
 

nadogail

Well-known member
Joined
Jan 23, 2009
Messages
32,049
Location
Coronado, CA
Worked on my 12 Volt Generator Project, re-drilled the 11/32 holes to 23/64 and now the Hona engine mounting bolts line up nicely. The engine is now bolted in place.

I also cut a hole in the mounting plate to accommodate engine oil changes. I discovered that my Drill Press does not have the capacity to drill to the center of the mounting plate; I bought this Drill Press in 1978 from an AD on the back page of a magazine.

I also wished my youngest brother a Happy 78th Birthday and made a major grocery shopping trip.
 

Hal

Well-known member
Joined
Mar 8, 2008
Messages
673
Location
Vermont
Sat around with my hand on my *** all day waiting for a drum of universal tractor hydraulic/transmission fluid. It was supposed to be here Monday. When it got here about 4:00PM, it was straight AW32 Hydraulic. I didn't catch it until the truck had left. At least I didn't pull the drain plugs before I looked at it.
 

Arne73

Well-known member
Joined
Mar 20, 2010
Messages
1,477
Got rained out in the yard so I started reassembly of the tractor engine. Next step is bolt it in place, install the flywheel & belts.
 

NWOhioChevyGuy

Well-known member
Joined
Feb 20, 2007
Messages
1,945
Location
Buckeye Hill (Morenci, MI)
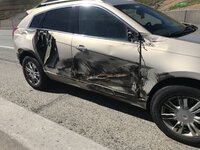
Worked on my wife’s soon to be daughters 2012 SRX.

Before (AKA after semi tried to occupy her space)

After sourcing “new” doors & fender.

Now to pull out the rear fender and touch up the paint.
 

Attachments

  • F3A7BDBF-1066-4F2D-975D-CBCB82F4117E.jpeg
    F3A7BDBF-1066-4F2D-975D-CBCB82F4117E.jpeg
    388.9 KB · Views: 87
  • 978D9A76-5F19-4B3E-9ED3-E18DCF21A26F.jpeg
    978D9A76-5F19-4B3E-9ED3-E18DCF21A26F.jpeg
    295.6 KB · Views: 87
To avoid these ads, REGISTER NOW!

rmalkow2

Well-known member
Joined
Jun 26, 2009
Messages
4,087
Location
Brighton, MI
Worked on the hot rod today. A bunch of little things, adjusted engine timing, put on new spark plug heat shields, fixed a small coolant leak, cleaned and checked power to the starter and engine ground. Unfortunately the starter is a bigger problem than connections. Gonna need a new starter motor before any serious cruising can happen.5561295A-979B-4910-92C9-39C43DB507D2.jpeg
 

555

Well-known member
Joined
Nov 10, 2007
Messages
2,312
Location
Nomad-Arkansas & Georgia
Put the new master cylinder on the bitsa Honda CB750. I planned to flip this bike but it is growing on me. Worked on a couple of other rusty projects. Listened to a 70s rock music mix for a while, drank a diet coke and sat on my Triumph desert sled making vroom noises while thinking about New Mexico.
 

ZRX61

Well-known member
Joined
Aug 15, 2006
Messages
28,716
Location
Solar Blight Valley, SoCal
Well ****. Exhaust won't be going back on today. Opened the bags the gaskets came in & found this:

IMG_20220610_133846893.jpg

Called the dealer, they're gonna have Kawasaki overnight air 3 new ones from Kentucky. Their parts guy says they looked fine to him, but ya couldn't see the damage until they came out of the individual bags as all four were stapled together & one side of the bags is opaque.

Won't be riding this weekend.

& It's gonna cost me damn near $30 in gas to go get them.
 

Old Man Roger

Well-known member
Joined
Apr 6, 2017
Messages
17,833
Location
Palm Coast Florida
Well ****. Exhaust won't be going back on today. Opened the bags the gaskets came in & found this:

IMG_20220610_133846893.jpg

Called the dealer, they're gonna have Kawasaki overnight air 3 new ones from Kentucky. Their parts guy says they looked fine to him, but ya couldn't see the damage until they came out of the individual bags as all four were stapled together & one side of the bags is opaque.

Won't be riding this weekend.

& It's gonna cost me damn near $30 in gas to go get them.
I’ve re used them before.
 

HPRifleman

Member Emeritus
Joined
Nov 18, 2019
Messages
767
Location
Wayne, IL
Started troubleshooting the reason the windshield wipers aren't working on the Corvette.

This is a two-part system. The vacuum portion opens and closes a door over the wipers in front of the windshield. The electrical portion moves the actual wipers. Nothing happens when actuating the dash switch but the wipers will work if I manually open the wiper door. This tells me that the problem is on the vacuum side. I just need to find which vacuum component isn't doing its job.

gj_124.JPG
 

Mikeske

Well-known member
Joined
Apr 28, 2017
Messages
2,131
Location
Washington State
Hit on a common issue of the 3rd generation Dodge Ram Quad Cabs. The back doors electric windows randomly quit working. I known of this issue and repair these in the past as the wires are to short from the factory. The fix is to solder in a additional 2-3" inches of wire and covered with tape and heat shrink. It actually took longer to put back the flexible rubber then it did to do the repair. tempImageoxus7h.pngtempImagesuiIlg.png
 

PassnThru

Well-known member
Joined
Jan 5, 2010
Messages
6,512
Location
Bowling Green KY
Just killed mole number 3 for the week. Well - behind the garage - not in it actually. But I was in the garage before I went hunting.
They are unrelenting and stealthy creatures - but I'm a creature of patience and perseverance.
 

welder4956

Well-known member
Joined
Apr 8, 2010
Messages
3,084
Location
Birmingham, AL USA
Started troubleshooting the reason the windshield wipers aren't working on the Corvette.

This is a two-part system. The vacuum portion opens and closes a door over the wipers in front of the windshield. The electrical portion moves the actual wipers. Nothing happens when actuating the dash switch but the wipers will work if I manually open the wiper door. This tells me that the problem is on the vacuum side. I just need to find which vacuum component isn't doing its job.

gj_124.JPG
Check the vacuum cannister in the driver's fenderwell. I have welded a couple of these up that had fatigue cracks along the ribs. I used ERCuSi-A on alternating current.
 
To avoid these ads, REGISTER NOW!
Top Bottom