555
Well-known member
Helped a friend with a 1942 Harley 45 engine.


torx driver shaft needs a duct tape dial position indicatorI fixed the dryer.New timer is on the way.

 Have been using the emergency release button at the bottom of the column lately to release the key. As most here probably know, it's not the key tumbler. The pin that raises up and down and hits the switch at the bottom of the shifter wasn't making the switch (or the switch lever is wore out) letting it know it was in "P". The pin was still present, not interested in putting any money into the deal. Zip tied the switch closed works fine. ***I am the only one who drives this, so safety concerns are out the window..and no JB Weld was used!


Not just a TV Kay. I call mine a Productivity Enhancement Tool because it gets me off the couch and into the garage doing things while listening to things in the background. Usually a YT video etc. And see, already you got a bunch of other things done with the PET turned on!!!Pulled a bunch of stuff of the wall. Hung a big TV. Put the hose reel back on the wall. Made a rack for the bar clamps. Fiddled with the new to me tv and remote. Ordered a new remote. Fixed a couple badly chipped nails. Cleaned.


Rigged up a bucket for draining the compressor.

Well it only took 5 years but I finally built a camper dolly. I have wanted to do this at several houses we had, but just never got it done.
It works well for moving it and then I put the jacks back down to store it. No need to keep all the weight on the dolly.
This was built with wood I already had. The 3/4 ply was already cut in those sections, so why waste another sheet. I used 6” casters. Pretty happy with it.

ThanksBack in the early 90's when we had our 10.5' Northland camper, I built a similar cart to move my camper around on. I would back my truck up to the shop to off-load the camper but then needed to move it around behind the house so it was out of the way. The dolly worked great. Then when I was ready to load the camper I could position it where it was more in line with my driveway.
Nice job on the camper dolly/cart.

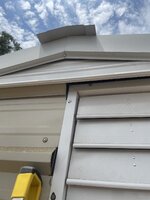
 . I did not want to cut a hole in my new shop, this should work perfectly.
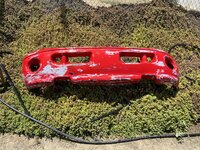
People won't crowd you on the highway. They always gave my multicolor Nissan a wide berth. Guess they figured I had nothing to lose.Still sanding/prepping the junkyard off-road edition bumper for the Cummins truck. Have some repairs to do to it still.
But got it wet sanded with 220, now it’s hang drying. When it’s dry, I’ll see what all I missed and go at her again. Then repair the gouges and holes. Then 600 grit, primer, more prep, then paint, then more prep, and then clear coat. Not trying to make it 100% perfect, just don’t want to make a cross country trip in a green truck with a red bumper LMAO
Looks nice.Planed down some cheap cedar fence pickets, created a rabbit on the sides and used them to cover interior walls on a small cabin at the back of our property..

Par for the course around here..lolCleaned a piece of old steel that was given to me maybe 15 years ago and made it ready to weld. $25 dollars worth of time to save maybe $5.
Leave it red and add a big green goblin face to the front to scare people the hell out of the way just like the movie " Maximum overdrive "Still sanding/prepping the junkyard off-road edition bumper for the Cummins truck. Have some repairs to do to it still.
But got it wet sanded with 220, now it’s hang drying. When it’s dry, I’ll see what all I missed and go at her again. Then repair the gouges and holes. Then 600 grit, primer, more prep, then paint, then more prep, and then clear coat. Not trying to make it 100% perfect, just don’t want to make a cross country trip in a green truck with a red bumper LMAO
I knew it reminded me of some movie, but I just couldn’t think of it..lolLeave it red and add a big green goblin face to the front to scare people the hell out of the way just like the movie " Maximum overdrive "
Looks great! but no insulation?Planed down some cheap cedar fence pickets, created a rabbit on the sides and used them to cover interior walls on a small cabin at the back of our property..
Wait, Wut? where are you moving to? I missed this...More packing, more sorting, and meeting the movers today to get this show on the road...
God that's the truth! when I was just learning to drive my dad had a 67 4WD International 3/4 ton 4X4 (with winch and Bardon extendable bumper for the camper) and we had sanded and primed all he PO's b"Battle damage" everyone gave that truck a wide berth (I know, I drove it more than my did did...) after he had it painted all pretty, they would crowd you to stupid levels...People won't crowd you on the highway. They always gave my multicolor Nissan a wide berth. Guess they figured I had nothing to lose.
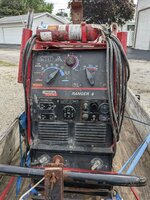
Cleaned a piece of old steel that was given to me maybe 15 years ago and made it ready to weld. $25 dollars worth of time to save maybe $5.
That’s the kind of rationale I use to try to save an hour, three hours later I realize I was wrong lolDon't forget the cost of going to a place that sells steel, the time to find it and maybe have it cut, and then back again...
If it were me, I'd skip all the finish work, spray it with rattle can Rustoleum bedliner, and call it done.Still sanding/prepping the junkyard off-road edition bumper for the Cummins truck. Have some repairs to do to it still.
But got it wet sanded with 220, now it’s hang drying. When it’s dry, I’ll see what all I missed and go at her again. Then repair the gouges and holes. Then 600 grit, primer, more prep, then paint, then more prep, and then clear coat. Not trying to make it 100% perfect, just don’t want to make a cross country trip in a green truck with a red bumper LMAO
You're old, unemployed, your time is worth nothing, so the steel was free.Cleaned a piece of old steel that was given to me maybe 15 years ago and made it ready to weld. $25 dollars worth of time to save maybe $5.