kaymccampbell
Well-known member
Those are called design opportunities.I feel like woodworking is half setup and half fixing **** that didn't work how it was supposed to.

Those are called design opportunities.I feel like woodworking is half setup and half fixing **** that didn't work how it was supposed to.
That's not nearly corporate enough. How about... "pivoting to respond to unforeseen changes in circumstance"?Those are called design opportunities.
That's not nearly corporate enough. How about... "pivoting to respond to unforeseen changes in circumstance"?Those are called design opportunities.


It wasn't meant to be corporate. It's what happens when your lovely planned woodturning blows up on the lathe, and you still make something out of it.That's not nearly corporate enough. How about... "pivoting to respond to unforeseen changes in circumstance"?
Absolutely, just having a little fun.It wasn't meant to be corporate. It's what happens when your lovely planned woodturning blows up on the lathe, and you still make something out of it.

Man those are turning out cool! It's good to see the whole process, mistakes included. I feel like woodworking is half setup and half fixing **** that didn't work how it was supposed to.
Great work, can't wait to see it come together.

Those are going to look really good!
Looks damn good to me Nick. I definitely would use 1/2" for the drawers. Man you need a planer.
Rockler does sell dimensional wood but its on the expensive side.


I use Excel for EVERYTHING!Great progress Nick!
I'm a fan of 80/20 theory in most things. 80% prep and 20% execution leads to excellent results.
Of course being a fan of the theory is easy. Actually using it in practice is something I'm guilty of failing to do on occasion.
As an absolute certified Excel Junkie who lives it and loves it every day, I love seeing spreadsheets used for non-day job activities. I won't comment on the blasphemy of Google Sheets I see some people using...
As an absolute certified Excel Junkie who lives it and loves it every day, I love seeing spreadsheets used for non-day job activities. I won't comment on the blasphemy of Google Sheets I see some people using...
 Just a dusting and didn't stick, but that was a wake up call. We've had some overnight lows in the 20's. Also in peak fall color. This weekend we did another quick getaway with the kids to Wisconsin, and the trees were poppin'.


And for the car show, I must say I'm jealous:
a) all the cars you got to see in one place (I especially liked the Singer)
b) your kids are with you, my daughters have no interest in cars, starting from the first years. And I'm not going to push it to them neither, but they have kind of a big uninterest in cars
I think with the price of all lumber and supplies which have gone up in the recent years, it's surprising to make anything cheaper than something that is produced in multiple numbers. You should instead of making two night stands, make 8, and just add nice plaques on them stating no 3/8 to 8/8 and sell them on with some profit, with your own getting to be collectibles in the future

I enjoyed reading your problem solving process and seeing the beautiful results. They are going to be a very nice pair of nightstands!


And if you are going to spend space budget on a cabinet saw, why skimp? Get a good one and be done with it.
Based on the bed not having pronounced grain I would guess it's either grain filled before stain, or dyed and not stained. The third option would be neither stained or dyed, but a toned top coat with a tinted clear.
Thanks for sharing those pictures from the home tour. Although I don't think I could ever get my wife on board with a home of that style, I love the look and appreciate the design. That 3rd one, to me, was the best of the bunch.
And the nightstands are coming along nicely. I'm always impressed by the woodworking skills on GJ, as I can't cut a board straight to save my life.
Deja vu from my beam project.
So far I like the Natural Danish Oil. But with the effort, time and coin you have wrapped up in these, it seems some more experimenting would not be a bad investment.
I'd add Rubio Precolor in Smoked Brown followed by Monocoat 2C to the list. No sheen on my walnut mantle with uncolored 2C. Even in direct sunlight.
There is definitely a Transtint dye you could use and mix your ratio until you get a close match. Also the toner sprays like Jar mentioned. I think Mohawk makes good toner sprays. That definitely might take some experimenting depending on how close you want to get.


Wow. Since you've got the spare board, I'd jam it in and give it a shot. You've got nothing to lose.
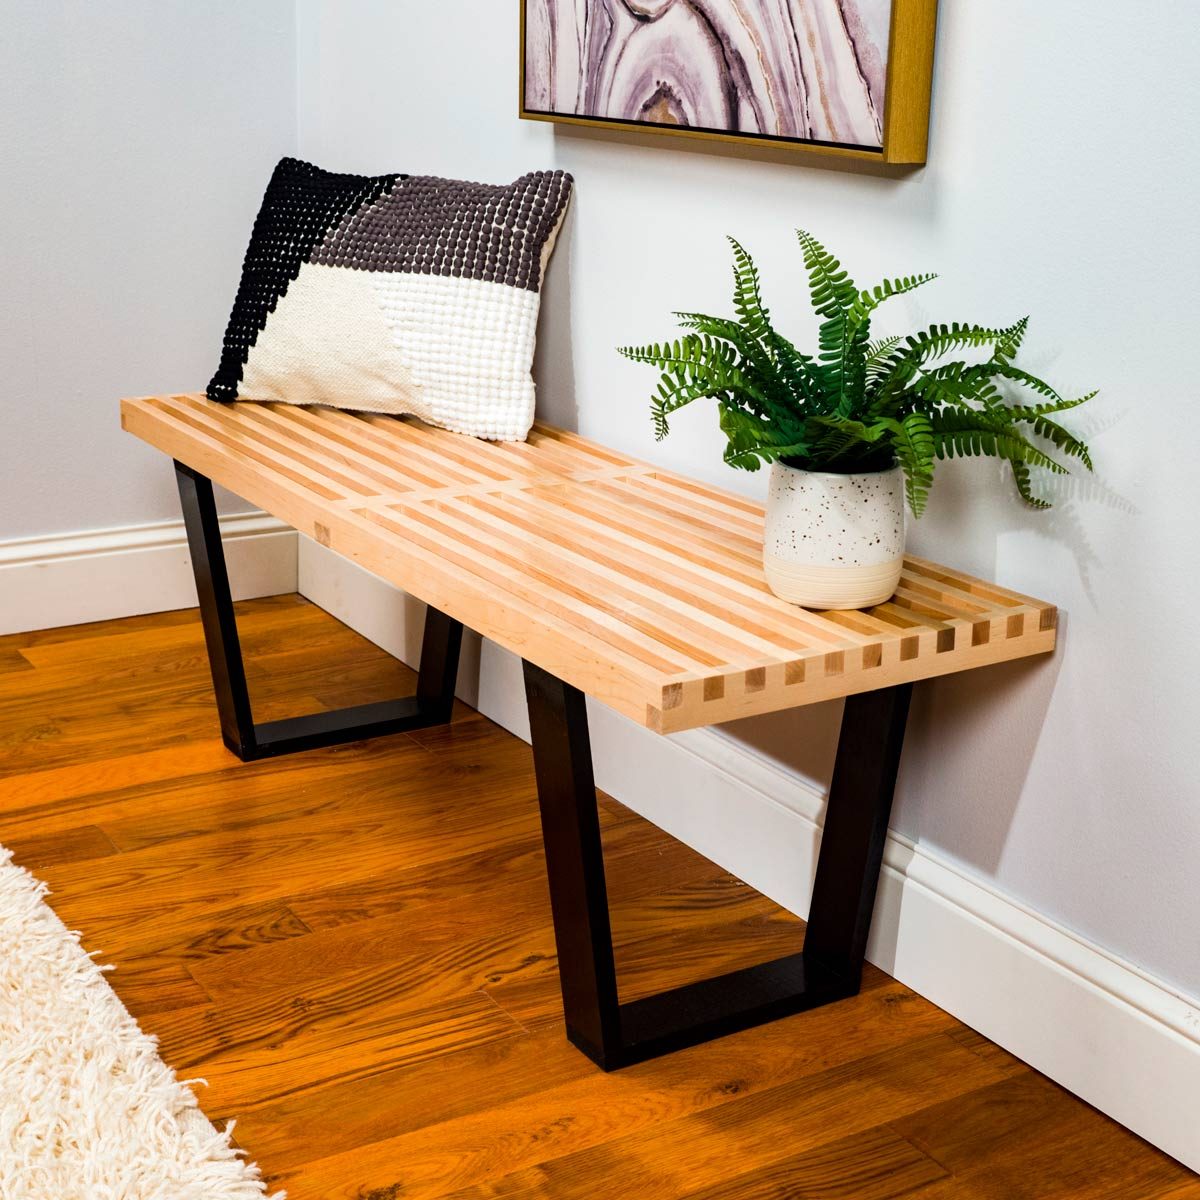
I’ve really enjoyed your Twin Cities Modernism tour. I’m from Northern Ireland but know the TC fairly well, having many relatives in MN.……………I like that but, having a reference to make my own stuff is great, because I think the hardest thing to I've thought about making a Nelson slatted bench myself because that would be fairly easy, and seeing if I can order the metal leg base for it. I wonder if they let you buy "spare" parts at all. Getting off on a tangent here...
I'm going on a Modernism open house tour in the Twin Cities this Saturday. I'll try to post some pics from that if photography is allowed.

 www.beckiandchris.com
 www.familyhandyman.com

 The nightstands look great which is again quite a feat with that exposed 45. Then you take it up a notch by matching the waterfall grain. I'm not sure why those pics resonated so strongly but it kind of reminded me "Zen and the Art of Motorcycle Maintenance" which suggests that you should not feel guilty for taking time to get these small details right. It makes a big difference in the final product to the depth that only a few trained eyes will fully appreciate.
thanks for sharing your projects! love the details and solutions! I have great results using odie's oil on walnut , ipe and hickory you should try this.
That is just crazy right there! I still so bad for recommending you the printer. I have not had any issues at all with mine. Quality Assurance is a crazy ride I guess. Every time I find something I like on Amazon and look at the reviews I feel like I am playing the odds on whether the item I order will be dead on arrival.
Wow. Since you've got the spare board, I'd jam it in and give it a shot. You've got nothing to lose.
Agree with Kay...what's there to loose other than those few fleeting minutes when the kids are asleep before you crash
Nick, finally had a chance to get caught up again - nice work as always. Love the house tours, thanks for sharing those. That has to be super inspirational for you!
Man, can't believe issues that printer is giving you! Might as well throw the other PCB in there and see what happens.
Our daughter just turned one (yesterday) - I also can't believe how quickly the time passed. I was so worried about being in the newborn stage again, and just like that, we're well through it.
This should get you back up to speed. Remember that the new board may have outdated firmware, check for a newer version if you can.
As always, good luck and post if you run into trouble.
Evening mate
One vote here for the Osmo hard wax oil, super hard wearing, I used it on a couple of timber floors I put down at home, might have a couple of pictures.
Not a scooby about 3d printing, good luck.
Steve


I’ve really enjoyed your Twin Cities Modernism tour. I’m from Northern Ireland but know the TC fairly well, having many relatives in MN.
Just a thought; the base/legs of the Nelson slatted bench isn’t metal. It’s ebonised timber. Making one of these is on my ‘to do’ list also. A couple of useful links for inspiration….
DIY Nelson Platform Bench — Becki and Chris
For those of you who missed the frenzy of East Coast Creative's Creating With the Stars competition , we were selected as one of 12 contestants to compete and won ! Here's a full tutorial for our round one project! The first round's theme was create a DIY knock off of an existing product. We loveSaturday Morning Workshop: How To Build A Nelson Platform Bench
This is a classic mid-century modern bench design that you can buy for about $1200 or build in one day for $100. Your call.

The nightstands are looking great! I really like how the dado'd front creates a lot lighter box. Definitely going to incorporate that sometime.
I've built a decent amount of floating nightstands/mitered boxes over the years and initially spent time domino'ing the joints...the glue-ups sometimes could be a pain because I was stubborn and wanted to use the tight setting on every mortise. I had one glue-up that was particularly painful and decided to pull the dominos mid-glue and just tape it up....I've now used it daily for probably 5 years, had my kiddos climbing all over it and it's incredibly strong. I built it as a basic prototype to get the dimensions we liked before eventually building in solid walnut and inadvertently learned I didn't need the dominos.
I'm a bit older/wiser now and willing to use the width adjustment on the mortise, but really don't think dominos are necessary.
Also, I completely agree with @Bakafish about buying a nice cabinet saw. I started with a ridgid contractors saw because my shop is just one side of a two car garage and quickly realized how limited I was by it....I returned it for the ridgid hybrid saw and learned a lot, but hated how terrible the fence was and how loud/underpowered it was on hardwoods. I ended up getting a sawstop cabinet saw 5 years ago that's been a joy to use! I never thought I'd have room for a cabinet saw, but after looking at the dimensions it was a really similar footprint to the hybrid and being on casters it's easy to store up against the wall. I built a rolling storage cabinet under the wing and with the 36" rails, think it's a pretty good fit for a small garage. Based on the projects you're tackling, I think you'd benefit greatly from a saw upgrade! It's definitely expensive up front, but if you buy once and cry once I think you'll be happier in the long run.
Nick I somehow missed the post about the Tablesaw miters. I had to look away with the insert removed. In helping to provide my public service to you and GJ below is the Tablesaw I need to buy. It has a digital readout for the blade angle that is pretty slick. And of course it has a splitter. Which my Ridgid does not. I made ZCI that have splitters in them but its kinda of a pain to change when you need to run without it.
My Ridgid TS3650 has been an amazing saw and still is for the price(I got it as payment for a job). But as far as ease of adjustments and "More Power" a cabinet saw is the way to go. I'm not really into Sawstop. I know a lot of people are. I don't really want to spend money on having a spare brake when it goes off for no reason. Just my .02 Oh one other thing to consider is you will need 220 to run most of these big cabinet saws.
https://www.grizzly.com/products/grizzly-10-3-hp-220v-cabinet-table-saw/g0941
Bret
Nick, I appreciate the effort it takes to make a truly precise 45 degree joint ... and it sure likes you are winning


My wife & I are big fans of Room & Board! Actually writing this while laying in bed on a R&B mattress on the king size bed frame I made...also have sofas, chairs, pillows, coat hooks and some other random stuff from them. My cousins live in Maple Grove and tell me some of the sample sales in the past have had some pretty good deals. I love wandering around their store in Denver and getting inspiration for builds!Thanks! I remember the first time I discovered that trick was at a Room & Board outlet, inspecting how a dresser was made. If you aren't going to do some sort of profile detail or bevel, I think it's a pretty nice trick that lightens up a 3/4" case.
I am tracking with you guys. I think it would need to be a balance of features and cost. I'm not going to go out and get the best saw on the market just because it's the best. But I definitely don't want to spend a good amount of money and still have frustrations, either.
My requirements would be
— large, flat, cast iron top
— quality trunnions and blade controls
— quality fence
— decent dust collection
— portable — in my space I need something on casters that's light enough to move. Probably every time I use it.
I'm not sure on power. I feel like I could be ok with a 2 hp / 110v saw instead of a 3+hp / 220v saw. But that requires more research on my part.
Your night stand + bed design are very similar to what I'm after! I originally wanted to make a whole bedroom set including bed, and the one you made is pretty much what I would have done. Really nice looking stuff!
Since you haven't made your real night stands yet, check out some of the models they have at Room & Board. Most use that rabbeting technique, even with one drawer + open cavity like your design. Maybe worth a consideration!


