To avoid these ads, REGISTER NOW!

Escape FROM my dream shop

OP
R

rmack898

Well-known member
Joined
Jan 23, 2007
Messages
3,196
Location
Honu Grove NE Florida
just sitting around eating cake?:)
No cake, but good pie. Chocolate/Peanut Butter/Pecan pie.

My daughter and her family arrived on my birthday and were here for 10 days. Laura and I had a blast with our 3 year old grandson, Leland.

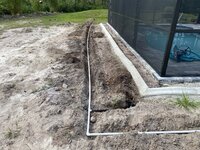
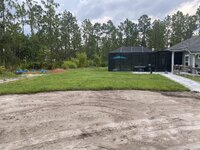
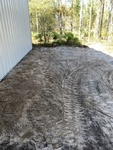
A fair amount of stuff got done here at the Grove and in my shop. We decided it was time to get some grass in the back yard to help reduce the amount of sand that gets tracked into the house by both me and the dog. We got 2 quotes to lay 3500 sq/ft of Bahia sod and they were both around $5k. No prep work just provide lay the sod. The cost of the sod was just under $1200 so we decided to do it ourselves.

We needed to install more irrigation. About 140' of pipe and 7 sprinkler heads needed to be installed. I took one of the forks off the skid steer and used a single fork in the dirt to dig the trench for the pipe. It required some clean up work with a shovel but was way better for my back than digging it all by hand. Once that was done, Laura and I laid 8 pallets of sod over two days and it really kicked our butts. Since we saved $3800 on labor costs, I told Laura that we each made over $100/hr for laying sod, she was not amused.
21DFA040-9D33-4B26-9E3A-44D1E83A8D27.jpeg


tempImageSSgemc.jpg

tempImageiFrlhU.jpg
 
To avoid these ads, REGISTER NOW!
OP
R

rmack898

Well-known member
Joined
Jan 23, 2007
Messages
3,196
Location
Honu Grove NE Florida
I also got a few things done in the shop.
Since getting the new shear and selling my old stomp shear, that left a vacancy on stand/rack what ever you want to call it thing that held the stomp shear and brake in one easily moved unit.
After some beverages and a considerable amount of thought, I decided to install my notcher in the space the shear vacated. I cut the old notcher stand up and welded it into the new "sheet metal module". I gave it a coat of paint and everything works in their new space. The "sheet metal module" fits nicely behind the new shear and is easily moved if more room is needed.

Next up was making the Ellis saw more mobile. The 1800 saw is supposed to be stationary but I added rear wheels and a cam over, lever operated, single caster wheel to lift the front of the saw and make it mobile. It was a good idea but it never really worked well because of the offset of the caster would trip the cam over effect when it swivel to change direction when I move the saw around. I just lived with it like that for years.

I was helping a friend solve a problem and I suggested using ball transfers. He wasn't familiar with ball transfers so I pulled them up on McMaster Carr to show him and that's when I realized I needed a ball transfer for my Ellis saw. The brown truck showed up the next day with a 250# capacity ball transfer. The saw is now easily moved and the cam over mechanism stays locked when I move the saw.

tempImage1xbK8b.jpg

tempImageFVxoJR.jpg

tempImageGhv4F5.jpg

tempImage7IyWwF.jpg

tempImageNN9RWe.jpg
 

shortykorte

Well-known member
Joined
Sep 1, 2014
Messages
8,039
Location
Tallahassee, Fl
Everything is shaping up nicely and with the satisfaction you all did it yourself. 👍

Nice tip on the ball transfer. Looked it up and didn’t know they had such a thing. Thanks.

p.s. is it hot enough for the welding class yet?
 
OP
R

rmack898

Well-known member
Joined
Jan 23, 2007
Messages
3,196
Location
Honu Grove NE Florida
I figured in Florida you just butted the pieces together, and sat them out in the sun
I clamp them until the sun goes down.
MINI-SPLITS !!!!!
This was my second summer in the shop and I spent more time in there than last year, I WILL have mini-splits in there next year.
 
OP
R

rmack898

Well-known member
Joined
Jan 23, 2007
Messages
3,196
Location
Honu Grove NE Florida
I've been meaning to do an update for a while as I have gotten quite a few things done since my last update, but we had a little bump in the road and now life is getting back to some kind of normal again.

Laura drove up to NJ in October to take care of our grandson after a surgery so our daughter didn't have to take off a week of work. On the weekend to 10/15, Laura drove to upstate Pennsylvania to see her 90 year old aunt in a nursing home. After the visit Laura ran a stop sign and got T-boned by a tanker truck. Laura was very fortunate, had she been 6" further into the intersection, she most likely would not be here. She suffered broken ribs and massive contusions from the impact and airbags. She spent a a day in the hospital and Trevor made the 8 hour round trip to bring her back to NJ the next day. The following day we got her on a plane and back home here at the grove and she was still in shock.

It's quite a few weeks and Laura is healing but still not back 100% but she's getting there.

732C993A-FBAB-4275-B322-2321F50A213D.jpeg

8C074BB0-9FC6-4D5E-9EB2-D08F02CA9506.jpeg
 
OP
R

rmack898

Well-known member
Joined
Jan 23, 2007
Messages
3,196
Location
Honu Grove NE Florida
Aside from Laura's boo boo, I have been able to get a few things scratched off my list of things to do.

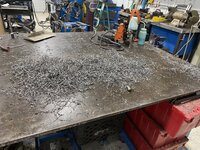
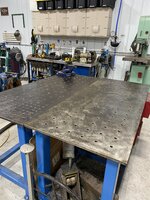
My welding fixture tables were meant to be a project that I would just pick away at as time allowed until they would eventually be done. After almost a year of not having any time to pick away at it, I just decided to jump in and do the whole job at once.

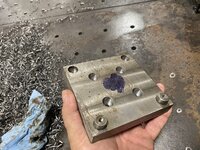
The tables are 30"x72" with a 3/4" top. With the tables pushed together I have a 5'x6' work surface. I can spread the tables apart if I need to accommodate bigger parts. I wanted to be able to use the strong hold type fixture clamps so I drilled 5/8" holes in the table tops. One table got a 24"x30" section drilled in a 2x2 pattern and the balance of the table tops were drilled in a 4x4 pattern. All tolled, I drilled 267 5/8" holes in 3/4" plate. I used a mag drill with an annular cutter and it took a day and a half of drilling. I drilled 260 holes before breaking the cutter. Luckily I had a fresh cutter to finish the last 7 holes.

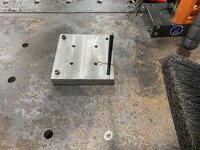
I made a jig for marking my hole pattern and it easily adapts from a 2x2 pattern to a 4x4 pattern or back to a 2x2 pattern by relocating the dowels in the jig.
Square the jig on the table and mark 2 holes with a transfer punch and drill the two holes. Insert the dowels in the jig, then place the jig on the table with the dowels in the first two holes drilled, mark 2 more holes and repeat until you drill the entire surface.

I used a pneumatic chamfer tool on all the holes and all my clamps and tooling work well on the table. I should have done this a long time ago and I was really happy to scratch it off the list.

94C4E59A-508B-43C4-B6E9-1049A32A41C6_1_201_a.jpeg
255F9AA3-EDF3-4CA9-8609-DD96D21F5A09_1_201_a.jpeg
tempImageZQBZRz.jpg
tempImageliwlnO.jpg
 

zmotorsports

ALLIANCE MEMBER
Joined
Oct 20, 2009
Messages
21,441
Location
Northern Utah
Love the tables Mac. Those turned out great. I took the plunge and drilled a few holes in my fabrication table about a year and a half ago but feel I want to add a few more holes now. :unsure:
 

Craptain

Well-known member
Joined
Apr 18, 2013
Messages
4,029
Location
Tampa Bay FL
I'm happy and sad. Sad to hear about Laura, but happy that she's going to be OK.
I'm also pretty happy to see you making progress in the shop.
Hopefully we'll see you down here soon. At least for Flywheelers in February.
 

Johanfpa

Well-known member
Joined
Dec 27, 2016
Messages
241
Location
Aberdeen Scotland
Happy to hear your wife Laura is getting better, if you see the damage this side on collision caused to what is considered the strongest part of a car she did get lucky to "walk away" from it.
Beautiful job on your welding tables, like the idea to do only part 2 x2 and rest 4 x 4 and use two tables instead of one big one.
 

jbmatth

Well-known member
Joined
Jun 3, 2013
Messages
5,689
Location
Northern Ok.
I'm also glad to hear her crash wasn't any worse, it really helps to show how much safer vehicles have come even over my time driving.

I took the plunge and drilled my fab table a while back on 4x4 centers but only drilled them 1/2", they are really handy and I use them all the time when using the table.

JB
 
To avoid these ads, REGISTER NOW!
OP
R

rmack898

Well-known member
Joined
Jan 23, 2007
Messages
3,196
Location
Honu Grove NE Florida
Laura appreciates all the well wishes from everyone and thanks for the compliments on the tables. I may make a few more of the table marking jigs and put them in my Etsy store.

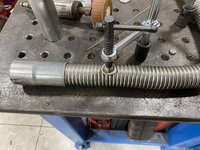
Another one of the projects that was on my list for way too long was the exhaust system on the diesel golf cart. It had a dual exhaust that fed into some gutted Harley slip on mufflers and it was loud and the crappy spiral wound flex pipes I used finally fell apart.
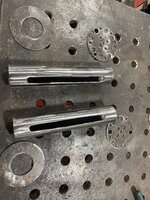
Last February at Flywheelers I bought some solid SS flex pipe to re-do my exhaust. After spending way too much time looking for a good muffler candidate, I decided to just make some baffles for the Harley slip ons. I used some 1-1/8" DOM and some 1/8" sheet to make the new baffles.
I cut up a section of 1-1/4" exhaust pipe and welded ends on the SS flex. I used clamps on each end of the flex to install it and now the cart is a little bit more quiet and I get to scratch another thing off the list.

tempImagelYzzkq.jpg

tempImagePrusbV.jpg

tempImagea1RN3I.jpg

tempImageOAtOVU.jpg

1F3D2DA1-E3C7-4281-98E4-A1106D3A6532_1_201_a.jpeg

tempImageCb7lnc.jpg
 
OP
R

rmack898

Well-known member
Joined
Jan 23, 2007
Messages
3,196
Location
Honu Grove NE Florida
I’m on a roll and got another one scratched off the list.
Sink and pisser pseudo-septic for the shop. A new plastic 55 gallon drum just happened to come my way for free and I figured I’d bury it before anyone decides to use it for something else.

That job was on my list for almost two years.
 

Attachments

  • 6C4BA212-1EDD-4D60-9C66-28322EABFAF8.jpeg
    6C4BA212-1EDD-4D60-9C66-28322EABFAF8.jpeg
    198 KB · Views: 184
  • B4E98E2D-6553-4B63-8EB6-D8203FB19C8C.jpeg
    B4E98E2D-6553-4B63-8EB6-D8203FB19C8C.jpeg
    181 KB · Views: 204
OP
R

rmack898

Well-known member
Joined
Jan 23, 2007
Messages
3,196
Location
Honu Grove NE Florida
Another month has passed and I guess it's time for an update.
The back side of the Grove butts up to a state highway and I have a double leaf 16' farm gate on our highway entrance. I knew that eventually the farm gates would need to be replaced with something a little bit more substantial and now the time has come. We've had unwelcome visitors and I'll leave it at that. Time for a new gate.

Back when we did that playground demo job and I saved all of that 5" steel tube, I knew it would come in handy. The new gate will be built from 5" tube.
I wanted that industrial, intimidating looking kind of gate but Laura was not so keen on giving me free range on the design. I sketched 4 pages of designs and Laura poo pooed 2 pages that I thought were pretty intimidating, that left 4 designs and after a brief discussion we agreed on a design.

Time do draw it up in CAD. The gate will be just a tad over 14' so I used concrete for my CAD drawing instead of cardboard. Don't hate on me for having open floor space, that was a requirement when I built this shop. With the full size gate drawn on the shop floor in soapstone, Laura gave the green light and work commenced. Drawing it full size made it easy to measure each element and compare it to the pile of tube I had to ensure I had enough material to build it.

I have a tube coping calculator that lets me input tube size and angle and prints out a template. All the angles in this design are 30*, 60*,and 90* so I made the 90* template first, traced it on the tube and cut the cope with a cut off wheel. It came out nice and needed very little trimming so I made the other 2 paper templates and transferred them to aluminum flashing so that they would be more durable for multi uses.

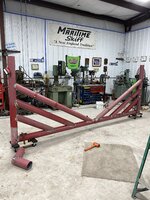
I got the first 3 pieces of the gate cut and tacked. I'm going to cut and tack the entire gate and then finish weld it. I calculated the weight of the gate a 530*s.

This gate will be automated and will not be hinged to a post, instead it will pivot itself on a single point at ground level. I will have a fairly large concrete base that will incorporate the front wheel spindle/hub from a class 8 truck or heavy fork truck, I'll have to look around and see what I can find. I'm not sure how long this project is going to take because I got bored being retired and took a job driving parts to construction sites.
 

Attachments

  • 3FB4AF9F-6ADA-4DBF-9FA3-DE7041D2CD2C.jpeg
    3FB4AF9F-6ADA-4DBF-9FA3-DE7041D2CD2C.jpeg
    848.5 KB · Views: 124
  • 90FFAB27-1BFE-4EDB-B827-A9CED9A255BD.jpeg
    90FFAB27-1BFE-4EDB-B827-A9CED9A255BD.jpeg
    743.3 KB · Views: 121
  • C6A9EF6C-2606-4357-BA3F-F2495F4BAD01.jpeg
    C6A9EF6C-2606-4357-BA3F-F2495F4BAD01.jpeg
    1.9 MB · Views: 113
  • 0A589933-2E26-4293-8AB3-C72B1B1F7809.jpeg
    0A589933-2E26-4293-8AB3-C72B1B1F7809.jpeg
    569.4 KB · Views: 101
  • 1564AE72-23C3-4DF0-AC99-2F7FE8B155A1.jpeg
    1564AE72-23C3-4DF0-AC99-2F7FE8B155A1.jpeg
    642.6 KB · Views: 98
  • 42E7180C-436D-4B5E-9D0A-9899329D0A09.jpeg
    42E7180C-436D-4B5E-9D0A-9899329D0A09.jpeg
    1.3 MB · Views: 105

shortykorte

Well-known member
Joined
Sep 1, 2014
Messages
8,039
Location
Tallahassee, Fl
So what you’re saying is you made us use the servant entrance? 🤦‍♂️

That’s going to be quite the gate. Will the gate pivot from the center or from the end. I just learned what a Texas bump gate is. Great idea if you have a push bar or pipe bumper.
 

cvairwerks

Well-known member
Joined
Aug 12, 2016
Messages
7,245
Location
Within hearing distance of Texas Motor Speedway
OP
R

rmack898

Well-known member
Joined
Jan 23, 2007
Messages
3,196
Location
Honu Grove NE Florida
Mack: maybe copy the West Texas Bump Gate...
A bump gate would be cool if I wasn't trying to keep unwelcome visitors out, do I will be doing a remote operator.

As I progress on the gate, it has gained enough weight that I couldn't move it anymore. I got 2 HF moving dollies and welded temporary brackets to the bottom of the gate and screws them to the dollies. Now its easy to move the gate outside to do some grinding and then back inside to weld on it. The next 3 pieces will have both coped and mitered joints and will take some time to get done. The longer pieces are getting pretty heavy and when you have to cut, fit, mark, cut, fit, many times, progress slows drastically.
 

Attachments

  • ECDF66D3-30FB-4C6B-9A16-944F2C411D19.jpeg
    ECDF66D3-30FB-4C6B-9A16-944F2C411D19.jpeg
    1.1 MB · Views: 169
OP
R

rmack898

Well-known member
Joined
Jan 23, 2007
Messages
3,196
Location
Honu Grove NE Florida
I finished the fab work on the gate and started fully welding the joints. I have 6 of 26 joints fully welded, it ain’t easy for me so sit or lay on the floor to weld anymore. I hope to have all the welding done this coming weekend.
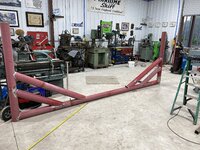
I’m still sourcing materials for the pivot and foundation.
 

Attachments

  • 888E0D77-9218-477C-9DB3-B71CDAE55D6F.jpeg
    888E0D77-9218-477C-9DB3-B71CDAE55D6F.jpeg
    146.3 KB · Views: 96

Duker

Well-known member
Joined
Sep 25, 2010
Messages
10,861
Location
Livingston, TX
I finished the fab work on the gate and started fully welding the joints. I have 6 of 26 joints fully welded, it ain’t easy for me so sit or lay on the floor to weld anymore. I hope to have all the welding done this coming weekend.
I’m still sourcing materials for the pivot and foundation.
That's going to leave a mark! Looking forward to seeing this in action Mack! I am working on my gates plans now for our place... looking to make a rolling gate between stone columns
 
OP
R

rmack898

Well-known member
Joined
Jan 23, 2007
Messages
3,196
Location
Honu Grove NE Florida
Mac, any idea how much that gate weighs? Just curious.

:beer:
Dan, the math says that the gate should weigh 580#s. I think the math is wrong, once I move it out of the shop we will find out the real deal.
That's going to leave a mark! Looking forward to seeing this in action Mack! I am working on my gates plans now for our place... looking to make a rolling gate between stone columns
Duke, it's already left a mark, my body feels it.
Mac, are you sure that gate is going to hold back the Zombie Apocalypse? Zombies (and druggies) are pretty skinny. All kidding aside, that's an awesome gate and an amazing job fabricating it. As soon as there are angles involved, symmetry becomes a challenge. A challenge you met and crushed.
Bob, drawing it out full size on the floor took some of the challenge out of the symmetry. If the skinny druggies and zombies show up, the gate will slow them down enough for better acquisition.
WOW!!!

I've built gates for 2000# steers that were only half that size that are still standing and swinging after 30 years :ROFLMAO:
I have feeling this one will still be operational long after I'm gone.

One of the things that I haven't talked too much about is the fact that I took a post retirement "part time" job. I'm a parts driver for a very large construction company. I work out of their new shop that supports over 400 pieces of heavy equipment. The shop does 2-3 undercarriage rebuilds each week on dozers and excavators. I think that a carrier roller from a D5 or D6 is what I will use as a pivot for the gate. I'm sure it will handle a 1,000# gate. Several of these rollers go in the dumpster each week, I'll pick out a good one.

Once I'm done welding, the gate will go to sand blast and then to powder coat. That should give me plenty of time to dig and pour the foundation along with fabrication of the pivot point.
 
To avoid these ads, REGISTER NOW!
Top Bottom