To avoid these ads, REGISTER NOW!

Between 265 & 485 SQ/FT Weisenheimer's Bicycle Haus

Workspaces sized between 265 and 485 squarefeet.
OP
M

manbike26

Well-known member
Joined
Sep 23, 2015
Messages
224
Location
Boise ID USA
Yesterday, I decided to tackle the last piece of the puzzle on the Marin: The SPD pedals. They have clearly never been serviced.
53109922688_14fae33cd8_b.jpg

The bearings are butter, but the rest of the pedals is full of gunk.
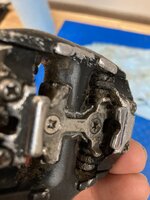
53451440341_f2c7312134_b.jpg

Older SPDs are a fully serviceable and fully rebuildable item...it's been over a decade since I tinkered with any clipless pedal. Step one is to take the center foot plate off.
53451440411_584520db46_b.jpg

Next, you remove all of the spring tension from the system and pull the pin from the side. That frees both of the jaws and the springs.
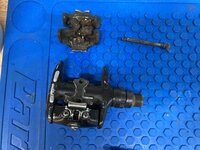
53451756794_e31486e479_b.jpg

Those things are on there tight and its a phillips screw. I was careful not to let the tool slip. Holding the pedal in a vise is helpful.
53451564683_70626be84e_b.jpg

All cleaned up! I opted not to paint or otherwise improve the appearance beyond cleaning. This bike is worth being ridden.
53451564703_213e509590_b.jpg

Assembly is the reverse, naturally. I find it easiest to put the pin part way in and add the jaw and springs one at a time. Jaws first...
53451564693_ee9dbfc802_b.jpg

Then the springs...
53451564673_5ae2f2134c_b.jpg

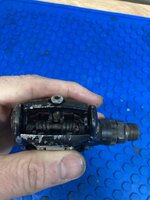
And finally, secure the pin. Nice and tight like I found it! You can see here the 3mm spring tension screw is nearly unthreaded so that assemble is easy.
53451855805_cb3992a9db_b.jpg

Once the foot plates are back in, I added spring tension. Pedals function as they should! You can see the little red dot for spring tension. I forgot those indicators were even in there!
53451855790_ef382250cf_b.jpg

I don't know if I'd eat off of it, but it's pretty damn clean.
53451564678_a0f7f3a85f_b.jpg

I'd say the bike is pretty much ready for sale. I'll take some nice photos of it and see how it goes. I have a new ride being added to the fleet soon...so I need to make room.
 
Last edited:
To avoid these ads, REGISTER NOW!
OP
M

manbike26

Well-known member
Joined
Sep 23, 2015
Messages
224
Location
Boise ID USA
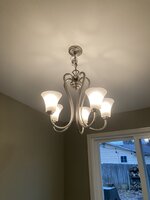
Some non-bike content. The wife and I have HATED this light fixture since we moved into the house in 2016.
53504250551_132c5b2361_b.jpg

It's centered in the room (not over the table) and is too low. I yanked the chain up when I moved back in 2022 so I'd quit bumping my head on it.

We occasionally see a light fixture that we like, but then we give it a couple days. We may dislike it after that, or decide it won't age well...or we find out its a thousand dollars. We're picky and not of the financial means to get it wrong. Plus, other projects seem to take the lead.

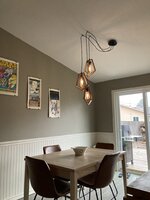
On a whim, we went into a lighting store here in town as we were in the neighborhood. I took this picture of it and days later we were still liking the design. Plus, it was being discontinued by the manufacturer...so we had a time limit set. I went so far as to make a cardboard mockup and hang it in the dining room. We found a winner.
53504570599_81b4b59c2b_b.jpg

We bought three and wired 'em up with some dimmable LED bulbs. It fits our functional needs and aesthetic much better than the home depot cheapo that was there before.

I think I want to adjust how the cords come out of the ceiling mount and hang, but for now, I'm satisfied.
53504250586_355bd4fc50_b.jpg

In bike news: the Marin sold for a fair price. It was a cool bike, but I'm happy to move onto a bike I'll actually ride. More to come.
 
OP
M

manbike26

Well-known member
Joined
Sep 23, 2015
Messages
224
Location
Boise ID USA
Well, my new (to me) frameset showed up a week or so ago. I'm in the process of sorting out what parts will go on it. I'm pretty pumped to get out and ride some of the fire roads southeast of town. I hope to get an improved level of fitness and maybe even do a century this year. Time will tell.

Frame is a 2018 Specialized Sequoia.
53504394268_aa4bf349ab_b.jpg

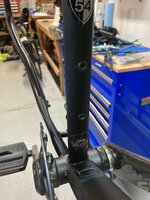
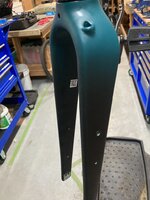
It's a pretty dang cool bike...STEEL IS REAL!! It has lots of mounting points on frame and fork.
53522571163_8ac8e3b39f_b.jpg

53522571178_4214c5a984_b.jpg

3 points on the top of the downtube
53521504652_1e732fdc75_b.jpg

2 points under the downtube
53522719089_30dc56887f_b.jpg
 
OP
M

manbike26

Well-known member
Joined
Sep 23, 2015
Messages
224
Location
Boise ID USA
Really, I won't use all those mounting points. I'm not a multi-day guy. I like to sleep at home, in my own bed, as often as possible. But I do like to get the weight off my body...I pretty much don't ever wear a pack anymore. And I like to carry tools and food. Minimum two bottles, a couple spare parts (like a chain link), an actual pump, two tubes...it can fill up fast.

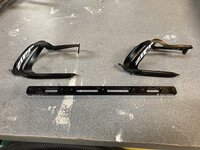
These little guys are the answer. Wolf Tooth Components B-RAD system. Bottle relocation.
53522832215_f0b5b9081a_b.jpg

I had the 3-place one on my All-City bike before, but will repurpose it here. Then, I was in Walla Walla for a day and popped into the shop there. Allegro Cycles: great folks, if you're in the area, give 'em some love and money.

They had the ultra-cool 4 place version in stock. So I snagged it.
53522832245_110daaf822_b.jpg

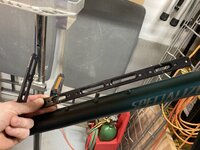
Basically, they are slotted risers that allow extended mounting options. Here is the 4-place installed on the bike:
53522832235_b6b6144362_b.jpg

You can do two bottles in a row, like this:
53521504877_acf164b52d_b.jpg

Or pair a bottle with a tie-down system like this:
53521504847_0632b37dec_b.jpg

It's great stuff. They have cargo cages, side-by-side bottle mounts...the list goes on. Link HERE

What I need to do is nail down exactly what I intend to carry and how and then figure out how to mount it all.
 
Last edited:
OP
M

manbike26

Well-known member
Joined
Sep 23, 2015
Messages
224
Location
Boise ID USA
The bike came with the original wheels (Specialized Cruzero) and an 11-speed cassette. I'm hoping to put newer 12-speed parts on the bike, so I did some internet research to see if there were replacement driver bodies available. Specifically, I wanted an XD or XDR so that I can mount a SRAM cassette.

I think I'm SOL. Even my local Specialized shop said they couldn't find a listing for parts for that hub.

So I'll just have to hope they're durable and find another solution. It dawned on me that many suppliers will use DT Swiss "guts" on their hubs for durability and compatibility reasons. My wife's mountain bike does this. See post #51

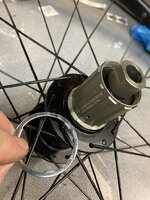
So I removed the cassette to see if the hub body was a DT Swiss.
53522719079_81c85dd8d9_b.jpg

No dice. Seems like fine construction though.
53521504807_9fd9bfcb73_b.jpg

Next steps are to source some parts. Shifters/brakes are going to be the big items. Then it's time for some shakedown rides. It'll be nice to have a road bike with gears. It's been a long time since I owned one of those.
 
Last edited:
OP
M

manbike26

Well-known member
Joined
Sep 23, 2015
Messages
224
Location
Boise ID USA
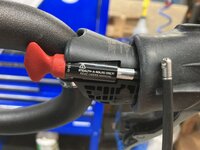
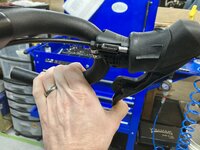
Shifters arrived! I'm so excited to make progress on the build...I pretty much tackled the install right away. These shifters have a pretty easy and foolproof way to fit the lines, called Stealth-a-majig. Here is the shifter first installed on the bar, with the rubber hood pulled back and the female portion of the connector plugged.
53532123480_4f0ea1a122_b.jpg

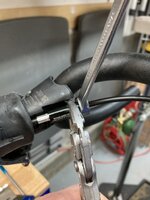
Tools to properly shorten the hose and press in the hose barb.53531880313_65736e8ba6_b.jpg

The barb press is a cool little tool that clamps the hose and drives the barb easily. This beats the vise and hammer method every time.
53532123475_dd5e1f4275_b.jpg

Results:
53531880228_c6e02ff207_b.jpg

First, the compression nut goes on. The red bit is a crush fitting that threads onto the barb after that. So you get the correct depth and fitment every time.
53531880218_8243f3cd2d_b.jpg

The compression fitting gets threaded into the connector and tightened down. I don't have to tell you all the importance of a flare nut wrench.
53532123485_a695a93e1b_b.jpg

And then, we check for leaks. I always just squeeze the brake hard and hold it. I'd pretty much never put this kind of force on a brake while riding. If it doesn't leak now, it won't change when ridden.
53531880278_9a97f04894_b.jpg

Finally, we can center the caliper. I've always felt the easy way is to hold the brake lever (a zip-tie, or a toe-strap works great) and then alternate tightening the caliper bolts until proper torque is reached.
53530799897_9098bdedbc_b.jpg

I'd say that most of the time, that technique works everytime. The rear brake didn't want to cooperate, but I'll deal with that later. I need to get some properly sized caliper mount bolts for that one before I can really call it complete.

Thanks for reading.
 

acer66

Well-known member
Joined
Dec 4, 2010
Messages
4,418
Location
Western North Carolina
I hope it is okay to ask a bicycle question here.

My cheapo tire sealant syringe is finally kicking it.

Is there a recommendation for something that lasts?

Thank you.
 

kppolich

Well-known member
Joined
Apr 7, 2020
Messages
348
Location
Eastern Iowa
Never heard of that brand.

Are you using it?
I've used it on Road, MTB, and Gravel wheels for the past 6 years without one single issue.
It's more concentrated and lasts about twice as long as Stans or Orange Seal at about half the price while also coming with an injector.
If you do a ton of cold weather riding maybe the Orange Seal stuff, otherwise this is worth trying, I've gone back to try others like MucOff/Stans Race/Orange Seal Endurance, but they just don't last or seal as well as this.

Haven't tried Silca. Won't try Silca.
YMMV
 

ericm

Well-known member
Joined
Apr 17, 2016
Messages
1,963
Location
Southern Oregon
No dice. Seems like fine construction though.
53521504807_9fd9bfcb73_b.jpg

Next steps are to source some parts. Shifters/brakes are going to be the big items. Then it's time for some shakedown rides. It'll be nice to have a road bike with gears. It's been a long time since I owned one of those.

That freehub looks similar to the Bitex hubs I have built road wheels on. You might try the folks at bikehubstore.com to see if that's Bitex and if they can get you an XD driver.
 
OP
M

manbike26

Well-known member
Joined
Sep 23, 2015
Messages
224
Location
Boise ID USA
That freehub looks similar to the Bitex hubs I have built road wheels on. You might try the folks at bikehubstore.com to see if that's Bitex and if they can get you an XD driver.
I’ll have to check that out. Thanks for posting it!
 
OP
M

manbike26

Well-known member
Joined
Sep 23, 2015
Messages
224
Location
Boise ID USA
Regarding sealants: if you live in an area with goatheads, beware of sealants that "last longer."

I ran a fleet of rental bikes for a while. Had lots of experiences where sealants wouldn't seal the hole and keep it sealed. Meaning, you get a puncture (or 5 or 10) and they just continue a slow leak, weeping out the fluid over time. I'd come into the shop and find a small pool of sealant on the ground next to a flat tire the morning after a customer ran over some puncture vines/glass/whatever.

Here in the western US, I've had good luck with Stans, Orange Endurance, E13.
 
Last edited:
OP
M

manbike26

Well-known member
Joined
Sep 23, 2015
Messages
224
Location
Boise ID USA
Some non-bike content. I've got limited funds and space as it relates to the garage. So, when I need space, what I need is good efficiency. Rarely can I throw a thousand (or more) bucks at something to improve it...so I often DIY. The design and build of something improved also makes me a lot happier than just buying fancy ****.

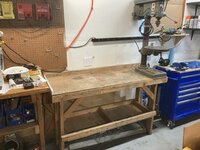
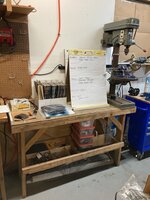
Anyway. This bench bothers me A LOT for it inefficiency:
53530799902_41c66460f8_b.jpg

There is a lot of wasted space. It was with the house when I bought it, I just added the little organizers in the shelf to keep some drill bits and stuff. The orange bins hold some parts that I don't access regularly. The biggest thing it does well is hold the drill press (which I don't use too often).

I have often dreamed of having more drawers. Lately, we've been kicking around the idea of a built-in electric fireplace/drawer set-up in our living room. I've never built cabinets or furniture. I do love a challenge though. So I decided to test my abilities by building a cabinet set-up to replace this bench.

Space is at a premium right now, so there are minimal pictures aside from my work-in-progress ones. I have two 24" wide cabinets started and a bunch of cuts left to make on my plywood.

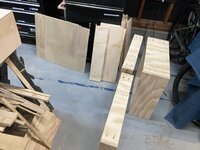
Cabinet boxes:
53531880283_a473ab692d_b.jpg

Cutting in progress. You can see some of the drawer pieces staged on the far right of the photo.
53532011614_a8dd21ecb0_b.jpg

I just plan to paint it white for now. Or maybe a muted blue to not clash with the blue tool boxes too much. We'll see.

My desire is to have that drill press be a little less cluttered visually...and a lot better for storage and functionality. I won't be taking too many photos of this work, unless someone really wants to see it. It's been fun learning and getting more accurate with my cuts. I think I might be good enough at this to make something the wife would be happy with. I'm a lot easier to please than she is.
 

fishwatcher

Well-known member
Joined
Jan 26, 2023
Messages
759
Good luck with your build. I’ve been wondering what I can build for my little bike-focused shop with just a circular saw and drill/impact driver. This would be a very interesting topic to learn about.
 
OP
M

manbike26

Well-known member
Joined
Sep 23, 2015
Messages
224
Location
Boise ID USA
@fishwatcher -- Cool. I'll document a little more and share some plans. So far, I've only used a circular saw and drill. I own a table saw, but have kept it stowed due to cold and my desire to minimize dust in the garage.
 
OP
M

manbike26

Well-known member
Joined
Sep 23, 2015
Messages
224
Location
Boise ID USA
Here it goes. Here are the sites and things I used for the cabinet design and the build so far.

This was the first one I checked out: MVA Woodworks -- I liked how detailed the photos were, plus there is a video where he goes thru it all as well. A very good tutorial.

I also spent a fair bit of time on Kreg's project plan site. This plan in particular was a frameless cabinet design I took some inspiration from.

To lay out my specific cabinet design, I used a free website called TinkerCAD. It took some learning, but I managed to build both an overview and a detailed design that seemed to work well. How my overview looked:
53541040226_f57fa50253_b.jpg

Detail:
53541464105_0186a7a91f_b.jpg

To make the most out of a sheet of plywood, I also used a free cut optimization tool called Opticutter...Link HERE. Photo of the site below:
53541366359_8dd2b23e93_b.jpg

That last one was what allowed me to justify the cost of the project. I was envisioning a need for 6+ sheets of 3/4" ply. Instead, I used 3 sheets of 3/4" ply and one sheet of 1/4" ply. I went by my local lumber supplier and got the most affordable cabinet grade wood they had, I think I'm about $300 in for the whole project? I might be under counting there. It's been a fun, but time consuming project.

I haven't made progress lately, had a good amount of work last week. I'll try and snap some more pics as I go when I pick it back up this week ahead.
 

fishwatcher

Well-known member
Joined
Jan 26, 2023
Messages
759
Here it goes. Here are the sites and things I used for the cabinet design and the build so far.

This was the first one I checked out: MVA Woodworks -- I liked how detailed the photos were, plus there is a video where he goes thru it all as well. A very good tutorial.

I also spent a fair bit of time on Kreg's project plan site. This plan in particular was a frameless cabinet design I took some inspiration from.

To lay out my specific cabinet design, I used a free website called TinkerCAD. It took some learning, but I managed to build both an overview and a detailed design that seemed to work well. How my overview looked:
53541040226_f57fa50253_b.jpg

Detail:
53541464105_0186a7a91f_b.jpg

To make the most out of a sheet of plywood, I also used a free cut optimization tool called Opticutter...Link HERE. Photo of the site below:
53541366359_8dd2b23e93_b.jpg

That last one was what allowed me to justify the cost of the project. I was envisioning a need for 6+ sheets of 3/4" ply. Instead, I used 3 sheets of 3/4" ply and one sheet of 1/4" ply. I went by my local lumber supplier and got the most affordable cabinet grade wood they had, I think I'm about $300 in for the whole project? I might be under counting there. It's been a fun, but time consuming project.

I haven't made progress lately, had a good amount of work last week. I'll try and snap some more pics as I go when I pick it back up this week ahead.
This is awesome! Thanks for sharing both of these sites. Good luck with your build!
 
To avoid these ads, REGISTER NOW!
OP
M

manbike26

Well-known member
Joined
Sep 23, 2015
Messages
224
Location
Boise ID USA
I had some more parts arrive for the Sequoia...so that was a focus of my garage time this week. I checked out the site that @ericm was kind enough to suggest. Cool stuff! I hadn't heard of Bitex hubs, but looking at the freehub body, it's definitely not the same. There are a couple of steps in this one that don't exist on the Bitex. So plan B was to acquire a 12-speed cassette for a standard driver body. Lucky for me, SRAM makes a version of their XPLR cassette that fits the bill. So I bought one.
53543428624_52d72444eb_b.jpg

53543428634_d9a990c154_b.jpg

Instead of 10-44 range that a XD or XDR driver body would allow, I have to settle for a 11-44 range. The bike has a 38t front ring, and I'm not a strong rider. Odds are good I'll be satisfied with a big gear of 38/11. And, importantly I still have 38/44 to get me up the hills.

When I went to slide it onto the cassette, I noticed the small "rib" on the freehub body prevented the cassette from seating. You can see the rib clearly in the pictures on post #206. A minute or two with a file...and the rib is gone. Cassette slid right on.
53542231906_2c0a9c3e4d_b.jpg

Rotors showed up as well, so now I have fully functional brakes. All installed:
53542556834_80fd2a5ef3_b.jpg

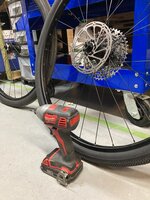
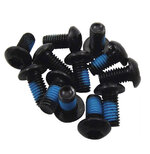
I post this picture of my wheels with an impact driver to share a story. I worked at a shop with two arrogant, ******* mechanics. First week of work, they told me they had a "no power tools on bikes" rule. If you've never seen how much thread lock is on a rotor bolt, it's a lot. Like A LOT. Here is a picture that is pretty accurate:
53543459559_e6dfe9e3f1_b.jpg

There are 12 of these per bike. I'd estimate the torque required to get through that thread lock on a new bolt is about 2-4nm. M5x0.8 thread, 10-12mm depth...that's a lot of turns with a hand tool. Especially if you have to do multiple bikes per day. Nuts to that ****. My Milwaukee drill on setting 16 yields about 6-6.5nm of torque. Kids, listen to ol' Weisenheimer: Work smart, not hard.

I offered up $100 to those losers if one of them ever saw me cross thread or break a bolt. I still have my money.

I digress. In addition to installing some cool wireless shifting, I put on a powermeter.
53542413648_73f901381c_b.jpg

If you've never used one, they are an amazing training tool. They measure the torque at the pedals combined with your pedal cadence to give you a wattage measurement. The advantage vs. heart rate monitors is that it is a nearly instant read of your effort. Heart rate monitoring has a pretty substantial lag as your cardio system reacts to what your muscles did already. Less accurate still is your own perceived rate of exertion. I'm REALLY bad at judging how hard I'm pushing myself. So this tool should help me build my fitness much more effectively.

In my case, I set-up my little Garmin GPS to show a 3-second average power reading.
53541355322_4e58f6499a_b.jpg

Et Voila!
53541355337_7ebe826492_b.jpg

53542660660_01ebf616d9_b.jpg

No bar tape yet, no bottle cage/mounts yet...but it's rideable. I spun it around the neighborhood. It fits and feels a lot like my All-City...but with a bit smoother ride and with a lot more gears.

More to come. Thanks for reading!
 
Last edited:

acer66

Well-known member
Joined
Dec 4, 2010
Messages
4,418
Location
Western North Carolina
Thank you for this thread because it is getting me back into push bikes again.

Dusted off my bikes after letting them collect dust for who knows how long and got them ready if my nos tire sealant is still good though. 🤞🏼
 
OP
M

manbike26

Well-known member
Joined
Sep 23, 2015
Messages
224
Location
Boise ID USA
Thank you for this thread because it is getting me back into push bikes again.

Dusted off my bikes after letting them collect dust for who knows how long and got them ready if my nos tire sealant is still good though. 🤞🏼
I love this. More miles usually means more smiles.
 
OP
M

manbike26

Well-known member
Joined
Sep 23, 2015
Messages
224
Location
Boise ID USA
I tackled a couple of small things in the garage yesterday when I had some unexpected free time. First up, rotating the tires on the wife's bike. I was happy I didn't procrastinate on this one.

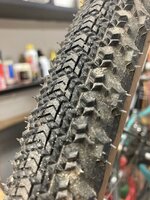
Its tough to tell, but the rear tire is taking some wear.
53545086092_318bf7eaaa_b.jpg

Front had some visibly taller knobs. I think its easiest to see the difference on the knobs just off of the chevron center.
53546396145_a74b903963_b.jpg

One of my favorite things about her bike (which is a do-it-all kind of ride) is the bolt on skewers. Not really an anti-theft device...but maybe an anti-opportunity device? I think they're helpful in preventing some crackhead from walking off with a wheel.
53546396135_415496ccea_b.jpg

And finally, got to do the maiden voyage on the new bike this AM. A fine way to spend a morning.
53546396195_8940d44ccb_b.jpg

53546144843_dce3ce9447_b.jpg
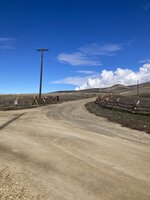
Quiet roads, a little sun: feels like spring is near.

Thanks for reading.
 
OP
M

manbike26

Well-known member
Joined
Sep 23, 2015
Messages
224
Location
Boise ID USA
I made some progress on the cabinet/bench replacement yesterday. I finished up all my cuts on the 3/4" plywood. Stacks of drawer sides/fronts ready for drilling:
53548128687_0a3ba52c49_b.jpg

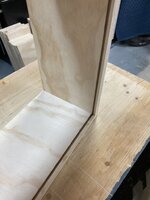
On my first drawer, I used my circular saw to cut a slot for the 1/4" plywood to sit in.
53548128647_719460397e_b.jpg

It turned out OK! It was hard to get everything together and square. It felt like all my imperfections were stacking up. If you look at the corner on the photo above, you can see a little variance in the slot. Drawer looks fine once assembled:
53548999611_5c512310b4_b.jpg

Since my accuracy wasn't enough to have everything come together like it should, it was time for a different technique. Plus, it was time consuming to make the cuts for those slots.

So for the next drawer, I left the 1/4" ply bottom a little larger and nailed it to the bottom of the drawer with some ring shank nails.
53548999631_aa0bdac9c2_b.jpg

It seems sturdy enough and the boxes have been easier to square up. Plus, less saw dust and faster progress. Which is nice.
I repeated that technique for the two, smaller top drawers as well.

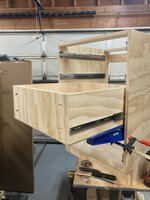
I used spacers to set the slides for the lowest drawer:
53549334309_5b6d719fed_b.jpg

Two lower drawers installed:
53548999636_b0fc833905_b.jpg

Continued....
 
Last edited:
OP
M

manbike26

Well-known member
Joined
Sep 23, 2015
Messages
224
Location
Boise ID USA
This was my initial test cabinet. The bench I'm replacing is about 60" wide. This is a 12" wide cabinet that will be on the right side.
53548128682_cb7db5fdd4_b.jpg

I put the garbage can holder to work right away:
53549192688_cc40c56c0e_b.jpg

Right about this time, I realized that I was severely cramped in my workspace. So it's time to move these two cabinets to be near to their final home.

I moved all of my stuff off of the existing bench to a corner near my bike workstand.
53548128717_bf521b7e91_b.jpg

Bench all cleaned off...except for the drill press.
53549334319_c6dfde445b_b.jpg

My thought here was to move the drill press up to the bench above for now. I started by removing the motor to reduce weight. Removing the lockring:
53549334244_b3f417c1b3_b.jpg

Undoing the wiring.
53549334279_f84f668a26_b.jpg

And right about that time, the wife was done with work. I was tired too, so it was time for a break.

More to come...I'm light on paying work this week.
 
Last edited:
OP
M

manbike26

Well-known member
Joined
Sep 23, 2015
Messages
224
Location
Boise ID USA
That Sequoia build is very, very cool. Sorting out out the hub/cassette issue shows some tenacity too...most folks would have just given up on that wheel.
@Denwood thanks for the compliment on the bike!

I believe I am somewhere between determined and stubborn, depending on who you ask.
 

ericm

Well-known member
Joined
Apr 17, 2016
Messages
1,963
Location
Southern Oregon
It's great that you found a way to get a 12sp cassette on there. I think not having the 10t cog is a feature not a bug. It's got a lot of friction. When I use mine it feels like half my effort is not even getting to the wheel. I'm sure it's not that bad but its definitely noticeable.

The downside of power meters is that they tell you exactly how much you ****.
 
OP
M

manbike26

Well-known member
Joined
Sep 23, 2015
Messages
224
Location
Boise ID USA
Yesterday, I got the drill press off the bench. Then I moved the old bench away from the wall:
53551806940_b12b9cfef5_b.jpg

53551364206_e19045d9e5_b.jpg

After I broke the old bench down and tossed it outside, I moved the two cabinets into place. Screwed together:
53551700404_0ddfc4cfd4_b.jpg

And with drawers installed:
53551561163_d194ae30ac_b.jpg

Obviously, I still have to assemble the final 24" wide cabinet, put on the drawer faces and go get a top for the workbench.

It's not clean and tidy in the garage yet...but it is less of a disaster, which feels good.

More to come. Thanks for reading.
 
OP
M

manbike26

Well-known member
Joined
Sep 23, 2015
Messages
224
Location
Boise ID USA
Made a little progress yesterday between some errands. Then, I got a last minute call into work.

Piles of drawers and scrap!
53553811177_27ae887ee7_b.jpg

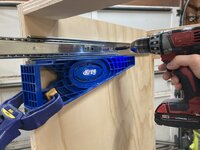
For the drawer slides, I bought these Kreg jigs. I was skeptical, but it got me to free shipping on an order. Turns out, they're a winner. The only place they don't work well is on the bottom most drawer (no room for the jig).
53554663091_2b25287974_b.jpg

I had all 8 slides installed for fitment of the drawers in about 20 min.
53554663111_01ed6e387d_b.jpg

Then it was off to work. More to come.
 
OP
M

manbike26

Well-known member
Joined
Sep 23, 2015
Messages
224
Location
Boise ID USA
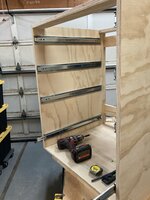
Continued work on the cabinet today. Mounted the drawers in the last cabinet:
53557509701_868ace868a_b.jpg

After a bit of work, I was able to move the cabinet and all the drawers to their final spot. Drawers in...just have faces and bench top to go.
53557509726_3c121c4129_b.jpg

I ordered one of these tops from LL Flooring (formerly Lumber Liquidators). It was ready same day for me to pick up. You can see the tall cardboard covering in that top picture with the drawers.

Before trying that, I took a stab at mounting the drawer faces. For all of these face pieces, I left them larger than what was needed by about 1/4" so I could adjust later as needed. I started with the top faces (since they lined up with my 12" test cabinet).
53557509736_ed70768030_b.jpg

After this, I did the bottom most row of drawers. These needed about 1/8" trimmed off the sides to fit the cabinets better...they were overhanging a little. I didn't trim top/bottom initially.
53556659662_c2f719ee0f_b.jpg

As I mounted my remaining four drawer faces, I found that my accuracy in cutting and mounting was definitely not as good as I'd hoped. You know how a picture never does the scene justice? I feel like it looks even worse in person, hahaha!
53556659677_f3256cbe62_b.jpg

After a few minutes, I quit messing with the drawer faces for the day. The pull knobs came with screws that are too short, so I'll have to replace them. The few that you see there were spare screws I had around.

I trimmed the 30" wide benchtop down to 26.5" depth and put the scrap on as a backsplash.
53556659667_420c492a20_b.jpg

You can see above that LL has greater accuracy than me. That thing is exactly 60" long. My cabinets totaled 60 3/8"...so I've got an exposed cabinet edge on the left side. There is no way I'm going back to fix that, it will get a coating of dark paint and be good enough.

I'll make a separate post for my no BS self-critique. I'm happy I undertook the project...and REALLY happy its in the garage and not my living room. I'd be furious with myself if this was indoors.
 
OP
M

manbike26

Well-known member
Joined
Sep 23, 2015
Messages
224
Location
Boise ID USA
A few things to think about.

First is tolerance stack-up. All the way at the beginning with the cabinet box sides and base, I cut my slots with a circular saw and several passes. This would have been a better job for a table saw and a greater level of test fitting before I glued it up. Each of the cabinets was approx 1/8" thicker than my specs...so across three cabinets, we have that total stack-up of 3/8" at the end.

This was manifest with the drawers as well. I measured for the bottom most drawer, presumed the box was square and cut all my drawers from there. That slight taper at the top resulted in a VERY tight fit on the top drawers.

Another thing on the drawers: I should have made the box smaller than the face for all the drawers...I had one where it was equal. From the top, drawer faces are 5", 6.5", 8", 10". Drawer boxes are 3.5", 3.5", 8", 10". That 8" box with an 8" face is a problem. I had to adjust the slide mounting at the very end to prevent interference with all the other drawers.

Finally, the faces just don't quite have the clean look I was hoping for. I think I'll use a mid-gray or a dark gray on the cabinet to minimize this. We'll see how it looks with paint and after I work at it more. I also may widen the gaps to be more like 3/16" or 1/4" between faces. I may or may not post about this.

If I didn't mention it here, I'm satisfied with the result. So overall, I'm glad I undertook the project and am looking forward to the improved use of space.

Thanks for reading!
 
Last edited:
OP
M

manbike26

Well-known member
Joined
Sep 23, 2015
Messages
224
Location
Boise ID USA
Garage stuff is the best way to learn without shame :) That said, organization in a small shop is everything and you definitely took things up a notch here.

If you want to see crazy precise work in cabinetry, check out @jar944 's thread: https://www.garagejournal.com/forum/threads/jar944s-3car-cabinet-shop.339476/

For sure. I learned a ton and it is an improvement. I'll take a before after to add here later.

I may sound like I'm beating myself up a little on the lack of precision...and I am. I can accept the imperfections. It just takes a few days for that acceptance to set in.

@jar944 is on a different level. I love that thread.
 

jar944

Well-known member
Joined
Jul 26, 2010
Messages
5,951
Location
Northern VA
OP
M

manbike26

Well-known member
Joined
Sep 23, 2015
Messages
224
Location
Boise ID USA
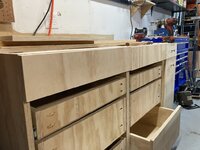
Quick update to the cabinet. I widened the gaps to be about 1/4" between the faces and trimmed them up a bit. I'm glad I did.
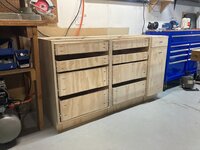
53566235338_67120872d2_b.jpg

Definitely not perfect, but it's better than it was.

I threw a coat of primer on it and a couple coats of poly on the top.
53565191217_2ec43f43bb_b.jpg

And in other news, the lower alternator bracket I built broke. So I need to replace it.
53566364934_6184ebd220_b.jpgUntitled by street26, on Flickr

I'm not sure what I'll do about this one, but it obviously needs some reinforcement.

More to come.
 
To avoid these ads, REGISTER NOW!
Top Bottom