
You are using an out of date browser. It may not display this or other websites correctly.
You should upgrade or use an alternative browser.
You should upgrade or use an alternative browser.
Between 265 & 485 SQ/FT Basement Bike Cave and 3D Printing Workspace
- Thread starter kppolich
- Start date
Workspaces sized between 265 and 485 squarefeet.

Jeff Ivers
Well-known member
That reminds me of the old joke - "What is black and white and rode all over?"
New project thanks to Facebook Marketplace. $100, CO2 is pretty full and comes with the regulator as well as cleaning stuff, extra tap, etc.
Plans are:
-Wrap it in Vinyl Black Camo
-Paint the base black and put new clear 3" roller blade casters on it
-Replace the top laminate or patch it in a wrap it with the same snow camo wrap
-Get a long extension cord and setup an umbrella at the end of the driveway for summer driveway neighborhood beers
Attachments

Last edited:
Kegerator update:
I made a list of things I needed to do and started plugging away as parts arrive. I really wanted to completely replace the top with a nice piece of Walnut, but the top piece has some grooves on the bottom and threaded inserts as well so it sits flat and it wasn't worth the trouble. I also looked at removing the existing laminate and veneering the top and sides which I still might do, but I'd rather just get it working.
Items in bold below are done.
The List:
-Remove the existing base/casters and paint the base flat black/sand a bit beforehand.
-Bondo the small dings on the door and sides a bit and sand/prime before wrapping
-Install new Casters
-Wrap the door and 3 sides with the Vinyl arriving Monday
-Spray the top/sides of the countertop with spray in Bed liner.
-Install new Golden Retriever tap handle!
-Fix the existing laminate on the top
-Fill in existing screw holes on top in preparation for new screws
-Remove the beer tower and polish/remove any gunk
-Straighten the lightly kinked refrigerant line on the back just in case
-Clean the inside of the existing fridge with a magic eraser and clean the stainless keg support.
---
So far, $275 into this thing including the $100 for the kegerator itself. Vinyl was $50, tap handle was $45, then a few other costs like the new screws, line cleaning solution, bondo, contact cement, and bed liner spray.
Pics:
Removed the stainless fence and saw what I was working with. I need up 3d printing a filler piece for the missing corner area in the bottom right and will be bondo'ing over that and the other rough areas before spraying with Bed liner.


Here's a shot of the underside of the removed top.

Here's the top after I used contact cement and some super glue to stick down the cracked area. I also 3D printed the red cover up piece so where the tower screws back down its nice and flat and not sitting on top of the new bed liner spray. I also used some wood glue and tooth picks to fil in the old screw holes. I have new screws and will pre-drill as well before re-installing the 'fence'


Excited about some warmer weather this weekend so I can do the light body work/sanding and prime/painting in the garage.

I made a list of things I needed to do and started plugging away as parts arrive. I really wanted to completely replace the top with a nice piece of Walnut, but the top piece has some grooves on the bottom and threaded inserts as well so it sits flat and it wasn't worth the trouble. I also looked at removing the existing laminate and veneering the top and sides which I still might do, but I'd rather just get it working.
Items in bold below are done.
The List:
-Remove the existing base/casters and paint the base flat black/sand a bit beforehand.
-Bondo the small dings on the door and sides a bit and sand/prime before wrapping
-Install new Casters
-Wrap the door and 3 sides with the Vinyl arriving Monday
-Spray the top/sides of the countertop with spray in Bed liner.
-Install new Golden Retriever tap handle!
-Fix the existing laminate on the top
-Fill in existing screw holes on top in preparation for new screws
-Remove the beer tower and polish/remove any gunk
-Straighten the lightly kinked refrigerant line on the back just in case
-Clean the inside of the existing fridge with a magic eraser and clean the stainless keg support.
---
So far, $275 into this thing including the $100 for the kegerator itself. Vinyl was $50, tap handle was $45, then a few other costs like the new screws, line cleaning solution, bondo, contact cement, and bed liner spray.
Pics:
Removed the stainless fence and saw what I was working with. I need up 3d printing a filler piece for the missing corner area in the bottom right and will be bondo'ing over that and the other rough areas before spraying with Bed liner.
Here's a shot of the underside of the removed top.
Here's the top after I used contact cement and some super glue to stick down the cracked area. I also 3D printed the red cover up piece so where the tower screws back down its nice and flat and not sitting on top of the new bed liner spray. I also used some wood glue and tooth picks to fil in the old screw holes. I have new screws and will pre-drill as well before re-installing the 'fence'
Excited about some warmer weather this weekend so I can do the light body work/sanding and prime/painting in the garage.


Have everything done on my list, just waiting for the last coat of spray on Bed liner on the top to dry. Not as much texture as I would have liked, but can always roll some more on down the line (pics tomorrow). Tap handle to arrive on Monday - Blonde Fatale 1/6 keg here tomorrow.
Really impressed by this wrap though! It's stealthy, the pictures make it stand out about 3x as strong I'd say.
I'm also impressed with these amazon rollerblade casters and I'm glad I painted the base black,


Really impressed by this wrap though! It's stealthy, the pictures make it stand out about 3x as strong I'd say.
I'm also impressed with these amazon rollerblade casters and I'm glad I painted the base black,


moab11
Well-known member
looks good!
Well, I still have a headache from the Blonde Fatale. But it works as good as it looks!
Still toying with the CO2 pressure and getting that dialed in will take a bit, especially because this beer wants to be more carbonated than usual. It was a little flat last night at 12psi but this Belgian Style blonde prefers to be between 15-20 PSI.
Anyway, also had a chance to 3d print a few parts.
1.) Inside the unit there are what I assume to be shelf inserts. I ended up printing some PETG hose clamps to keep the hoses nice and tidy inside.
2.) On the back, there wasn't really a good place to store the cord when not in use. I printed some black (hard to see in the photo) cable guide type of donut things so I can wrap the cord around the back when its not in use.
3) Next up will be replacing the male power cord end with a 90 degree version so it lays flat on the wall.


Since I had already done so much, I figured I really should finish it off with new beer lines (3/16 ID), a new coupler and some nice 90 degree barbed tailpieces. Super happy with it now, I did have a small leak at the coupler and this small and cheap upgrade has it pouring great.
Yeah, kind of a pain to install the longer 90 behind the faucet, but I got it done.
---Onto the next project (Modine Hot Dawg 45K BTU Heater) install for the garage, smart thermostat, and such too!
Pics!
Old beer line, kinked a bit behind the faucet in the tower

New stuff


Installed


Then I moved the unit to the other garage bay and did some reorganizing so everything is still on a single wall.


Yeah, kind of a pain to install the longer 90 behind the faucet, but I got it done.
---Onto the next project (Modine Hot Dawg 45K BTU Heater) install for the garage, smart thermostat, and such too!
Pics!
Old beer line, kinked a bit behind the faucet in the tower
New stuff
Installed
Then I moved the unit to the other garage bay and did some reorganizing so everything is still on a single wall.
Last edited:
Updates as we head into the weekend.
Building my wife a new to her bike. She thought her Waltly titanium bike was nice, but boring. So I found a flashy Cervelo Aspero in her size and I'm building it up. Waiting on the BBRight Dub BB to show up and it'll be ready for spring.
Black powder coated King Cage Ti cages!

Holler if you are a size ~52 and are interested in her Waltly/Enve/Chris King/King Cage Ti module

On the beer front, new faucet (inter tap) with auto return spring, 10ft upgraded beer lines for slower pours, etc. Faucet is cool because you can put different tips on for Stouts, Growler fillers, etc. Nice to know the beer will stop pouring now when someone lets off the tap handle.
So far, the only things I haven't replaced or updated is the cabinet itself, the fence, and tower. Otherwise a new faucet, beer lines, coupler, wrap, power cord, fittings etc. That being said, I'm officially marking it as DONE.


and printed some more hose fasteners to keep things organized on the inside as well

Building my wife a new to her bike. She thought her Waltly titanium bike was nice, but boring. So I found a flashy Cervelo Aspero in her size and I'm building it up. Waiting on the BBRight Dub BB to show up and it'll be ready for spring.
Black powder coated King Cage Ti cages!
Holler if you are a size ~52 and are interested in her Waltly/Enve/Chris King/King Cage Ti module
On the beer front, new faucet (inter tap) with auto return spring, 10ft upgraded beer lines for slower pours, etc. Faucet is cool because you can put different tips on for Stouts, Growler fillers, etc. Nice to know the beer will stop pouring now when someone lets off the tap handle.
So far, the only things I haven't replaced or updated is the cabinet itself, the fence, and tower. Otherwise a new faucet, beer lines, coupler, wrap, power cord, fittings etc. That being said, I'm officially marking it as DONE.
and printed some more hose fasteners to keep things organized on the inside as well
Last edited:
Welp, new project just arrived -- once again courtesy of FB Marketplace.
Reznor UDAP 75K PTU - Original owner, sparingly used, $350
Should be more than plenty for our 3+ car garage at around 1500sq ft.
To Do List:
-Need to order a ceiling mount, then paint the mount white.
-I'll also need to order the exhaust 4" duct, but might rely on someone doing the final hookup for exhaust and gas
-Order *********** cord
-Order white 50ft 18/5 Thermostat Wire
-Order Honeywell T5 smart thermostat to put out in the garage so it can be part of our HomeKit smart home
-Order white wire loom to conceal the power cord and thermostat cable behind the unit


Reznor UDAP 75K PTU - Original owner, sparingly used, $350
Should be more than plenty for our 3+ car garage at around 1500sq ft.
To Do List:
-Order *********** cord
-Order white 50ft 18/5 Thermostat Wire
-Order Honeywell T5 smart thermostat to put out in the garage so it can be part of our HomeKit smart home
-Order white wire loom to conceal the power cord and thermostat cable behind the unit
Last edited:
Garage heater update:
-Power Cord Installed
-Drip Leg dry fit up
-Have shopping list of 4" Type-B vent from Menards + a 4 to 5" coupler since the vent in the ceiling just happens to be 5"
-Turns out the pin connector I needed for my C-Wire isn't a Molex at all but a Mate-N-Lock so I'm returning what I picked up and will try again with that. Yet another 'similar' but not close enough to work type of deal.
-Thermostat will be here next week and my 18/5 thermostat wire arrived today.
-Mount will be here a little later this week and my goal is to get it hung up in the garage, go shopping for the various B-Vent pieces and fire things up next week.


-Side quest today was 3D modeling and printing a Hot Ones hot sauce caddy for my dad who has been storing this huge box in their basement fridge. V2 is on the printer now with thicker walls and a taller handle.


V2 Done

Mount arrived, quick install for the time being while I finish up the workday.

First coat of Satin White for the Mount, no need to paint the surfaces that will be in contact with the ceiling or top of the unit itself.

-Power Cord Installed
-Drip Leg dry fit up
-Have shopping list of 4" Type-B vent from Menards + a 4 to 5" coupler since the vent in the ceiling just happens to be 5"
-Turns out the pin connector I needed for my C-Wire isn't a Molex at all but a Mate-N-Lock so I'm returning what I picked up and will try again with that. Yet another 'similar' but not close enough to work type of deal.
-Thermostat will be here next week and my 18/5 thermostat wire arrived today.
-Mount will be here a little later this week and my goal is to get it hung up in the garage, go shopping for the various B-Vent pieces and fire things up next week.
-Side quest today was 3D modeling and printing a Hot Ones hot sauce caddy for my dad who has been storing this huge box in their basement fridge. V2 is on the printer now with thicker walls and a taller handle.
V2 Done
Mount arrived, quick install for the time being while I finish up the workday.
First coat of Satin White for the Mount, no need to paint the surfaces that will be in contact with the ceiling or top of the unit itself.
Last edited:
Garage Related
Reznor UDAP 75 Update------Closer:
-4" to 5" Selkirk adapter installed, height with elbow and initial piece is just about perfect height wise too.
-Mount painted and dry install.
-Thermostat arrived, but my 18/5 I ordered was too short by about 5 feet for where I wanted to located it, so return and re-order there.
-Still waiting on the pin connector to show up - Monday most likely for that and then will install everything. I'll do a dedicated post on how the pin is created, crimped, and wired up as I've seen about 1000 questions online with no real guide or answers with part numbers etc.


Bike & 3D Printing related:
Wife's new bike is built up, just need to wrap the bars and she's on her way.
-Fired up the 3D printer to make some custom width Dub BB spacers out of ASA. This was required due to the BBRight bottom bracket on the NDS having the bearing slightly more inboard which was causing some interference with the NDS Dub Preload Adjuster. So I fired up a quick 1mm spacer for the NDS and a 3mm for the DS. Torqued down and spinning beautifully as expected from our friends at CeramicSpeed.
- 44T max up front and 10-44 out back. 46T 1x did not have enough clearance.
-17.5lbs as pictured, size 51cm, rocking 700x38mm Pathfinder Pro's on Enve AG25s


Reznor UDAP 75 Update------Closer:
-4" to 5" Selkirk adapter installed, height with elbow and initial piece is just about perfect height wise too.
-Mount painted and dry install.
-Thermostat arrived, but my 18/5 I ordered was too short by about 5 feet for where I wanted to located it, so return and re-order there.
-Still waiting on the pin connector to show up - Monday most likely for that and then will install everything. I'll do a dedicated post on how the pin is created, crimped, and wired up as I've seen about 1000 questions online with no real guide or answers with part numbers etc.
Bike & 3D Printing related:
Wife's new bike is built up, just need to wrap the bars and she's on her way.
-Fired up the 3D printer to make some custom width Dub BB spacers out of ASA. This was required due to the BBRight bottom bracket on the NDS having the bearing slightly more inboard which was causing some interference with the NDS Dub Preload Adjuster. So I fired up a quick 1mm spacer for the NDS and a 3mm for the DS. Torqued down and spinning beautifully as expected from our friends at CeramicSpeed.
- 44T max up front and 10-44 out back. 46T 1x did not have enough clearance.
-17.5lbs as pictured, size 51cm, rocking 700x38mm Pathfinder Pro's on Enve AG25s
Last edited:
Here's the write up on the jumper wire and pin creation process in order to add a Thermostat C-Wire (Common) to the Reznor UDAP75. This C "Common" wire is required for most, but not all Smart Thermostats. I'm using a Honeywell T5 here, as thats what we also have in the house and it works great with our Apple HomeKit setup.
Step 1 - With the unit unplugged, remove the side panel

Step 2 - Unplug the harness from the circuit board and identify the open port that has the C-Wire (Common)

Step 3 - Identify any unused terminals on the thermostat board on the back of the unit. I'll be using the W2 port as the second stage call for heat isn't used on this unit because it's a single stage heater.


Step 4 - Create your jumper wire. I used blue 16ga wire, and put a female spade disconnect on one end and a Male Mate-N-Lok connector on the other end. I made my wire 14" long to be roughly the same length as the others in the harness that are also running to the terminals on the back of the unit for the thermostat to use.

Step 5 -Insert the Male Mate-N-Lock into the existing hardness. Remember which port you need to use so it connects to the already installed, but unused female connector on the circuit board.

Step 6 - Install harness and reattach side cover plate to the unite.

Step 7 - Fire it up, this 'Common' wire should provide power to the thermostat constantly to keep it up and running.
Step 1 - With the unit unplugged, remove the side panel
Step 2 - Unplug the harness from the circuit board and identify the open port that has the C-Wire (Common)
Step 3 - Identify any unused terminals on the thermostat board on the back of the unit. I'll be using the W2 port as the second stage call for heat isn't used on this unit because it's a single stage heater.
Step 4 - Create your jumper wire. I used blue 16ga wire, and put a female spade disconnect on one end and a Male Mate-N-Lok connector on the other end. I made my wire 14" long to be roughly the same length as the others in the harness that are also running to the terminals on the back of the unit for the thermostat to use.
Step 5 -Insert the Male Mate-N-Lock into the existing hardness. Remember which port you need to use so it connects to the already installed, but unused female connector on the circuit board.
Step 6 - Install harness and reattach side cover plate to the unite.
Step 7 - Fire it up, this 'Common' wire should provide power to the thermostat constantly to keep it up and running.
Attachments


Last edited:
Closer, needed a fish stick kit as my thermostat wire wasn't making it though the pink exterior wall insulation well enough to hit my mark. I know I'm in the right stud bay, I'm just hoping there isn't fire blocking in there and ~10 feet of fiberglass fish stick helps me push that 18/5 thermostat wire down.

Thermostat wire ran, a few casualties in the cheap-o fish stick kit I picked up on Amazon but it served its purpose. I'm assuming I went through some fire blocking or some insulation got caught on an end causing the kinks.
I also left myself 5 or so feet of wire in the wall and plenty extra for the unit itself.


Next up is to get the thermostat itself mounted, and do little touch up painting up there on the thimble area before throwing this thing up on the ceiling and calling this project complete.


I also left myself 5 or so feet of wire in the wall and plenty extra for the unit itself.
Next up is to get the thermostat itself mounted, and do little touch up painting up there on the thimble area before throwing this thing up on the ceiling and calling this project complete.
Last edited:
Ready to get the thing up.
I mocked up the unit with a piece of cardboard and got it attached to the ceiling.

Now I'm going back and forth on what b-vent to use:
-I have a 3 ft section of flexible b-vent
-I also have various 45/60 and 90 degree elbows
-I have a taller 4 to 5" adapter since the ceiling thimble is 5" and the heater itself takes 4"
-I also have ordered a lower profile (1 inch height) adapter vs the current 5" taller adapter


I think I'll end up using the flexible b vent piece and I can rotate the unit a bit but the biggest thing I ran into when mocking it up was the tall adapter pushing things too far down from the ceiling.
Lower profile increaser: Selkirk 104305 for Type B Gas Vent Low Profile Double Wall 4RV-15 Increaser

Current increaser that drops things down 5" and is causing issues to my the low profile mount height.

I can also use the elbows, but ran into the same issue with the tall adapter not giving me enough room and I do not want to use a different mount that moves the unit lower.
Have some buddies coming over to help move the unit up some ladders, but really want to just buy a drywall lift to make things easier and allow me to move it around a bit to get the exact position dialed in if I need to move it one way or another.
I mocked up the unit with a piece of cardboard and got it attached to the ceiling.
Now I'm going back and forth on what b-vent to use:
-I have a 3 ft section of flexible b-vent
-I also have various 45/60 and 90 degree elbows
-I have a taller 4 to 5" adapter since the ceiling thimble is 5" and the heater itself takes 4"
-I also have ordered a lower profile (1 inch height) adapter vs the current 5" taller adapter
I think I'll end up using the flexible b vent piece and I can rotate the unit a bit but the biggest thing I ran into when mocking it up was the tall adapter pushing things too far down from the ceiling.
Lower profile increaser: Selkirk 104305 for Type B Gas Vent Low Profile Double Wall 4RV-15 Increaser
Current increaser that drops things down 5" and is causing issues to my the low profile mount height.
I can also use the elbows, but ran into the same issue with the tall adapter not giving me enough room and I do not want to use a different mount that moves the unit lower.
Have some buddies coming over to help move the unit up some ladders, but really want to just buy a drywall lift to make things easier and allow me to move it around a bit to get the exact position dialed in if I need to move it one way or another.
Last edited:


Reznor UDAP 75K BTU Unit up and installed with Honeywell T5 Smart Thermostat.
Added to HomeKit and ready to roll.
Really nice unit, heats up fast, no leaks, and quiet too.
Took less than 2 mins to hang, 3 guys, 2 on the A-Frame alloy ladder and one on the blue fiberglass to support from below.
Basically got it up on the bucket then readjusted things so we had less than a 1ft final lift to get the unit itself hanging from the mount.
Tested it and it heated up the space pretty fast. Less tan 5 mins from 58 to 60 degrees.
For now the gas is off and I'll do a final leak test after the high temp sealant has a chance to setup after 4 hours.
I'll also do some final wire ties around the two cables once the memory has gone out of them and they warm up a bit.
I did 3D print the little clips that are on the ceiling that hold the power and the thermostat cords. They are stuck to the ceiling now with 3M command strips and holding well. Ultimately I'll likely re-print them with a hole for a fastener instead.


Back to the 3D Printer
I have the Gladiator rails along one side of the garage and that keeps everything somewhat organized.
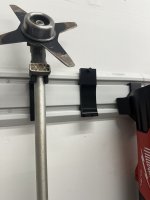
I also have the Milwaukee M18 lineup of blower, Quik-Lok head, trimmer, edger, and brush cutter along with the 1 gallon iteration of the M12 sprayer.
Super nice stuff, just going down the rabbit hole now of designing and printing some mounts for everything.
First up, the newer (3017-20) M18 blower.
I tried this orientation

Which held, but was weak under the even minor stress of removing and inserting the blower.

Then tried laying it flat

This is also week in a different direction, so I think I'm going to try at 45 degrees and see what happens.
6 walls, 25% infill, ASA
I have the Gladiator rails along one side of the garage and that keeps everything somewhat organized.
I also have the Milwaukee M18 lineup of blower, Quik-Lok head, trimmer, edger, and brush cutter along with the 1 gallon iteration of the M12 sprayer.
Super nice stuff, just going down the rabbit hole now of designing and printing some mounts for everything.
First up, the newer (3017-20) M18 blower.
I tried this orientation
Which held, but was weak under the even minor stress of removing and inserting the blower.
Then tried laying it flat
This is also week in a different direction, so I think I'm going to try at 45 degrees and see what happens.
6 walls, 25% infill, ASA
Did the first version fail along the intersection between the upper rail interface and lower hook portion? If so, have you considered adding gussets and/or a widening the rail interface portion to better distribute the load?
Yep, broke right here, which due to the shape of the interface limits where gussets/etc can be added.Did the first version fail along the intersection between the upper rail interface and lower hook portion? If so, have you considered adding gussets and/or a widening the rail interface portion to better distribute the load?
If I add more, it won't fit into the slots.

Yep, broke right here, which due to the shape of the interface limits where gussets/etc can be added.
If I add more, it won't fit into the slots.
I was thinking something more like this...

The red lines represent gussets, the green lines represents extending the hook portion. A combination of both might work as well - a slightly wider hook section with gussets extending to end of the hook section. Whatever direction you choose, instead of spreading the weight of the blower across a 2-3" section, you are now spreading it across ~6".
Great success, much stronger --thanks!I was thinking something more like this...
The red lines represent gussets, the green lines represents extending the hook portion. A combination of both might work as well - a slightly wider hook section with gussets extending to end of the hook section. Whatever direction you choose, instead of spreading the weight of the blower across a 2-3" section, you are now spreading it across ~6".
Model here on Makerworld


Last edited:
While the next 3D printing project wraps up, I'm going to Plasti Dip these Time Master wheels as I saw the newer Turf Master came with Black wheels vs the grey and I think it looks sharp. If it doesn't work out, it peels right off. Going this route before paint.
Before:


In Progress, masking bearings, etc.


After

Wrapped up the Milwaukee Quik-Lok attachment mounts for the Gladiator panels too. PETG ftw!
Markerworld Link:

Voila!

Before:
In Progress, masking bearings, etc.
After
Wrapped up the Milwaukee Quik-Lok attachment mounts for the Gladiator panels too. PETG ftw!
Markerworld Link:
Voila!
Attachments

Last edited:
Got all the Milwaukee Quik-Lok stuff modeled up and mounted.
Pretty sure I used the wrong model for the Powerhead as the fit is good put not perfect.
Anyway, might re-do that one otherwise we're up and running. I'm heading to run a few errands and maybe grab another Gladiator panel or two in order to get a few more things spaced out a bit.


New Version of the power head mount here:


Pretty sure I used the wrong model for the Powerhead as the fit is good put not perfect.
Anyway, might re-do that one otherwise we're up and running. I'm heading to run a few errands and maybe grab another Gladiator panel or two in order to get a few more things spaced out a bit.
New Version of the power head mount here:
Attachments
Last edited:
Have the garage dialed in for summer. Quick trip to Lowes and I had a few more gladiator panels. They were out of just the panels so I had to buy the 2 panel kit but now I can sell the extra hooks and come out ahead most likely.
Little before and after below, still need a better home for my wife's golf clubs - which she doesn't use but we must keep.
I'm also going to re-print the Quik-lok power head mount with a more traditional keyhole mount as this one is sturdy, but really doesn't fit the bottom contour as nice as I would like -- one little bump and the unit is coming off.
Before:

After:

Little before and after below, still need a better home for my wife's golf clubs - which she doesn't use but we must keep.
I'm also going to re-print the Quik-lok power head mount with a more traditional keyhole mount as this one is sturdy, but really doesn't fit the bottom contour as nice as I would like -- one little bump and the unit is coming off.
Before:
After:
moab11
Well-known member
Great job on the custom mounts for the gladiator panels, I have 3 walls in my garage with them, off to see what other custom mounts are available now!
Welp, I've had some kegerator difficulties in the past week and wanted to share here.
When I redid the faucet/shank I ordered this shank to go with the new faucet.
 morebeer.com
You'll notice its for DuoTight quick connectors.

Problem!
I don't have quick connectors

I should have ordered this version with the barb for a hose.
morebeer.com

Yeah, emptied a CO2 tank and the last 10% of a keg this weekend when the back of the shank hose popped off.
Replaced keg, refilled CO2, but didn't realize the the fitting was incorrect.
So I was taking the recycling out last night after hooking top a new keg (Mango Cart) that I had 2 beers out of I saw a huge puddle of beer in the garage again.
****!
The hose/clamp blew off again and luckily I caught it before the whole CO2 was gone, but the keg was shot. $95 bucks down the drain + another $30 for the fitting I needed.
Live and learn fellas!
At least I've hosed out the garage 4 times in 5 days and have a good relationship with the beer guy at the grocery store.
When I redid the faucet/shank I ordered this shank to go with the new faucet.
Beer Faucet Shank | Tower Shank | Stainless | Duotight Compatible Barb | Intertap® | NukaTap®
Outfit any 3" diameter draft tower with these stainless steel Intertap Tower Shanks with Duotight compatible tailpiece. The 1/4" barb pairs perfectly with the Duotight 6.35 mm x 8 mm reducer (DUO100), allowing you to quickly and easily connect 8 mm OD EVABarrier draft line (D1717 & D1718). The...
morebeer.com
You'll notice its for DuoTight quick connectors.
Problem!
I don't have quick connectors
I should have ordered this version with the barb for a hose.
Beer Faucet Shank | Tower Shank | Stainless | Intertap® | NukaTap®
This shank's small design makes it perfect for attaching a faucet to a tower. Included on the Intertap towers that we stock but can be used to replace the short shank on any 3" diameter tower. Made from stainless steel. Please note these shanks are not compatible with Perlick brand faucets...
morebeer.com
Yeah, emptied a CO2 tank and the last 10% of a keg this weekend when the back of the shank hose popped off.
Replaced keg, refilled CO2, but didn't realize the the fitting was incorrect.
So I was taking the recycling out last night after hooking top a new keg (Mango Cart) that I had 2 beers out of I saw a huge puddle of beer in the garage again.
****!
The hose/clamp blew off again and luckily I caught it before the whole CO2 was gone, but the keg was shot. $95 bucks down the drain + another $30 for the fitting I needed.
Live and learn fellas!
At least I've hosed out the garage 4 times in 5 days and have a good relationship with the beer guy at the grocery store.
I've had a few questions about my outlet shelf + charging station so I uploaded a Makerworld model for it.
I added separate files for the shelf, box, and lid so you can customize if you have specific things/holes for the lid.
Check it out here


I also have quite a few Sonos speakers in the house, and have 1 on our screened in porch that I wanted to protect from the elements.
After 2 iterations I have a nice cover for Sonos Era 100s
Check it out here:


Next up, a ceiling mount for my new Garage Wifi Eero Pro 6
I added separate files for the shelf, box, and lid so you can customize if you have specific things/holes for the lid.
Check it out here
I also have quite a few Sonos speakers in the house, and have 1 on our screened in porch that I wanted to protect from the elements.
After 2 iterations I have a nice cover for Sonos Era 100s
Check it out here:
Next up, a ceiling mount for my new Garage Wifi Eero Pro 6
Eero Pro 6 ceiling mounted in the garage, I'll sun some CAT 5E (rest of the house is wired with it) here eventually when I find a longer/cheaper roll of matching blue. Fresh roll of Overture PETG refill in white was nice as well and I was able to reuse one of my old plastic Bambu spools.
This is a good 2 piece print with cable storage too!
Then upgraded the cycling/workbench charging station.
White lid, official Apple MagSafe charger now at an angle so more real estate for up to 3 other items to rest on the top while they charge.


This is a good 2 piece print with cable storage too!
Then upgraded the cycling/workbench charging station.
White lid, official Apple MagSafe charger now at an angle so more real estate for up to 3 other items to rest on the top while they charge.


Hottest week of the year so far, sounds about right when I need to go into the attic to run some CAT6 cable.
In order to avoid that elevated sauna for a few days back to the bike cave!
Trying something new, SpeedyDecal comes through again.
Gloss with hot pink outline for head tube and downtube decals.
Black bar tape going back on here next week after going back to the S-Works power arc.


In order to avoid that elevated sauna for a few days back to the bike cave!
Trying something new, SpeedyDecal comes through again.
Gloss with hot pink outline for head tube and downtube decals.
Black bar tape going back on here next week after going back to the S-Works power arc.