
You are using an out of date browser. It may not display this or other websites correctly.
You should upgrade or use an alternative browser.
You should upgrade or use an alternative browser.
Between 265 & 485 SQ/FT Basement Bike Cave and 3D Printing Workspace
- Thread starter kppolich
- Start date
Workspaces sized between 265 and 485 squarefeet.


larry4406
Well-known member
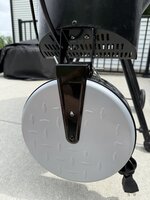
Clever!Updated the hardware holding my retractable power cable on the Recteq bullseye before a heavy weekend of use. Holding up great and I'm really happy with how this turned out.

Timemaster update - still waiting on some key parts like the front height adjuster arm but had some time over the long weekend to get some solid work done.
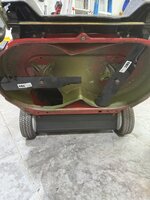
Disassembled the mower, cleaned/greased the wheel spindles and gear areas associated with the self propel transmission.
Then I got out the red scotchbrite and did some surface prep for some new paint on the deck area.
Color: Rustoleum Regal Red was close enough for my $7 vs the toro can which was $28!
Today I did the following:
Install new battery to install and test the electric start, it didn't work but I assume the battery needs charged.
Installed the new blade engagement cable. So much more smooth. I also adjusted the self propel personal pace cable tension and greased the sliding handle and it's nice!
Tomorrow:
I'll be adding another coat of paint to the front/top area of the deck that was more pitted/rusty as its a high traffic area for grass/moisture to get trapped under the front belt cover.
Pics:
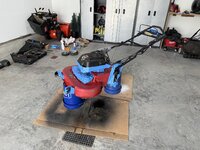


Disassembled the mower, cleaned/greased the wheel spindles and gear areas associated with the self propel transmission.
Then I got out the red scotchbrite and did some surface prep for some new paint on the deck area.
Color: Rustoleum Regal Red was close enough for my $7 vs the toro can which was $28!
Today I did the following:
Install new battery to install and test the electric start, it didn't work but I assume the battery needs charged.
Installed the new blade engagement cable. So much more smooth. I also adjusted the self propel personal pace cable tension and greased the sliding handle and it's nice!
Tomorrow:
I'll be adding another coat of paint to the front/top area of the deck that was more pitted/rusty as its a high traffic area for grass/moisture to get trapped under the front belt cover.
Pics:
Last edited:
2nd to last timemaster update.... I think
-Painted & a few coats of rattle can clear coat - not the best but better than it was by far. It's a lawn mower not a show car.
-Installed new battery - Electric start works! Scared the **** out of me too.
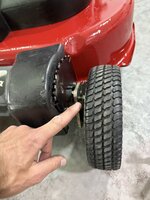
-Bent the front axle connecting rod back into better shape so the front wheels were both straight and it won't pull one direction. My guess is the previous owner strapped it down and bent it or ran into something with the front left wheel.
-Waiting on 3 parts
1.) Side Discharge cover/assembly
2.) Front Wheel Height Adjuster Arm
3.) Front Wheel Height Adjuster Bracket
Put back together as far as I could before the 3 parts arrive from Toro in MN.
Pics!
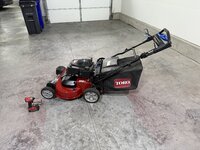



-Painted & a few coats of rattle can clear coat - not the best but better than it was by far. It's a lawn mower not a show car.
-Installed new battery - Electric start works! Scared the **** out of me too.
-Bent the front axle connecting rod back into better shape so the front wheels were both straight and it won't pull one direction. My guess is the previous owner strapped it down and bent it or ran into something with the front left wheel.
-Waiting on 3 parts
1.) Side Discharge cover/assembly
2.) Front Wheel Height Adjuster Arm
3.) Front Wheel Height Adjuster Bracket
Put back together as far as I could before the 3 parts arrive from Toro in MN.
Pics!
Vette60
Well-known member
Enjoyed your updates - We have the Bambu printer at my office and it's great. I am just running a Prusa Mini here at home which works fine for what I am doing. Nice score on the Toro and nice light resto work on it as well. Looks great.
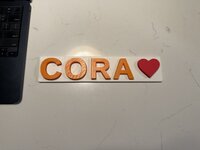
Man is it handy to have a 3D printer loaded with multiple colors in the house. Our neighbors had a little girl (Cora) and said she was into puzzles and spelling. Makerspace to the rescue with a Customizable print and 2 hours later I'm once again super impressed with the quality of the prints and the ease of BambuStudio ability to color fill just like Microsoft Paint did in 1999.
Much nicer to have the black shadow area literally fill in the letter area rather than an all white print or a full black layer that would be visible from the outside.
Only regret is not making it a little bigger, but it'll do.
Puzzle Generator:


Much nicer to have the black shadow area literally fill in the letter area rather than an all white print or a full black layer that would be visible from the outside.
Only regret is not making it a little bigger, but it'll do.
Puzzle Generator:
Last edited:
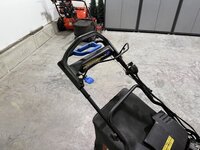
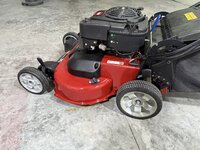
All wrapped up on the Timemaster 30" and ready for the first mow today.
Last night I:
-Installed side deflector shield
-Installed new Blade Engagement/Brake Blue Release Handle. OCD was getting the best of me with the old, faded blue one and this new one looks great. I did keep the old one around just in case this one breaks.
-Installed new Front height adjuster
-Installed new Font height adjuster bracket - I kept the old one as it was only broken in 1 location and I might use it for a project that adds better front swivel wheels to the front of this model.
-Installed 2 new covers for the front and rear height adjuster
-Installed new cable holder/plastic clamp thing that all 3 main cables run through on the lower end of the handle. -I kept the old cracked one that was held together with a zip tie just in case.
-Put the ~$20 battery charger on and topped things off.
Time to mow before it gets too hot out and then if everything works out I'll move over the lawn striping kit and sell the old one on FB Marketplace.
Pics!

Last night I:
-Installed side deflector shield
-Installed new Blade Engagement/Brake Blue Release Handle. OCD was getting the best of me with the old, faded blue one and this new one looks great. I did keep the old one around just in case this one breaks.
-Installed new Front height adjuster
-Installed new Font height adjuster bracket - I kept the old one as it was only broken in 1 location and I might use it for a project that adds better front swivel wheels to the front of this model.
-Installed 2 new covers for the front and rear height adjuster
-Installed new cable holder/plastic clamp thing that all 3 main cables run through on the lower end of the handle. -I kept the old cracked one that was held together with a zip tie just in case.
-Put the ~$20 battery charger on and topped things off.
Time to mow before it gets too hot out and then if everything works out I'll move over the lawn striping kit and sell the old one on FB Marketplace.
Pics!
I'm having a custom Rock Lobster built and the actual build started today.
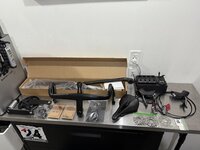
Long story short, it'll be a steel single speed cyclocross machine with paragon machine works sliding rear dropouts, all internally routed hoses, enve in route fork and 1 piece cockpit in flat barney purple frame/fork.
Color for reference and same white downtube decals, my fork will be color matched:


Build parts I've been collecting:
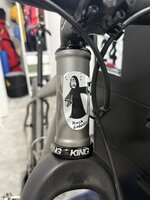
and I'm working on a custom head tube badge decal


I Had a great call with Paul today and a few emails/pictured have been exchanged as well to get closer. Looks like he'll start on the front triangle later this week and the rear end when the Paragon flat mount sliders for 140mm stuff comes in early next week.
Geo Drawing from the man himself

First welds going on:


I then started playing with the head tube badge decal size and position:
Long story short, it'll be a steel single speed cyclocross machine with paragon machine works sliding rear dropouts, all internally routed hoses, enve in route fork and 1 piece cockpit in flat barney purple frame/fork.
Color for reference and same white downtube decals, my fork will be color matched:
Build parts I've been collecting:
and I'm working on a custom head tube badge decal
I Had a great call with Paul today and a few emails/pictured have been exchanged as well to get closer. Looks like he'll start on the front triangle later this week and the rear end when the Paragon flat mount sliders for 140mm stuff comes in early next week.
Geo Drawing from the man himself
First welds going on:
I then started playing with the head tube badge decal size and position:
Last edited:
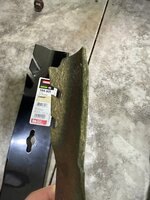
Welp, officially spent more on this Big League Lawns striping kit than I did on the rest of the mower combined!

 bigleaguelawns.com
15% off fathers day coupon did it for me.
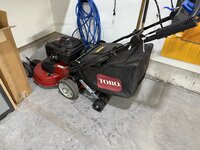
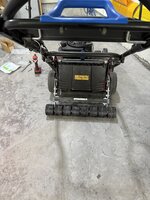
Sold our old Troy Bilt TB200 and now need to sell the 21" version of this stripe kit. Holler if you are interested as it looks like it will fit quite a few 21" models.
Full details here: https://bigleaguelawns.com/products/tb-rpm20

CheckMate™ for Toro® TimeMaster® – Big League Lawns, LLC
Big League Lawns© manufactures striping rollers that connect to the full line of Toro® Wide Area Walk-Behind mowers. As the operator mows the turf, the CheckMate™ striping roller gently folds the grass in the direction of cut. The resulting patterns are created by sunlight reflecting from the...
bigleaguelawns.com
15% off fathers day coupon did it for me.
Sold our old Troy Bilt TB200 and now need to sell the 21" version of this stripe kit. Holler if you are interested as it looks like it will fit quite a few 21" models.
Full details here: https://bigleaguelawns.com/products/tb-rpm20
tweidman
Well-known member
I guess you plan on racing some SS cross races this fall?
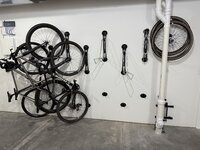


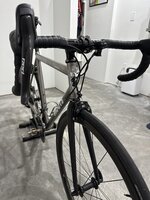
A few more phone calls with Paul and he's all set on the internal hose routing and a first for him will be the internal rear brake hose routing through the chain stay.
I mailed out the Enve In-Route Fork and Chris King Aeroset 3 (matte black) headset to Paul as well. I'll be using a matching Chris King Seatpost binder clamp (matte black).
Finalize the head tube badge and working with Gus at Gus Salmon Decals to get a few made. Good dude that Gus!
Pics


Final Size/Headtube size comparison:
Middle size, still too big
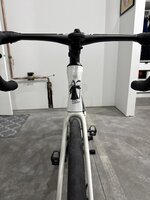
Original larger size too big IMO

I mailed out the Enve In-Route Fork and Chris King Aeroset 3 (matte black) headset to Paul as well. I'll be using a matching Chris King Seatpost binder clamp (matte black).
Finalize the head tube badge and working with Gus at Gus Salmon Decals to get a few made. Good dude that Gus!
Pics
Final Size/Headtube size comparison:
Middle size, still too big
Original larger size too big IMO
3D printer time --
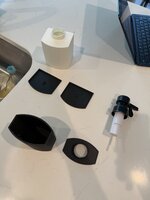
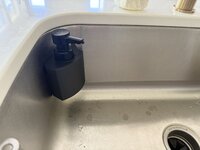
This was a bigger print for me - I'm trying to make my own sink mount automatic dish soap dispenser that fits inside the corner radius of our kitchen sink. Attached with high strength magnets.
The dispenser top is powered by 2 AAA batteries from this $10 all in one and the batteries are supposed to last a year of regular use.
For v1 I ran out of filament at 99% and made due with some white.
Overall, too big and missed the corner profile I was trying to match.
I'll print the next one in 2 pieces to save on the support and glue the top on to the bottom container.
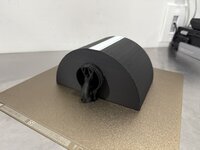


Timemaster time -- Stripe kit installed and it cuts great with the new blades. It's fast, pulls uphill just fine for now and I'm so happy with it! The next post I'll do a quick write up on the overall cost of the rehab.

Tool time --
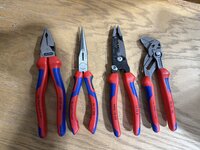
I'm slowly building my around the house DIY-anything tool pouch and have been on the 1-a-month Knipex purchase train. I'm sticking with the comfort grips for this kit. Maybe just the lineman's pliers next, but thats about it it.


This was a bigger print for me - I'm trying to make my own sink mount automatic dish soap dispenser that fits inside the corner radius of our kitchen sink. Attached with high strength magnets.
The dispenser top is powered by 2 AAA batteries from this $10 all in one and the batteries are supposed to last a year of regular use.
For v1 I ran out of filament at 99% and made due with some white.
Overall, too big and missed the corner profile I was trying to match.
I'll print the next one in 2 pieces to save on the support and glue the top on to the bottom container.
Timemaster time -- Stripe kit installed and it cuts great with the new blades. It's fast, pulls uphill just fine for now and I'm so happy with it! The next post I'll do a quick write up on the overall cost of the rehab.
Tool time --
I'm slowly building my around the house DIY-anything tool pouch and have been on the 1-a-month Knipex purchase train. I'm sticking with the comfort grips for this kit. Maybe just the lineman's pliers next, but thats about it it.
Good day to get the only rim brake bike left in the Haus ready for some miles.
Here's a 2 year maintenance check on some not-so-often ridden tubeless tires.
~50g of old sealant from the front and the same from the rear.
I started this process due to a little imbalance I was feeling in the rear wheel when I had the bike in the stand, turns out there was a large chunk of dried sealant sitting in the tire which was the culprit.
Overall, 10 minutes to remove tires, pull out old sealant and reinstall the tires, add new sealant, and inflate.


Road Worthy Once Again

Here's a 2 year maintenance check on some not-so-often ridden tubeless tires.
~50g of old sealant from the front and the same from the rear.
I started this process due to a little imbalance I was feeling in the rear wheel when I had the bike in the stand, turns out there was a large chunk of dried sealant sitting in the tire which was the culprit.
Overall, 10 minutes to remove tires, pull out old sealant and reinstall the tires, add new sealant, and inflate.
Road Worthy Once Again
Last edited:
My sealant adventure did not go as smoothly as yours. Glad to see yours came out much easier than mine !Good day to get the only rim brake bike left in the Haus.
Here's a 2 year maintenance check on some not-so-often ridden tubeless tires.
~50g of old sealant from the front and the same from the rear.
I started this process due to a little imbalance I was feeling in the rear wheel when I had the bike in the stand, turns out there was a large chunk of dried sealant sitting in the tire which was the culprit.
Overall, 10 minutes to remove tires, pull out old sealant and reinstall the tires, add new sealant, and inflate.
Road Worthy Once Again
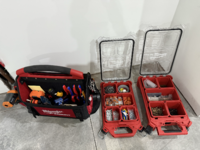
Been on the fence about joining the Packout cult for a while, but took the initial plunge today for my homeowner DIY mobile setup for all things plumbing, electrical, and fastening.
P.S. is something up with the forum, I can't seem to embed photos like I usually do within the post, I can only attach things today.
P.S. is something up with the forum, I can't seem to embed photos like I usually do within the post, I can only attach things today.
Attachments


Also installed a nicer hour meter and tachometer on the Timemaster.
I'm happy with it and the RPMs its running (3600) as its perfectly in spec at idle and with the blades engaged.
3M Command strips for the win also, no holes to drill and can move it elsewhere if needed in the future.
I'm happy with it and the RPMs its running (3600) as its perfectly in spec at idle and with the blades engaged.
3M Command strips for the win also, no holes to drill and can move it elsewhere if needed in the future.
Attachments


Good day to get the tools out and do some basic homeowner maintenance.
Damn the guy that put the Dryer vent next to the AC unit.
Quick 30 mins and she's clean. The outside coils were dirty, inside were perfect, didn't even vacuum it out.
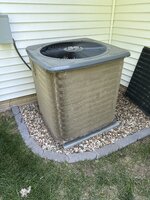
After some coil clean and mist rinse with the garden hose

All put back together
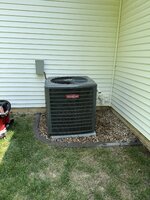
Damn the guy that put the Dryer vent next to the AC unit.
Quick 30 mins and she's clean. The outside coils were dirty, inside were perfect, didn't even vacuum it out.
After some coil clean and mist rinse with the garden hose
All put back together
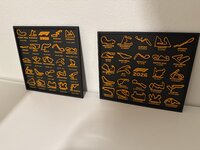
And the Wife is a big F1 fan, but not big enough to remember 1.) if there is a race this weekend or 2.) in the event there is a race --where it might be at in the world.
3D printer to the rescue for 2025 & 2026 calendars
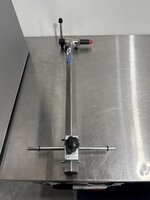
Then loaded up some white PETG to get the Park Tool DAG out of my regular toolbox and up on some Wall Control.


3D printer to the rescue for 2025 & 2026 calendars
Then loaded up some white PETG to get the Park Tool DAG out of my regular toolbox and up on some Wall Control.
Grant Gunderson
Well-known member
That park tool DAG is the least used tool in my shop. I keep debating on just getting rid of it. What I do use offer. Is the Abbey pre-hag I’m sure you could easily print one of these your self as it quickly tells you if you need to replace the hanger. I have zero patience in using the Park Hag to try and save a $10 derailleur hanger.And the Wife is a big F1 fan, but not big enough to remember 1.) if there is a race this weekend or 2.) in the event there is a race --where it might be at in the world.
3D printer to the rescue for 2025 & 2026 calendars
Then loaded up some white PETG to get the Park Tool DAG out of my regular toolbox and up on some Wall Control.
Yep, couldn't agree more Grant. It'll be the first tool I sell this year when the time comes and I believe I only shelled out $30 for it used a few years back.That park tool DAG is the least used tool in my shop. I keep debating on just getting rid of it. What I do use offer. Is the Abbey pre-hag I’m sure you could easily print one of these your self as it quickly tells you if you need to replace the hanger. I have zero patience in using the Park Hag to try and save a $10 derailleur hanger.
trytochaseme
Well-known member
I only use mine for checking alignemnt on hoods. Ive literally never used it to check a derailleur hanger. But that might also be partly due to most of my bikes are running transmission now.

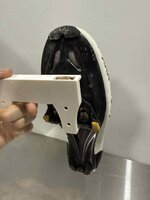
Shoe storage project for a cycling buddy who is already using my helmet mounts.
I printed the original version here:
https://makerworld.com/en/models/48...of-cycling-shoes?from=search#profileId-399032
Then made a wider version because he has wide feet/shoes and I saw some feedback that wider shoes can have interference.
Pics!


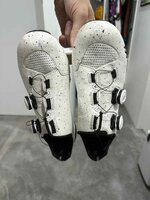

I printed the original version here:
https://makerworld.com/en/models/48...of-cycling-shoes?from=search#profileId-399032
Then made a wider version because he has wide feet/shoes and I saw some feedback that wider shoes can have interference.
Pics!
Attachments

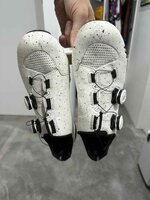

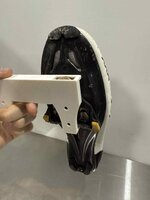
Got a file link for the shoe mounts ?Shoe storage project for a cycling buddy who is already using my helmet mounts.
I printed the original version here:
https://makerworld.com/en/models/48...of-cycling-shoes?from=search#profileId-399032
Then made a wider version because he has wide feet/shoes and I saw some feedback that wider shoes can have interference.
Pics!
I printed the original version here:
https://makerworld.com/en/models/48...of-cycling-shoes?from=search#profileId-399032
https://makerworld.com/en/models/48...of-cycling-shoes?from=search#profileId-399032

Weekend update:
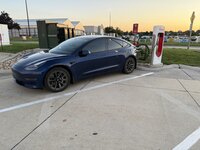
Road trip, car did great - the 1UP rack dings range by about 10% but works flawlessly.
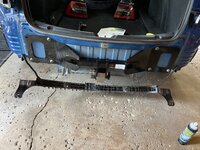
Pics of install process for the StealthHitch here for those interested. About a 2 hour job which involves removing the rear bumper to get access to the crash bar and such.

Tried one of these - meh 1 was enough, maybe 2 if they were free but give me a Corona and Lime next time bartender.

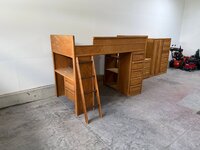
Goal for this week is to sell my old childhood bedroom set that is currently living in our 3rd garage stall and ride my bike more!
Holler if you are near Eastern Iowa and are interested!

Road trip, car did great - the 1UP rack dings range by about 10% but works flawlessly.
Pics of install process for the StealthHitch here for those interested. About a 2 hour job which involves removing the rear bumper to get access to the crash bar and such.
Tried one of these - meh 1 was enough, maybe 2 if they were free but give me a Corona and Lime next time bartender.
Goal for this week is to sell my old childhood bedroom set that is currently living in our 3rd garage stall and ride my bike more!
Holler if you are near Eastern Iowa and are interested!
Been riding this a bit more lately and man it's just so smooth. The tactile feel of the SRAM Red 11 speed shifting mixed with the titanium frame absorbing the road. It's a nice change of pace once in a while from my Tarmac SL7.
A few small updates to the build (pedals, slightly more slammed stem position, longer rear brake cable and noodle)
Sitting at 16.1 lbs as pictured below
Latest Pic!

Frame: Moots Vamoots-SL, size 56, 2004
Fork: Enve
Headset:Chris King Black
Bottom Bracket: CeramicSpeed GXP
Bar: Enve, Compact 42cm
Stem: Enve, 100mm, 6 degree
Seatpost: Enve 27.2 with setback
Shifters:SRAM Red 22
FD: SRAM Red 22
RD: SRAM Red 22
Crank: Quarq Dzero, GXP, 172.5 & 50/34
Brakes: Cane Creek eeG4
Cassette: SRAM XG1190 11-28
Chain: SRAM Red 22
Wheel Set: Enve 3.4 Gen II, DT240
Tires: Continental GP5000TL 700x25mm
QR: Enve Titanium
Saddle: S-Works Power Arc (143)
Cages: King Ti
Pedals: Shimano Dura Ace 9100
A few small updates to the build (pedals, slightly more slammed stem position, longer rear brake cable and noodle)
Sitting at 16.1 lbs as pictured below
Latest Pic!
Frame: Moots Vamoots-SL, size 56, 2004
Fork: Enve
Headset:Chris King Black
Bottom Bracket: CeramicSpeed GXP
Bar: Enve, Compact 42cm
Stem: Enve, 100mm, 6 degree
Seatpost: Enve 27.2 with setback
Shifters:SRAM Red 22
FD: SRAM Red 22
RD: SRAM Red 22
Crank: Quarq Dzero, GXP, 172.5 & 50/34
Brakes: Cane Creek eeG4
Cassette: SRAM XG1190 11-28
Chain: SRAM Red 22
Wheel Set: Enve 3.4 Gen II, DT240
Tires: Continental GP5000TL 700x25mm
QR: Enve Titanium
Saddle: S-Works Power Arc (143)
Cages: King Ti
Pedals: Shimano Dura Ace 9100
ericm
Well-known member
Those King cages are the best. I have at least 50k miles on a pair, on rough California roads including multiple editions of the race called NorCal's Roubaix and they haven't broken. Really easy to get bottles in and out too.
Grant Gunderson
Well-known member
On that nice of a build I’d put a Chris King ceramic BB on it. I’ve gotten over 5K miles on mine and it’s still going strong, despite riding my trail bike in the wet 6 months of the year. I just inject it with fresh grease using their injection tool every few months and it’s paid for it’s self.
Those DT Swiss hubs go forever! I’ve been running an Enve whelk set built with those for 10+ years on my daily trail bike and they are still going strong! When it’s time to rebuild them, the Endro bearing hub tools for DTswiss are the best out their.
Those DT Swiss hubs go forever! I’ve been running an Enve whelk set built with those for 10+ years on my daily trail bike and they are still going strong! When it’s time to rebuild them, the Endro bearing hub tools for DTswiss are the best out their.
CeramicSpeed GXP bottom bracket on it with over 5000 miles.
I usually stay away from Chris King bottom brackets if they require one of their adpaters aka Fit Kits (which GXP does require instead of just having the right size ID Bearings) as I've never had good luck setting them up on 5 other bikes.
GXP fit kit with extra plastic parts vs other BBs that just size the bearing correctly.

 chrisking.com
DT hubs on all my bikes from the Ratchet 240s pictured on that bike and also some new 180 EXPs on my Tarmac. They are just solid hubs with tons of options for end caps and free hubs while having easy maintenance.
I usually stay away from Chris King bottom brackets if they require one of their adpaters aka Fit Kits (which GXP does require instead of just having the right size ID Bearings) as I've never had good luck setting them up on 5 other bikes.
GXP fit kit with extra plastic parts vs other BBs that just size the bearing correctly.
Fit Kits for 24mm Cranks
Why We Make It Chris King Fit Kits make that magical love connection between your cranks and our legendary bearings. Why You Want It Your Fit Kit extends the useful life of both your bottom bracket and your cranks, reduces the potential for noise, and also allows you to use one bottom bracket...
chrisking.com
DT hubs on all my bikes from the Ratchet 240s pictured on that bike and also some new 180 EXPs on my Tarmac. They are just solid hubs with tons of options for end caps and free hubs while having easy maintenance.
Last edited:


I agree that CK really seemed to have taken the easy way out with bottom brackets and all of the adapters they want you to use. I get it.....the fact there are so many different sizes for bottom brackets is utterly ridiculous but I just don't trust that it would be a reliable setup.
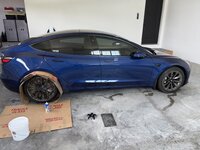
Got the car washed and ready for a light paint correct/polish later this week.
In the process I noticed one of my PlastiDipped wheels was peeling and in my attempt to save it ended up peeling the whole wheel off. So I got to spend the next 2-3 hours redoing that single wheel.
Peeled and prepped for first coat

First coat on
After about 4-5 coats of build up
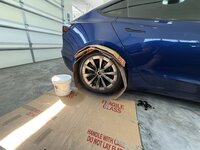
After 2 light coats of 'Metalizer' and ready for the final 2 coats of 'Glossifer' things are good.

In the process I noticed one of my PlastiDipped wheels was peeling and in my attempt to save it ended up peeling the whole wheel off. So I got to spend the next 2-3 hours redoing that single wheel.
Peeled and prepped for first coat
First coat on
After about 4-5 coats of build up
After 2 light coats of 'Metalizer' and ready for the final 2 coats of 'Glossifer' things are good.
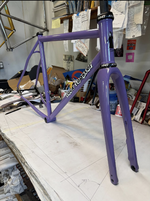


Just Puttering
Well-known member
That’s an awesome color!
3D print update:
A buddy of mine has some old blinds, and a pivotal part broke so he gave me a working version to model some replacement parts.
Basically, this rod fits through a spring loaded blind tilt/close mechanism.

The rod sits in here, running through 3 of the parts.
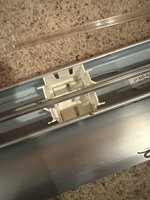
This center channel with a catch area is what broke over time.

So I modeled a few different inside diameters since I didn't have the rod in hand.

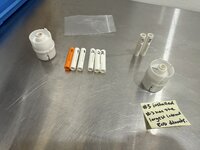
and made some different version while I waited for my other cycling related project to do its thing.

CROSS IS COMING update
Back at it again with the tubulars and Effetto Mariposa!
The new Corogna remover is high quality! Brush it on, let it sit ~5-7hrs and wife it off. It took me longer to remove the glue from inside/around the spoke holes than it did for the rest of the process combined on these Enve CX Tubulars.
I will once again be using their tape and adhesion promoter when I setup these with some dry/fast Challenge Chicane team editions tubs ahead of this years SSCX run.
Pics!
Brush it on

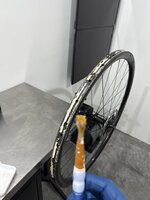
Wipe it off, then wipe with Isopropyl


A buddy of mine has some old blinds, and a pivotal part broke so he gave me a working version to model some replacement parts.
Basically, this rod fits through a spring loaded blind tilt/close mechanism.
The rod sits in here, running through 3 of the parts.
This center channel with a catch area is what broke over time.
So I modeled a few different inside diameters since I didn't have the rod in hand.
and made some different version while I waited for my other cycling related project to do its thing.
CROSS IS COMING update
Back at it again with the tubulars and Effetto Mariposa!
The new Corogna remover is high quality! Brush it on, let it sit ~5-7hrs and wife it off. It took me longer to remove the glue from inside/around the spoke holes than it did for the rest of the process combined on these Enve CX Tubulars.
I will once again be using their tape and adhesion promoter when I setup these with some dry/fast Challenge Chicane team editions tubs ahead of this years SSCX run.
Pics!
Brush it on
Wipe it off, then wipe with Isopropyl
Last edited: