To avoid these ads, REGISTER NOW!

Toolbox Refinishing - The "Barn Find" Look

Private Lugnutz

Well-known member
Joined
Mar 30, 2012
Messages
30,489
Location
The Authentic Jersey Shore
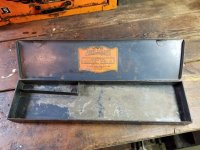
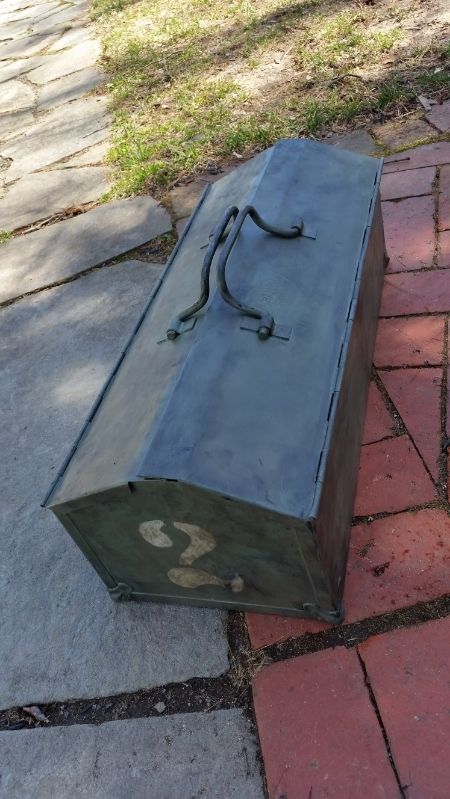
The subject of refinishing WWII era toolboxes has come up a few times recently. By request, and instead of barraging either of those threads with photos, I am putting this on a separate thread. Maybe others can add their own procedures and materials. I'm always open for new ideas.

For starters, note that my strong preference as a collector is for preserving tools and toolboxes. To each his own, but I'm not a NOS or perfect restoration guy. Sometimes, though, even a tool or a toolbox is just too far gone in rust to preserve. But that doesn't mean the finished result has to look NOS/restored.

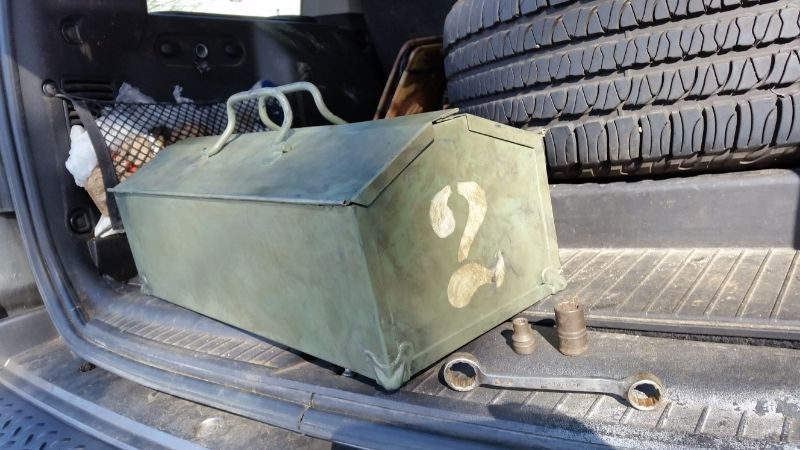
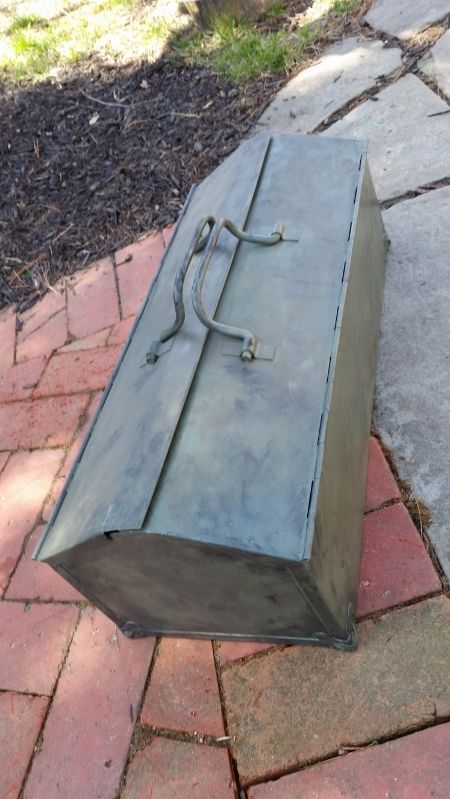
The look I go for when I have to refinish a toolbox is the same look I prefer on a Jeep - that of a weathered, well-used, but well-maintained combat veteran "barn find" - without the rust! :) (Ratrodders actually go so far as to apply a rust-promoting solution, which they then seal to prevent further oxidation!)

To achieve that aged worn original look, I use some common "painterly" techniques used in faux finishes by house painters and decoupage.

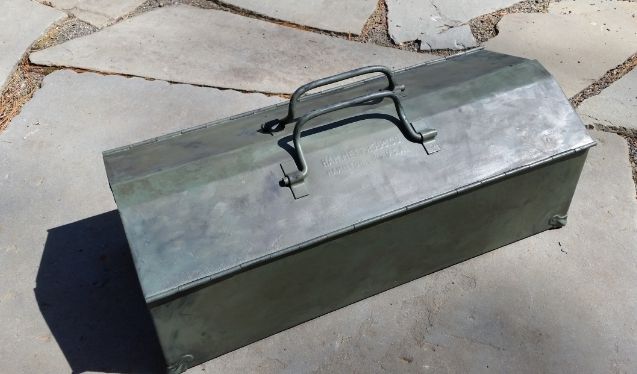
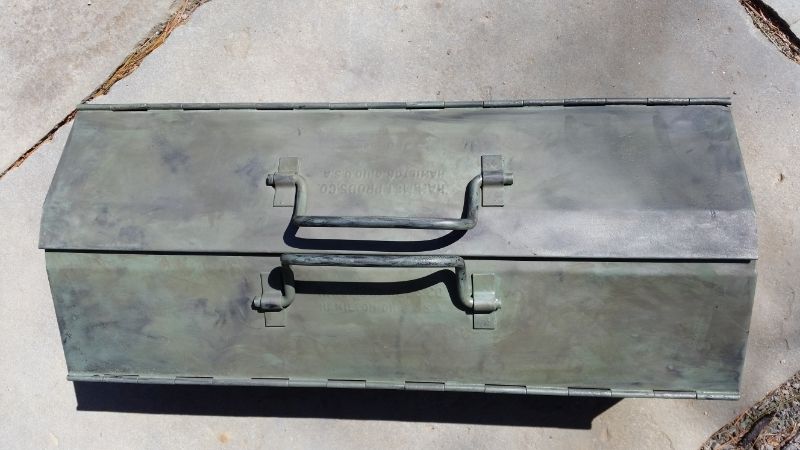
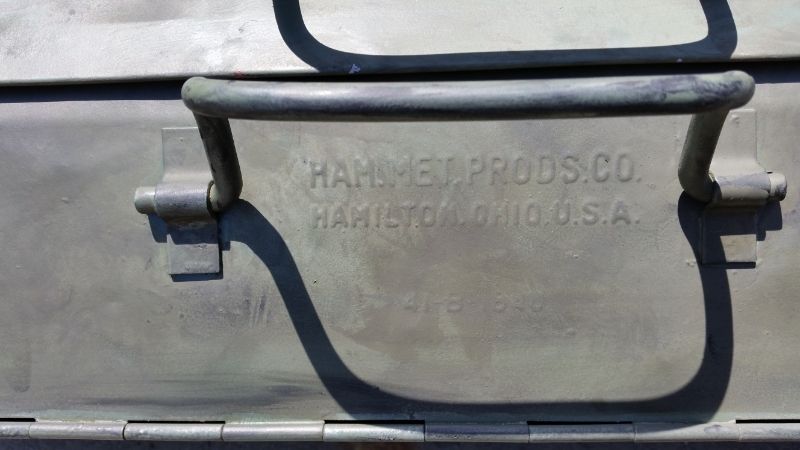
A note on WWII paint color. The formula for the "correct" OD green is a hotly debated topic in the Jeep community. There are a number of specs out there, and in my opinion, they're all "correct" and you can't go wrong, especially when you consider that GI's used gasoline to thin it in the field. 33070 and TM 9 Shade 8 are very close. I actually prefer 34087, which has a khaki faded look to it, where most 33070 or TM 9 Shade 8 vehicles go after 70+ years. But even though I have leftover 34087, I don't bother with a sprayer for a toolbox. And, it's way too flat. Vehicles and equipment were lusterless. Toolboxes were not. The spec was semi-gloss. So I use rattle cans. There is no perfect rattle can color out there for WWII paint, which has a hard to match yellow in it. Which is another reason why I think using techniques is best. All old toolboxes look correct regardless of their original color! :)

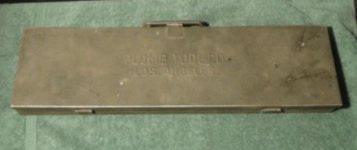
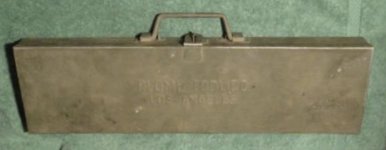
I'll show the boxes first, then discuss materials and process.
 
Last edited:
To avoid these ads, REGISTER NOW!
OP
P

Private Lugnutz

Well-known member
Joined
Mar 30, 2012
Messages
30,489
Location
The Authentic Jersey Shore
THE BOXES

BOX # 1 is a Hamilton 41-B-1840

ORD6SNLG2710010.jpg


This toolbox was very commonly used in WWII for all kinds of tool-sets, including machinists, welders, painters, upholsterers, etc, and of course general mechanics. While all of them had access to unit level equipment, this was their carry box. Just over a 157,000 of these were shipped to the ETO alone between 1942 and 1945. Other makers include Union, E.J. McAleer, Duplex and Waterloo. The 41-B-1840 is the Federal Stock number. Not all Hamiltons have it, but Hamilton is the only mfgr that does.

I don't have any BEFORE pics but it was a rust bucket. It was stripped, bead blasted, and repaired (brazed patches on the bottom).

Here is a photo of the finished product I took in the back of my truck with some tools as if I found it at the flea market. I wanted to test my finish - and the trick worked, fooling everyone except one wily collector in the UK.

20150412_085816_zpscezxwu8h.jpg


Here are some additional photos:

20150412_113103_zpsqgjju3en.jpg


20150412_120132_zpsyp5wqdml.jpg


20150412_113830_zpsldvoeiuq.jpg


20150412_113909_zpsjzxifqff.jpg


20150412_120347_zpsllqhmlm6.jpg


20150412_120446_zpswxjohuqi.jpg


20150412_120542_zpsjr3l52ip.jpg


20150412_113001_zpssme8vvz4.jpg
 
OP
P

Private Lugnutz

Well-known member
Joined
Mar 30, 2012
Messages
30,489
Location
The Authentic Jersey Shore
BOX # 2 is a Plomb 5400 socket set

attachment.php


This attache style toolbox was used for a number of different Plomb 5400 series 1/2-inch drive socket sets during WWII. I didn't bead blast this box - just gave it an Evap-O-Rust bath.

BEFORE:

attachment.php


AFTER:

attachment.php


attachment.php


attachment.php


attachment.php


attachment.php
 
OP
P

Private Lugnutz

Well-known member
Joined
Mar 30, 2012
Messages
30,489
Location
The Authentic Jersey Shore
MATERIALS

- Rustoleum Painter's Touch 2X Ultra Cover 'Gray' Primer 249088
- Krylon Satin Touch 'Italian Olive' 53522 (or a mix of RUSTOLEUM 284986 Satin Eden and RUSTOLEUM 249127 Flat Black)
- Rustoleum Specialty Camouflage 'Deep Forest Green' 621128
- Turpentine
- Rags
- Fine grade 0000 steel wool
- Kiwi shoe polish - black
- Turtle Wax Super Hard Shell Paste Wax

THE PROCESS

I primed with two (2) coats of Rustoleum Painter's Touch 2X Ultra Cover 'Gray' Primer 249088.

First and second coats after primer on the 41-B-1840 was Krylon Satin Touch 'Italian Olive' 53522.

Warning: I don't like Krylon, and this is VERY runny spray paint, but the color is the best I have found for off the shelf. Rustoleum Specialty Camouflage 'Army Green' is just not right, and Rustoleum 'Oregano' is too light.

Alternative: I used a mix of Rustoleum Eden 284986 and Flat Black 249127 on the Plomb 5400. The Eden looks bright, but trust me, Eden is an almost perfect shade of green for WWII, just too bright, so you are basically darkening it with a little black. It's a PITA spray-mixing them in a pan, but I love how close the color came to WWII OD green.

Let dry for at least 48 hours.

For the first layer of techniques, I used Rustoleum Specialty Camouflage 'Deep Forest Green' 621128. This is extremely flat paint. I sprayed it directly into the bottom of a halved plastic milk jug. You won't need a lot. Cut it with a VERY healthy splash of turpentine (probably 50%/50%). You are basically making a stain out of a paint. The turpentine thins the paint being applied and also reacts with the dried top coat of the paint on the box like a "distressing" painterly technique commonly used on a vintage interior house wall. Using a balled up old t-shirt as a rag, I wiped and blotched and dabbed this solution on in flourishes for the appearance I wanted. This is done with a light, quick touch in whatever pattern you want. Results will appear immediately due to the quick drying turpentine. Because it's cut so thin, and you're not coating it on, if you don't like the look in a certain spot, just re-splotch/re-dab it. The result is places that look faded, discolored and worn.

Let dry 24 hrs.

For the Hamilton 41-B-1840, at this point I added a big early war stenciled "2" to the end of the box with white paint, on a brush, by hand.

For the Plomb 5400, at this point I used 0000 fine grade steel wool to remove some paint in some select spots all the way down to the steel, creating natural tool and box
rubbing marks.

For the second layer of techniques, I used Kiwi black shoe polish, rubbing a healthy dab into my hands until they were coated and almost dry to the touch. Then I simply manhandled the boxes in selective places - corners, lid, tray handle, handles, etc, as a mechanic would have handled the boxes with dirty hands over time.

Finally, I rubbed both boxes down by hand with the Turtle Wax paste wax, sealing all the techniques in, then wiped that down again with a dry rag. That left that sort of semi-gloss spec sheen you see on found boxes, somewhere between flat and satin.

That's it.

Again, may not be for everyone's taste, but if you're interested, that is one approach.
 
Last edited:

RubiconJK

Well-known member
Joined
May 15, 2016
Messages
1,380
Location
"I'm bad, I'm Nationwide"
Thanks for sharing Lugz. Very nice! I have a spare 5400 box on which I may try this process. It happens to have a felt lining which I kind of like but will need to obviously remove. Do you always leave your boxes unlined or do you have a lining you prefer? I've seen some recent posts of examples with cork lining that looks really nice (seems like Don posted an example).
 

d42jeep

Well-known member
Joined
Oct 22, 2014
Messages
16,505
Location
Northern California
I like the cork look but I haven’t tried it yet. Lugz, your Plomb box came out looking really similar to my original. I would say mission accomplished. :thumbup:
-Don
 

Attachments

  • B3DB3BE3-FFBE-49BF-8BAD-45D8723C4130.jpg
    B3DB3BE3-FFBE-49BF-8BAD-45D8723C4130.jpg
    50.6 KB · Views: 129
  • 37D520A3-00E0-4D7A-8D3B-7EF7BDCD9212.jpg
    37D520A3-00E0-4D7A-8D3B-7EF7BDCD9212.jpg
    45.3 KB · Views: 117
  • 6718897D-7529-407F-B3F7-7AC53623520F.jpg
    6718897D-7529-407F-B3F7-7AC53623520F.jpg
    74.2 KB · Views: 145
OP
P

Private Lugnutz

Well-known member
Joined
Mar 30, 2012
Messages
30,489
Location
The Authentic Jersey Shore
Do you always leave your boxes unlined or do you have a lining you prefer?
I am pretty much in the 'strict constitutionalist' camp of collectors, Rubicon! :lol: 
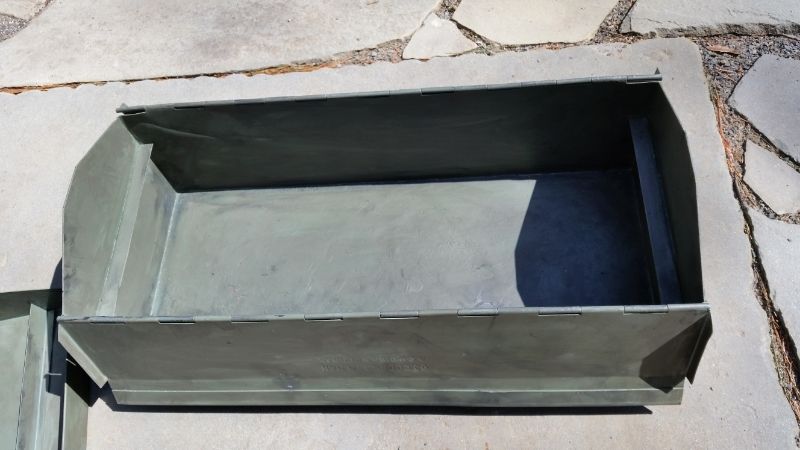
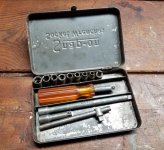
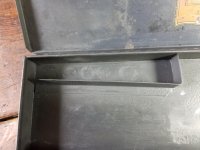
I've never lined any box except machinists' chests, mainly because they came that way originally. Except for a quirky little Duro-Indestro ignition set I have that came with a cardboard lining showing the outlines of the tools, I've never collected any other carry type toolbox or socket set type of box that came with a lining, and I don't recall seeing any boxes advertised with a lining in catalogs. (I could be wrong about that last part!)

Lugz, your Plomb box came out looking really similar to my original. I would say mission accomplished. :thumbup:
Thanks. I didn't post photos of the inside of the box, but it wasn't as bad as the outside with rust. I used those photos as a model for refinishing it after I stripped the box. I would've liked to preserve the interior, and just strip the exterior, but it wasn't possible.
 

Gmonkee

Well-known member
Joined
May 9, 2010
Messages
2,731
How about depression era faked antique?

Weather beat cement form wood and real used oil stains. Even the name on it goes back to a real person selling used Fords in DeWitt in the depression era.

But he never seen this box.
 

Attachments

  • 20181121_164907-1.jpg
    20181121_164907-1.jpg
    71.6 KB · Views: 257
  • 20181121_164921-1.jpg
    20181121_164921-1.jpg
    98.2 KB · Views: 254

Farmer J.

Well-known member
Joined
Sep 18, 2016
Messages
1,995
Location
UK, Cornwall/Hertfordshire.
How about depression era faked antique?

Weather beat cement form wood and real used oil stains. Even the name on it goes back to a real person selling used Fords in DeWitt in the depression era.

But he never seen this box.

A fake old box from DeWitt eh. Is there any of those chinese made fake vise grips hidden in there?? Ha ha.
It looks nicely done though.
 

southalabama

Well-known member
Joined
Jan 10, 2011
Messages
5,532
Location
Brewton AL
Nicely done Private

In the past I've not purchased older boxes because of rust. A new paint finish wouldn't have looked right.

Thanks for sharing the tips and techniques. Printed for my "idea" file for projects.
 

leg17

Well-known member
Joined
Aug 11, 2011
Messages
1,369
Location
Kentucky
How about depression era faked antique?

Weather beat cement form wood and real used oil stains. Even the name on it goes back to a real person selling used Fords in DeWitt in the depression era.

But he never seen this box.


That you Striker?
 
Last edited:

JHuston

Well-known member
Joined
Feb 21, 2016
Messages
301
Location
Canton, Ohio
This is very timely information, because I have a Plomb utility box that would look a lot better in it's original livery than the two tone spray job it has now. Thank you for sharing your techniques!
-James Huston
 

Gmonkee

Well-known member
Joined
May 9, 2010
Messages
2,731
Faux finishing for that well used antique look is pretty similar for wood and metal.

I took old weather beat wood and used horrible carpentry skills to make a box. The idea is a box that has seen neglect and repairs over time. Not a nice new item.

One was painted up in one railroad color and logo then roughed up and sanded back to some bare wood. Then repainted in another color and logo and beat to **** again to where the first paint was visible in parts.
Then I donated it to a local train museum. They had old maintence yard tools but no totes. It nearly fooled the security guard there as I went to donate it.

I did date and sign it on the bottom so future folks won't be convinced they got a rare treasure.

Steel boxes just start with a cheap old wreck and patch damages as past generations would have. Distressed paint and personalized a bit by an unknown past person (even if invented) gives it that flavor.

Mine was created for a display of Ford T tools and parts in my home. It is still in a natural wear and weathering process to lend credibility for when the display is made. Wear on the bottom for being moved about and damages to the wood for actually being used as a tool box around the house. Nothing fake about those marks.
 
OP
P

Private Lugnutz

Well-known member
Joined
Mar 30, 2012
Messages
30,489
Location
The Authentic Jersey Shore
I just refinished my first civilian box using some of the same methods. The guinea pig was a 9/32-inch Snap-on box. It was completely roached on the outside, and, while there was no rust on the inside, there wasn't much paint remaining except for under the lid. I taped that off, stripped everything else down to bare steel, put two coats of a rattle can industrial satin grey on, and used my "aging" and "distressing" techniques on top of that.

BEFORE: Pics 1, 2, & 3.

AFTER: Pics 4, 5, & 6.
 

Attachments

  • 20190704_112501.jpg
    20190704_112501.jpg
    151.6 KB · Views: 156
  • 20190704_112801.jpg
    20190704_112801.jpg
    70.3 KB · Views: 158
  • 20190704_112717.jpg
    20190704_112717.jpg
    63.1 KB · Views: 165
  • 20190809_213822.jpg
    20190809_213822.jpg
    130.8 KB · Views: 171
  • 20190809_210813.jpg
    20190809_210813.jpg
    153.7 KB · Views: 162
  • 20190809_210436.jpg
    20190809_210436.jpg
    151 KB · Views: 153
Last edited:
To avoid these ads, REGISTER NOW!

d42jeep

Well-known member
Joined
Oct 22, 2014
Messages
16,505
Location
Northern California
Looks good. Here are some unrestored boxes for comparison.
-Don
 

Attachments

  • 244B933D-7946-4F17-93F6-6CF3B8852F43.jpg
    244B933D-7946-4F17-93F6-6CF3B8852F43.jpg
    151.1 KB · Views: 149
OP
P

Private Lugnutz

Well-known member
Joined
Mar 30, 2012
Messages
30,489
Location
The Authentic Jersey Shore
That's what the BEFORE pics of the same unrestored box were for, Don, lol, but thanks. I like how much it looks like your third box there! That's what I'm going for in all my restos - an aged but not too tarnished look.
 

y'sguy

Well-known member
Joined
May 1, 2010
Messages
1,310
Location
Tulsa, Oklahoma
Private Lugnutz, beautiful work on these boxes! I can really appreciate the effort that goes into the preservation of them. I have some Snap-on and Plvmb, that I'm not going to do anything to but keep using them as is. It is important to me that if the previous owner used them, their "fingerprint" of their life still remain if possible.
 
OP
P

Private Lugnutz

Well-known member
Joined
Mar 30, 2012
Messages
30,489
Location
The Authentic Jersey Shore
Thanks, Ganymede.

Thanks Wiseguy, and I agree wholeheartedly. That is always my first instinct. With tools, too. And my preserved boxes outnumber my restored boxes by a ratio of 5 to 1. But there are boxes that are beyond preserving. When a box is so roached that I don't want to put my tools in it or it's so unsightly that it does the tools a disservice, I will restore it. When I do, I prefer the "used but maintained with care" look, mainly because I like the appearance of the box to match the appearance of the tools.

Sometimes it's not an easy decision. In the case of this 9/32-inch drive box, the inside was not bad at all. But I couldn't stand looking at the lid.

Here is another one I am going to restore. The underside of the lid (See Pic 1) is in very good condition, with a good coat of original paint and a nice intact decal (See Pic 2). But the bottom was cancerous with rust, and after de-rusting it has that typical stubborn black box rot scarring (See Pic 3). The top is just rust and flaking paint (See Pic 4). So I will mask off the underside of the lid, and strip and repaint everything else to try to make it match the appearance and condition of the original paint and patina on the underside lid.
 

Attachments

  • 20190809_141109.jpg
    20190809_141109.jpg
    151 KB · Views: 105
  • 20190809_141048.jpg
    20190809_141048.jpg
    148.8 KB · Views: 109
  • 20190809_141850.jpg
    20190809_141850.jpg
    148.1 KB · Views: 114
  • 20190809_141101.jpg
    20190809_141101.jpg
    148.7 KB · Views: 109
Last edited:
OP
P

Private Lugnutz

Well-known member
Joined
Mar 30, 2012
Messages
30,489
Location
The Authentic Jersey Shore
I re-finished a Williams Bantam 5 box today - on commission (where's that danged Van Gogh emoji?!) from another member who shall remain as anonymous as he wants. I'm really pleased with the way it turned out, but if he doesn't like it I will give him his money (for materials only) back.

Here are some BEFORE pics for an idea of what I had to work with. Or you can scroll up one post to see more.
 

Attachments

  • Before 1.1.jpg
    Before 1.1.jpg
    148.9 KB · Views: 91
  • Before 1.2.jpg
    Before 1.2.jpg
    152.8 KB · Views: 87
  • Before 1.3.jpg
    Before 1.3.jpg
    151.3 KB · Views: 95
  • Before 1.4.jpg
    Before 1.4.jpg
    151.4 KB · Views: 101
Last edited:
OP
P

Private Lugnutz

Well-known member
Joined
Mar 30, 2012
Messages
30,489
Location
The Authentic Jersey Shore
I took a high-resolution photograph of the Williams decal on the inside with an iPhone 11 ProMax, pasted it into a PowerPoint file with gridlines that I had set up for the correct size, shrunk it to size, and printed it on a high-resolution printer on regular ply paper. I carefully cut it out with tiny curving Wiss paper snips and then I distressed it where it was distressed in the photo (holes, rubs, etc). When the coat of glossy polyurthane was almost dry but still a little tacky, I placed it on the lid and put another light coat over that. I took the shine down with 0000 steel wool and rubbed it back up a little with wax. The decal got a little darker than I wanted with the last coat, but it is not as red in person as it looks in the photo, and, I have seen exterior decals discolor differently than interior decals, so I am okay with that.
 
Last edited:

r_olson_06

Well-known member
Joined
Feb 12, 2012
Messages
4,076
Location
SD
That is impressive. The attention to detail is impeccable.

Looking for a Plomb 3061 Pebble Open End.
 
OP
P

Private Lugnutz

Well-known member
Joined
Mar 30, 2012
Messages
30,489
Location
The Authentic Jersey Shore
Thanks, Roy. I honestly don't know why I didn't think of this before, focusing only on military boxes previously. I have so many socket boxes with no decals to go back and do now. Westcraft 1/2-drive. NB 3/8-drive. NB midget drive. Duro midget drive.
 

ddawg16

Well-known member
Joined
Jul 11, 2008
Messages
21,005
Location
S. California
Private.....the problem with what you are doing.....no way you are making the money to cover your effort. What you are doing is a passion....not for profit

I need to hook you up with my BIL who is in the war bird business......I bet he could send some business your way.
 
OP
P

Private Lugnutz

Well-known member
Joined
Mar 30, 2012
Messages
30,489
Location
The Authentic Jersey Shore
I appreciate it, John, but I'd probably turn it way. For many years I was making WWII reproduction camouflage nets (authentic 2 x 2 fish netting burnished with burlap Greek key patterns) and I still get emails and PMs for them. It just became too much. One or two now and again for friends will be fine.
 

MR.X

Well-known member
Joined
Dec 13, 2010
Messages
1,792
MATERIALS

- Rustoleum Painter's Touch 2X Ultra Cover 'Gray' Primer 249088
- Krylon Satin Touch 'Italian Olive' 53522 (or a mix of RUSTOLEUM 284986 Satin Eden and RUSTOLEUM 249127 Flat Black)
- Rustoleum Specialty Camouflage 'Deep Forest Green' 621128
- Turpentine
- Rags
- Fine grade 0000 steel wool
- Kiwi shoe polish - black
- Turtle Wax Super Hard Shell Paste Wax

THE PROCESS

I primed with two (2) coats of Rustoleum Painter's Touch 2X Ultra Cover 'Gray' Primer 249088.

First and second coats after primer on the 41-B-1840 was Krylon Satin Touch 'Italian Olive' 53522.

Warning: I don't like Krylon, and this is VERY runny spray paint, but the color is the best I have found for off the shelf. Rustoleum Specialty Camouflage 'Army Green' is just not right, and Rustoleum 'Oregano' is too light.

Alternative: I used a mix of Rustoleum Eden 284986 and Flat Black 249127 on the Plomb 5400. The Eden looks bright, but trust me, Eden is an almost perfect shade of green for WWII, just too bright, so you are basically darkening it with a little black. It's a PITA spray-mixing them in a pan, but I love how close the color came to WWII OD green.

Let dry for at least 48 hours.

For the first layer of techniques, I used Rustoleum Specialty Camouflage 'Deep Forest Green' 621128. This is extremely flat paint. I sprayed it directly into the bottom of a halved plastic milk jug. You won't need a lot. Cut it with a VERY healthy splash of turpentine (probably 50%/50%). You are basically making a stain out of a paint. The turpentine thins the paint being applied and also reacts with the dried top coat of the paint on the box like a "distressing" painterly technique commonly used on a vintage interior house wall. Using a balled up old t-shirt as a rag, I wiped and blotched and dabbed this solution on in flourishes for the appearance I wanted. This is done with a light, quick touch in whatever pattern you want. Results will appear immediately due to the quick drying turpentine. Because it's cut so thin, and you're not coating it on, if you don't like the look in a certain spot, just re-splotch/re-dab it. The result is places that look faded, discolored and worn.

Let dry 24 hrs.

For the Hamilton 41-B-1840, at this point I added a big early war stenciled "2" to the end of the box with white paint, on a brush, by hand.

For the Plomb 5400, at this point I used 0000 fine grade steel wool to remove some paint in some select spots all the way down to the steel, creating natural tool and box
rubbing marks.

For the second layer of techniques, I used Kiwi black shoe polish, rubbing a healthy dab into my hands until they were coated and almost dry to the touch. Then I simply manhandled the boxes in selective places - corners, lid, tray handle, handles, etc, as a mechanic would have handled the boxes with dirty hands over time.

Finally, I rubbed both boxes down by hand with the Turtle Wax paste wax, sealing all the techniques in, then wiped that down again with a dry rag. That left that sort of semi-gloss spec sheen you see on found boxes, somewhere between flat and satin.

That's it.

Again, may not be for everyone's taste, but if you're interested, that is one approach.

interesting subject and impressively unselfish to share techniques.:thumbup:
 

Smokeshow69

Well-known member
Joined
Dec 7, 2012
Messages
8,366
Location
Pacific Northwest
While this is not a “barn find” duplicated tool box, I did create this “barn find” barn door last week! Using similar aging techniques. Wood is new but screws used are truly old
IMG_0151.jpg
IMG_0169.jpg


Looking to buy a craftsman heritage era 10 drawer top chest
 
To avoid these ads, REGISTER NOW!
Top Bottom