To avoid these ads, REGISTER NOW!

Toolbox Refinishing - The "Barn Find" Look

OP
P

Private Lugnutz

Well-known member
Joined
Mar 30, 2012
Messages
30,595
Location
The Authentic Jersey Shore
When I said I would check the 1943 catalog, I wasn't referring to only the 4000W Socketchest page, which I sent you a scan of several weeks ago, I wasn't referring to color at all (you asked about finish, didn't you?), or artwork, I was referring to descriptions.

Descriptions can be very helpful. I have studied all the wartime catalogs extensively, especially from the WPB Limitation Order L-216 perspective, and I am well aware that the frontispiece in the 1943 SK catalog states that the illustrations are from peacetime catalogs. As Don alludes to. Note that it does not say anything about descriptions being peacetime.

Having said that, some of the text, especially parts lists, are also implied to be peacetime artifacts, because items are redlined, marked SUSPENDED at the end of the redline, with footnotes added at the bottom referencing L-216, or, when more convenient than individual redlines, a whole section is just stamped SUSPENDED. Those are all mark-ups, made on top of the original printing.

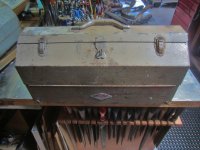
Most of the text is not marked-up. It is not possible to determine if the text describing the many toolboxes is peacetime or original, but I really don't understand how the difference is germane to begin with. I find peacetime catalogs to be very useful for wartime preservation efforts. In many cases there were no changes at all except availability (redundancy was the main goal of L-216, to preserve steel), alternatives to plating, and in the case of boxes, to color. Edit: In some cases, markings on tools.

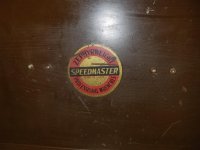
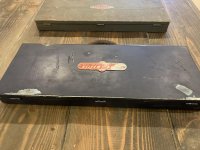
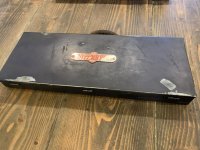
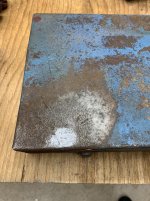
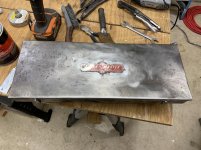
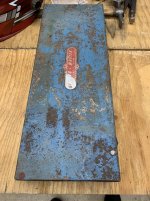
On top of all that suggesting you rethink how much credence you give to the idea of dismissing peacetime artifacts, including artwork, I wasn't aware you knew exactly when your box was made. It had the remains of a logo found on pre-war and wartime boxes, did it not? In my opinion, the 1943 catalog gives collectors good insight into both eras, and I wasn't aware you decided your box would be strictly wartime.

FINDINGS

Unfortunately, unlike Plomb, Snap-on, Blackhawk and other OEMs, SK was less directly forthcoming in the 1943 catalog about stating or implying how much shine their box finishes had.

If you've read the 4000C Socketchest description on the page 13 scan I sent you, you've seen it called a "baked enamel finish." For your information, all the smaller socket set boxes on page 8 through 12 have the same exact description.

The Toolwagon on page 14, 15, and 16 had a "red and black wrinkle finish."

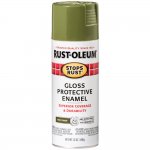
The larger Socketchest (4010C) on page 17 had an "attractive green baked enamel" finish, as did the heavy duty machinists' chests on page 20.

The Carb-O-Mang boxes on page 24 were "finished in Crystalline."

My read?

If it was originally shiny, it might say Crystalline. If it was originally wrinkled, it would say wrinkled. (I'm not even sure it's possible to bake on an enamel finish with wrinkles.)

I would probably use semi-gloss. I have even used matte and brought the shine up with polish rather than dulling down an overly glossy finish.

But just my $.02.
 
Last edited:
To avoid these ads, REGISTER NOW!

Mintgrun

Well-known member
Joined
Oct 7, 2015
Messages
2,133
Location
Kingston, Wa.
"(I'm not even sure it's possible to bake on an enamel finish with wrinkles.)"

The instructions on the VHT Wrinkle-Plus paint include baking it for an hour at 200 degrees. That makes a world of difference in how quickly it fully cures.


I don't know when this S-K box was made, but it must have been later than Don's, based on the metal handle. Was there a specific cut off date for the leather handles?

IMG_3757.jpg

IMG_3756.jpg


The color suggests that it served in a desert war ; ) ... or had an owner that wanted it to match his Powr-Kraft box.

Happy Veterans' Day

Tom
 

Farmer J.

Well-known member
Joined
Sep 18, 2016
Messages
1,995
Location
UK, Cornwall/Hertfordshire.
I hope these pics help.
Don and Lugz refer to a 'semi gloss' and 'low gloss' finish paint.
This ammo box was painted with some genuine army surplus paint in the mid 1980's. Yes, we did stir the can!
A friend of mine was painting his FFR Land Rover in my yard and bought paint from a surplus dealer we used to use quite a bit. The cans were old then but well sealed. After he finished his Land Rover there was paint left in my spray gun so I used it to smarten up this ammo box I use for document storage.
It has a lovely semi gloss finish (as did the Land Rover), and I always have liked the look of it. Just enough to reflect objects but not too shiny.
Before I painted it the box had a lot of rust and '6 IN HOW.' written on it, but not good enough to preserve.
 

Attachments

  • DSC05104.jpg
    DSC05104.jpg
    92.4 KB · Views: 33
  • DSC05103.jpg
    DSC05103.jpg
    75.1 KB · Views: 31
  • DSC05101.jpg
    DSC05101.jpg
    107.5 KB · Views: 35
  • DSC05100.jpg
    DSC05100.jpg
    95.4 KB · Views: 27

d42jeep

Well-known member
Joined
Oct 22, 2014
Messages
16,553
Location
Northern California
"(I'm not even sure it's possible to bake on an enamel finish with wrinkles.)"

The instructions on the VHT Wrinkle-Plus paint include baking it for an hour at 200 degrees. That makes a world of difference in how quickly it fully cures.


I don't know when this S-K box was made, but it must have been later than Don's, based on the metal handle. Was there a specific cut off date for the leather handles?

IMG_3757.jpg

IMG_3756.jpg


The color suggests that it served in a desert war ; ) ... or had an owner that wanted it to match his Powr-Kraft box.

Happy Veterans' Day

Tom

The metal tag on your box indicates that it is postwar but probably before mid ‘50s. My opinion is that 1943 was the last year for the S-K leather handles. I have boxes with the water transfer decals and metal handles which I assume were made in ‘44 or ‘45.
-Don
 

d42jeep

Well-known member
Joined
Oct 22, 2014
Messages
16,553
Location
Northern California
Here are wartime S-K boxes with metal handles.
-Don
 

Attachments

  • C0F9BC1E-7B78-4A8F-9261-BBCA1CF9DBA0.jpg
    C0F9BC1E-7B78-4A8F-9261-BBCA1CF9DBA0.jpg
    115.4 KB · Views: 25
  • 1EAF9DE4-6E75-40E4-B955-A0AF68C048DB.jpg
    1EAF9DE4-6E75-40E4-B955-A0AF68C048DB.jpg
    83.7 KB · Views: 22
  • 38D8D69B-5294-49B2-A6A3-FA68E80B8E00.jpg
    38D8D69B-5294-49B2-A6A3-FA68E80B8E00.jpg
    149.4 KB · Views: 25
  • 221520D4-857E-4787-A9ED-5857EB799F24.jpg
    221520D4-857E-4787-A9ED-5857EB799F24.jpg
    146.7 KB · Views: 27
Last edited:
OP
P

Private Lugnutz

Well-known member
Joined
Mar 30, 2012
Messages
30,595
Location
The Authentic Jersey Shore
The instructions on the VHT Wrinkle-Plus paint include baking it for an hour at 200 degrees. That makes a world of difference in how quickly it fully cures.
Thanks, Tom. I black japanned a Billings adjustable a few years ago and it involved baking. I am wondering what the vintage process was, though if any, to produce a wrinkle. We may not know enough about these materials and processes to interpret the verbiage in catalogs. I know I am not very well read on the subject. And they all used different verbiage. Is there a difference between wrinkle, crinkle and crackle? Or just semantics? I have seen all three. I went through this when I was re-doing a Blackhawk box several years ago. And I have some boxes that I wouldn't call either of those, more like pimpled. Thousands of tiny tightly grouped bumps. I am starting to think these were all just various forms of a textured finish, all baked enamel. As opposed to a smooth finish, which may also be baked enamel.

EDIT: But, I am not inclined to believe SK's language was haphazard. If they described one box as Wrinkle, and another as Crystalline, and the others as Baked Enamel, neither Wrinkle, or Crystalline, I am inclined to believe it was intentional until we learn more, and that the Baked Enamel boxes would not be Wrinkled or Crystalline. That was my main point.
 
Last edited:

ALLFAST

Well-known member
Joined
Feb 20, 2017
Messages
1,233
Location
Northern California
Hello Lugz,

I mistakingly replied to this thread (and your excellent, lengthy PhD level well thought out reply) over on the SK thread, so I Thank you again. Also my apologies ,because you clearly address my question of toolbox gloss in the very opening of THIS thread: Semi Gloss it is !

So I explain my lessons learned over on SK. Points all taken with much respect. Lugz, I'm now leaning heavily to doing the 4000C like your K21. It's the most appropriate look I feel,at this time. I am thinking to derust ,and top coat with my favorite primer of all time (I practically use it for deodorant! ) ,Duplicolor Self Etching Zinc Green aerosol. Let that sit 24 hours, and then use your stain process.

As I have the perfect color, but in a liquid oil base form, will I simply just "thin " it to a stain like consistency and not mess with color modification ? Just thin it with a compatible product and go? I should probably play it by ear and go patienly layer by layer and see what the box tells me as the layering progresses. It's probably the safest path. What are your thoughts on me using a primer in this case, as the ACE paint is a DTM item, but IIRC, can be put on top of primer as well. .

Stay safe, Happy tool hunting!

Shawn
 
OP
P

Private Lugnutz

Well-known member
Joined
Mar 30, 2012
Messages
30,595
Location
The Authentic Jersey Shore
Shawn,

I'm confused by your questions. Between the toolboxes thread, the SK thread, and this thread, I may have lost the bead on what you're doing to your box, so I'll just repeat my understanding, which you can correct if I am wrong.

- The exterior finish is basically gone. Little to no original paint remaining.
- The interior finish is basically a nice case of well-preserved original finish with lots of olive paint remaining, with some worn spots, that overall just needed some cleaning (grime, etc) and light de-rusting.
- The tray finish is basically in the same condition as the interior of the box with maybe a little less paint, which is typical, due to more wear.

And, I thought you were going to leave the interior alone and re-paint the exterior with the custom mix you were very happy with. Not sure what you mean by "liquid oil base." In a can? Not a rattle can?

If you want to cover the bare steel areas on the interior, and you're confident in your paint match for the exterior, just touch-up those interior spots with the same paint you're using on the exterior. If after fully drying the two colors aren't as exactly matching as you would like, and those spots look touched up, you can use a rag and thinner to variegate the boundaries, diminishing the noticeability of the differences in the two hues.

If you're not confident enough in the match to even try touching up those spots, then yes, I might thin it and just wipe it on to build up those areas just a little. But keep in mind that the stain may start to interact with the remaining original paint. You are in essence creating a new finish that is blending the original paint with the new paint.

As for the exterior, I don't know anything about the primer you're using. I have only primed one box before painting, and it was completely stripped with a bead blaster.
 

ALLFAST

Well-known member
Joined
Feb 20, 2017
Messages
1,233
Location
Northern California
Hello Lugz,
Yes, not touching the interior or tray whatsoever, just cleaning and wax at this point. I will eventually have my expert paint matching Daughter custom blend and touch up any bad spots inside.

The exterior I want to do as you did on the K21, But my box has 80 percent less nice paint left as the K21. I will go with your suggested primer and consult my ACE man for making a stain. I don't know that trying to redo a wrinkle exterior finish will look very proper (and top coating with a nice paint job)because the interior wrinkle is very much flattend down with age. Off to the laboratory !!

As always ,thanks for your time,

Shawn
 
OP
P

Private Lugnutz

Well-known member
Joined
Mar 30, 2012
Messages
30,595
Location
The Authentic Jersey Shore
The exterior I want to do as you did on the K21, But my box has 80 percent less nice paint left as the K21.
Aha! Now I got it!

Have you seen my first two or three boxes on this thread? Or what Smoke did to his PLOMB tray a few pages ago? I think you have to completely re-paint your box exterior, and then, if you want it to look like you didn't just re-paint it, distress and age it with those techniques. Not what I did to my K-21. What I did to the earlier boxes. You have way too much bare steel to just stain the outside of your box.
 

ALLFAST

Well-known member
Joined
Feb 20, 2017
Messages
1,233
Location
Northern California
Now we are cooking with gas !! That's exactly what I'm looking to do,although I must say your green K21 is remarkable in how old and well preserved you made it appear.
I'll study those threads and get a game plan going.

Thank you Lugz.....Carry On !

Warmest Regards, Shawn
 

ALLFAST

Well-known member
Joined
Feb 20, 2017
Messages
1,233
Location
Northern California
That's what I needed guidance on is having all the bare steel, recoating, and then craftily distressing that ! My hat is off to you again Lugz!
 

ALLFAST

Well-known member
Joined
Feb 20, 2017
Messages
1,233
Location
Northern California
Don,

What are your feelings about the hasp style in the two photos of your's and Mintgrun's' boxes ? I refer to this as the dog tongue hasp shape, as it is distinctively contoured,as opposed to straight.

I've noticed the dog tongue hasp mostly on SK boxes with the riveted orange red SK diamond exterior badge.I thought that particular badge was postwar. I have seen very few curved hasps on early boxes (with leather handles, water transfer SK interior emblems).

Is it simply a matter of the SK boxes receiving whatever style hasps were provided during the various production runs of the boxes? What is your experience in the trenches with respect to curved vs straight stye hasps, and pre, wartime, post wartime toolbox assignment ?

Shawn
 
Last edited:

d42jeep

Well-known member
Joined
Oct 22, 2014
Messages
16,553
Location
Northern California
Don,

What are your feelings about the hasp style in the two photos of your's and Mintgrun's' boxes ? I refer to this as the dog tongue hasp shape, as it is distinctively contoured,as opposed to straight.

I've noticed the dog tongue hasp mostly on SK boxes with the riveted orange red SK diamond exterior badge.I thought that particular badge was postwar. I have seen very few curved hasps on early boxes (with leather handles, water transfer SK interior emblems).

Is it simply a matter of the SK boxes receiving whatever style hasps were provided during the various production runs of the boxes? What is your experience in the trenches with respect to curved vs straight stye hasps, and pre, wartime, post wartime toolbox assignment ?

Shawn

Mintgrun’s box with the riveted on label is postwar. My box has the brown finish and the water transfer which indicates to me that it was probably made in ‘44 or ‘45. The ‘43 catalog calls for a leather handle. My S-K carry box and my Brazil carry box are similar except for the handles and hasps. The paint style is the same. They probably changed the hasps at the same time they transitioned to metal handles then continued with the hasps postwar. In the second picture the upper two boxes are postwar with riveted labels. The box in the first picture is on the bottom. You can make out the paint difference if you look carefully.
-Don
 

Attachments

  • 5494FD72-09A0-4F82-A360-97ED93593A1E.jpg
    5494FD72-09A0-4F82-A360-97ED93593A1E.jpg
    148.1 KB · Views: 18
  • CCCBCBC3-439D-4012-A1DB-2927FD5EA3D7.jpg
    CCCBCBC3-439D-4012-A1DB-2927FD5EA3D7.jpg
    116.4 KB · Views: 22

ALLFAST

Well-known member
Joined
Feb 20, 2017
Messages
1,233
Location
Northern California
Yes, I see that. Good points as always from you ! Don, you might look into gentting some Rustoleum Textured Stops Rust Aerosol Enamel. I just happened upon this line about 4 days ago. They have many colors, in flat, gloss and metallic. Most notable is a deep forest green and a rich ,nearly vintage SK/Kennedy like brown hue. I want to see what the texture is like, for toolbox finishes.

I'll be ordering some deep forest green and seeing how well it takes to be painted over with Signal Corp aerosol and the ACE enamel brush on. Now that it's full on cold at home I'll be painting at work in the comfort of our large 65 degree shop, during downtime bertween my watches..

Thanks again for the 3/4 socket alert !

Have a pleasant evening,

Shawn
 

ALLFAST

Well-known member
Joined
Feb 20, 2017
Messages
1,233
Location
Northern California
They also have an gloss army green,to be exact ! They call the brown , Autumn Brown. It looks promising as a good match to vintage toolbox brown.

I've used this Rustoleum Stop Rust Aerosol quite alot and it's an outstanding product.
 

Attachments

  • Screenshot_2020-11-13-19-12-44.jpg
    Screenshot_2020-11-13-19-12-44.jpg
    20.4 KB · Views: 24
  • Screenshot_2020-11-13-19-14-13.jpg
    Screenshot_2020-11-13-19-14-13.jpg
    18.5 KB · Views: 22
  • army-green-rust-oleum-stops-rust-general-purpose-spray-paint-214087-c3_1000.jpg
    army-green-rust-oleum-stops-rust-general-purpose-spray-paint-214087-c3_1000.jpg
    53.8 KB · Views: 22

Smokeshow69

Well-known member
Joined
Dec 7, 2012
Messages
8,383
Location
Pacific Northwest
Hey Lugz, I am wondering if you or anyone else has had any luck with creating surface rust on any of your boxes ? I have watched a few videos online but they all recommend vinegar or muriatic acid which i believe will strip the paint... i just want some of my scratches on a Speedmaster carry box i am working on to have some surface rust...any suggestions ? Also, does anyone have a leather carry handle for sale, like the one lugz recovered up thread ? My box is missing one and i need some help locating one.
 
OP
P

Private Lugnutz

Well-known member
Joined
Mar 30, 2012
Messages
30,595
Location
The Authentic Jersey Shore
i just want some of my scratches on a Speedmaster carry box i am working on to have some surface rust...any suggestions ?
Why not just leave it outside through a damp or wet spell? I don't go that far on purpose with the aged/worn look, but I have inadvertently left boxes outside that I am cleaning, and they always get rusty overnight. Seriously.

Another solution that will promote rust almost immediately is toilet bowl cleaner. But not the Green Eco friendly kind. The old blue kind. It is typically only 10% or less HCL, so far less harsh than muriatic acid. Before Evaporust I used to use it quite a bit for de-rusting, and if you don't wipe it off a steel surface immediately with water, followed by oil, it will immediately fuzz it up with rust.

My only other recommendation is to Google around for ratrod techniques sites. Those guy rust their cars up on purpose and then clearcoat it.

Smokeshow said:
Also, does anyone have a leather carry handle for sale, like the one lugz recovered up thread ? My box is missing one and i need some help locating one.
I have a couple on hand that I cannibalized off junk boxes. One of these came off a Snap-on 3/4-drive box and the other off a wartime armorers' type box. Both of them are rough. I was probably going to re-clad them when I had the need. You may like them as is. I would let one go for a man in need. Better measure yours, though. From clip to clip on the box, I mean. These are not all the same.
 

Attachments

  • 20210110_170216.jpg
    20210110_170216.jpg
    150.6 KB · Views: 17
To avoid these ads, REGISTER NOW!

Smokeshow69

Well-known member
Joined
Dec 7, 2012
Messages
8,383
Location
Pacific Northwest
Why not just leave it outside through a damp or wet spell? I don't go that far on purpose with the aged/worn look, but I have inadvertently left boxes outside that I am cleaning, and they always get rusty overnight. Seriously.

Another solution that will promote rust almost immediately is toilet bowl cleaner. But not the Green Eco friendly kind. The old blue kind. It is typically only 10% or less HCL, so far less harsh than muriatic acid. Before Evaporust I used to use it quite a bit for de-rusting, and if you don't wipe it off a steel surface immediately with water, followed by oil, it will immediately fuzz it up with rust.

My only other recommendation is to Google around for ratrod techniques sites. Those guy rust their cars up on purpose and then clearcoat it.


I have a couple on hand that I cannibalized off junk boxes. One of these came off a Snap-on 3/4-drive box and the other off a wartime armorers' type box. Both of them are rough. I was probably going to re-clad them when I had the need. You may like them as is. I would let one go for a man in need. Better measure yours, though. From clip to clip on the box, I mean. These are not all the same.

Funny you should mention leaving it outside... i live in a damp environment and have the box sitting outside with towels on it to keep the moisture on it. it has been raining a bit so it should hopefully work on the areas that is scraped. I measured my box and in the center of one set of holes to the next center is 5".
 
OP
P

Private Lugnutz

Well-known member
Joined
Mar 30, 2012
Messages
30,595
Location
The Authentic Jersey Shore
I measured my box and in the center of one set of holes to the next center is 5".
Sorry to say that neither of these (at 5-3/4" and 6") will work for you, Smoke. That must be a smaller box. My Precision-Bilt box has a 5" handle. All my larger vintage carry boxes have larger handles.
 

Attachments

  • 20210122_144055.jpg
    20210122_144055.jpg
    149.5 KB · Views: 15
  • 20210122_144423.jpg
    20210122_144423.jpg
    118.5 KB · Views: 17
OP
P

Private Lugnutz

Well-known member
Joined
Mar 30, 2012
Messages
30,595
Location
The Authentic Jersey Shore
All my larger vintage carry boxes have larger handles.
Scratch that. I got curious. I don't know what year your Speedmaster box is, but mine (40's, OEM Wright set) also has the smaller handle. And it's not a smaller box. It's a big fat whoppin' master wrench set in a box with a drop front and a pull out drawer inside. I guess the moral of the story is that MW thought it 'wasn't the size of the handle in the fight, but the size of the fight in the handle'. :)
 

Attachments

  • 20210122_145630.jpg
    20210122_145630.jpg
    130.6 KB · Views: 14
  • 20210122_145611.jpg
    20210122_145611.jpg
    146.5 KB · Views: 14
  • 20210122_145558.jpg
    20210122_145558.jpg
    147 KB · Views: 19

Smokeshow69

Well-known member
Joined
Dec 7, 2012
Messages
8,383
Location
Pacific Northwest
Why not just leave it outside through a damp or wet spell? I don't go that far on purpose with the aged/worn look, but I have inadvertently left boxes outside that I am cleaning, and they always get rusty overnight. Seriously.

Another solution that will promote rust almost immediately is toilet bowl cleaner. But not the Green Eco friendly kind. The old blue kind. It is typically only 10% or less HCL, so far less harsh than muriatic acid. Before Evaporust I used to use it quite a bit for de-rusting, and if you don't wipe it off a steel surface immediately with water, followed by oil, it will immediately fuzz it up with rust.

My only other recommendation is to Google around for ratrod techniques sites. Those guy rust their cars up on purpose and then clearcoat it.


I have a couple on hand that I cannibalized off junk boxes. One of these came off a Snap-on 3/4-drive box and the other off a wartime armorers' type box. Both of them are rough. I was probably going to re-clad them when I had the need. You may like them as is. I would let one go for a man in need. Better measure yours, though. From clip to clip on the box, I mean. These are not all the same.

Sorry to say that neither of these (at 5-3/4" and 6") will work for you, Smoke. That must be a smaller box. My Precision-Bilt box has a 5" handle. All my larger vintage carry boxes have larger handles.

Well shoot, those big handles wont work. I just measured my craftsman heritage carry box that is the same dimensions and it has the same size handle holes of 5" on center....I appreciate you trying!
 

JoCoSawdust

Well-known member
Joined
Nov 19, 2018
Messages
2,416
Location
Eastern NC
Since you're missing the brackets that screw into the box to hold the handle, I think you're going to have to find a donor box Smokes. I'll keep my eyes peeled on my end here. Don't be too picky about the condition of the leather. As long as the paper (or whatever the hell it is) form for it is in decent shape, it can be recovered with new (or old for that matter) leather.
 

Packard V8

Well-known member
Joined
Mar 16, 2009
Messages
7,380
Location
Spokane, WA
THE BOXES

BOX # 1 is a Hamilton 41-B-1840

ORD6SNLG2710010.jpg


This toolbox was very commonly used in WWII for all kinds of tool-sets, including machinists, welders, painters, upholsterers, etc, and of course general mechanics. While all of them had access to unit level equipment, this was their carry box. Just over a 157,000 of these were shipped to the ETO alone between 1942 and 1945.
I'm late to the party with this recollection, but these boxes were still in USAREUR depots as late as 1969. As the statute of limitations has long expired, I can confess to being a party to misappropriation of US Army property,

I was at the Pirmasens Army Depot in Germany and had a friend who was the Supply Officer. I mentioned I needed some tools which the PX didn't carry. He said, "The Army is drawing down here and in the underground storage, we have ten times the supplies we'll ever use; he gave me one of those boxes with a padlock on the handles. We cut off the lock and inside was a general mechanics set, but made up from thirty years of army flotsom and jetsom. There were P&C, Thorsen, Proto, Plomb, Plumb, New Britain, Crescent, Blackhawk; most every USA brand of the era.

jack vines
 
Last edited:
OP
P

Private Lugnutz

Well-known member
Joined
Mar 30, 2012
Messages
30,595
Location
The Authentic Jersey Shore
I'm late to the party with this recollection, but these boxes were still in USAREUR depots as late as 1969.

I was at the Pirmasens Army Depot in Germany and had a friend who was the Supply Officer. I mentioned I needed some tools which the PX didn't carry. He gave me one of those boxes with a padlock on the handles. We cut off the lock and inside was a general mechanics set, but made up from thirty years of army flotsom and jetsom. There were P&C, Thorsen, Proto, Plomb, Plumb, New Britain, Crescent; most every USA brand of the era.
Where's that danged Time Machine when you need it?! :lol:

The tools inside didn't change too much, either, by the way. The GMTK was pretty much the same in the 1980's (see Pics 1 & 2 for the GMTK tool layouts I have in the Lugzsonian from that era) and it was still issued in a metal box. I don't think the Army went to the injection molded plastic Pelican case on wheels until the 90's.
 

Attachments

  • GMTK Outline green.jpg
    GMTK Outline green.jpg
    127.5 KB · Views: 26
  • GMTK Outline white.jpg
    GMTK Outline white.jpg
    157.8 KB · Views: 33

Smokeshow69

Well-known member
Joined
Dec 7, 2012
Messages
8,383
Location
Pacific Northwest
Since you're missing the brackets that screw into the box to hold the handle, I think you're going to have to find a donor box Smokes. I'll keep my eyes peeled on my end here. Don't be too picky about the condition of the leather. As long as the paper (or whatever the hell it is) form for it is in decent shape, it can be recovered with new (or old for that matter) leather.

Thats what I was kinda anticipating... I know i could fabricate them but it would be a lot easier to just swap from a roached out box
 
OP
P

Private Lugnutz

Well-known member
Joined
Mar 30, 2012
Messages
30,595
Location
The Authentic Jersey Shore
Sometimes they're riveted, so you can only scavenge the handle and swinging clips. I have the brackets and screws that go with those handles, but I'm not going to separate them. You'll run into a scrap box eventually. But the next one I find that's small is yours if I run into one first, Smoke.
 

Smokeshow69

Well-known member
Joined
Dec 7, 2012
Messages
8,383
Location
Pacific Northwest
Sometimes they're riveted, so you can only scavenge the handle and swinging clips. I have the brackets and screws that go with those handles, but I'm not going to separate them. You'll run into a scrap box eventually. But the next one I find that's small is yours if I run into one first, Smoke.

That sounds great Lugz. I totally understand you not wanting to separate the hardware. I wouldn't either
 

Marvin Hagen

Well-known member
Joined
Oct 9, 2015
Messages
54
Location
Beckemeyer IL
Sometime around 2004 the USAR unit I was in the we turned in our GMTK which were two boxes of tools one box standard and the second box was metric and received the green pelican this was great a toolbox on wheels pull the handle out and take it out to whatever you were working on but the wheels didn't last long but almost everything in it was SK then around 2015 we were supposed to turn them in ad receive the new boxes everything in the box was Armstrong the Pelican box came with extra wheels.
 

Smokeshow69

Well-known member
Joined
Dec 7, 2012
Messages
8,383
Location
Pacific Northwest
Well I have another addition to this thread... I am not completley finished with this carry box as i need to swap over the working hasps from my donor box but the majority of the work is completed.I started out with a pretty rough box set that I traded Jocosawdust for. This 1/2 drive speedmaster set was made by Penens a Plomb subsidiary. I am missing both extenions, hinge handle and a few sockets and the T bar so if anyone has any of these pieces , I am all ears...

I stripped the entire out side, had to weld up a rivet hole, rewelded a hinge and the speed handle hasp. I painted it, and distressed it per Lugz techniques by making the turpentine stain and then also sanding the edges and making some scratches on the paint. I used another craftsman carry box with original paint and real wear to model this carry box after. I also left it outside after i painted it so that it would get wet and start to get some surface rust on the sanded/worn edges
 

Attachments

  • IMG-2291.jpg
    IMG-2291.jpg
    147.8 KB · Views: 36
  • IMG-2289.jpg
    IMG-2289.jpg
    151.3 KB · Views: 38
  • IMG-2288.jpg
    IMG-2288.jpg
    156 KB · Views: 39
  • IMG-2287.jpg
    IMG-2287.jpg
    148.6 KB · Views: 39
  • IMG-2286.jpg
    IMG-2286.jpg
    151.9 KB · Views: 42
  • IMG-2285.jpg
    IMG-2285.jpg
    152.8 KB · Views: 44

Smokeshow69

Well-known member
Joined
Dec 7, 2012
Messages
8,383
Location
Pacific Northwest
Here is a few before pictures.... this set was filthy, had a broken hinge and also had a rivet hole I filled in and also had to fill in some pitting from some bad surface rust. I probably wouldn't have put this much effort/time into such a rough box if it wasn't somewhat uncommon.
 

Attachments

  • IMG-2168.jpg
    IMG-2168.jpg
    147.6 KB · Views: 39
  • IMG-2165.jpg
    IMG-2165.jpg
    99.3 KB · Views: 36
  • 63261487350--975AE8FF-5CAC-4D28-9B2B-00D804C8B4AA.jpg
    63261487350--975AE8FF-5CAC-4D28-9B2B-00D804C8B4AA.jpg
    151.3 KB · Views: 34
  • IMG-2167.jpg
    IMG-2167.jpg
    147.4 KB · Views: 35
OP
P

Private Lugnutz

Well-known member
Joined
Mar 30, 2012
Messages
30,595
Location
The Authentic Jersey Shore
There was just a little too little original paint left on the inside of this Plomb midget box I got from Catfishdan in a trade recently (tools are mine...)...

20210719_124544.jpg

...and none whatsoever to speak of on the outside.

20210719_124508.jpg

But you all know how I feel about new paint jobs on old tool boxes, so I barnfinded it! :pimpflash

20210726_105629.jpg

20210726_105351.jpg

20210726_105616.jpg
 
To avoid these ads, REGISTER NOW!
Top Bottom