To avoid these ads, REGISTER NOW!

Shop Makeover - TRUSS Modification, In-Ground Lift, Recessed Lights, Hellfire

justnutsandbolts

Well-known member
Joined
Jun 9, 2015
Messages
58
Location
NJ
Background:
Moved in about 5 years ago. Before I moved in, the house had been sitting for about 2.5 years after the owners passed. Having only been employed for only 6 years with limited funds, my budget was $250k and that does not get you much in NJ, near Philadelphia. The detached garage which I now call my “shop” was not on the listing, so I was very happy to see it when I arrived for a walk through, I put the offer in the same evening.

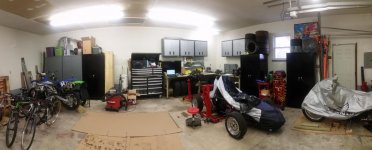
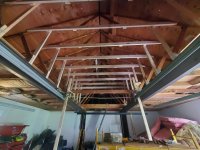
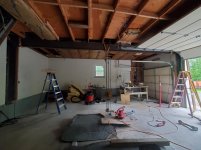
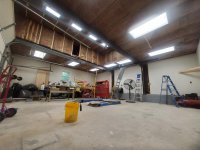
The shop is a 30x28 frame, 10ft ceilings, built in 1985. I honestly hate the layout with the tiny 8' wide doors but that's what I have. For all the available space, they could have built a 40x40 or 40x50. If you park a car on the side bays, you cannot swing the doors open all the way, if I put cabinets along side walls. I now have ideas for my next shop.

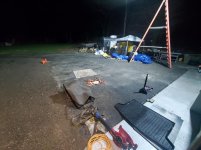
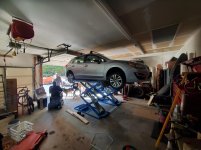
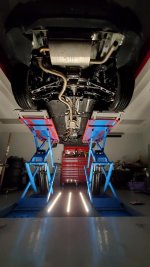
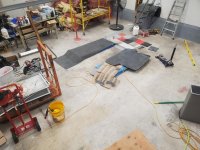
Anyway, I bought a scissor lift about 2 years ago. The purchase of this lift and the hassle of only being able to use it at 1/2 lift height at 10' ceiling height and prior rainwater damage eventually led to the my Shop Makeover.

attachment.php

attachment.php

attachment.php
 

Attachments

  • 20170211_140331.jpg
    20170211_140331.jpg
    107.3 KB · Views: 821
  • 20170124_181835.jpg
    20170124_181835.jpg
    148.9 KB · Views: 105
  • 20200420_115812.jpg
    20200420_115812.jpg
    76.3 KB · Views: 104
  • 20191019_144740.jpg
    20191019_144740.jpg
    147.6 KB · Views: 820
  • Capture.jpg
    Capture.jpg
    145.8 KB · Views: 809
To avoid these ads, REGISTER NOW!
OP
J

justnutsandbolts

Well-known member
Joined
Jun 9, 2015
Messages
58
Location
NJ
Truss Modification:
Disclaimer: I am not a structural engineer.

The shop had Fink type trusses. There were a few ways to modify the trusses, including this one:
I eventually decided to put in 2 steel beams front to rear. I don’t have a stamped drawing, but the calculations were done by 3 engineers. I ran it by 2 PE friends who were clueless on how to go about this because they have only worked on bridge projects. According to the calculations, the roof live load came out to be ~40 psf (code for where I live is 25 psf) while lifting a 4,000 lbs load in the center. The beams are W12 x 19# x 25' 11” and the posts are hidden inside the walls which are 3 X 3 X 1/4 SQ TUBE 10' .250 WALL sitting on 3/8” x 6 x 8 steel plates which are anchored to the cinder blocks. I lifted the beams in place with a manual hoist. They were notched at the ends to fit under the header and boxed to provide more strength.
 

Attachments

  • 20200509_181714.jpg
    20200509_181714.jpg
    149.6 KB · Views: 216
  • 20200509_181721.jpg
    20200509_181721.jpg
    131.7 KB · Views: 216
  • 20200523_150612.jpg
    20200523_150612.jpg
    151.8 KB · Views: 236
  • 20200508_174015.jpg
    20200508_174015.jpg
    147.2 KB · Views: 221
  • 20200521_170400.jpg
    20200521_170400.jpg
    146.9 KB · Views: 220
  • 20200509_181945.jpg
    20200509_181945.jpg
    119.2 KB · Views: 205
  • 20200523_121638.jpg
    20200523_121638.jpg
    147.8 KB · Views: 209
Last edited:
OP
J

justnutsandbolts

Well-known member
Joined
Jun 9, 2015
Messages
58
Location
NJ
Lights

This took the longest to decide and plan. I read many threads on the Lighting section in this forum and a lot of posts by the user “Platonic Solid”. I wanted to do recessed lights and I did not like the recommended surface mounted fixtures even though they output the brightest light with the frosted LED T8 Bulbs. My initial plan was to use the 6” round recess lights and for the amount of foot-candles I would need at 30” workbench level, I would have to install somewhere about 140 of them. I used DIALUX software to run the simulations.
I then ran into a few youtube videos on modifying fluorescent troffers to accept LED bulbs. Seeing that each fluorescent fixture (not integrated LED) is about $60 new at the stores and since I needed 12 units so I would have to spend over $700 + tax on just the fixtures. FB marketplace to the rescue, I scored 40+ fixtures for free, kept 20 and gave away the rest. They were not in great shape but since I was going to recess them and paint over the frames, I did not care. Framing them in and modifying them took a long time but at the end, it was all worth it. Lighting in the shop is just simply amazing. I added some additional lighting under my workbench area, but I doubt I will need them.


Framing & Sheetrock & Insulation:

This is my first time framing a ceiling and walls. I used strings and 10' levels to align everything. I tied the remaining bottom chord to the beams with Spax Screws and tied the upper framing with 5/16-18 X 5" Carriage bolts and wood glue. I left the 3 trusses as-is in the back side for attic access. The hood of trucks and cars clear the lower part of the ceiling with the lift at the hightest position. I can fit a Ford Crewcab, 8ft bed truck inside and lift it all the way up (kind of scary looking but I balance the truck with 1,500 lbs jacks so it does not rock on the lift. I still have storage above the side bays but I will hardly store anything up there..
I calculated about $1100 for the new insulation on the ceiling and some parts of the open walls. Mice have eaten a good portion of it over the 30 years and I think this was the nastiest part of the project with feces falling down on me during the demo. I had to wear more protection than just a mask and glasses. Browsing FB Marketplace one day, I ran into a contractor’s post who was removing R19 fiber glass insulation from a gym ceiling. I scored a 6x12 trailer packed full of insulation for free. Another guy took 3x as much for his new shop. Worst part was that insulation took about a full bay space as I finished framing. I double stacked most of the attic space achieving somewhere around R30 and had enough left over to lay over the attic in the house..so much insulation! Doing all this during hot and humid days of NJ summer is something I do not recommend doing. It might be my first and last insulation project at this scale.
When i was framing the "pocket" in the mid bay, I did not think ahead of sheetrocking the new walls and went to 50” above the beams for the opening. I could have gone 2” less and just line up the 4x8 sheetrock easily without having to cut & spackle 2 pieces…oh well. I put one sheetrock up myself which took about 40 minutes with a harborfreight sheetrock lift that only goes up ~12'. After that one piece, I cursed, re-evaluated the cost vs time and went onto FB marketplace again to look for contractors. I got a $1100 labor only quote to hang&spackle new and skimcoat existing walls which was a smoking deal. They took 3 days to finish the job.
 

Attachments

  • 20200714_102158.jpg
    20200714_102158.jpg
    88.1 KB · Views: 237
  • 20200709_150127.jpg
    20200709_150127.jpg
    143.1 KB · Views: 209
  • 20200517_140934.jpg
    20200517_140934.jpg
    152.3 KB · Views: 202
  • 20200616_090116.jpg
    20200616_090116.jpg
    136.1 KB · Views: 234
  • 20200618_131254.jpg
    20200618_131254.jpg
    152.8 KB · Views: 215
  • Troffer - 1.jpg
    Troffer - 1.jpg
    86 KB · Views: 228
Last edited:
OP
J

justnutsandbolts

Well-known member
Joined
Jun 9, 2015
Messages
58
Location
NJ
Hellfire

Maybe this took longer to decide due to immense differences in cost and durability claims.
I use this shop for working on cars, motorcycles, mini excavators, tractor...etc therefore I ruled out the plastic stuff and epoxy.

If the cost was not a factor, I would have really liked to lay down PEI 5 tile.
The cheapest overall cost would have been around $6250 for my 675 sqft shop (omitting the lift pad - 2250 for tile, 2500 for labor, 1500 for prep and materials). I got so many samples, visited many stores and got install quotes. I even bought PEI 4 tile and later decided not to go pick it up from Lowe’s due to the glazed surface. Comparing to the PEI tile samples I got later, I am glad I returned them.

I then got some 1-Day Polyurea, Epoxy and Polyaspartic install quotes. I really liked one Polyurea contractor Mike and his company Grasso Services that uses Citadel brand coating (owned by Rustoleum) but his bottom price was $4000 (not including the pit).

I later decided to go with Hellfire and had Mike just prep the floors for $1300 including the front apron and my attached home garage. 1300 would have been his lowest to come out to my place, he agreed to do the ~1000 sqft.

I really like the Legacy Industrial as a company and how responsive Scotty was with all questions on here and phone calls.

Since this is a DIY heavy product on GarageJournal, I do wish that for DIY people there were more cautions and instructions available on prep. There really is not much media available. I obtained most of the info from here.

My concrete condition was extremely poor. I have thousands of pinholes throughout which I did not quite realize until after the first coat went down. I had used 2 part bondo to cover all the larger holes. After I applied the first thin coat, I tried to fill the small pinholes with pressing a little harder but that did not help. Although not recommended, I should have went over the whole floor to fill in all the holes but may have needed to sand it all again. In total I applied 4 color coats and 2 clear coats. I started at 4PM in the afternoon and was able to get 2-3 hr of sleep in between coats after the 4th coat and finished the last clear coat around 8AM in the morning. Even though I applied so many coats, I can still see the roller marks even though I lightly rolled the entire 26’ distance after each 3’ wide application. I am OK with the final results but because I could not fill all the pinholes, I am not 100% satisfied.

Additionally, I did my attached garage floor with Hellfire as well but used Rustoleum Flakes after the 1st clear coat.

Hellfire is VERY slippery when wet when the floor is cold even with the anti slip additive. It is less slippery in my attached garage with the flakes.
I should have used the flakes in my shop as well, I could have used only the gray flakes to have a uniform look, it is too late for that.

I will post a detailed review in the Flooring section later.
 

Attachments

  • 20201121_123938.jpg
    20201121_123938.jpg
    147 KB · Views: 184
  • 20201112_134511.jpg
    20201112_134511.jpg
    78.4 KB · Views: 225
  • 20201109_172220.jpg
    20201109_172220.jpg
    101.7 KB · Views: 184
  • 20201110_102540.jpg
    20201110_102540.jpg
    145.6 KB · Views: 180
  • 20201109_083037.jpg
    20201109_083037.jpg
    157.9 KB · Views: 181
  • 20201104_120423.jpg
    20201104_120423.jpg
    68.2 KB · Views: 172
  • 20201106_205912.jpg
    20201106_205912.jpg
    101.8 KB · Views: 183
Last edited:
OP
J

justnutsandbolts

Well-known member
Joined
Jun 9, 2015
Messages
58
Location
NJ
Some more in progress pics.
 

Attachments

  • 20201202_190601.jpg
    20201202_190601.jpg
    108.5 KB · Views: 230
  • 20201103_200156.jpg
    20201103_200156.jpg
    68.1 KB · Views: 234
  • 20201125_181746.jpg
    20201125_181746.jpg
    75.2 KB · Views: 251
  • 20201219_185118.jpg
    20201219_185118.jpg
    109.5 KB · Views: 231

imjustdave

Well-known member
Joined
Apr 9, 2014
Messages
204
Location
Sumner WA
now that is the way the shop should have been built.
loved the fact you made a crane out of the beams.

Sent from my SM-N986U using Tapatalk
 
OP
J

justnutsandbolts

Well-known member
Joined
Jun 9, 2015
Messages
58
Location
NJ
Thanks.

Putting it to use already. Still need to figure out the cabinet situation.
 

Attachments

  • 20201223_222752.jpg
    20201223_222752.jpg
    156.8 KB · Views: 462

LX-Markham

Well-known member
Joined
Apr 27, 2013
Messages
2,929
Location
Markham, Ont.
Interesting solution to gain extra height: turning the single span deep trusses into 3 single span trusses with a raised centre section. And using the steel beams as crane rails is just a bonus. Nice job!

The end result is not unlike our steel factory. Main high roof bay with a gantry crane, with a low roof bay on either side.
 
To avoid these ads, REGISTER NOW!
OP
J

justnutsandbolts

Well-known member
Joined
Jun 9, 2015
Messages
58
Location
NJ
Interesting solution to gain extra height: turning the single span deep trusses into 3 single span trusses with a raised centre section. And using the steel beams as crane rails is just a bonus. Nice job!

The end result is not unlike our steel factory. Main high roof bay with a gantry crane, with a low roof bay on either side.

Hey, i saw your garage before and considered doing it like that.
I had messaged you about your lights too.

I wanted to keep the storage space above the side bays. My span is 30ft side to side so it would have required a lot more work to do it like yours.
 
Last edited:

CombatNinja

Well-known member
Joined
Aug 24, 2013
Messages
1,456
You really upgraded that space, well done! I agree that the door arrangement is weird, had I built the place, I would've gone with a single 18' door myself. Guess the original owner had an RV or something given that single high door in the middle. Funny that he would go with that truss arrangement if he wanted to park something that high in there.

Don't beat yourself up over the floor. I think it looks great and there is a certain appeal to a slab with a little "patina" to it so you don't have to fret over every mark, scratch or spill. If the slipperiness is a safety issue, I'm sure the flooring gurus on here can offer up a compatible top coat with and anti-skid.

Overall, great job. I love to see guys using ingenuity and creative solutions to problems in normal 'everyman' garages that are obtainable for most of us. I like these threads better than a build thread of some 80' x 100' garage mahal built to spec for $350,000. Zero relevance to my life.
 
OP
J

justnutsandbolts

Well-known member
Joined
Jun 9, 2015
Messages
58
Location
NJ
You really upgraded that space, well done! I agree that the door arrangement is weird, had I built the place, I would've gone with a single 18' door myself. Guess the original owner had an RV or something given that single high door in the middle. Funny that he would go with that truss arrangement if he wanted to park something that high in there.

Don't beat yourself up over the floor. I think it looks great and there is a certain appeal to a slab with a little "patina" to it so you don't have to fret over every mark, scratch or spill. If the slipperiness is a safety issue, I'm sure the flooring gurus on here can offer up a compatible top coat with and anti-skid.

Overall, great job. I love to see guys using ingenuity and creative solutions to problems in normal 'everyman' garages that are obtainable for most of us. I like these threads better than a build thread of some 80' x 100' garage mahal built to spec for $350,000. Zero relevance to my life.
Thank you for the kind words. All these average homes and detached garages around me have the same type of garage door setup. It's really odd.

I am creating a spreadsheet to share soon. Overall cost is no more than $15,000 including the luxuries such as the AC and Liftmaster 8500s.

This took me about 7.5 months from start to finish because I was hunting for "deals" rather than just going and buying everything at cost.
 

CombatNinja

Well-known member
Joined
Aug 24, 2013
Messages
1,456
I am creating a spreadsheet to share soon. Overall cost is no more than $15,000 including the luxuries such as the AC and Liftmaster 8500s.

This took me about 7.5 months from start to finish because I was hunting for "deals" rather than just going and buying everything at cost.

That is what I'm talking about. I am all about a nice shop built for, say, 10s of thousands rather than hundreds of thousands. I have nothing against anyone who builds such a shop but it is just not as relevant to ME at the end of the day. Keep updating this as the build goes along. Working with what you had and doing it on the budget of the average working dude who is disciplined enough to save a bit of money is awesome.
 

loganb

ALLIANCE MEMBER
Joined
Dec 29, 2011
Messages
5,521
Location
Omaha, NE
This is an incredible overhaul! The lights, the high bay, lift, steel beams...awesome work and congrats on the new space! Going to be fun to work in...definitely subscribing to follow along closer!

Hope you put a big bow on the door as your Christmas Present to yourself :)
 

LXCam

ALLIANCE MEMBER
Joined
Apr 23, 2013
Messages
19,109
Location
AZ
Excellent transformation, that not only turned out functional but stylish too.
 
OP
J

justnutsandbolts

Well-known member
Joined
Jun 9, 2015
Messages
58
Location
NJ
Thanks for the comments.

Although I accepted the fact that it is a floor, I am realizing that Hellfire was a mistake, it is scratching easily and the fact that my concrete was soft is not helping the cause. Next shop will have PEI5 tile.

I am still trying to figure out cabinetry. I am browsing every local industrial auction to find a set. I sold the NewAge Bold Series ones that I ordered from Costco and don't want to bite the bullet for the Pro series due to insane cost.


The latest addition worth mentioning is the 500w (claimed) LED light outside along with a motion sensor. I had to wire my own motion sensor and even though there were some negative comments, I picked up the RAB Lighting STL360W sensor due to its 1000W capacity. The sensor is currently working awesome and I hope it stays that way. The store sold motion lights like the ones I have on the corners of the shop do not work well when I am backing up a car at night. This sensor has detectors underneath of it for a full 360 degree coverage. As soon as I step a foot outside, they come on as well as when I am walking up from 40-50ft away. It also has bright LED scanner lights that act as a deterrent. I will paint the conduit to try to blend it in. Since this was an afterthought, I did not wire it before sheetrock went up and since this is my "shop" the look does not bother me much.

The LED light is from eBay and there is only a few manufacturers for it. This one was made by Tycolight. On my Kill-a-Watt reader, its output was 386W max.


I also picked up older Hallowell worktables and a 1.25" thick steel table that I am contemplating on fitting in the workspace. The tables are 250lbs each and the steel top table is a whopping 875lbs... I think I will turn that into my welding table and put on better casters to move it outside when I'm welding.
 

Attachments

  • 20210403_190920.jpg
    20210403_190920.jpg
    154.3 KB · Views: 56
  • 20210403_222702.jpg
    20210403_222702.jpg
    149 KB · Views: 51
  • 20210326_184218.jpg
    20210326_184218.jpg
    128.4 KB · Views: 52
  • 20210326_100144.jpg
    20210326_100144.jpg
    148.3 KB · Views: 49
  • 295b3bd5-2993-42b5-a469-acee013f8538.jpg
    295b3bd5-2993-42b5-a469-acee013f8538.jpg
    119.7 KB · Views: 47
OP
J

justnutsandbolts

Well-known member
Joined
Jun 9, 2015
Messages
58
Location
NJ
That is what I'm talking about. I am all about a nice shop built for, say, 10s of thousands rather than hundreds of thousands. I have nothing against anyone who builds such a shop but it is just not as relevant to ME at the end of the day. Keep updating this as the build goes along. Working with what you had and doing it on the budget of the average working dude who is disciplined enough to save a bit of money is awesome.

Still working on the spreadsheet. I promise I'll post it.
I got lucky with pre-covid lumber prices. 2x4x8 sells for $7ish near me. I bought them for around $3.54 about a yr ago.
 
To avoid these ads, REGISTER NOW!
Top Bottom