To avoid these ads, REGISTER NOW!

The thread of Dimple!! Finally.

NASTYZEN

Well-known member
Joined
Jun 11, 2010
Messages
2,823
Location
St-Colomban,Que. Canada
Post your dimple projects here and discuss all that is dimpling. Different techniques and such.

About time I stopped high jacking Dirtball's Dimple Die Thread, and started my own.:evil:
Sorry, my bad.

You can find the Dimple Dies thread here, and how the story began.
http://www.garagejournal.com/forum/showthread.php?t=38532&highlight=dimple+dies

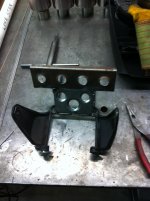
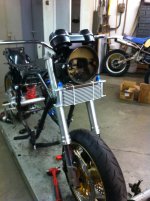
Now, to get the ball rolling. I'll start with a project I did not long ago.
This cage came pre made like an Ikea kit and I should not get any credit for the dimples. Only the assembly and welding.


Dimpling truly enhances a project and gives it that pro look.


Ok, now it's your turn.

Thank's to all the members who got Dies from me, after all, I made them for you.:) Ok, I get a bad *** set out of it for myself to.:D

I can't believe that out of all the members who got a set, only Jim Stabe and Boost creep posted up some cool pictures of there Dimple projects?????

C'omon guys! Lets see those things you've been worked on late into the night this winter!

:beer:
 
Last edited:
To avoid these ads, REGISTER NOW!

alan camby

Well-known member
Joined
Dec 3, 2011
Messages
1,566
Location
South of Indianapolis, Indiana
I put a few on my homemade Dixie Chopper oil cooler mount. Nothing fancy, just something to dress it up some.
dixie11-30-12012.jpg

dixie11-26-12023.jpg
 

4EyedTurd

Well-known member
Joined
Oct 3, 2009
Messages
595
Location
Texas
Scrubs in a bucket, I've got a few of those leftover buckets holding nuts and bolts. Nice setup
 

SM Racing

Well-known member
Joined
May 3, 2006
Messages
856
Location
Huntsville, AL
Honda CRX chassis stiffening and front engine mount.

DSC_0210.jpg

DSCN4780-1.jpg

DSCN4779-1.jpg

DSCN4794-1.jpg


All of my reinforcements had to fit under the stock interior panels and carpet.
 

Case IH

Well-known member
Joined
Dec 31, 2010
Messages
904
Location
Green Bay WI
What is the point of dimple dying something?just astetics?

I at work I build calf milk pasteurizers and when I build the tanks it's rolles sheet metal and I have to weld the seam and a cap on one end, and the holes all get pulled out like dimple dies do but for us it's so we can weld ferrals on cleanly since it all gets purge welded. So that's the only reason I see those used....
 

SM Racing

Well-known member
Joined
May 3, 2006
Messages
856
Location
Huntsville, AL
In my case it allowed me to build my parts out of 22 gauge steel instead of say 1/8thin plate. It really does stiffen the flat parts significantly.
 
OP
N

NASTYZEN

Well-known member
Joined
Jun 11, 2010
Messages
2,823
Location
St-Colomban,Que. Canada
What is the point of dimple dying something?just astetics?

I guess Dimpling comes from aviation, where weight is a major factor. The more holes you can put into a part, the lighter it gets.
The main drawback of making a hole in something is that you weaken it in the process.
For example, if you take a sheet of paper and hold it from a corner. It will flop over. Now, if you put a fold or two into it. It becomes strong enough to hold itself together.
Same thing with sheet metal. Make a hole in it and it loses some strength. But if you put a dimple or ridge around the perimeter, it now becomes much stronger because of the flange spreading the load equally all around.
I'm sure Moonrise could verbalize it in a more adequate way.

I knew you guys had been dimpling stuff! Thank's for posting Alan and SM racing.
Keep em coming boys.

Here is an example of a purely aesthetic application of a dimple.
I made some book shelf brkt's a long time ago and decided to spiff them up a little during my basement reno.

Firstly ,cleaned them up a little and then laid out the hole location.


Making a hole with a hole saw. Would of used my HF knock out punch with the Pipe sized Dimple, but lent the unit out to a friend...


A little de burring with my Vargus de burring tool.


The Dies can be used with the Knock out punch, a bolt or in a press.
Or the lazy man's way with a hammer n anvil.:D
I did not wish to damage my shinny new Die, so I used some scraps of wood under and over the Die.


The finished project.


:beer:
 
Last edited:

cmandp

Well-known member
Joined
Dec 22, 2011
Messages
1,271
Location
New Jersey
The dimple really added to the cool factor on those brackets. Reminds me of all the WWII aircraft pictures I used to stare at (and still do). Are you the gamer or did you make the brackets for someone else?
 

MoonRise

Well-known member
Joined
Nov 5, 2010
Messages
4,027
Location
NJ
I guess Dimpling comes from aviation, where weight is a major factor. The more holes you can put into a part, the lighter it gets.
The main drawback of making a hole in something is that you weaken it in the process.
For example, if you take a sheet of paper and hold it from a corner. It will flop over. Now, if you put a fold or two into it. It becomes strong enough to hold itself together.
Same thing with sheet metal. Make a hole in it and it loses some strength. But if you put a dimple or ridge around the perimeter, it now becomes much stronger because of the flange spreading the load equally all around.
I'm sure Moonrise could verbalize it in a more adequate way.

Oooo, I've been called out! :lol_hitti

Kewl.

Sort of short answer: Removing material makes the part lighter, but weaker. Dimpling displaces some of the material off-axis and makes the area a bit 'stiffer'. Which translates into a bit 'stronger', as thin(ish) parts would typically fail under compression buckling and the dimpling moves some of the material off-axis and gives you a bigger/better moment of inertia to resist that bending/buckling.

Doesn't really do much for tension loading though. In that case, the "strength" of the part is pretty much just how much material area the load is spread/transfered through.

Same idea as rolling a bead in a piece of sheetmetal, stiffens and thus 'strengthens' it a good bit. Think of a metal jerry can, with the beads in the sheetmetal sides that stiffen those sides up a good bit.

Another example. Take a slice of pizza and pick it up to eat it. It just flops right over (flat pizza with yummy cheese, other toppings optional :D , on top, dough just flops over and then the cheese/toppings runs off. Drat!). So what do you do in order to eat your pizza? Fold it into a V-shape and then you can pick it up and take a bite. The pizza didn't change, you just changed the shape a bit in order to make it a little 'stiffer' vertically so you can eat your slice of pizza. Fork-using heathens just go away, deep-dish pizza (yummy, but not -really- "pizza" IMNSHO. there, that should stir up at least someone. :evil: ) is usually fork-acceptable though.

:beer:
 

KPSquared

Well-known member
Joined
Aug 18, 2010
Messages
2,750
Location
Wetaskiwin, Alberta, Canada
Beauti work fellas. Always wanted to get a set. Maybe once this shop is a little further along.

I got it. I'll order the dies then tell my wife I HAVE to have a press now or they're useless. Great idea!! :p

Keep posting your projects!

Reznunt - bumper or rock slider?
 
Last edited:

waggie

Well-known member
Joined
Aug 3, 2010
Messages
305
Location
Upland, ca
after i dimple thin gauge the material sometimes ended up bent... how do you prevent this? do you guys just bend it back so it's straight?
 

SM Racing

Well-known member
Joined
May 3, 2006
Messages
856
Location
Huntsville, AL
after i dimple thin gauge the material sometimes ended up bent... how do you prevent this? do you guys just bend it back so it's straight?

I notice when I press the dimple in if I go a little past "down" with the press I can get the part to flatten back out. I have never used mine with a hammer, I always use a press or just the bolt and a wrench.
 

70rsss

Active member
Joined
Feb 8, 2006
Messages
26
Location
Houston
Here are some plates I made for a bike project I just finished.
 

Attachments

  • 4236291376_b1a208024f[1].jpg
    4236291376_b1a208024f[1].jpg
    110.5 KB · Views: 673
  • 4236293872_3a4a2fc0b3[1].jpg
    4236293872_3a4a2fc0b3[1].jpg
    132.4 KB · Views: 654
  • 4235517465_422bbaa153[1].jpg
    4235517465_422bbaa153[1].jpg
    142.4 KB · Views: 670
  • IMG_0438.jpg
    IMG_0438.jpg
    137.6 KB · Views: 634
  • IMG_0444.jpg
    IMG_0444.jpg
    142.3 KB · Views: 627
  • IMG_1145.jpg
    IMG_1145.jpg
    138.4 KB · Views: 685

Boost Creep

Well-known member
Joined
Feb 17, 2010
Messages
1,407
Location
michigan
those shelf brackets look awesome. i might have to steal that idea soon

has anyone found a 3" hole punch for the hf kit yet? i was just browsing around last week trying to find one but haven't come up with anything yet. I'd like to order the 3" die too

hoping to make some more cool stuff this summer once i get a welder
 
To avoid these ads, REGISTER NOW!

BDAZSVT

Well-known member
Joined
Jun 22, 2010
Messages
204
those shelf brackets look awesome. i might have to steal that idea soon

has anyone found a 3" hole punch for the hf kit yet? i was just browsing around last week trying to find one but haven't come up with anything yet. I'd like to order the 3" die too

hoping to make some more cool stuff this summer once i get a welder

My local HF had 2 on the shelf by the punch kits.
 

ckpitt55

Well-known member
Joined
Jan 15, 2011
Messages
108
Location
PA
So this may be a noob-ish question, but what is the difference in a nut shell between the pipe and standard size dies? are the pipe dies made to fit the OD's of pipes in an instance where you want to have the pipe pass through and weld up to the sheet metal? And am I correct in assuming the standard sizes are made to work with standard size hole cutters / punches - primarily for lightening and stiffening purposes in flat sheet sections?

Sorry for the OT-ish question Claude. I just bought a press and am getting into some sheet metal work on my car. May be interested in a set of dies here, just wondering what would be best to get when money allows.
 

JZHeyde

Well-known member
Joined
Apr 28, 2008
Messages
168
I was trying to order these from the website and couldnt get it to work. I registered, logged in, and still wouldnt work. any ideas???
 

d_rock

Well-known member
Joined
Apr 14, 2012
Messages
192
Location
Denver
Where are you guys getting your dies? I looked at that barbed wire off road ebay store and the prices for the 9 piece has shot up to almost 700 bucks!!
 

SM Racing

Well-known member
Joined
May 3, 2006
Messages
856
Location
Huntsville, AL
If you need to do basic sheetmetal, the dies are pretty reasonable, if you want to do the thicker plate, bring money. My dies are from Mittler Bros, but I do sheetmetal, not plate with them.
 
OP
N

NASTYZEN

Well-known member
Joined
Jun 11, 2010
Messages
2,823
Location
St-Colomban,Que. Canada
So this may be a noob-ish question, but what is the difference in a nut shell between the pipe and standard size dies? are the pipe dies made to fit the OD's of pipes in an instance where you want to have the pipe pass through and weld up to the sheet metal? And am I correct in assuming the standard sizes are made to work with standard size hole cutters / punches - primarily for lightening and stiffening purposes in flat sheet sections?

Sorry for the OT-ish question Claude. I just bought a press and am getting into some sheet metal work on my car. May be interested in a set of dies here, just wondering what would be best to get when money allows.

The difference is that the pipe sized Dies are made to fit the HF knock out punch size.The dies also have a matching thread in them so you can also use the Knock out mandrel to squeeze the dies together.

The standard size Dies have standard sizes starting at 1/2'' through to 3 1/2'' diameters in 1/4'' increments. These are made to be used regular hole saw hole size.They are also threaded for use with the Knock out punch.

I was trying to order these from the website and couldnt get it to work. I registered, logged in, and still wouldnt work. any ideas???

Hmmm.. the website seems to be running ok.
PM me please, I'll work it out for you.

Where are you guys getting your dies? I looked at that barbed wire off road ebay store and the prices for the 9 piece has shot up to almost 700 bucks!!

I made my own.

If you have access to a lathe make your own dies,then use a press to use them.

That's what I did!:)

The pipe ones on top and the standard sizes on the bottom row.


The entire family.

 
Last edited:

ilovevocs

Well-known member
Joined
Jun 26, 2009
Messages
1,966
Location
Toledo, Ohio
^Your dies are super nice looking! I have been admiring them for some time..

I have the light racing 5 piece set, $359 or so. At the time i felt like they were the best value. Max sheet thicknesses of .090 for chromoly and .125 for mild steel. My intentions were to use them in chassis fabrication so i wanted something that was capable of working with thicker material.
 
Last edited:
OP
N

NASTYZEN

Well-known member
Joined
Jun 11, 2010
Messages
2,823
Location
St-Colomban,Que. Canada
The dimple really added to the cool factor on those brackets. Reminds me of all the WWII aircraft pictures I used to stare at (and still do). Are you the gamer or did you make the brackets for someone else?

Made it for my sons, yes I game a little when time permits, which is not very often.


Cool!

Here are some plates I made for a bike project I just finished.

That should stiffen things up. Did you beef up the goose neck as well?
 

willymakeit

Well-known member
Joined
Apr 27, 2009
Messages
1,242
Location
Springfield Mo.
What is the basic difference between the pipe size and the other, other than being able to use a hole saw?
Im interested in getting a set. But prefer to buy once. I piddle with both steel and aluminum.
 

ckpitt55

Well-known member
Joined
Jan 15, 2011
Messages
108
Location
PA
What is the basic difference between the pipe size and the other, other than being able to use a hole saw?
Im interested in getting a set. But prefer to buy once. I piddle with both steel and aluminum.

He answered this above:

NASTYZEN said:
The difference is that the pipe sized Dies are made to fit the HF knock out punch size.The dies also have a matching thread in them so you can also use the Knock out mandrel to squeeze the dies together.

The standard size Dies have standard sizes starting at 1/2'' through to 3 1/2'' diameters in 1/4'' increments. These are made to be used regular hole saw hole size.They are also threaded for use with the Knock out punch.
 

KPSquared

Well-known member
Joined
Aug 18, 2010
Messages
2,750
Location
Wetaskiwin, Alberta, Canada
So this may be a noob-ish question, but what is the difference in a nut shell between the pipe and standard size dies?

Pipe diameters are ID and hole saws are OD.

Like was said, these particular pipe versions are for the HF knockout which i assume is conduit spec?

A 2" sched 40 pipe and a 2" sched 80 pipe will be two different outside diameters. The 2" is on the inside.

However, a 2" tube is 2" on the outside. Wall thickness can change but the outside diameter remains the same.

I don't know 100% but based on the pipe punches being "bigger than advertised" I would say conduit is an inside diameter measurement.

This discussion gets really ugly on 4x4 forums. . . :D ok, mostly pirate.
 

Kevin54

MEMBER EMERITUS
Joined
Jan 12, 2005
Messages
29,341
Location
Urbana, Ohio
dscn1713mw.jpg


Nasty....I don't know whether you know or not, but if you do know, then this is for others, but I want to comment on the Vargus knife. BUY EXTRA TIPS. Don't be afraid to use one a couple of dozen times then throw it away.

The reason is, if you have a dull tip, IT WILL BREAK. And when it does, if you are one of the unlucky one, you'll slit either your wrist or will be in for a ride to the hospital to stitch um your forearm.

I've witnessed it a number of times at work. The people now have to wear KEVLAR SLEEVES when using a Vargus. In the "Vee" of the tip, where it's sharpened, that is where it will break. Using a Vargus on aluminum, it will last about twice as long as using it on steel. Almost everyone that uses one, they use it in the clockwise direction while holding the part in their left hand.Once you get around the hole when you are in the upstroke is when it breaks because that is where you are applying the most pressure. And when it snaps, it will come right up your arm. So for anyone that own a Vargus, spend some money and buy your extra tips and be sure to use them.

For the people that find them hard to use because you are left handed, look in a tool catalog and buy left handed cutting tips. They make them, but don't supply them with the new Vargus because they thing everyone is right handed. :lol:

I just wanted to comment on this because I don't want to see anyone than has slit there arm from wrist to elbow.


NASTY......I'ma loving those shelf brackets. Now that you showed them, there is going to either be a demand on your part to make them or there will be a lot of brackets showing up on GJ. Nice job!!!!:thumbup::thumbup:
 
OP
N

NASTYZEN

Well-known member
Joined
Jun 11, 2010
Messages
2,823
Location
St-Colomban,Que. Canada
Here are the dimensions of the HF pipe punch dies

Pipe Punch Data.jpg


Thank's for the chart Jim.

pipepunchdata.jpg


Your inner door looks rad! I like it.:thumbup:

door004.jpg


Nasty....I don't know whether you know or not, but if you do know, then this is for others, but I want to comment on the Vargus knife. BUY EXTRA TIPS. Don't be afraid to use one a couple of dozen times then throw it away.

I just wanted to comment on this because I don't want to see anyone than has slit there arm from wrist to elbow.

NASTY......I'ma loving those shelf brackets. Now that you showed them, there is going to either be a demand on your part to make them or there will be a lot of brackets showing up on GJ. Nice job!!!!:thumbup::thumbup:

To late, I've already slit my wrists with my Vargus.:lol_hitti
Yeah, they can definitely surprise you when you don't expect it. Iv' broken so many that I got better with them over the years.
I even resharpen mine on a 1/4'' wide diamond wheel.

Those brackets are easy to make, go ahead and knock yourselves out man.

I have other little projects in mind. I'll post them up as I get around to making them.
 
Last edited:

MoonRise

Well-known member
Joined
Nov 5, 2010
Messages
4,027
Location
NJ
follow-up on dimpling and 'strength' (yeah, I was curious so I ran some numbers)

material: steel (mild 'structural'), 36 ksi yield, 67 ksi ultimate tensile

5" x 11" x 1/8" thick plate (randomly selected numbers)

load conditions: 0-450 lb 'axial' load, 5 lb 'face' load (to kick things sideways), fixed end (think of a domino or other block standing on end with a weight on top and a little push sideways)

analysis tool : starts with an "A" :D

variant #1 : plain plate, weight=1.94 lbs

15,501 psi max equivalent stress
0.329 inch max deflection (sideways)
Safety Factor = 2.34
Mode #1 vibration frequency = 34 Hz

variant #2 : plate with a 3.5" diameter hole centrally located in the plate (think "one" domino)
weight=1.60 lb

items fails (bends over and buckles, crash-boom)

variant #3 : add flange/dimple around hole, 3/8" total flange thickness (front face of plate to far edge of flange), 1/4" radius on 'back' of flange
weight=1.65 lb (15% lighter than plain plate)

11,086 psi max equivalent stress
0.173 inch max deflection (sideways)
Safety Factor = 3.27
Mode #1 vibration frequency = 36 Hz

variant #4 : two flanged holes (same hole and flange dimensions as before), holes located 5" center-to-center and 2.5" away from 'center' of the plate (think "two" domino)
weight=1.36 lb (30% lighter than the plain plate)

6715 psi max equivalent stress
0.08 inch max deflection (sideways)
Safety Factor = 5.4
Mode #1 vibration frequency = 42 Hz

summary: Under the selected load conditions (trying to buckle the plate with a compressive load), plate with a hole in the middle buckles and fails (under the selected load conditions), plate with one flanged hole is lighter and stronger and stiffer (the flange puts material away from the flat plate and makes a bit of a beam) than the plain plate, plate with two flanged holes is even lighter and stiffer and stronger (two flanged holes puts even more material away from the flat plate and helps distribute the force/load a bit more evenly than just one hole smack in the middle of a flat plate).

YMMV, etc, etc, etc
 

mdbeck1

Well-known member
Joined
Mar 7, 2010
Messages
2,297
Location
Norman, OK
I've got some questions on this table (I'm probably just confused):
attachment.php


Maybe I'm just reading this wrong...
Pipe Size = 3"
OD = 3.500"
ID = 3.520"

Where I come from:
OD=Outside Diameter and
ID =Inside Diameter

Using that logic the inside diameter is larger than the outside diameter???? :dunno:
...and you end up with a 0.010" wall thickness????

Maybe I've got the wrong acronyms?
 
OP
N

NASTYZEN

Well-known member
Joined
Jun 11, 2010
Messages
2,823
Location
St-Colomban,Que. Canada
Ok, so maybe this is the best description. As on the web site.

Specifications

Sizes include: ½”Pipe = 0.890” Hole , ¾”Pipe =, 1.118” Hole , 1.0”Pipe = 1.118” Hole , 1 ¼”pipe = 1.692” Hole , 1 ½ “Pipe = 1.941” Hole, 2.0”Pipe = 2.374” Hole, 3.0" Pipe= 3.5'' Hole all with either a 7/16”-20 or ¾”-16 threaded Top Die.
 

Jim Stabe

Well-known member
Joined
Feb 18, 2009
Messages
801
Location
San Diego, Ca
I've got some questions on this table (I'm probably just confused):
attachment.php


Maybe I'm just reading this wrong...
Pipe Size = 3"
OD = 3.500"
ID = 3.520"

Where I come from:
OD=Outside Diameter and
ID =Inside Diameter

Using that logic the inside diameter is larger than the outside diameter???? :dunno:
...and you end up with a 0.010" wall thickness????

Maybe I've got the wrong acronyms?

The OD is the OD of the HF punch and the ID is the ID of the HF die. The difference is the clearance of the punch in the die. The hole size is the diameter of the hole that the set produces. Sorry for the confusion
 
To avoid these ads, REGISTER NOW!
Top Bottom