To avoid these ads, REGISTER NOW!

Delta Rockwell Drill Press Restore 1957

Alexbn921

Well-known member
Joined
Aug 22, 2013
Messages
579
Location
East Bay Nor Cal
Edit
All my pictures got removed by Photobucket. :(

Thanks to garage journal I have been searching Craigslist for a old drill press. I have want one for awhile and I finally found one. Email the guy severly days ago and he just got back to me.:D After an hour drive and $110 dollars I am the proud owner of a 1957 Delta Rockwell Drill Press. I was in a San Francisco hotels workshop for the last 57 years. There is almost no rust and it is silent.:rocker: It was shocking how quit it ran. Needs new belts and fresh paint.
I had to pull it apart to get the damn thing out of the car by myself. I weights at least a 100 lbs!


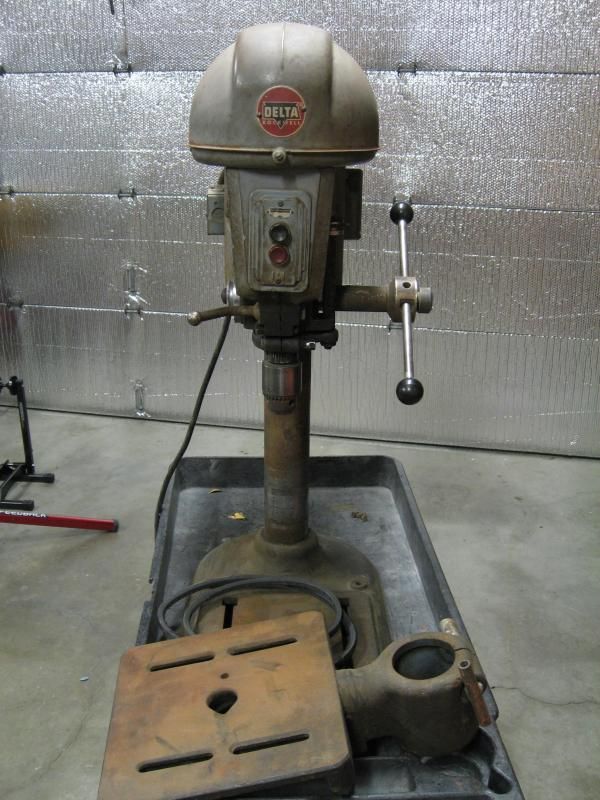
No model number but most likely a 15- 412. The serial is 119-3181,with the help of vintagemachinery.org dates it as 1957.

The best part is that it has the 3 pull slow speed setup. Only a 1/3hp motor, but that will be more than enuff for me.


AFTER


Last edited:
To avoid these ads, REGISTER NOW!

southalabama

Well-known member
Joined
Jan 10, 2011
Messages
5,528
Location
Brewton AL
Nice.

Thanks to garagejournal I've been looking for a similar drill press. I haven't been so lucky. Mostly hf drill presses selling for more than new.
 

Fretters

Well-known member
Joined
Jan 25, 2014
Messages
4,217
Location
South Yorkshire, England
It was shocking how quit it ran.

That's a nice pillar drill. Condition seems quite good. It's amazing just how much of a difference in quality there is between something like that and one of the modern import jobbies, isn't it. Very quiet running, no vibration, runout etc., (providing everything is in decent nick). A good quality drill and a cheap one are worlds apart in performance.
 

Outlawmws

Well-known member
Joined
Aug 9, 2011
Messages
39,084
Location
The Badlands
That is a nice find with the intermediate pulley. you don't see many vintage DP's with those. The pulley alone is worth near the price of admission...
 
OP
A

Alexbn921

Well-known member
Joined
Aug 22, 2013
Messages
579
Location
East Bay Nor Cal
The triple pulley did catch my eye.
I've got a couple of questions for the experts out there.:bowdown:
1. What is a close match for the original paint? A code or link would be great.
2. How the hell do I get the name badge off without buggering it up? It is near impossible to get to the back and it is on there good.
3. Once its off what should I use to clean it?
4. The bearings are good, but since I have it apart it would be nice to replace or clean the stock ones.
5. There is a little spring loaded knob on the side of the case with a hole behind it. What is it?


Old wires disintegrated so I will use all new cords.
Motor has some wasp mud in it, so its coming apart. I wanted to clean/lube the brushes anyway.

Not sure what the Walnut is for.:bounce:


Davefr

Well-known member
Joined
Jan 7, 2010
Messages
11,815
Location
OR
Nameplate rivets are often like this:
836.jpg


Cut a slit with a Dremel and see if they back out with a slotted screwdriver. Plan B is to grind them off and them punch them out.

You can then use new rivets or tap a hole and use a brass R.H. screw.

Polish the nameplate with a something very gentle like simichrome that is very fine abrasive. Go lightly so you don't remove the nameplate numbers.

I'd replace the bearings. They're actually pretty inexpensive if they're standard sizes and not proprietary.
 

nine4gmc

Well-known member
Joined
Mar 24, 2012
Messages
14,357
Location
Dallas
Nice press, it has the two bearings on the spindle pulley like my floor model, instead of the single bearing like on my bench model. I'm unsure what spring loaded knob you mean, neither of mine have one, mind getting a pic or pointing out where it's located on yours? Also, do you have a model number or just the serial number plate? When refurbing mine, I could not get to the plate pins from the back so I just taped them off and painted around them. Hurt my heart knowing it's not finished behind there but it would have killed me to tear up that plate trying to get it off... I found Rustoleum Smoke Gray to be an almost perfect match. Give me a minute and I'll tell you what year your machine was made. :beer:

1957 according to: http://wiki.vintagemachinery.org/DeltaSerialNumbers.ashx

Oh yeah, I'd replace the bearings as well but don't just go by the stamped number, measure the inside diameter. I had to order two sets as the first set was same model number but wrong I.D. Bearings are cheap and you don't want to have to tear it back down after painting, trust me...
 
Last edited:

WWIIjeep

Well-known member
Joined
May 30, 2012
Messages
1,240
Location
Arizona
4. The bearings are good, but since I have it apart it would be nice to replace or clean the stock ones.

Correction, I was assuming from what could be seen in the photos that his drill press was a slightly different model. See my next post, #15 below, for correct information.


5. There is a little spring loaded knob on the side of the case with a hole behind it. What is it?

Oil hole for quill.
 
Last edited:

gilbo

Well-known member
Joined
Feb 1, 2010
Messages
716
good find, and no arc of shame either, this tuneup should be quick and easy
 
Last edited:
OP
A

Alexbn921

Well-known member
Joined
Aug 22, 2013
Messages
579
Location
East Bay Nor Cal
It feels so good to have the help and resources of everyone on this forum. I would not have attempted this major of a restoration without knowing that I had backup.:thumbup:
I tend to bounce around on a project like this, you can only use the wire wheel for so long.:willy_nil
The motor had a wasp nest that need cleaned out. I pulled it apart and without destroying anything cleaned the mud out and blasted it with the air hole.
Is there anything I should do before I put it back together?
There are no bushes, just some felt things and copper contractors. Kind of hard to get a picture of.


Nameplate rivets are often like this:

Cut a slit with a Dremel and see if they back out with a slotted screwdriver. Plan B is to grind them off and them punch them out.

I'd replace the bearings. They're actually pretty inexpensive if they're standard sizes and not proprietary.

Thanks Dave I will use the dremel to extract them. I am still on the fence about it. I really want the clean full paint look, but know want to mess up the name plate.


I'm unsure what spring loaded knob you mean, neither of mine have one, mind getting a pic or pointing out where it's located on yours?

It located just above and to the right of the nameplate.


Also, do you have a model number or just the serial number plate?
No model number, only the serial.
I found Rustoleum Smoke Gray to be an almost perfect match.
Perfect. Thanks I will be ordering some today.

The spindle bearings are New Departure 88100 bearings with a special notched inner race to fit the interchangeable spindles that were used in that drill press. The ND 88100 bearings haven't been available for about 30 years; however, there is a guy named Jim who is making very good and reasonably-priced replacements using modern bearings fitted with a custom-made sleeve for the inner race. I don't know if Jim is a member here, but he's a member of owwm.org (old woodworking machines group). Can't remember his last name.
Hi Jeep and Thanks. The bearings are New Departure 88100. They are still in good shape, because the drill was in super low speed mode most of its life. It is not the hard to remove the spindle so I might just clean/lube everything and put it back together for now. I will try and find Jim to get some replacements ordered. Never know when my grand kids are going to need them.:lol:

That hole provides access to a set-screw in a collar which holds the interchangeable spindles in place. The collar both locks the spindle in the quill and provides positive spindle drive by means of a tab that fits into a corresponding notch in the inner race of the upper spindle bearing. Same thing happens at the lower spindle bearing with a fixed collar on the spindle, just above the chuck. Look at the top of your removed spindle assembly and you'll see the set-screw collar on the spindle at the top of the quill.

Not sure if this is the same hole. I included a picture above.
I believe this is the set collar that you are talking about on the spindle assembly. I read you can bang the chuck off, but it would be nice to confirm it. Maybe its just dirty, but I don't see any setscrews in the thing above the chuck.


good find, and no arc of shame either, this resto should be quick and easy
Hi Gilbo. No ark of shame, only one misplaced hole right off to the side of the main hole. Quick And Easy:willy_nil not so far.
 

Davefr

Well-known member
Joined
Jan 7, 2010
Messages
11,815
Location
OR
Thanks Dave I will use the dremel to extract them. I am still on the fence about it. I really want the clean full paint look, but know want to mess up the name plate.

If it were mine, I'd probably restore the nameplates while still on the machine since you have at least three of them. It looks like they'd clean up nicely.

Use a gentle metal polish, clean, then spray the nameplate with clear lacquer. (use toothpicks to polish small areas). Now mask them right to the very edge of the metal. Contour little strips of masking tape to go around corners. Now restore/refinish the rest of the machine. (you can also use a 000 artist brush and Testers hobby enamel for filling in some missing paint.)

Here's an example. It's hard to make them perfect but they can be substantially improved.

Before:

007x.jpg


After nameplate only was restored while still on machine:

P1020195.jpg


After machine was repainted:

grinder%20030rev1.jpg


Here's another example. This was a NOS Baldor but the original paint was destoyed. I think it was on a warehouse shelf and solvent dripped on it and removed the original paint. I was able to save the nameplate and all four decals including the little US flag. I spent more time masking then painting. (using Xacto knife and Optivisor). Hope this helps:

P1030003rev1.jpg
 
Last edited:

Fretters

Well-known member
Joined
Jan 25, 2014
Messages
4,217
Location
South Yorkshire, England
For trying to ease rivets out on nameplates, (doesn't always work, but most times does), I find tapping the cutting edge of a Stanley knife blade under the plate by the rivets will most times start the rivets lifting, unless they're rusted in there. The blade is fine enough that it won't distort the nameplate to any degree, and if they don't start to shift, stop then and leave the nameplate inplace rather than trying to remove it, else if they do start to move a putty knife or paper scraper can then be slid under the nameplate edges to tease it up with the rivets gradually.
 
Last edited:
OP
A

Alexbn921

Well-known member
Joined
Aug 22, 2013
Messages
579
Location
East Bay Nor Cal
Thanks for the tips on the name plates. I've spent at least 10 hours over the last two days working on the DP. Got a lot of things knocked off the list.:thumbup:

The motor is back together and spinning smooth.
The deck is mostly striped
I got the Jacobs chuck off and need to disassemble and clean it.
All the pulleys are as clean as I can get them. Didn't want to mess one up getting too aggressive.
Most small parts got hit with the wire wheel and are ready for deburring and polish.
Center slow assembly is clean, lubed and ready for reinstallation.


ToDo
I'm going to keep the original bearings.
Paint.
New wires.
Clean the rest of the big pieces.

Does anyone have a recommendation on grease?

All packed onto the cart so the kids don't mess with it.:rocker:
 

WWIIjeep

Well-known member
Joined
May 30, 2012
Messages
1,240
Location
Arizona
Hi Jeep and Thanks. The bearings are New Departure 88100. They are still in good shape, because the drill was in super low speed mode most of its life. It is not the hard to remove the spindle so I might just clean/lube everything and put it back together for now. I will try and find Jim to get some replacements ordered. Never know when my grand kids are going to need them.:lol:

Not sure if this is the same hole. I included a picture above.
I believe this is the set collar that you are talking about on the spindle assembly. I read you can bang the chuck off, but it would be nice to confirm it. Maybe its just dirty, but I don't see any setscrews in the thing above the chuck.

No, that's the integral locking collar on a Jacobs 633-C chuck assembly.

The set-screw collar I was talking about is at the other end of the quill. No matter though, because now I can see that yours is the next-in-line of the Delta drill press models, made after the one I was talking about (which leads me to believe that I shouldn't be reading the forum late at night when I should be thinking about going to sleep instead). :lol:

The spindle bearings for your drill press should still be available, and your spindle is held in place at the top by a retaining ring instead of a set-screw collar.

The spring cap and the hole on the side of the head casting is for oiling the quill.

You can't "bang the chuck off." You have to loosen that collar above it with an appropriately-sized pin-type spanner wrench. Once loosened, continue turning the collar down until it contacts the top of the chuck. Continue turning some more to force the chuck off of the taper on the end of the spindle.
 
OP
A

Alexbn921

Well-known member
Joined
Aug 22, 2013
Messages
579
Location
East Bay Nor Cal
Worked on the chuck a little last night. After struggling to get it off and worrying that I would break some thing I got it free. Looked up how to disassemble the chuck and after pressing hammering and pressing again it came apart. Cleaned the threads with a small wire wheel on the demel. Gonna polish it up with the deburring wheel. The dirt is packed in on every part I try to clean.


gearheadglen

Well-known member
Joined
Apr 24, 2013
Messages
133
Location
North Jersey
looks good, I am working on reassembling a chuck right now, what type of grease are you going to use on the jaws and half nuts before reassembly?
 
OP
A

Alexbn921

Well-known member
Joined
Aug 22, 2013
Messages
579
Location
East Bay Nor Cal
Hi Glen
I've got two candidates for oil. Red engine start up lube and Fox anti-friction air fork oil. Maybe someone that has done it before will chime in. The fox stuff is not as sticky as the start-up lube and does not dry out.
Girchey get off your **** and do it.:D Its like eating a horse, one bit at a time.:lol_hitti Do little things that you can finish in an hour or two. Its a big job and I might have to get a sand blaster for the base and table. It will take forever with the wire wheel and the nooks and crannies are a pain.
 

Outlawmws

Well-known member
Joined
Aug 9, 2011
Messages
39,084
Location
The Badlands
Alex, don't sand blast the table's top surface... and if you want to de-rust and repaint the lazy man's way, go for the E-tank...
 
To avoid these ads, REGISTER NOW!

Davefr

Well-known member
Joined
Jan 7, 2010
Messages
11,815
Location
OR
looks good, I am working on reassembling a chuck right now, what type of grease are you going to use on the jaws and half nuts before reassembly?


Non ball bearing chucks don't need much in the way of lube as long as they're squeaky clean, rust free and have no burrs.

A very light coating of Starrett Tool and Instrument oil will be fine. You don't want anything that'll attract debris or migrate to the surface of the jaws.
 

Fretters

Well-known member
Joined
Jan 25, 2014
Messages
4,217
Location
South Yorkshire, England
Outlaw its no so much the rust, there's almost none, but the dried crusted on oil and grease. Would an E-tank remove that?

Probably, depending on what you use in the solution. Easiest way would be paraffin, (kerosene), a green pan scourer and some elbow grease though. Those three combined are very effective, even when there's some rust in the mix.
 

gilbo

Well-known member
Joined
Feb 1, 2010
Messages
716
It feels so good to have the help and resources of everyone on this forum. I would not have attempted this major of a restoration without knowing that I had backup.:thumbup:
I tend to bounce around on a project like this, you can only use the wire wheel for so long.:willy_nil
The motor had a wasp nest that need cleaned out. I pulled it apart and without destroying anything cleaned the mud out and blasted it with the air hole.
Is there anything I should do before I put it back together?
There are no bushes, just some felt things and copper contractors. Kind of hard to get a picture of.


you call that a wasp nest, thats nothing, when i took apart my jack & heintz motor, it looked like this ( i forgot to take a picture of the inside of my motor but it looked pretty similar to this picture)

KC1-1-L.jpg
 

nine4gmc

Well-known member
Joined
Mar 24, 2012
Messages
14,357
Location
Dallas
My Craftsman looked like that Gilbo, it seemed like there was a larger pile of dirt/ dirt daubber larvae than would fit back in the case once I dug it all out :lol_hitti
 

Outlawmws

Well-known member
Joined
Aug 9, 2011
Messages
39,084
Location
The Badlands
Outlaw its no so much the rust, there's almost none, but the dried crusted on oil and grease. Would an E-tank remove that?

Probably, depending on what you use in the solution. Easiest way would be paraffin, (kerosene), a green pan scourer and some elbow grease though. Those three combined are very effective, even when there's some rust in the mix.

This, or a good long soak in Simple Green. Also a 4" mini grinder and a braided cup wire wheel will cut almost anything, but wear coveralls and be prepared for a mess... :willy_nil
 

gearheadglen

Well-known member
Joined
Apr 24, 2013
Messages
133
Location
North Jersey
Non ball bearing chucks don't need much in the way of lube as long as they're squeaky clean, rust free and have no burrs.

A very light coating of Starrett Tool and Instrument oil will be fine. You don't want anything that'll attract debris or migrate to the surface of the jaws.

Thanks Dave

I have a 18n and 20n I want to clean up in the future. What kind of lube you recommend on these ball bearing chucks
 

CoopVA

Well-known member
Joined
Jan 20, 2014
Messages
2,144
Location
Virginia
Nice find! That's a Dynalectric cart! I work for Dynalectric...


Sent from my iPad using Tapatalk
 

Davefr

Well-known member
Joined
Jan 7, 2010
Messages
11,815
Location
OR
Thanks Dave

I have a 18n and 20n I want to clean up in the future. What kind of lube you recommend on these ball bearing chucks

For Jacobs and Albrecht ball bearing chucks I use Synthetic Super Lube for the ball bearings, race and just a tiny bit on the shell and backside of the jaws. This stuff also helps keep the ball bearings where they belong while assembling the chucks.
 
OP
A

Alexbn921

Well-known member
Joined
Aug 22, 2013
Messages
579
Location
East Bay Nor Cal
Nice find! That's a Dynalectric cart! I work for Dynalectric...
Yes it is. They left it a job I was on and after it had been sitting there a year I snagged it.:pimpflash
I just wanted to put it out there, deburring wheels are awesome.:beer:
Worked on the chuck last night. Got it super clean inside and out. I've been mulling over the type of oil to use and then it hit me. Finnish line Teflon lube is dry and doesn't attract dust, plus it is super slippery. One spin moves it almost all the way from closed to open with no effort.:thumbup:


GirchyGirchy

Well-known member
Joined
Nov 14, 2011
Messages
9,815
Location
Central Indiana
Girchey get off your **** and do it.:D Its like eating a horse, one bit at a time.:lol_hitti Do little things that you can finish in an hour or two. Its a big job and I might have to get a sand blaster for the base and table. It will take forever with the wire wheel and the nooks and crannies are a pain.

Sigh, I know. Getting over that first step seems to be the hardest, especially when there's other **** to do, plus things always pop up out of nowhere...like the rear brake line leaking in my truck...
 

GirchyGirchy

Well-known member
Joined
Nov 14, 2011
Messages
9,815
Location
Central Indiana
Yes it is. They left it a job I was on and after it had been sitting there a year I snagged it.:pimpflash
I just wanted to put it out there, deburring wheels are awesome.:beer:
Worked on the chuck last night. Got it super clean inside and out. I've been mulling over the type of oil to use and then it hit me. Finnish line Teflon lube is dry and doesn't attract dust, plus it is super slippery. One spin moves it almost all the way from closed to open with no effort.:thumbup:


Those look great, what are you using to clean and polish everything?
 
OP
A

Alexbn921

Well-known member
Joined
Aug 22, 2013
Messages
579
Location
East Bay Nor Cal
Its a three or four step process. I use a fine grade 6" wire wheel for the real crud. Scrape with a pick and screwdriver for the hard to reach stuff. Then break out the dremel with a small wire wheel. Last use the Scotch-Brite EXL Deburring Wheel to put a mirror finish on it.
I used some 0000 steel wool wrapped around a rat tail file to clean the inside of the chuck bores.

This one is only 1/2 inch wide. My next one will be 8" x 1". They have a big hole and need a spacer to mount, but bigger is better. I like the finer grit ones. If you do get one wear a mask, the dust is not good for you.

http://www.amazon.com/dp/B004VTQOII/?tag=atomicindus08-20
 

GirchyGirchy

Well-known member
Joined
Nov 14, 2011
Messages
9,815
Location
Central Indiana
On the other hand, I don't think mine needs to look that great. :)

Do you ever use a coarse wire wheel?

I'm thinking I'll go with a wire cup on my grinder, a 6" fine wire wheel, a smaller wire on a drill for more detailed work, and some Scotch Brite pads with WD40 and then with Mineral oil. Finally clean and mask for paint, and apply wax or grease to parts which would rust. The WD40+ScotchBrite worked well for the guy who did this one:

http://www.forums.woodnet.net/ubbthreads/showflat.php?Number=4978276
 

CoopVA

Well-known member
Joined
Jan 20, 2014
Messages
2,144
Location
Virginia
That's gotta be the cleanest looking chuck I've ever seen! I won't say anything about the cart... Good snag!


Sent from my iPad using Tapatalk
 
OP
A

Alexbn921

Well-known member
Joined
Aug 22, 2013
Messages
579
Location
East Bay Nor Cal
I ordered the paint and some new course wire brushes. I will have to research electrolysis. Living California I need to be careful how to dispose of the byproducts.
How do I get the quill apart? There is a snap ring on the top that looks preloaded and some kind of hard to get to split ring on the bottom.


Worked on the pole last night.


Fretters

Well-known member
Joined
Jan 25, 2014
Messages
4,217
Location
South Yorkshire, England
I will have to research electrolysis. Living California I need to be careful how to dispose of the byproducts.

There's a fairly recent thread on here regarding the subject. If you keep to using iron/steel as your anodes, then just dump the water onto the flowerbed when you replace it, (it's iron rich, so most plants will love it), and put the paint & rust dross from the bottom into the bin. It's only when you introduce other metals that you risk any contamination, though even that would be minimal.
 

WWIIjeep

Well-known member
Joined
May 30, 2012
Messages
1,240
Location
Arizona
How do I get the quill apart? There is a snap ring on the top that looks preloaded and some kind of hard to get to split ring on the bottom.

The bearing at the top is preloaded by a wave (spring) washer underneath it. That's what is pushing against the snap ring.

The split ring at the bottom should stay on the spindle. To get the bearing and spindle out of the quill, you have to remove the threaded ring on the bottom of the quill with a spanner wrench. Then the spindle and lower bearing will come out of the quill.

There's another (hidden) snap ring on the spindle, above the lower bearing, which is why you won't be able to remove the spindle without first removing the threaded ring at the bottom of the quill.
 
To avoid these ads, REGISTER NOW!
Top Bottom