
You are using an out of date browser. It may not display this or other websites correctly.
You should upgrade or use an alternative browser.
You should upgrade or use an alternative browser.
Jake's Projects ...... or, .... How I waste my time
- Thread starter jakemac
- Start date

Outlawmws
Well-known member
Vise
Outlawmws
Well-known member
That would be the one you are painting... Wasn't that obvious?
Outlawmws
Well-known member
")

Last edited:
 )
)
G20-Budo
Well-known member
We need more pics..
drivesitfar
Well-known member
REED vise??
drivesitfar
Well-known member
Craftsman vise made by reed?????

drivesitfar
Well-known member
JAKE: Cheers buddy. (ice tea for me)
i know that Joe and Bagged bought $100 smokers to cook their vises, but if you are going to cook one with BLO i'm told you need to take it outside.
i wish i had an old vintage shop oven and fridge so it's on my LIST.
the little color pic you did give us looks pretty SWEET and i love old CRAFTSMAN vises made by REED.
post pictures when you have time and over on the vise thread too.
Well, here it is ......
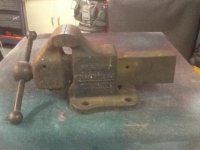
I picked up this vise two weeks ago sitting out in the rain at a flea market. It's a 4" 1940's Craftsman(Reed) #5181. It was in good shape, but a bit rusty because of neglect. I had a few issues getting it apart, the slide had just enough dings on the edges to bind it up in the tight channel. I had to beat it out using a wooden dowel. The next challenge was getting the pin that keeps the main nut in place out. It had a pressure fit and didn't want to budge. After soaking with PB Blaster for a few days, I solved the problem with a junk socket the same size and a BFH.
Then it was the usual cycle of degreasing, derusting, wire wheeling, cleaning, and painting.
Here's how it looked when I first got it home :
Attachments
Last edited:
PSYKO_Inc
Well-known member
That one doesn't seem to be in terrible shape, should be a nice restoration. I've got a couple vises around the garage that may get restored in the future, but for now I just put 'em to work in their "as found" condition.
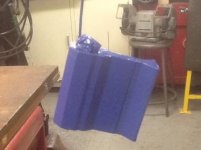
When it came time to paint the vice, I ran into an issue. I use Valspar's Premium Finish in Classic Royal Blue #85205, and I didn't have enough left to paint the whole vise. No problem, I'll just run out to one of the 3 Lowes in my area and pick up more. NOPE. This product line is now discontinued. They replaced it with a different product line with a Royal Blue, but when I checked online, the reviews were worse and I didn't want to experiment to find a match again. So I did a search to see if any of their stores had any left in stock.
There were 4 cans sitting in a store an hour away. When I got there, the inventory was off and they only had two left. So it seems that I have the last two cans in New England.
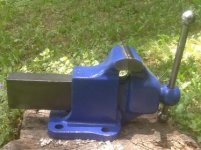
Once painted, I used a paint pen to paint the letters silver. Then two coats of clearcoat to preserve the paint.
There were 4 cans sitting in a store an hour away.
When I got there, the inventory was off and they only had two left. So it seems that I have the last two cans in New England. Once painted, I used a paint pen to paint the letters silver. Then two coats of clearcoat to preserve the paint.
Attachments


That one doesn't seem to be in terrible shape, should be a nice restoration. I've got a couple vises around the garage that may get restored in the future, but for now I just put 'em to work in their "as found" condition.
It was a good restoration, it just took time to type on the iPad to post it.
You must have patience young Padawan.

Last edited:
CrotalusAtrox
Well-known member
Like that blue on that Craftsman It came out very nice
PSYKO_Inc
Well-known member
Yeah I guess I kinda jumped the gun a bit there. Vise turned out great!
drivesitfar
Well-known member
Jake: WELL DONE!!
that's an oldie too maybe 1920's or 1930's.
KEEPER or present or ??
what's next on the project list? sorry to ask so soon because you do deserve a break.
that's an oldie too maybe 1920's or 1930's.
KEEPER or present or ??
what's next on the project list? sorry to ask so soon because you do deserve a break.
Nice vise Jake, I became the owner of a Reed 106 recently and I'm in the middle of electrolysis on it now. I'm debating on keeping it, if it were a swivel mount there would be no question but alas, it's a 6" solid mount 140# beast and I'm having thoughts of letting it go so I feel you. Here's to hoping we both find 5198(?) swivel mount vises! [emoji481]
Sent from my SM-T230NU using Tapatalk
Sent from my SM-T230NU using Tapatalk
Jake
I've followed this thread for awhile. What is a good supplier for the rotoloc/roloc sanding discs and other supplies you have used for your tool restorations?
I have tools from a grandfather and others from past auctions/etc that I would like to refinish. Some for rust removal only and others for a better restore.
GirchyGirchy
Well-known member
As nice as your stuff is, you should post some larger pics!
Thanks for stopping in guys. I appreciate your interest.
CD1 - since I don't use rolocs that often, I get them at harbor freight or at the local flea market. Which means lower quality imports. If I was using them more often for work, I'd probably be looking for a better quality named brand.
Girchy - I'd love to post better quality pictures, but my computer is currently dead and I'm reduced to posting off my iPad. I have no way at this time to get pictures off my camera to post. If you open the attached pictures in a new window you should be able to expand them, but the lower quality may make them blur.
Last edited:
Once again, I didn't think to take pictures until I was almost done.
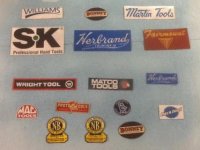
The last couple nights, I've been searching for pictures of tool brand's logos to steal off the internet. Why? You might ask ? The answer is simple - Magnets.
Since my computer died, I've been stuck using my iPad. This means that I have no access to my graphics programs to tidy up and print images. Finding images that are good enough to print hasn't been easy and a few are blurry.
So, what am I doing ? As I said, I've been making magnets to put on the drawers of my tool boxes. I don't like to use stickers or decals, so when I get one, I put it on some magnetic paper to turn it into a magnet. This way I can change them around if needed, and if I decide to sell a box it will clean up easily. The problem was that I didn't have stickers for many of the brands I wanted. Some brands are vintage as well.
I started by going to Michaels and picking up some 8x11 magnetic paper that can be used in a printer. The paper comes rolled up, so it needs to be flattened before using in the printer. I stuck them to the inside of the door of a metal cabinet for a few days to remove the bends. Then, I used an app called "Print to Size" to resize and layout the images I had saved onto the full sheet. I print right from the app.
Once the ink dries, I use an Exacto knife to trim each image out.
The next step is to seal the ink and give the magnet a glossy look.
I start by giving the magnets a light coat of gloss clearcoat and let it dry.
Next, another light coat to catch the spots I missed and let it dry.
Finally, a heavy coat to create a thick glossy layer and let it dry overnight.
Once dry they can be used Around the shop without worrying about devaluing your toolboxes.
Attachments
Last edited:

Outlawmws
Well-known member
I like it!
A few weeks ago, Uniballer posted in the garage sale thread about a house he was cleaning out. Hiding in one of the pictures he posted was a pull type bell, similar to the ones used for marking rounds in Boxing. I immediately thought about the mancave that my BIL and I share in the basement. So, after drooling for a bit, I PM'd him and we worked out a deal.
As usual, in my excitement, I forgot to take a before picture. The last week and a half has been restoring the bell and making a plaque to mount it on (which means a lot of waiting for paint, stain, and polyurethane to dry).
The frame was in good shape, it just needed a paint job and a little polishing. The bell, unfortunately, was a bit rougher. It's a steel bell with a thin brass plating. The plating was flaky and missing in spots. It came off easily on the wire wheel. Rather than trying to polish the steel, I decided to paint it with Krylon Caramel Latte since I had it on hand.
The plaque was a shape I found on the Internet. I made it out of a piece of maple and stained with Minwax Gunstock stain, finished with 3 coats of poly.
Once done, I added a brass chain with a 4-1/2" brass Baseball Bat (not shown) as a pull handle on the end.
Mounted on the wall within easy reach of the main chair, the bell is now set to cheer on the Bruins, Patriots, Red Sox (too late), and Revolution (maybe next year). We're not a basketball household, so the Celtics can fend for themselves.
My sister will be pi**ed. The bell sets off the dog when it rings.
Attachments

Last edited:
drivesitfar
Well-known member
Jake: good eye and great idea for the MAN CAVE.
I really like the labeling you do and i'll have to check that out better when I GET ORGANIZED and get my stuff more permanent. for know i'm using tape and a sharpie.
WELL DONE!!
I really like the labeling you do and i'll have to check that out better when I GET ORGANIZED and get my stuff more permanent. for know i'm using tape and a sharpie.
WELL DONE!!
uniballer
Well-known member
That turned out nice
Sent from my Z716BL using Tapatalk
Sent from my Z716BL using Tapatalk
Spent the week cleaning up a manual for a Cman 103.08011 belt/disk sander so I can post it over at VintageMachinery. I got the manual off eBay last year after searching for several years. I couldn't work on it until now because my iPad couldn't do that kind of work.
I had to explain to the seller why anyone would be interested in an old ripped tool manual. He didn't get it, but was happy to make a few bucks off of it. I didn't explain that after spending my own money, I was going to spend a week cleaning it up and making it available for free to anyone who could find it on the web.
Now that I have a working computer again (sort of, still setting up), I can get back to doing this sort of thing. I still need to find working copies of some of my old graphics programs to work on rebuilding the decal files. All those got lost when my old hard drive blew a gasket. Unretrievable. I'll have to start over from scratch.
Anyway, I've been turning this :

into this :

The other pages were in worse shape, with tears, dirt, smudged letters and words, and missing bits. Lots of Copy/Paste involved, almost at the pixel level.
The PDF that was created has been uploaded to VM. It will be available for download once the admin has a chance to approve it.
The manual can be downloaded here :
http://www.vintagemachinery.org/pubs/detail.aspx?id=16653
I had to explain to the seller why anyone would be interested in an old ripped tool manual. He didn't get it, but was happy to make a few bucks off of it. I didn't explain that after spending my own money, I was going to spend a week cleaning it up and making it available for free to anyone who could find it on the web.
Now that I have a working computer again (sort of, still setting up), I can get back to doing this sort of thing. I still need to find working copies of some of my old graphics programs to work on rebuilding the decal files. All those got lost when my old hard drive blew a gasket. Unretrievable. I'll have to start over from scratch.
Anyway, I've been turning this :
into this :
The other pages were in worse shape, with tears, dirt, smudged letters and words, and missing bits. Lots of Copy/Paste involved, almost at the pixel level.
The PDF that was created has been uploaded to VM. It will be available for download once the admin has a chance to approve it.
The manual can be downloaded here :
http://www.vintagemachinery.org/pubs/detail.aspx?id=16653
Last edited:
.................Now I just need to figure out how I want to set up the 220v wiring to the box. I'll do the rough-in work myself, and then have an electrician check my work and do the final hook-up. I'll make another post when that happens. It may be another few weeks though.
Well, I guess my timing was a little off, it's been a year and a half.
Not much happening in the shop for a while, life has been kicking my **** for the last few months.
I was able to get one thing off my to-do list last week. Unfortunately while working on it, it turned into two things.
It started with the need to wire a 220v line for the compressor. This is the first 220v line I've wired, so I double and triple checked myself as I went. I decided to run the compressor and the table saw off the same line and put a 30a breaker in the sub-panel. I then had to figure out how I wanted to run the line up to the scissor switches and then down to the compressor.

The line for the table saw will have to wait until later. I have to figure out how I want to get around a steel I-beam, place the saw in its permanent spot, and then re-wire the saw. That's all still at the bottom of my list.

Once the compressor side of the line was done and tested, I hooked up the compressor (that's been sitting since I picked it up 1-1/2yrs ago) and flipped the switch. Hummmmm, **** !

I had repeatedly confirmed that the motor was set up for 220v, so I know I didn't do anything wrong. The motor must have been fried when I bought the compressor. Now the one project has turned into two projects.

Spent a little time on the Internet and found a NOS motor in its original box. The issue was they wanted $299 for it. I offered $200 and they accepted. Still much more than I wanted to pay, but not out of the question unless I wanted to spend a few years hunting for a better bargain (it's been known to happen).

Once the motor showed up, it got installed and wired. After a few minutes of sweaty anxiety, I flipped the switch and ........ It runs perfectly !

This is an upgrade from a portable 1hp 12gal compressor that I bought used for $100 26yrs ago, to a 2hp 30gal horizontal that I paid $125 for (with 120' of hose). With the new motor and some other parts, I'm about $350 into the new compressor. Not good, but I could have done worse. To offset, I should have no problem selling the old compressor for the same price I paid for it in 1991. More if I throw in a hose or two.

I haven't had a chance to put it through it's paces yet. Eventually I'll run some air drops around the shop and add the water filter. A radiator would be nice as well. It should at least be an improvement over what I was using. We'll see.
One more thing off the checklist.
Last edited:
G20-Budo
Well-known member
Jake,
Just remember.. sh*t happens.. You made the most of it. And now you have a bigger more power compressor with a new motor on it! Should last a long time!
And it looks like you've made more progress in your garage in the last year than I did..so
Just remember.. sh*t happens..
You made the most of it. And now you have a bigger more power compressor with a new motor on it! Should last a long time! And it looks like you've made more progress in your garage in the last year than I did..so