To avoid these ads, REGISTER NOW!

Jake's Projects ...... or, .... How I waste my time

jakemac

Well-known member
Joined
May 21, 2013
Messages
9,035
Location
New England
I've got a pile of projects backing up in my shop (as I put it together), so I thought I'd start a separate thread instead of squeezing them into someone else's posts.


First up is a new wire wheel set-up.

I'm tired of having to start my old wheel by pulling the pulley belt. It would also be nice to not have to swap wheels when I need a course wire. So, my old trusty deathtrap needs to go. Enter a new deathtrap.
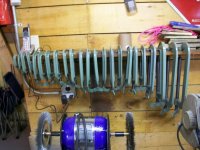
I'm replacing this -
attachment.php


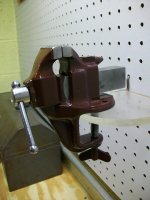
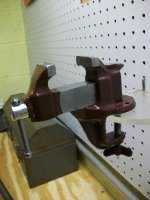
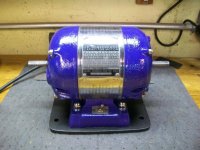
With this - (I freely admit that I planned this with the thought to inspire jealousy in a certain un-named member here :p)
attachment.php


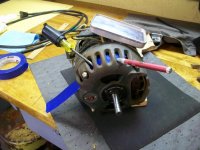
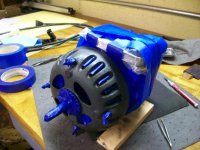
I started with the motor, a 1/2hp 1750rpm Craftsman. It needed a TON of sawdust blown out, a new cord, and the bearings needed to be re-greased. The second and third pictures are of me getting it ready for paint without taking the motor apart. Getting the tape into the housing was challenging.

I used Valspar Classic Royal Blue. I was hoping it would come close to Craftsman Blue, but it's too bright. Still, it's the closest rattle can I've found so far.

The stand is an original Craftsman stand that I paid WAY too much for. It got wire wheeled (the last job with the old contraption) and painted Rustolium Metalic Black.

(More in the next post)
 

Attachments

  • 100_1078.jpg
    100_1078.jpg
    138.3 KB · Views: 9,071
  • 100_0986.jpg
    100_0986.jpg
    139 KB · Views: 853
  • 100_0987.jpg
    100_0987.jpg
    135 KB · Views: 781
  • 100_1074.jpg
    100_1074.jpg
    139.6 KB · Views: 707
Last edited:
To avoid these ads, REGISTER NOW!
OP
J

jakemac

Well-known member
Joined
May 21, 2013
Messages
9,035
Location
New England
Wire Wheel cont. -

The next thing I needed to do was find a way to shield the motor from inhaling dust and wire shrapnel. At first I thought that I'd just stretch a pair of nylons over it, but that image didn't sit well in my head :lol:
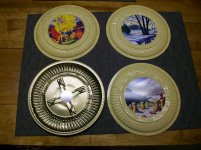
. I bounced a few other ideas around and finally came up the the idea to use Flue Stops (pic 1) (those things that look like metal paper plates that cover the stovepipe holes in walls). I removed the "painting" inserts and hammered the backing flat. The hole in the center is the perfect size to fit over the raised area of the bearing cover. I then drilled holes so the bearing cover screws can hold the shield on, and a hole in one to expose the reset button (pic 2). (I used a paddle bit, the first two tries didn't go well. That's why I bought extras)

After making the shields, I had to make a mounting plate (pic 3) to go between the motor and the stand. I used 1/4" steel plate and elevator bolts to mount it all.

The shields, plate, and bolts were painted metalic black to match the stand and I used thin drawer liner between everything to keep it all from rubbing together.

Pic 4 shows the elevator bolts holding the plate to the base.
Pic 5 shows one of the shields installed. The bearing cover screws hold it on.
Pic 6 is the whole thing together.

I originally thought about painting the shields to match the motor, but it would be way too blue for my tastes. I still need to get better arbor adapters. They're both RH, so the left one runs the risk of coming off, it's out of balance as well. Spacers to push the wheels out are also on the list, as well as 10" wire wheels so I'm not working at the same level as the shields.

Even so, it will be nice to use the wheels without having to stop and swap out.


Other projects in the line (for now) are :
a 12" disk sander repaint
new benches
Toolbox cleanings and/or repairs/rebuilds
a 12" bandsaw rehab
a parts cleaner cleaning/repair
perhaps a vise or two
and I always seem to have a c-clamp or two to rehab
 

Attachments

  • 100_1070.jpg
    100_1070.jpg
    133.5 KB · Views: 467
  • 100_1065.jpg
    100_1065.jpg
    133.5 KB · Views: 509
  • 100_1064.jpg
    100_1064.jpg
    144 KB · Views: 653
  • 100_1075.jpg
    100_1075.jpg
    132.4 KB · Views: 491
  • 100_1076.jpg
    100_1076.jpg
    133 KB · Views: 641
  • 100_1080.jpg
    100_1080.jpg
    139.6 KB · Views: 520
Last edited:

scw1991

Well-known member
Joined
Mar 28, 2010
Messages
506
Thinking I'd be a bit more concerned about that arbor letting loose from the shaft than debris entering the motor.

Love the vintage motor and stand though. Nice color choice!
 
OP
J

jakemac

Well-known member
Joined
May 21, 2013
Messages
9,035
Location
New England
I knew you'd like this one 94. It's a shame that those arbor adapters of yours wouldn't fit it. They would have been perfect.
 

Fretters

Well-known member
Joined
Jan 25, 2014
Messages
4,217
Location
South Yorkshire, England
so I thought I'd start a separate thread instead of squeezing them into someone else's posts.

Matey, the gratuitous and largely irrelevant mentions in any thread whenever there's the slightest opportunity are practically a forums must. :D

Be good to see how that machine performs over time.
 
OP
J

jakemac

Well-known member
Joined
May 21, 2013
Messages
9,035
Location
New England
Thinking I'd be a bit more concerned about that arbor letting loose from the shaft than debris entering the motor.

Love the vintage motor and stand though. Nice color choice!

The adapter is secure to the shaft, it's the nut spinning in the wrong direction that has trouble staying tight. I need to get LH and RH adapters.


I'd have just put an old Schwinn bicycle chain guard over the v-belt...

Good idea, but then I wouldn't have had anything to grab to get the motor spinning. :lol:
 
Last edited:

geologist

Well-known member
Joined
Dec 14, 2011
Messages
5,326
I just finished replacing the bearings and all of the wiring in a motor like that. It was a real pain in the ***. The only thing left to do is button it up.
 
OP
J

jakemac

Well-known member
Joined
May 21, 2013
Messages
9,035
Location
New England
I got to use the new wire wheel today. PASS :thumbup:

It's lower than I'm used to, but I'll get used to that. The great thing is that I don't have to fuss with a v-belt, it doesn't bog down or stall no matter how hard I push, and there is no jack-shaft to overheat.

I ran it for almost an hour (cleaning up c-clamps that have been soaking in EvapoRust for a week while I built the new machine) and the temp on the motor didn't even make it to lukewarm. It's a LOT quieter than the old set-up as well.
Happy Dance ! View media item 40257
I have better quality arbor adaptors (LH & RH) on order from Zoro.
 

nine4gmc

Well-known member
Joined
Mar 24, 2012
Messages
14,357
Location
Dallas
That's my only complaint, the pipe stand is too short, I am only 5'8 and I get a stiff neck after wheeling parts for any extended period. I need to find a source for 2-3/4" finished pipe....
 

-Brent-

Well-known member
Joined
Dec 23, 2009
Messages
4,709
Location
Utah
Nice job. It looks like a sharp set-up. Can't wait to see more.

What do you think about the speed of this unit, Jake? I messed around with a few 1750s and they seem to have more "grunt" than the 3450+s as far as not bogging and such but the faster motors seem to handle tasks faster/better.
 
OP
J

jakemac

Well-known member
Joined
May 21, 2013
Messages
9,035
Location
New England
I have the same motor at 3450rpm set up as a polisher. The higher rpm works for polishing, but I like the 1750rpm for the wire wheel. That's what my old set-up was at and I'm comfortable with it.

Besides, having shrapnel come at your head at 1750rpm is safer than at 3450rpm, isn't it ? View media item 38280
 
OP
J

jakemac

Well-known member
Joined
May 21, 2013
Messages
9,035
Location
New England
Just a quick little project today.
I picked up a rusty Eklind hex key set this morning. I spent a little time on the wire wheel and rubbing with Nevr-Dull this evening and cleaned it up.

before and after
 

Attachments

  • 100_1084.jpg
    100_1084.jpg
    136.8 KB · Views: 923
  • 100_1090.jpg
    100_1090.jpg
    136.5 KB · Views: 1,010

drivesitfar

Well-known member
Joined
Oct 23, 2013
Messages
36,007
Location
Pacific Northwest
Jake: great idea for a thread. by the way the de rusting you just did on the nice little set of Allen wrenches looks great. how long did it take you to make the transformation?

also i make sure to wear heavy clothing, long sleeves and full face shield when i'm using my wire wheel on my buffer, but i'm at 3600 RPM and those wires tend to stick when they fly off the wheel.

keep up the great work and would love to see your clamps in before and after mode too because i have a box full of them to de rust.
 
OP
J

jakemac

Well-known member
Joined
May 21, 2013
Messages
9,035
Location
New England
The whole thing took about 30-45 minutes, that included vigorously rubbing the stand with wads of Nevr-Dull to clean it up.

My wheel spins at 1750rpm, and the wires stick just as well as at a higher speeds. :lol: I've gotten used to pulling them out of my skin by now (how they get into the middle of my back I'll never know :headscrat), I only get annoyed when one of the wires finds it's way into the bottom of my foot.

I don't always remember to take pictures of the clamps except to post them in the Garage Sale thread. After that they get dumped into the EvapoRust tub and sit there until I get around to cleaning and painting them. I should have another round finished by the end of the week or so.

Here's a link to a thread from a few months ago about the first batch.
http://www.garagejournal.com/forum/showthread.php?p=3635866#post3635866
 
Last edited:
To avoid these ads, REGISTER NOW!
OP
J

jakemac

Well-known member
Joined
May 21, 2013
Messages
9,035
Location
New England
As requested, here are pictures of

1 - The latest batch of clamps.
2 - All my winged clamp duckies in a row (notice the upgraded arbor adapters and spacers on the wire wheel)
3 - some of my other clamps

Sorry, I don't have any before pictures. All were rusted up pretty good, and a few were seized. One needed a little bit of gentle beating with my biggest hammer to free it up, even after soaking in PB Blaster for a week.

I think I'm good on 4" and 6" clamps, but I still would like to pick up a few 8" and 12" ones to round out. Maybe a couple 5", 2" and 3" would be nice. A few larger than 12" would be handy. Hmmmmmmmmmm .................... something tells me I'm not done yet :lol_hitti
 

Attachments

  • 100_1094.jpg
    100_1094.jpg
    144.7 KB · Views: 508
  • 100_1093.jpg
    100_1093.jpg
    138.3 KB · Views: 591
  • 100_1092.jpg
    100_1092.jpg
    134.6 KB · Views: 540
Last edited:

-Brent-

Well-known member
Joined
Dec 23, 2009
Messages
4,709
Location
Utah
Love the clamps. Nice work. You can never have enough. I think they'll look even better with a little wear on them.
 

drivesitfar

Well-known member
Joined
Oct 23, 2013
Messages
36,007
Location
Pacific Northwest
Nicely done Jake. i see a little room up there for a few more so keep grabbing those good ones as you see them. I picked up a few English made Record clamps that are a nice blue that would look great with your collection if you can find a few.
 
OP
J

jakemac

Well-known member
Joined
May 21, 2013
Messages
9,035
Location
New England
Stanley #741 clamp vise restoration.

Here's one of my "in progress" projects

It's a clamp-on vise made by Stanley. The current guess on age is 1920-1934 (thanks Outlaw). More likely later than earlier. The original color seems to be a reddish brown, so I'll be looking for a rattle can that comes close.

I got REALLY lucky.
There was no grease or oil on the vise, so I expected the pins to be rusted in place. The first pin (holding the main screw in place) came right out with a drop of PB Blaster and a few light taps with a punch and 4oz hammer. The retaining pin for the main nut was harder. I couldn't push it from the bottom because it has a slight mushrooming, so I used a striking screwdriver (sideways) and transfered the hammer blows to the pin that way. I was afraid to wail on it for fear of cracking the 80+yo steel. The 4oz wasn't getting me anywhere, but an 8oz popped it right out.

I'm leaving the clamping screw on it because I don't want to mess with trying to take it apart without damaging it. The pad has a crack that I don't want to make worse.

Now it all sits in a tub of old EvapoRust for about a week. This batch of ER has been in use for about a year and is due to be retired after this job. Hence the week long bath when a fresher batch wouldn't take as long. Look out weeds, I'm a-comin' for ya ! AhaHaHa !


I've got an incomplete workbench build on hold at the moment. Waiting for funds and willingness to continue. :dunno:
 

Attachments

  • 100_1155.jpg
    100_1155.jpg
    146.7 KB · Views: 383
  • 100_1157.jpg
    100_1157.jpg
    146.6 KB · Views: 328
  • 100_1159.jpg
    100_1159.jpg
    145.2 KB · Views: 343
  • 100_1158.jpg
    100_1158.jpg
    144.7 KB · Views: 341
Last edited:
OP
J

jakemac

Well-known member
Joined
May 21, 2013
Messages
9,035
Location
New England
a nekkid vise !

Well I guess that old batch of ER is still good. I checked the parts today and while they could have stayed in another day, a little extra work on the wire wheel cleaned it all up.

Everything got a light touch with the course wire wheel, then more work on the fine wheel. Next it was off to the polishing wheels for the screw/handle. Red rouge then White and it shines like chrome. :D I still have to do the jaws, striking pad, and slider. I'll finish off the polished bits with a bit of Nevr-Dul before masking and painting.

A new, thicker, shim was made for the main nut out of some stainless steel I had laying around to take up some of the slop.

Now I need to find a can of paint that is close to the original brown. I'm thinking RO 2X Kona Brown, but I'll have to check it out first.
 

Attachments

  • 100_1160.jpg
    100_1160.jpg
    137.5 KB · Views: 401
OP
J

jakemac

Well-known member
Joined
May 21, 2013
Messages
9,035
Location
New England
Stanley #741 clamp vise restoration.

Vise parts hangin' out in the warmest room in the house while the paint cures. I'll leave them there for a few days if I can be patient. Ignore the paint color, the flash on the camera makes it look red. The color is Kona Brown (much darker).
 

Attachments

  • 100_1178.jpg
    100_1178.jpg
    138.1 KB · Views: 482
OP
J

jakemac

Well-known member
Joined
May 21, 2013
Messages
9,035
Location
New England
Hey, sometimes sh-PINK just happens. :dunno:

:lol_hitti:lol::lol_hitti

For some reason my camera has trouble with true colors with the flash or under fluorescent lights. :mad:
 
Last edited:
OP
J

jakemac

Well-known member
Joined
May 21, 2013
Messages
9,035
Location
New England
Stanley #741 clamp vise restoration - COMPLETE

Well, the paint dried faster than I was expecting, so I decided to let it "cure on the vine" and re-assemble it.

I left all the scars on the jaws and anvil to keep it's history, but buffed and polished the burrs smooth to keep it functional. The new shim tightened up the jaw nicely. The Kona Brown isn't a match for the original paint, but it's the closest that I could find.

You might be asking yourself "why did he display it on a plexi shelf instead of on the bench were it will be used ? ". The answer is simple - I'M AN IDIOT. The clamp opens to 1 1/4". My bench is 1 1/2" thick. When I picked up the vise and started to restore it, I never measured it or tried it on the bench. :tard:

I was really looking forward to using it too. :sad:
Now I need to look for another one that will fit. :D
 

Attachments

  • 100_1180.jpg
    100_1180.jpg
    135.8 KB · Views: 459
  • 100_1181.jpg
    100_1181.jpg
    130.8 KB · Views: 388
  • 100_1183.jpg
    100_1183.jpg
    130.5 KB · Views: 360
  • 100_1184.jpg
    100_1184.jpg
    134.7 KB · Views: 329
Last edited:

Outlawmws

Well-known member
Joined
Aug 9, 2011
Messages
39,180
Location
The Badlands
Nice job! you have a std vise on the work bench, right?

2x4 4" long, + a longer piece ft thick ply. Glue and screw so the longer piece sticks out from the 2x4. From the end it should resemble a "T"

Clamp the 2X4 in your regular vise

Clamp the little Stanley on the overhanging Ply...
 
OP
J

jakemac

Well-known member
Joined
May 21, 2013
Messages
9,035
Location
New England
I still haven't built my vise bench yet (hey - it's only been 4 years, I still got time - right ? :lol:). The clamp vise was going to be used on my "clean" bench for light work. Something will turn up eventually.
 
OP
J

jakemac

Well-known member
Joined
May 21, 2013
Messages
9,035
Location
New England
Yea, I know. When there's a will, there's a way.
But then I wouldn't have the excuse to buy more until I find the right one. :lol:
 
OP
J

jakemac

Well-known member
Joined
May 21, 2013
Messages
9,035
Location
New England
Just a little fluff project this week to keep me busy between other issues (dead hard drive, screwed up water filtration system, and no-one near me stocks RO Verde Green :mad:).

I picked up a little japanese made hobby anvil last week (1970's maybe ?) and decided to clean it up. The faces got polished, the wood base got stained and poly'd, and the anvil got a new dress of Rustoleum Hammered Verde Green. I didn't get much of the hammered effect though. It seems that my idea of 2 "medium coats" and RO's idea of 2 "medium coats" are not quite the same thing. :dunno: Either way, it works for me. :)

before and after :
 

Attachments

  • 100_1185.jpg
    100_1185.jpg
    137.2 KB · Views: 377
  • 100_1189.jpg
    100_1189.jpg
    135.2 KB · Views: 510

Alexbn921

Well-known member
Joined
Aug 22, 2013
Messages
579
Location
East Bay Nor Cal
Re: Stanley #741 clamp vise restoration - COMPLETE

The clamp opens to 1 1/4". My bench is 1 1/2" thick. When I picked up the vise and started to restore it, I never measured it or tried it on the bench. :tard:

I was really looking forward to using it too. :sad:
Now I need to look for another one that will fit. :D

Dremel out 1/4 inch from the underside of your workbench where you want to mount it. No one will be able to see it and it won't weaken the bench.:thumbup:
 

Outlawmws

Well-known member
Joined
Aug 9, 2011
Messages
39,180
Location
The Badlands
He would probably still have to notch out some of the bottom edge, unless the clamp pad is > 1/4" and the frame is > than 1-1/2"
 
To avoid these ads, REGISTER NOW!
Top Bottom