

You are using an out of date browser. It may not display this or other websites correctly.
You should upgrade or use an alternative browser.
You should upgrade or use an alternative browser.
Jake's Projects ...... or, .... How I waste my time
- Thread starter jakemac
- Start date
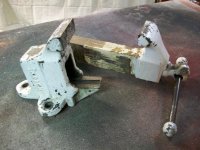
I picked up a Reed 102-1/2 a few weeks ago, and finally started working on it.
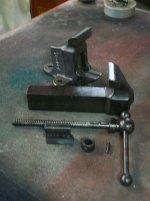
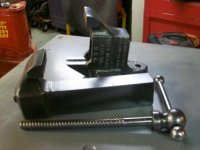
So far I've stripped the paint by soaking in Simple Green for a few days with the occasional scrubbing with a nylon brush, fixed a bend in the handle with a few strategic blows with a 48oz BP on a piece of RR track, and wire wheeled the whole thing to cleanup after the SG bath.
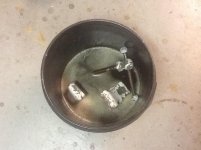
The next move will be to soak it in EvapoRust to get it all the way down to bare metal and create a good base for the primer.
The jaws and handle will get a polishing, but the rest will be left alone and painted. No fillers, unless there are major flaws, I like to see the signs of a vises history of being used. All those dings and cuts are part of the vises history that I like to preserve.
Before and in-progress pics.
(putting the little vise in the bucket was like drowning a kitten, it was so sad)
So far I've stripped the paint by soaking in Simple Green for a few days with the occasional scrubbing with a nylon brush, fixed a bend in the handle with a few strategic blows with a 48oz BP on a piece of RR track, and wire wheeled the whole thing to cleanup after the SG bath.
The next move will be to soak it in EvapoRust to get it all the way down to bare metal and create a good base for the primer.
The jaws and handle will get a polishing, but the rest will be left alone and painted. No fillers, unless there are major flaws, I like to see the signs of a vises history of being used. All those dings and cuts are part of the vises history that I like to preserve.
Before and in-progress pics.
(putting the little vise in the bucket was like drowning a kitten, it was so sad)
Attachments
G20-Budo
Well-known member
Nice vise there Jake! I look forward to seeing it completed. I'm a big fan of those older Reeds! 
I'd like to get my hands on a Reed 2C if one popped up in my area for a reasonable price, but I already have 4 vises..
I'd like to get my hands on a Reed 2C if one popped up in my area for a reasonable price, but I already have 4 vises..
G20-Budo
Well-known member
It's looking VERY good!!
taumac
Well-known member
but I already have 4 vises..
WHAT!!!! Only 4!!!! We need enable ( cough cough ) help you out. I think we should all send you some CL ads. LOL
taumac
Well-known member
Looking real good there jake. I like the "naked" look especially on theses older vises.
Removing Sticker Residue without damaging painted finishes.
The Reed has been on hold for a while. Waiting for the weather to turn so I can paint.
In the meantime .........
Over the weekend, I picked up some hanging cabinets for the shop.
One of the cabinets had a magnetic sticker on it. Peel, toss, done.
Another cabinet had two vinyl stickers on it. Since I'm not interested in RV'ing, the Camper's Inn advertising had to go. As an aside, if you're going to put stickers on your boxes or cabinets, DON'T cover the graphics ! Better yet, put them on magnetic paper first so they can be easily moved or removed by the next owner.
The vinyl came off easily with a heat gun, but the sticker residue was left behind. The usual solvents for removing it also remove paint, so another method needed to be used.

Here's how I remove the sticker residue. It's a tedious process that takes time, but the results are worth it.
First, I remove the vinyl or paper of the decal using a hair dryer or heat gun. Let the metal cool off. This process works best at room temperature.
After that, I use electrical tape to pull up the residue. Start at an edge of the residue. Press a piece of e-tape onto the residue to make a bond to the e-tape adhesive. Just the part under your finger or thumb, not the whole strip. Then, sharply pull the tape off, like a bandaid. REPEAT, over and over again until residue comes off the tape and back onto the surface. As needed, move to a fresh spot on the tape. Toss the tape when it gets full, and use a new piece to continue.

Alternate pulling up, and at a slight angle. Periodically, wipe the cleared area with your finger to feel for anything that might have been missed. As you go, you will get a feel for what works and what doesn't. You will go through a lot of tape, so make sure you have enough on hand.
(I use both hands for this, the pictures only show one hand because the other is holding the camera)
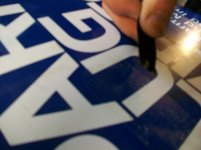
As I said, this takes time. A 3x5 area took me about an hour. If your fingers start to cramp, walk away and do something else for a while. The residue can wait. It helps to sit while you're working. The process can be mind numbing.
This will only work if the residue is still tacky, it it's old and dried out this won't work. I've tried this method with scotch tape, masking tape, painter's tape, duct tape, gorilla tape, and gaffer's tape. Electrical tape works the best and is less likely to leave it's own residue behind, or pull up paint. Solvents have their place, but work better on bare metal or resistant coatings. The tape method take much longer, but the end result is less likely to affect the finish.

The Reed has been on hold for a while. Waiting for the weather to turn so I can paint.
In the meantime .........
Over the weekend, I picked up some hanging cabinets for the shop.
One of the cabinets had a magnetic sticker on it. Peel, toss, done.
Another cabinet had two vinyl stickers on it. Since I'm not interested in RV'ing, the Camper's Inn advertising had to go. As an aside, if you're going to put stickers on your boxes or cabinets, DON'T cover the graphics ! Better yet, put them on magnetic paper first so they can be easily moved or removed by the next owner.
The vinyl came off easily with a heat gun, but the sticker residue was left behind. The usual solvents for removing it also remove paint, so another method needed to be used.
Here's how I remove the sticker residue. It's a tedious process that takes time, but the results are worth it.
First, I remove the vinyl or paper of the decal using a hair dryer or heat gun. Let the metal cool off. This process works best at room temperature.
After that, I use electrical tape to pull up the residue. Start at an edge of the residue. Press a piece of e-tape onto the residue to make a bond to the e-tape adhesive. Just the part under your finger or thumb, not the whole strip. Then, sharply pull the tape off, like a bandaid. REPEAT, over and over again until residue comes off the tape and back onto the surface. As needed, move to a fresh spot on the tape. Toss the tape when it gets full, and use a new piece to continue.
Alternate pulling up, and at a slight angle. Periodically, wipe the cleared area with your finger to feel for anything that might have been missed. As you go, you will get a feel for what works and what doesn't. You will go through a lot of tape, so make sure you have enough on hand.
(I use both hands for this, the pictures only show one hand because the other is holding the camera)
As I said, this takes time. A 3x5 area took me about an hour. If your fingers start to cramp, walk away and do something else for a while. The residue can wait. It helps to sit while you're working. The process can be mind numbing.
This will only work if the residue is still tacky, it it's old and dried out this won't work. I've tried this method with scotch tape, masking tape, painter's tape, duct tape, gorilla tape, and gaffer's tape. Electrical tape works the best and is less likely to leave it's own residue behind, or pull up paint. Solvents have their place, but work better on bare metal or resistant coatings. The tape method take much longer, but the end result is less likely to affect the finish.
Last edited:
Here's some more reading for you Tonellin.
Last Saturday I picked up 4 Napa/Belden spark plug wire cabinets at an estate sale. 3 blue and 1 white. Each has 4 shelves that are the perfect size for standard spray paint cans (didn't know that at the time, I got lucky). Two cabinets had a bunch of cabinet magnets bolted inside that the PO hung tools on, which necessitated removal and cleaning up the holes with a reamer and a body dolly. Another cabinet had stickers on it, which prompted the previous post.
At the time I bought these, I had no clue where I was going to put them since I have almost no wall space left.
The first picture shows the cabinets in front of their new home. I was able to fit everything around the heating pipes and a drain pipe from the shower upstairs, but the stop sign is still homeless for now.
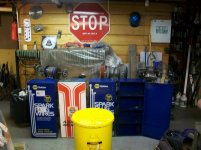
The cabinets were taller than I thought, so everything had to come off the wall, including the shelf. The first aid kit had to move over 1-1/2" so I wouldn't run into the drain pipe.
The second picture shows the spacer I used between the cabinets so I could open the doors. At the top you can see the heating pipes I needed to leave space for.
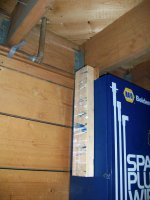
The shelf had to move down 3/4". Then I could finish hanging the last two cabinets.
The 3rd and 4th pictures are the cabinets in their new home, ready to load.
The last pic is all the spray paint that's been clogging up my paint closet, with room to spare.
The blue cabinets are for rattle cans, the white cabinet is for glue, solvents, and misc..

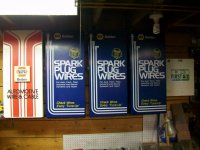

I can finally get my gallon paint cans off the floor again. I still need to find some space for my brooms and wood scraps, but that will sort itself out eventually.
Now, where to put the stop sign .................
Last Saturday I picked up 4 Napa/Belden spark plug wire cabinets at an estate sale. 3 blue and 1 white. Each has 4 shelves that are the perfect size for standard spray paint cans (didn't know that at the time, I got lucky). Two cabinets had a bunch of cabinet magnets bolted inside that the PO hung tools on, which necessitated removal and cleaning up the holes with a reamer and a body dolly. Another cabinet had stickers on it, which prompted the previous post.
At the time I bought these, I had no clue where I was going to put them since I have almost no wall space left.
The first picture shows the cabinets in front of their new home. I was able to fit everything around the heating pipes and a drain pipe from the shower upstairs, but the stop sign is still homeless for now.
The cabinets were taller than I thought, so everything had to come off the wall, including the shelf. The first aid kit had to move over 1-1/2" so I wouldn't run into the drain pipe.
The second picture shows the spacer I used between the cabinets so I could open the doors. At the top you can see the heating pipes I needed to leave space for.
The shelf had to move down 3/4". Then I could finish hanging the last two cabinets.
The 3rd and 4th pictures are the cabinets in their new home, ready to load.
The last pic is all the spray paint that's been clogging up my paint closet, with room to spare.
The blue cabinets are for rattle cans, the white cabinet is for glue, solvents, and misc..
I can finally get my gallon paint cans off the floor again. I still need to find some space for my brooms and wood scraps, but that will sort itself out eventually.
Now, where to put the stop sign .................
Last edited:
bubinga
Well-known member
I could have got you a "Million" road signs at one time.
They are nice for AL stock too.
They are nice for AL stock too.
The stop sign isn't an off the side of the road "find".
It's actually an officially decommissioned sign from the state that was used for a construction exhibit at a museum. I used to do maintenance on the exhibit and was on the crew that demo'd it when it's time was up. It's a piece of my working past. (I wasn't able to keep any of the other props from the many exhibits I've worked on. The dinosaurs, mummies, and R2D2 were off limits. I still have a rubber iguana on the dashboard of my truck, but I'm not telling that story. )
)
I'm sure I'll find a new spot for it somewhere.
It's actually an officially decommissioned sign from the state that was used for a construction exhibit at a museum. I used to do maintenance on the exhibit and was on the crew that demo'd it when it's time was up. It's a piece of my working past. (I wasn't able to keep any of the other props from the many exhibits I've worked on. The dinosaurs, mummies, and R2D2 were off limits. I still have a rubber iguana on the dashboard of my truck, but I'm not telling that story.
)I'm sure I'll find a new spot for it somewhere.
Last edited:
An ongoing project on the To-Do list thanks to interference from family and the weather.
This is the hole left from the 9x16 storage tent that Old Man Winter finally killed.

I forgot to take a picture of the carnage when I started cleaning up last week. Suffice it to say that the tent was squashed like a bug. Fortunately, only 1 plastic storage tote and the indigenous wildlife were harmed.
Here's the location of the new 10x17 HF tent.

I cleared out the brush last summer, thinking that I'd move the old tent, but never got around to it. Now I don't have a choice.
I still have to clear out the leaves, make a new 4x6 frame, fill the space with pallets, throw down some 1/2" plywood for a floor, and make sure I didn't cross the property line (I'm close. The neighbor is keeping an eye out, as would I in his place.). Then I can build the tent on top of it and cover it with a tarp so the original cover will survive the UV onslaught.
The way things are going, it should only take me another 2 or 3 months to finish an afternoon project.
This is the hole left from the 9x16 storage tent that Old Man Winter finally killed.
I forgot to take a picture of the carnage when I started cleaning up last week. Suffice it to say that the tent was squashed like a bug. Fortunately, only 1 plastic storage tote and the indigenous wildlife were harmed.
Here's the location of the new 10x17 HF tent.
I cleared out the brush last summer, thinking that I'd move the old tent, but never got around to it. Now I don't have a choice.
I still have to clear out the leaves, make a new 4x6 frame, fill the space with pallets, throw down some 1/2" plywood for a floor, and make sure I didn't cross the property line (I'm close. The neighbor is keeping an eye out, as would I in his place.). Then I can build the tent on top of it and cover it with a tarp so the original cover will survive the UV onslaught.
The way things are going, it should only take me another 2 or 3 months to finish an afternoon project.
Last edited:
Small progress. The frame is built, and most of the pallets are in.
Had to dig out some large rocks first. Dug out a larger hole for the biggest and buried it deeper.
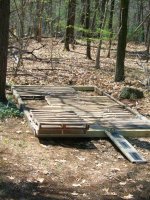
Went out to find two more pallets to fill in the rest of the space. Searched on CL for "free pallets". Plenty of listings saying "they're outside by the dumpster, come pick them up". No address. Some didn't even list a town. Idiots with opposable thumbs. Darwinism doesn't work fast enough.
I finally found a listing that had an address nearby, but the map was set up for the wrong area in the town. :tard: Its a good thing that I was familiar with the area that was listed. Got the pallets I needed. Now I have to cut them down to fit.
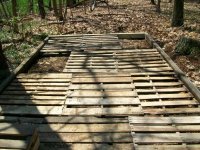
Getting closer to reading the chinese directions for setting up the tent.
Had to dig out some large rocks first. Dug out a larger hole for the biggest and buried it deeper.
Went out to find two more pallets to fill in the rest of the space. Searched on CL for "free pallets". Plenty of listings saying "they're outside by the dumpster, come pick them up". No address. Some didn't even list a town. Idiots with opposable thumbs. Darwinism doesn't work fast enough.
I finally found a listing that had an address nearby, but the map was set up for the wrong area in the town. :tard: Its a good thing that I was familiar with the area that was listed. Got the pallets I needed. Now I have to cut them down to fit.
Getting closer to reading the chinese directions for setting up the tent.
Last edited:
No rain today, finally.
The shelter is up, but still more to do.

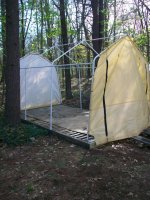

I still need to fill in the holes in the floor with more plywood and put a tarp over it to shield the cover from UV.
But, I can start loading it up and get some space back in the other tent.
Right now everything is piled up so that I have to unpack half the tent to get to anything.
Unfortunately, it also means that I have to start doing the yard work again, now that I can get to the mower.
The shelter is up, but still more to do.
I still need to fill in the holes in the floor with more plywood and put a tarp over it to shield the cover from UV.
But, I can start loading it up and get some space back in the other tent.
Right now everything is piled up so that I have to unpack half the tent to get to anything.
Unfortunately, it also means that I have to start doing the yard work again, now that I can get to the mower.
I suffer from Someday.
Someday, once I figure out what I want to keep, I'm going to sell off some of my duplicates and a few other things that have found their way into my shop. To that end, knowing that I'll need boxes and packing material, I've been letting things pile up.
Someday, I'm going finish building out my long bench. Originally, I planned on moving my grandfather's RAS over from his shop and put it in the middle of the benchwork. Since I get better use out of my portable sliding compound miter saw, I've changed my mind and will use the SCM and Cman RAS cabinet instead. This will give me a little more room for a longer bench. I'll turn the RAS in for the bounty if Craftsman is still honoring it.
Before
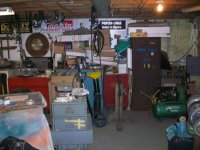
Now, I need the room. So the pile needs to get cleaned up.
Today, I started to get things cleaned and shifted. The boxes got collapsed and stored away, and the packing material got bagged and stowed. The RAS cabinet needed a little work, I'll do more work on it when I get ready to use it for real, Someday. For now it's just holding its place.
The blue cabinet, and a white one, I got from my grandfather. He had them in his shop for years. I wouldn't mind two more, but I have no idea who made them. I think he got them from Bell Labs years ago when they remodeled his lab.
The red boxes are roadboxes I made from scrap plywood off of jobs. Even the castors were free. I only had to buy the hardware and paint (I miss Red Devil enamel). The big one holds air staplers and pin nailers. The small one was my toolbox. Most of the time it was strapped to the wall of my vans when it wasn't on a job. I now use it for electrical tools and supplies. Eventually, both will need to find a new home in the shop. Someday.
Eventually, the brown storage cabinet will go to recycling. I hate that thing. Someday.
It's good to see the pegboard again. I need to do more, but that will have to wait for .......... Someday.
In Progress

There is a point to this rambling, hopefully I'll be able to talk more later this week.
Someday, once I figure out what I want to keep, I'm going to sell off some of my duplicates and a few other things that have found their way into my shop. To that end, knowing that I'll need boxes and packing material, I've been letting things pile up.
Someday, I'm going finish building out my long bench. Originally, I planned on moving my grandfather's RAS over from his shop and put it in the middle of the benchwork. Since I get better use out of my portable sliding compound miter saw, I've changed my mind and will use the SCM and Cman RAS cabinet instead. This will give me a little more room for a longer bench. I'll turn the RAS in for the bounty if Craftsman is still honoring it.
Before
Now, I need the room. So the pile needs to get cleaned up.
Today, I started to get things cleaned and shifted. The boxes got collapsed and stored away, and the packing material got bagged and stowed. The RAS cabinet needed a little work, I'll do more work on it when I get ready to use it for real, Someday. For now it's just holding its place.
The blue cabinet, and a white one, I got from my grandfather. He had them in his shop for years. I wouldn't mind two more, but I have no idea who made them. I think he got them from Bell Labs years ago when they remodeled his lab.
The red boxes are roadboxes I made from scrap plywood off of jobs. Even the castors were free. I only had to buy the hardware and paint (I miss Red Devil enamel). The big one holds air staplers and pin nailers. The small one was my toolbox. Most of the time it was strapped to the wall of my vans when it wasn't on a job. I now use it for electrical tools and supplies. Eventually, both will need to find a new home in the shop. Someday.
Eventually, the brown storage cabinet will go to recycling. I hate that thing. Someday.
It's good to see the pegboard again. I need to do more, but that will have to wait for .......... Someday.
In Progress
There is a point to this rambling, hopefully I'll be able to talk more later this week.
Last edited:

taumac
Well-known member
Spent the day up at Strouty's place lending a hand. Had a great day.
Came home with a little something on the trailer.
It will have to wait until I can get to it.

Tease
Tease
YUP !
$5 says it's blue
You're absolutely right. I brought home a Smurf in a cage and it's currently living on my trailer in the backyard. I put the tarp over it at night so it will go to sleep and stop squawking. Smurfs can be quite loud and chatty, I don't want the neighbors to complain.
Besides, it only knows one dirty Pub song and it sings it over, and over, and over. It's driving me crazy. I may need to take it back and trade it for an Oompa-Loompa. At least I'll get some work out of it, instead of a cage full of shredded newspaper and a pile of blue pellets.
I need to get it a 24"dia. exercise wheel. With my luck, the damned thing will have a perpetual squeak.
Fretters
Well-known member
You want a Womble. Their main trait should match you well.
It's a good thing I spent time with Strouty yesterday, otherwise I would never have been able to get this cabinet apart. Getting the doors back on will be an adventure.
Got it disassembled. I have a little cheap homeowner electric pressure washer, but I think I'm going to go through a LOT of simple green. The PO's spilled a lot of oil on these cabinets while they had them. It's worse than Bowser's hair.

Hot and humid again today, not as bad as the last week though, I should get this done. Taking lots of breaks to hydrate. Good thing the beer fridge is full.
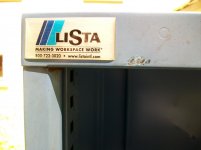


Got it disassembled. I have a little cheap homeowner electric pressure washer, but I think I'm going to go through a LOT of simple green. The PO's spilled a lot of oil on these cabinets while they had them. It's worse than Bowser's hair.
Hot and humid again today, not as bad as the last week though, I should get this done. Taking lots of breaks to hydrate. Good thing the beer fridge is full.
Got the case cleaned up and dried. The other bits can wait until I get the case down into the shop.
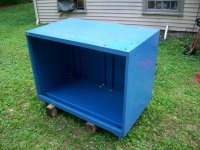
Now I just need to manhandle it down the steps, through the door, and past the obstacles. It will be going in the spot where the red roadboxes are sitting now.
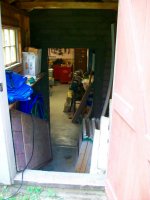
Not sure if this is Jenga or Tetris. Either way it's going to be tight.
I have less than an hour before it all needs to be inside. Need to stop typing.
Now I just need to manhandle it down the steps, through the door, and past the obstacles. It will be going in the spot where the red roadboxes are sitting now.
Not sure if this is Jenga or Tetris. Either way it's going to be tight.
I have less than an hour before it all needs to be inside. Need to stop typing.
The Smurf is in the house !!!!
It fits the space nicely, even matching the end of the pegboard (more or less). Wasn't counting on that.
The only issue I have now is that the feet make it sit about 1" too high. I can switch them out for some leveling feet I have, but then it may be too low without blocking. We'll see.
That will have to wait for another time, tomorrow maybe.
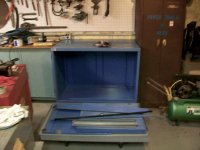
I'm pretty much done for the day. Hopefully I can get it put together tomorrow before I have to drive to the airport to pick up the family.
Gotta run, I'm late for listening to my grandmother ***** ....... err, I mean ..... converse.
It fits the space nicely, even matching the end of the pegboard (more or less). Wasn't counting on that.
The only issue I have now is that the feet make it sit about 1" too high. I can switch them out for some leveling feet I have, but then it may be too low without blocking. We'll see.
That will have to wait for another time, tomorrow maybe.
I'm pretty much done for the day. Hopefully I can get it put together tomorrow before I have to drive to the airport to pick up the family.
Gotta run, I'm late for listening to my grandmother ***** ....... err, I mean ..... converse.
Last edited:
Fretters
Well-known member
i don't need a womble, i already have a dog digging up my back yard and my rubbish is carefully hoarded. A womble would just screw with my system.
Couldn't help chuckling at that. Couldn't help myself, went down to the shop to play with the critter.
We played Dollys.
By that I mean ....... I beat it with a hammer and dollies.
The top had a Wilton vise mounted to it, no I didn't get the vise, and the top had deformed from the vise getting beat on. It's not perfect, but at least the plywood should sit flat once I put the bench together. I took care of a few other minor dings as well.
I forgot the Before pic, here's the After.

The other thing I did was swap out the feet since the originals were too tall. The one on the left is the Lista foot, at it's shortest it's around 4" and can extend to 5.25". Too tall to match my other cabinets.
The one on the right is from a pile of 25 Cman table saw stand leveling feet I got off of ebay to use under my bench legs. The threads are the same size as the Lista's. I use a spacer I made from plugs I cut out of 5/4 composite decking to add to the height. It also keeps the feet out of the water when my shop floods.

They're not as pretty, but it doesn't matter. They get the job done.
If I'm looking at them from eye level, either I've dropped another ratchet ball, or my beer is too strong.
Hopefully, I'll be able to post more tomorrow.
We played Dollys.
By that I mean ....... I beat it with a hammer and dollies.
The top had a Wilton vise mounted to it, no I didn't get the vise, and the top had deformed from the vise getting beat on. It's not perfect, but at least the plywood should sit flat once I put the bench together. I took care of a few other minor dings as well.
I forgot the Before pic, here's the After.
The other thing I did was swap out the feet since the originals were too tall. The one on the left is the Lista foot, at it's shortest it's around 4" and can extend to 5.25". Too tall to match my other cabinets.
The one on the right is from a pile of 25 Cman table saw stand leveling feet I got off of ebay to use under my bench legs. The threads are the same size as the Lista's. I use a spacer I made from plugs I cut out of 5/4 composite decking to add to the height. It also keeps the feet out of the water when my shop floods.
They're not as pretty, but it doesn't matter. They get the job done.
If I'm looking at them from eye level, either I've dropped another ratchet ball, or my beer is too strong.
Hopefully, I'll be able to post more tomorrow.
Strouty
Well-known member
Looking good, you did well to get the smurf inside.
Strouty
Well-known member
Seeing your pictures reminds me that I have to clean another 8 of those cabinets. You will be the first one to put the doors back in, so I want to see pictures.
Aw hell, I was hoping that YOU'D be the Guinea Pig.
I'll try to document how they go back in, but no promises. I'm not good about remembering to take pictures.
If I break the track putting it back in, I may need to hit you up for one of your spares. This cabinet didn't have one.
I'll try to document how they go back in, but no promises. I'm not good about remembering to take pictures.
If I break the track putting it back in, I may need to hit you up for one of your spares. This cabinet didn't have one.
Strouty
Well-known member
I am going to try and get them all cleaned by this weekend, I will have to figure out how to put them back together one way or another.
I am going to try and get them all cleaned by this weekend, I will have to figure out how to put them back together one way or another.
Strouty - I think I figured it out, see my posts in your Salvage Garage thread.
Waiting for Lista to send me a replacement part next week that I lost in the grass while pressure washing yesterday. Haste definitely makes waste.
Last edited: