
You are using an out of date browser. It may not display this or other websites correctly.
You should upgrade or use an alternative browser.
You should upgrade or use an alternative browser.
New 24'x24' Bungalow Woodshop/Autoshop in California
- Thread starter nitro3421
- Start date
Blackening. Anodizing?
Yup, using Berchwood Casey aluminum black: https://www.amazon.com/dp/B00V511GPG/?tag=atomicindus08-20
What is the deal with the random appliances? Can we expect a kitchen remodel in the near future?
Sure thing. I collect them as I find good deals. I'm able to get appliances that are normally $12-14k (Subzero fridge, wolf range, etc.) at less than 1/3 the cost of new if I'm patient enough.
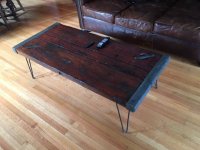
Finished up my outdoor dining room table project.
The finish on the table top is:
-Minwax gel stain diluted with mineral spirits
-2 coats of two part Smith & Co. penetrating epoxy sealer
-3 coats of Wood Kote Ulta Flagship 450 Satin sealer
-Sanding in between each coat
The finish on the aluminum frame is:
-Raw milled aluminum sanded with 150 grit random orbital sander
-Scrubbed surface with dish soap to remove all oil
-2 coats of Berchwood Casey aluminum black neutralized with water after reaction occurs
-2 coats of paste wax
Last edited:
Tunajoe
Well-known member
Are you using Waterlox penetrating epoxy?
Looking good!
Looking good!
richtersrodz
Well-known member
Wow.. I've been following along quietly.. But WOW.. Impressive.. Garage, gate, driveway, tool boxes, lift, and now the table.. Very nice work!!
Are you using Waterlox penetrating epoxy?
Looking good!
Not for this project, I used Smith & Co. penetrating epoxy (see my last post). I topcoated with Wood Kote Ultra Flagship 450.
I dont believe most Waterlox products are exterior rated. I did use Waterlox at my last house I built for a butcher block I made for the kitchen:

Wow.. I've been following along quietly.. But WOW.. Impressive.. Garage, gate, driveway, tool boxes, lift, and now the table.. Very nice work!!
Thanks!
richtersrodz
Well-known member
Man.. once you go to the double fridge, you never want to go back!! We built one into our last place, and my wife hated to leave them. Our new (1915) place has a single fridge, and we are planning to rip out the whole kitchen and redo it, just so that we can have our dual (one fridge / one freezer) setup again. With 4 kids, we can't keep enough food in a single shared unit. lol. Fantastic kitchen! Like the garage, top notch!


Dan_RN
Member
Awesome work! Thank you for taking the time to post pictures of the build process; such a cool table.
GLTHFJ60
Well-known member
Those are some burly ******** boards!! Most I see have 1/4" ply as the top.

shortykorte
Well-known member
Looks good. Some reason I was thinking a more elaborate paint scheme.
Nice looking boards! Are you going to add a layer or two of Poly? It makes them a little slick at first, but if you buy real "corn" filled bags, the dust (once pulverized) will slow them down to the proper friction.
yeah, I've made about 8-sets of CH boards for friends & family in the past...I'm a CH nerd.
yeah, I've made about 8-sets of CH boards for friends & family in the past...I'm a CH nerd.
polexican23
Banned
what was the overall height of the gate post again, including buried depth.
Looks good. Some reason I was thinking a more elaborate paint scheme.
Thought about it... then got lazy. Easy to add the traditional triangle shaped paint later.
Nice looking boards! Are you going to add a layer or two of Poly? It makes them a little slick at first, but if you buy real "corn" filled bags, the dust (once pulverized) will slow them down to the proper friction.
yeah, I've made about 8-sets of CH boards for friends & family in the past...I'm a CH nerd.
I very well might clear coat them. Going to try them out as is for now using some corn filled bags I picked up from Etsy (tons of selection BTW).
what was the overall height of the gate post again, including buried depth.
10' (5' above grade, 5' below grade)
s2kattracks
Well-known member
Dang, Just got through all 25 pages. Amazing is simply and understatement!
I am in Real Estate, so I look at a ton of homes. Not many get this level of detail! Way to go on that!
Love it!
I am in Real Estate, so I look at a ton of homes. Not many get this level of detail! Way to go on that!
Love it!
bulletpruf
Well-known member
Table came out great. I like your style.
Not for this project, I used Smith & Co. penetrating epoxy (see my last post). I topcoated with Wood Kote Ultra Flagship 450.
I dont believe most Waterlox products are exterior rated. I did use Waterlox at my last house I built for a butcher block I made for the kitchen:

Thanks!
Incredible attention to details. Whomever purchased you last house is very lucky!

drivesitfar
Well-known member
Nitro: place is really shaping up nicely. I sure like the new table you made, but I REALLY LOVE the butcher block top you made in your old kitchen's island. any chance you might have more pictures of it during that build and maybe telling me (us) how you made it?
keep up the great work.
keep up the great work.
Dang, Just got through all 25 pages. Amazing is simply and understatement!
I am in Real Estate, so I look at a ton of homes. Not many get this level of detail! Way to go on that!
Love it!
Thanks! My wife was in Real Estate for awhile too so I got to see quite a few homes with her, amazing to see the variation in quality.
Table came out great. I like your style.
Thanks, hoping to build more and even sell them for some extra $$
I've made many tables using similar reclaimed wood, I'll dig up some photos.
Incredible attention to details. Whomever purchased you last house is very lucky!
It was a lot of fun matching the original details of that 1912 house. The kitchen. For example you can see the floor in the kitchen matches the original floor in the 1912 portion of the house in the dining room. I matched all the siding, trim profiles, coved ceiling (not pictured), corbels, etc.
Nitro: place is really shaping up nicely. I sure like the new table you made, but I REALLY LOVE the butcher block top you made in your old kitchen's island. any chance you might have more pictures of it during that build and maybe telling me (us) how you made it?
keep up the great work.
Thanks - it was a blast to make. I have TONS of pics documenting the process... I'll try to dig up and post.
Luke.jenner
Member
- Joined
- Jul 23, 2011
- Messages
- 13
Awesome Shop!
I am considering the same lift. Does it require a seperate constant air supply for the safety interlocks???
Regards,
Luke
I am considering the same lift. Does it require a seperate constant air supply for the safety interlocks???
Regards,
Luke
Awesome Shop!
I am considering the same lift. Does it require a seperate constant air supply for the safety interlocks???
Regards,
Luke
You can lift it up without air, but you need air to lower it (to release the interlocks). Doesn't take much air.


vonhef
Well-known member
I am impressed! Your industrial style is to my taste also. Thanks for sharing!!
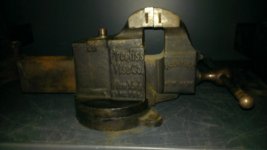
Picked up an absolutely massive Wilton bullet vise which needs a little bit of work. Does anyone know how I might go about replacing the end cap on the crank handle? You can see in the photo it's been jerry rigged. One thought I had was to weld on a large nut then grind smooth to match the other and the best I could. Open to ideas...
Model 101164

Model 101164

drivesitfar
Well-known member
Nitro: Wiltons are great vises and there are even better ones from pre 1950's if you happen to find one for the other end of that huge AWESOME bench you own.
i'm not quite sure what you are looking for unless you just need a dust cap which you could replace as simply as getting a $1 brass or aluminum freeze plug. i'd need more pictures to help more. or read this thread i started called Vise Repair 101 and post up a few questions asking about your vise there and plenty of helpful guys will help you including me if we can.
http://www.garagejournal.com/forum/showthread.php?t=252830
how wide are your jaws? 4 inch or bigger?
Redboy
Well-known member
Got a lathe? Or a friend with a lathe?Does anyone know how I might go about replacing the end cap on the crank handle? You can see in the photo it's been jerry rigged. One thought I had was to weld on a large nut then grind smooth to match the other and the best I could. Open to ideas...
")
Here's a good replacement handle...
That tubalcain's a resourceful fellow, and I like his style!
bulletpruf
Well-known member
Picked up an absolutely massive Wilton bullet vise which needs a little bit of work. Does anyone know how I might go about replacing the end cap on the crank handle? You can see in the photo it's been jerry rigged. One thought I had was to weld on a large nut then grind smooth to match the other and the best I could. Open to ideas...
Model 101164
Nice bullet.
GJ member KMScott has a website - wiltonviseparts.net. He makes replacement handles, replacement jaws, etc. VERY nice stuff. I have one of his handles on a 3.5" bullet that I restored.
Scott
Nitro: Wiltons are great vises and there are even better ones from pre 1950's if you happen to find one for the other end of that huge AWESOME bench you own.
i'm not quite sure what you are looking for unless you just need a dust cap which you could replace as simply as getting a $1 brass or aluminum freeze plug. i'd need more pictures to help more. or read this thread i started called Vise Repair 101 and post up a few questions asking about your vise there and plenty of helpful guys will help you including me if we can.
http://www.garagejournal.com/forum/showthread.php?t=252830
how wide are your jaws? 4 inch or bigger?
Got a lathe? Or a friend with a lathe?
Here's a good replacement handle...
That tubalcain's a resourceful fellow, and I like his style!
Nice bullet.
GJ member KMScott has a website - wiltonviseparts.net. He makes replacement handles, replacement jaws, etc. VERY nice stuff. I have one of his handles on a 3.5" bullet that I restored.
Scott
Great advise and thanks for all the great resources guys! Looks like I have my fair share of reading up to do. No rush on this one but want the restoration to turn out well. I'll post some pics as I get started.
We're having a big Halloween party this weekend so it was a good excuse to get the place cleaned up and finish a few projects. Picked up these authentic Octoberfest beer garden tables from Germany. They'll be put to good use with over 100 guests coming. A few evening shots of the garage as well:


RXtacy
Well-known member
We're having a big Halloween party this weekend so it was a good excuse to get the place cleaned up and finish a few projects. Picked up these authentic Octoberfest beer garden tables from Germany. They'll be put to good use with over 100 guests coming. A few evening shots of the garage as well:
The garage looks fantastic!
Could you go into a little more detail about your gate hinge/bearing setup? It looks like you used pillow block bearings? Did you just secure your gate with set screws?
dittle fart around
Well-known member
We're having a big Halloween party this weekend so it was a good excuse to get the place cleaned up and finish a few projects. Picked up these authentic Octoberfest beer garden tables from Germany. They'll be put to good use with over 100 guests coming. A few evening shots of the garage as well:
Those tables are great! I think I can see a German **** print on one of the benches.
The garage looks fantastic!
Could you go into a little more detail about your gate hinge/bearing setup? It looks like you used pillow block bearings? Did you just secure your gate with set screws?
Check out post #446 - top photo.
I had some solid rod (1" if I recall correctly) welded to the top and bottom of the frame. These rods slip into the top & bottom bearing plates. First I bolted a bearing plate to the concrete then dropped the gate into the bearing plate.
Next, I leveled the gate, and bolted the top bearing plate into the bottom of a 3/4" thick flange that was welded onto the gate post. The 3/4" flange at the top had 4 holes pre-drilled with some play in them to allow for adjustment to get the gate perfectly level.
Here are a few more photos:
You'll notice in this photo, I accidently made my gate post too short and in order to hang the gate, I welded a temporary plate on there and replaced with a proper extension later.


Last edited:
airmissle
Active member
This is an absolutely amazing thread. I just binge read the whole thing, it has given me tons of ideas for my upcoming build. Thanks for sharing!
drivesitfar
Well-known member
Nitro: i won't expect an answer before you have your party for about 100 guests, but one of the members is trying to install a stainless steel surface on top of about 18 feet of cabinets in his garage and wondering how to do it.
i know you tac welded the pieces together, but i can's recall how you attached the steel to the old doors you used as a base for it. sorry if you've already mentioned it, but i couldn't find it so if you wouldn't mind mentioning again could you?
also no hurry, but would still love pictures and you mentioning the process on how you built that awesome butcher block style top for the kitchen island in your old home.
thanks and good luck with the party
(yes those old German tables look cool too)
Attachments

Nitro: i won't expect an answer before you have your party for about 100 guests, but one of the members is trying to install a stainless steel surface on top of about 18 feet of cabinets in his garage and wondering how to do it.
i know you tac welded the pieces together, but i can's recall how you attached the steel to the old doors you used as a base for it. sorry if you've already mentioned it, but i couldn't find it so if you wouldn't mind mentioning again could you?
also no hurry, but would still love pictures and you mentioning the process on how you built that awesome butcher block style top for the kitchen island in your old home.
thanks and good luck with the party
(yes those old German tables look cool too)
Happy to elaborate on the steel bench top install. Each of the 3 pieces of steel (14 gauge) weighs about 100 lbs. Given the L shape of the counter and all pieces being tacked together, I didn't fasten them to the door sub tops below. The weight alone of the steel holds them in place. If it ever does start moving around, it's easy enough to throw a few screws through on the turned down apron portion, directly into the doors below.
Here are some pictures of the butcher block process from my old house:


.


vonhef
Well-known member
Happy to elaborate on the steel bench top install. Each of the 3 pieces of steel (14 gauge) weighs about 100 lbs. Given the L shape of the counter and all pieces being tacked together, I didn't fasten them to the door sub tops below. The weight alone of the steel holds them in place. If it ever does start moving around, it's easy enough to throw a few screws through on the turned down apron portion, directly into the doors below.
Here are some pictures of the butcher block process from my old house:
This is really nice!!!

drivesitfar
Well-known member
NITRO: thanks for the 411 on the steel bench top. i REALLY LOVE your countertop and i need to make one. i also have found some old Ship Hatches from WWII that i'm going to do something with soon.
just a quick couple questions. is that Elmers or what glue did you use and how long did you have it clamped up? also what is the finish that makes it shine and protect it and about how often would you need to put on another coat? or how many coats did you put on in the first place?
thanks also for showing the routering out of the sink's hole.
VERY WELL DONE SIR!!
just curious what you might make out of this if you had a 5 foot long 27 inch wide 2 inch thick old ship hatch? i'm thinking of making it a small work bench that i have a metal cabinet to put under and then putting a 1920's Drill press on one side and a 1920's Prentiss swivel jaw vise on the other and use the bench for my light duty type stuff.
Attachments
NITRO: thanks for the 411 on the steel bench top. i REALLY LOVE your countertop and i need to make one. i also have found some old Ship Hatches from WWII that i'm going to do something with soon.
just a quick couple questions. is that Elmers or what glue did you use and how long did you have it clamped up? also what is the finish that makes it shine and protect it and about how often would you need to put on another coat? or how many coats did you put on in the first place?
thanks also for showing the routering out of the sink's hole.
VERY WELL DONE SIR!!
just curious what you might make out of this if you had a 5 foot long 27 inch wide 2 inch thick old ship hatch? i'm thinking of making it a small work bench that i have a metal cabinet to put under and then putting a 1920's Drill press on one side and a 1920's Prentiss swivel jaw vise on the other and use the bench for my light duty type stuff.
The glue is Titebond II: http://www.homedepot.com/p/Titebond-II-16-oz-Premium-Wood-Glue-5004/100144210
The finish is Waterlox. 4 coats on the top and 8 coats on the end grain in the sink. http://www.woodcraft.com/Product/14...atin-Qt.aspx?gclid=CNupi7vjhdACFQ52fgodOsYDfA
Great rustic looking wood in that ship hatch. If it were me, I'd make a tube steel frame to fit it and pick up a couple of vintage wood crates and turn them into drawers below the ship hatch top. Gorgeous vise!
wasfast
Well-known member
How did you plane the entire top after gluing? Your planar looks a bit small to fit that into