To avoid these ads, REGISTER NOW!

let's see your craftsman block grinders

bubinga

Well-known member
Joined
Jul 26, 2014
Messages
12,744
Location
Bridgeport Ohio. (Across River From Wheeling WV)
To avoid these ads, REGISTER NOW!

WWShop

Well-known member
Joined
Aug 25, 2015
Messages
948
Location
MN
Rabid Badger;7524367 I was going to use the usual gray but the wife saw the red and insisted.[/QUOTE said:
Ohhhh?? So it was actually your wife who did the restoration and you're just taking credit for her amazing work!! Just kidding! :)
 

drivesitfar

Well-known member
Joined
Oct 23, 2013
Messages
35,997
Location
Pacific Northwest
WW: I rarely use the eye shields and this old craftsman pre block grinder has been sitting on a shelf waiting for me to find a spot for it. so I guess the answer is no i haven't tried to find any.

Rapid: your bride has good taste in men and colors cause you've got skills. :thumbup:
 

beltdrive

Well-known member
Joined
Jan 17, 2015
Messages
111
Location
Smithfield, RI
So I picked up a 1/2 horse 1959 craftsman block grinder last night...drove an hour in the rain to Narragansett RI....THING IS BEAUTIFUL CONDITION ON THE STAND....industrial rated with lamp and eye shields. Question....it has a 220 plug on it. Is there anything I have to do to make it run 110? I keep buying these and trading up...the late 50s are freaking awesome.

PS grinder shows both voltages on the label and says dual voltage.
 
Last edited:

beltdrive

Well-known member
Joined
Jan 17, 2015
Messages
111
Location
Smithfield, RI
This is a pic of the 1966 1/2 hp industrial rating. Cord is spliced in the middle and a 220 plug is on the end. Need to revert back to 110......???
 

Attachments

  • block grinder craftsman 1959.jpg
    block grinder craftsman 1959.jpg
    32.6 KB · Views: 63
Last edited:

drivesitfar

Well-known member
Joined
Oct 23, 2013
Messages
35,997
Location
Pacific Northwest
Belt: I wish you were closer cause i've been thinking of changing my industrial model 1/2's to 220. until some of the experts chime in I think if I recall correctly that the wiring diagram is under the bottom plate if you want to rewire it back to 110. if you can plug it in a 220 and tell me (us) how it runs i'd appreciate it. a year or two ago we had a long discussion on this thread about changing 110's to 220's if you want to look for it.

good luck and nice find!!
 

torqueman2002

Well-known member
Joined
Jun 3, 2009
Messages
6,138
Location
SE Michigan
This is a pic of the 1959 1/2 hp industrial rating. Cord is spliced in the middle and a 220 plug is on the end. Need to revert back to 110......???
Belt - like Drives ^^ said, there is probably a dual voltage wiring diagram under the bottom cover.

I may also have a picture, if you can post the model number.

Nice find!
:beer:
 

Negen

Well-known member
Joined
Jul 15, 2015
Messages
1,909
Location
Seatltle WA
This is a pic of the 1959 1/2 hp industrial rating. Cord is spliced in the middle and a 220 plug is on the end. Need to revert back to 110......???
Are you sure that is 1959? Mine is identical and stamped 1969 on the inside of the bottom plate. Or did they just look the same adjective that long. I know mine is aluminum where some are iron. Mine also has dual voltage diagram on the inside.

Sent from my G8141 using The Garage Journal mobile app
 
Last edited:

beltdrive

Well-known member
Joined
Jan 17, 2015
Messages
111
Location
Smithfield, RI
Belt: I wish you were closer cause i've been thinking of changing my industrial model 1/2's to 220. until some of the experts chime in I think if I recall correctly that the wiring diagram is under the bottom plate if you want to rewire it back to 110. if you can plug it in a 220 and tell me (us) how it runs i'd appreciate it. a year or two ago we had a long discussion on this thread about changing 110's to 220's if you want to look for it.

good luck and nice find!!


I do not have a way to plug into a 220. I have not seen the unit run...bought it on faith. But i ALSO GOT in the package a Red wing huge jelly-bean shaped 1950'sish buffer that hummed really sweetly and a delta 1950s scroll saw - with belt drive motor in a cabinet - in minty condition. 200 for all, including a pile of clamps and some old scrap hardwood.
 

beltdrive

Well-known member
Joined
Jan 17, 2015
Messages
111
Location
Smithfield, RI
If yours is aluminum it is 69ish I would think. This one is the old cast iron. The switch should be different among other things. The date code on mine is 19590
 

Attachments

  • block grinder label craftsman.jpg
    block grinder label craftsman.jpg
    34.4 KB · Views: 43

beltdrive

Well-known member
Joined
Jan 17, 2015
Messages
111
Location
Smithfield, RI
I was incorrect on the year...in looking at this (i just now unloaded it) it has a stamp of 1966 on the bottom. I do have a coupl 1/4 blocks that are 1959...really heavy and spin for over a minute after shut down.

So I dont have time to get to it today but I will take the tray off the bottom tomorrow and see if it says anything. Does your 69 look exactly like it??
 

torqueman2002

Well-known member
Joined
Jun 3, 2009
Messages
6,138
Location
SE Michigan
Belt - I have these pictures of a model 397.19590, like yours.
attachment.php

I'm guessing the mfg date is 'SEP 17 1978'.
attachment.php


attachment.php


attachment.php
 

Attachments

  • Fi P1090671.jpg
    Fi P1090671.jpg
    68.6 KB · Views: 284
  • Fi P1090673.JPG
    Fi P1090673.JPG
    65.6 KB · Views: 282
  • Fi P1090678.jpg
    Fi P1090678.jpg
    94.8 KB · Views: 281
  • Fi P1100200 Smaller.jpg
    Fi P1100200 Smaller.jpg
    49.2 KB · Views: 285

rporonga

Member
Joined
Jun 17, 2014
Messages
6
That one is a 6" wheel.
Thanks for the info. Indeed, it had 6"x3/4" wheels. I ended up buying it. Now I have a couple of questions regarding restoration (397.19430, 5.1 AMP, 1/2 HP)

The sheet metal center part has some rust in the top and back. I was thinking of repainting this part. The label is in good shape with no rust or bubbles around it. Should I just mask it and paint around, or remove it for painting? In the latter case, what is the best approach for removing the adhesive label so that it does not show crease marks from peeling it off?

One of the eye shields has both plastic tabs broken. I have the pieces and could try gluing it back, but it may not be safe. Are there any replacements for these plastic eye shields?

Thanks!
 

beltdrive

Well-known member
Joined
Jan 17, 2015
Messages
111
Location
Smithfield, RI
wow! thrilled to see that diagram. I finally had a chance to open the bottom...and nothing diagram wise.
 

Attachments

  • IMG_5012.jpg
    IMG_5012.jpg
    147.2 KB · Views: 21
  • IMG_5011.jpg
    IMG_5011.jpg
    75.2 KB · Views: 20
  • IMG_5010.jpg
    IMG_5010.jpg
    135.1 KB · Views: 23
  • IMG_5009.jpg
    IMG_5009.jpg
    148.8 KB · Views: 26

torqueman2002

Well-known member
Joined
Jun 3, 2009
Messages
6,138
Location
SE Michigan
No way that is 78....more like 68....the 70s are much different. Thanks for the diagram!!
That's my thought, too. The stamp is very difficult to make out, and the cover may not be original.


Hmm. I noticed some differences between my 397.19590 and yours.


My Block's badge/label is a 'Crown Top'.
attachment.php


From what I can make out from your picture, the start-up relay appears to be a different design. See my diagram above.


Close up of my Block.
attachment.php


These may be minor revisions, but caution should be used when using the above diagrams for your application.


If I find a diagram closer to your style relay (or the style I think yours uses) I will post it.


May be you can post a pic of your relay with more detail?
 

Attachments

  • Fi P1090668.jpg
    Fi P1090668.jpg
    99.1 KB · Views: 163
  • Fi P1090684.jpg
    Fi P1090684.jpg
    61.5 KB · Views: 166
Last edited:

beltdrive

Well-known member
Joined
Jan 17, 2015
Messages
111
Location
Smithfield, RI
Here's pics of the 66. I believe the crown top to be earlier.
 

Attachments

  • IMG_5025.jpg
    IMG_5025.jpg
    146 KB · Views: 12
  • IMG_5021.jpg
    IMG_5021.jpg
    150.4 KB · Views: 15
  • IMG_5020.jpg
    IMG_5020.jpg
    97.7 KB · Views: 16
  • IMG_5019.jpg
    IMG_5019.jpg
    144.7 KB · Views: 18
  • IMG_5017.jpg
    IMG_5017.jpg
    128 KB · Views: 18
  • IMG_5016.jpg
    IMG_5016.jpg
    147.6 KB · Views: 18
  • IMG_5015.jpg
    IMG_5015.jpg
    97.8 KB · Views: 20
To avoid these ads, REGISTER NOW!

beltdrive

Well-known member
Joined
Jan 17, 2015
Messages
111
Location
Smithfield, RI
In the same buy, I picked up the homecraft scroll saw with cabinet and motor, red wing buffer, craftsman grinder stand, and the 66 grinder. 200. So many deals....and so little space left in my garage and basement...
 

Attachments

  • IMG_5000.jpg
    IMG_5000.jpg
    81.1 KB · Views: 23
  • IMG_5029.jpg
    IMG_5029.jpg
    120.8 KB · Views: 34
  • IMG_5028.jpg
    IMG_5028.jpg
    138.7 KB · Views: 26

torqueman2002

Well-known member
Joined
Jun 3, 2009
Messages
6,138
Location
SE Michigan
Belt - ".... so little space left in my garage and basement..." That sure sounds familiar! LOL

Nice bit of shopping ^^.

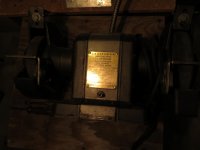
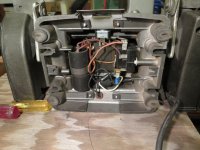
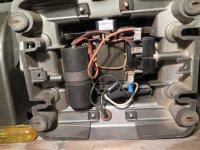
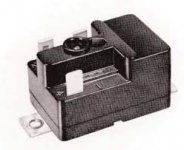
Your Block's relay is one I haven't seen before. I am not sure how it might or might not be like the one I posted. So I'd proceed with caution.

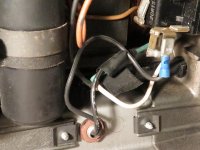
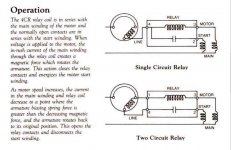
These are potential relays and function differently than the relays used in cars/trucks.

BTW - I looked through several dozen pics I have of various HP & model Blocks and I didn't see a relay like yours or a diagram.

I will search for the info. I have on how these potential relays work and see if I still have examples of how the internals are laid out.

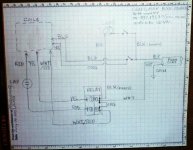
OK - Here's what I have. Hope it helps.

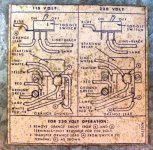
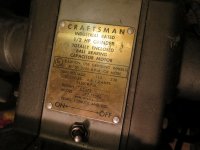
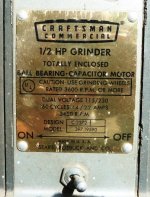
It is my experience, the dual voltage Blocks are of the "Two Circuit" design.
attachment.php


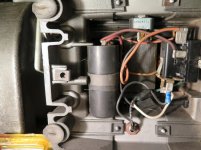
4-terminal /2-circuit relay, similar to the m-397-19590 Block I show above.
attachment.php


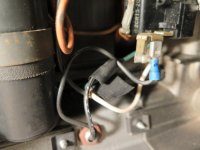
3-terminal /1-circuit relay
attachment.php


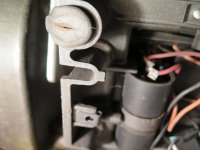
Another 3-terminal /1-circuit style relay.
démarrage = start-up |sont = are
attachment.php
 

Attachments

  • 2CR_Klixon diagram 2.jpg
    2CR_Klixon diagram 2.jpg
    37 KB · Views: 257
  • 4CR_Klixon 3terminal e.jpg
    4CR_Klixon 3terminal e.jpg
    7.1 KB · Views: 256
  • 4CR_Klixon 4terminal a.jpg
    4CR_Klixon 4terminal a.jpg
    59.5 KB · Views: 261
  • Klixon 4CR Diagram 1.JPG
    Klixon 4CR Diagram 1.JPG
    78 KB · Views: 267
Last edited:

torqueman2002

Well-known member
Joined
Jun 3, 2009
Messages
6,138
Location
SE Michigan
I found a YouTube video of a down and dirty grinder restoration, complete with a re-winding of the stator!

Warning - non-Block content. :)
<a href="<iframe width=" 560"="" height="315" src="https://www.youtube.com/embed/W7iSj_b3-xc" frameborder="0" allow="accelerometer; autoplay; encrypted-media; gyroscope; picture-in-picture" allowfullscreen=""><iframe src="https://www.youtube.com/embed/W7iSj_b3-xc" allow="accelerometer; autoplay; encrypted-media; gyroscope; picture-in-picture" allowfullscreen="" width="560" height="315" frameborder="0"></iframe>
 

LesserSon

Well-known member
Joined
Feb 7, 2016
Messages
5,050
Location
PA USA
I found a YouTube video of a down and dirty grinder restoration, complete with a re-winding of the stator!

Wow, holy cow, etc! The poultry clucks at the very end say it all: I am way too chicken to EVER try that.
Three comments:
That guy has been building motors all his life.
Unless you were incarcerated or marooned AND had free access to all the tools and materials, it would NEVER be cost-effective.
That particular green is a terrible color choice.

But, it DOES demonstrate that NOTHING is ever “beyond repair.”
 

exmaxima1

Well-known member
Joined
Jun 25, 2011
Messages
6,339
Location
Midwest
Wow, holy cow, etc! The poultry clucks at the very end say it all: I am way too chicken to EVER try that.
Three comments:
That guy has been building motors all his life.
Unless you were incarcerated or marooned AND had free access to all the tools and materials, it would NEVER be cost-effective.
That particular green is a terrible color choice.

I agree that the color scheme is less than appealing. Running a pair of grinding wheels with no guards just makes my sphincter pucker....
 

jonshonda

Well-known member
Joined
Jul 17, 2017
Messages
4,733
Location
Wisconsin
I was able to utilize my dad to buy this pristine 1/2hp setup. Bought it from the original owner who stated it had maybe been used 4-5 times.

I really want to get some eye shields that have the metal frame around them, and I'm sure torqueman2002 has some nice examples that would really finish this setup off!

<a data-flickr-embed="true" href="https://www.flickr.com/photos/154822526@N03/45924012501/in/dateposted-public/" title="Grind1"><img src="https://farm5.staticflickr.com/4910/45924012501_76631ae02c.jpg" width="314" height="500" alt="Grind1"></a><script async src="//embedr.flickr.com/assets/client-code.js" charset="utf-8"></script>

<a data-flickr-embed="true" href="https://www.flickr.com/photos/154822526@N03/32052932788/in/dateposted-public/" title="Grind2"><img src="https://farm5.staticflickr.com/4867/32052932788_c999efda6f.jpg" width="314" height="500" alt="Grind2"></a><script async src="//embedr.flickr.com/assets/client-code.js" charset="utf-8"></script>

<a data-flickr-embed="true" href="https://www.flickr.com/photos/154822526@N03/45924012281/in/dateposted-public/" title="Grind3"><img src="https://farm5.staticflickr.com/4817/45924012281_f52cb7f209.jpg" width="413" height="500" alt="Grind3"></a><script async src="//embedr.flickr.com/assets/client-code.js" charset="utf-8"></script>
 
Last edited:

bubinga

Well-known member
Joined
Jul 26, 2014
Messages
12,744
Location
Bridgeport Ohio. (Across River From Wheeling WV)
Thanks for the info. Indeed, it had 6"x3/4" wheels. I ended up buying it. Now I have a couple of questions regarding restoration (397.19430, 5.1 AMP, 1/2 HP)

The sheet metal center part has some rust in the top and back. I was thinking of repainting this part. The label is in good shape with no rust or bubbles around it. Should I just mask it and paint around, or remove it for painting? In the latter case, what is the best approach for removing the adhesive label so that it does not show crease marks from peeling it off?

One of the eye shields has both plastic tabs broken. I have the pieces and could try gluing it back, but it may not be safe. Are there any replacements for these plastic eye shields?
Thanks!

Someone in the Know (more about R&R-ing the label) Will Jump in.
If It were me, these days, I'd just mask it and paint it, and be done with it.:thumbup:
 

SwampCat

Well-known member
Joined
May 15, 2009
Messages
293
I was able to utilize my dad to buy this pristine 1/2hp setup. Bought it from the original owner who stated it had maybe been used 4-5 times.

I really want to get some eye shields that have the metal frame around them, and I'm sure torqueman2002 has some nice examples that would really finish this setup off!

<a data-flickr-embed="true" href="https://www.flickr.com/photos/154822526@N03/45924012501/in/dateposted-public/" title="Grind1"><img src="https://farm5.staticflickr.com/4910/45924012501_76631ae02c.jpg" width="314" height="500" alt="Grind1"></a><script async src="//embedr.flickr.com/assets/client-code.js" charset="utf-8"></script>

<a data-flickr-embed="true" href="https://www.flickr.com/photos/154822526@N03/32052932788/in/dateposted-public/" title="Grind2"><img src="https://farm5.staticflickr.com/4867/32052932788_c999efda6f.jpg" width="314" height="500" alt="Grind2"></a><script async src="//embedr.flickr.com/assets/client-code.js" charset="utf-8"></script>

<a data-flickr-embed="true" href="https://www.flickr.com/photos/154822526@N03/45924012281/in/dateposted-public/" title="Grind3"><img src="https://farm5.staticflickr.com/4817/45924012281_f52cb7f209.jpg" width="413" height="500" alt="Grind3"></a><script async src="//embedr.flickr.com/assets/client-code.js" charset="utf-8"></script>
Thats an official " YOU **** "
 

torqueman2002

Well-known member
Joined
Jun 3, 2009
Messages
6,138
Location
SE Michigan

Attachments

  • 25HP Clay 1.jpg
    25HP Clay 1.jpg
    28.2 KB · Views: 243

torqueman2002

Well-known member
Joined
Jun 3, 2009
Messages
6,138
Location
SE Michigan
Wow, holy cow, etc! The poultry clucks at the very end say it all: I am way too chicken to EVER try that.
Three comments:
That guy has been building motors all his life.
Unless you were incarcerated or marooned AND had free access to all the tools and materials, it would NEVER be cost-effective.
That particular green is a terrible color choice.

But, it DOES demonstrate that NOTHING is ever “beyond repair.”
There are a lot of so called 'tool restoration' YouTube videos that are little more than a clean-up and repaint.

What impressed me was/is this guy knows his stuff and he has that funky whirligig coil winding tool.

Other than the stator rewinding tool, he does a lot with very little.

I agree, it looks like he's been doing this for a while.

Not my choice of colors, either.
 
Last edited:

Maineiacmoose

Well-known member
Joined
Jan 2, 2016
Messages
134
Location
Maine
I'm just going to leave this right here for now.... More to follow.
 

Attachments

  • IMG_20181117_214659.jpg
    IMG_20181117_214659.jpg
    109.2 KB · Views: 53

jonshonda

Well-known member
Joined
Jul 17, 2017
Messages
4,733
Location
Wisconsin
Funny you should mention that.

How do these look. They are the larger metal framed eye shields, I think.
attachment.php


Good price too - $25 for both AND you get the 1/4-HP m-115.19500 pre-Block free!
:beer:

It looks like they would clean up well. Let me know if you have some laying around! I owe you at least one purchase for all the work you put into previous email exchanges! :thumbup:
 

cajunfirehawk

Well-known member
Joined
Nov 29, 2011
Messages
2,566
Location
Ms Gulf Coast

SwampCat

Well-known member
Joined
May 15, 2009
Messages
293
:D

I'm sure its been covered dozens of times before, but can I trust the original grinding wheels that come with it? What do I look for if I intend to use them?

One test is to put loose stone wheel on a screwdriver, like a shishkabob, hold the handle, use another screwdriver handle and strike the stone. If it rings true, its probably good. If it rings dull or flat, toss it.
 
To avoid these ads, REGISTER NOW!
Top Bottom