Whoah. Thanks for this!

You are using an out of date browser. It may not display this or other websites correctly.
You should upgrade or use an alternative browser.
You should upgrade or use an alternative browser.
Above 1200 Sq/FT The ASYLUM - Happy 40th Birthday to Me! (Est. 2005)
- Thread starter shopnut
- Start date
Wokspaces above 1200 squarefeet.
shortykorte
Well-known member
Re: The ASYLUM - Turning a Crazy Vision into a Lakefront Gearhead Getaway: Year 6
You light up our world.....
Spot on!!!!!
Sent from my iPhone using Garage Journal
You light up our world.....
Spot on!!!!!
Sent from my iPhone using Garage Journal
Bob Heine
ALLIANCE MEMBER
Mark, those valve covers are priceless. My uncle had a 1856 Owens cabin cruiser that was powered by a Corvette 265 engine with those valve covers on it. For a cabin cruiser back then it was pretty fast.
zanyad - You’re welcome! I reference my breaker panel all the time and it’s great to have it labelled where I can tell what’s what. I wasn’t sure if any of the old links were working (that was a long time ago!!), but apparently Aussie Dan’s link is still operative.
shortykorte - Witty!
Bob Heine - I had to look up what an Owens cabin cruiser looked like… nice old boat with what looks like lots of teak.
My dad has been in the mode lately of researching this stuff and is going through everything he has to first find out exactly what it is and then attempt to put a value on it. This is his note that was attached to the underside of one cover.

So apparently there were different versions through the years. I remember seeing a second set at the local speed shop for $25/pr and knowing I was just
“borrowing” this set from Dad back then, I thought I might buy my own set. But I was broke and decided to pass on them. Perhaps that was the wrong decision since they seemed to have appreciated nicely over the years!
shortykorte - Witty!
Bob Heine - I had to look up what an Owens cabin cruiser looked like… nice old boat with what looks like lots of teak.
My dad has been in the mode lately of researching this stuff and is going through everything he has to first find out exactly what it is and then attempt to put a value on it. This is his note that was attached to the underside of one cover.
So apparently there were different versions through the years. I remember seeing a second set at the local speed shop for $25/pr and knowing I was just
“borrowing” this set from Dad back then, I thought I might buy my own set. But I was broke and decided to pass on them. Perhaps that was the wrong decision since they seemed to have appreciated nicely over the years!
Attachments

Bob Heine
ALLIANCE MEMBER
Mark, back in the '50s Owens dominated the affordable end of the cabin cruiser market. Brand new my uncle's boat sold for less than $4,000 and he bought his used for a lot less. A unique feature on his boat was a V and upholstered top on the transom. A very New York beer advertisement featured a larger Owens.

Attachments

Very classy. So much workmanship went into those vintage boats. My grandpa restored an old Chris Craft runabout for a friend when I was a kid. Just beautiful. I only wish I had been a little older at the time to fully understand the process that went into it. Thanks for sharing.Mark, back in the '50s Owens dominated the affordable end of the cabin cruiser market. Brand new my uncle's boat sold for less than $4,000 and he bought his used for a lot less. A unique feature on his boat was a V and upholstered top on the transom. A very New York beer advertisement featured a larger Owens.
TASK LIST UPDATE…
WOW, the last Task List update was back in 2014 so it was time to go through it. With the main workbench now done, the only significant area left to finish is the South Wall. I would really like to get going on that soon, but I have a number of smaller items on the list that need to be knocked out first.
Anyway, here is the list. It’s much shorter than the last one due to many getting knocked out, and that’s always a good thing. Only newly completed things not shown on the last list are shown DONE here.
Link to prior Task List (Reply#2959)
Link to next Task List (Reply#4252)
ASYLUM Task List:
Crane
* Final leveling of crane beam
West Wall (Wall with 3 roll-up doors)
* Finish wall section in corner by mandoor
South Wall (adjacent to apartment)
* STARTED Design shallow storage cabinet covering entire wall (expand to multiple steps once designed)
* Build shallow storage cabinet covering entire wall (expand to multiple tasks once designed)
* Install Battery Tender with matching cord reel in south wall cabinet (when designed)
Library Ladder
* Paint ladder trolley
* Modify ladder to store in retracted position
Electrical
* **DONE** Add branch on “Night Lights” circuit to front of shop for illuminating ASYLUM sign.
* STARTED Replace T12 fluorescent fixtures in side bay (2 of 8 replaced)
* Install dedicated outlet on porch for gas pump
* Install switched lighting circuit for side lofts
* Install cord reels in south wall cabinet (when built)
Auto Lifts
* Install rope-light loop for general undercarriage illumination on existing Bendpak
* Determine which new lift model suits my car renovation needs (MAX-JAX?)
* Determine where to buy it from
* Pickup and install lift
Man-Lift Upgrades
* **DONE** Permanently mount battery charger
* **DONE** Add voltmeter as “fuel gauge”
* **DONE** Paint (Chassis - Black) (Mast - Silver) (Basket - Yellow)
* Replace lift hose
* And rope ladder for emergencies
Exterior
* Rebuild water filter enclosure
* Repaint pump house
* Repaint garden shed
MISC Project List:
* **DONE** Rolling workbench – Add table support props and paint to match
* **DONE** Install parking meters in front of exterior columns for collision avoidance.
* **DONE** Lathe Cart – Build heavy duty version
* Install final large diameter air line loop around main bay (through side bay)
* Add air line drops for auto lift and hose reels
* Portable Air Tank – Convert spare 30gal compressor tank (with wheels) to function like one of those portable carry-around tanks.
* Add trim panels and door to drill press/bandsaw cart
* Chevelle – Replace fuel line tubing
* Chevelle – Replace transmission cooler line tubing
* Chevelle – Replace heater core
* Chevelle – Replace brake master cylinder
* Chevelle – Install Corvette valve covers
* Corvette – Fix clogged A/C expansion valve (again!)
* Corvette – Repack rear wheel bearings
* Sailboat – Clean up and sell
* Cargo Trailer - Repaint body white and frame black
.
Last edited:
harley jim
Well-known member
Re: The ASYLUM - Turning a Crazy Vision into a Lakefront Gearhead Getaway: Year 6
That is one heck of a list you got there!
That's what I need to do, make a list and prioritize it.
Sent from my SM-A102U using The Garage Journal mobile app
That is one heck of a list you got there!
That's what I need to do, make a list and prioritize it.
Sent from my SM-A102U using The Garage Journal mobile app
Re: The ASYLUM - Turning a Crazy Vision into a Lakefront Gearhead Getaway: Year 6
I would survive without a task list, but it does keep me on track. After not really doing much to the Asylum for 3 years or so, now I can pick right back up where I left off.
Priority is important, and I hold it paramount in all my workplace and life's general tasks, but you'll notice I have not assigned any priority to the tasks on this list. Priority (and sequence) is mainly just kept in my head. I try to keep priority out of the equation here at the Asylum because it might tend to put too much pressure on things. It's nice to just come out to the shop and work on whatever I feel like at the time (and sometimes what the weather permits!). Honestly, everything I listed above falls into "LOW priority" in the grand scheme of my life. The HIGH priority stuff that pops up here (like fallen trees, water well problems, or a failed fridge) get dealt with immediately as they arise, but those things don't get logged on the list.
Yeah, but its a LOT less intimidating than it used to be years ago! The historical lists show I have accomplished a lot around here over the years and sometimes I think I have included the links to jump back easily just so I can pat myself on the back occasionally. LOLThat is one heck of a list you got there!
That's what I need to do, make a list and prioritize it.
Sent from my SM-A102U using The Garage Journal mobile app
I would survive without a task list, but it does keep me on track. After not really doing much to the Asylum for 3 years or so, now I can pick right back up where I left off.
Priority is important, and I hold it paramount in all my workplace and life's general tasks, but you'll notice I have not assigned any priority to the tasks on this list. Priority (and sequence) is mainly just kept in my head. I try to keep priority out of the equation here at the Asylum because it might tend to put too much pressure on things. It's nice to just come out to the shop and work on whatever I feel like at the time (and sometimes what the weather permits!). Honestly, everything I listed above falls into "LOW priority" in the grand scheme of my life. The HIGH priority stuff that pops up here (like fallen trees, water well problems, or a failed fridge) get dealt with immediately as they arise, but those things don't get logged on the list.
harley jim
Well-known member
Re: The ASYLUM - Turning a Crazy Vision into a Lakefront Gearhead Getaway: Year 6
I agree with that. I lost part of two days here this week, the heat pump quit and I had to chase parts and supplies.
Sent from my SM-A102U using The Garage Journal mobile app
I agree with that. I lost part of two days here this week, the heat pump quit and I had to chase parts and supplies.
Sent from my SM-A102U using The Garage Journal mobile app
Re: The ASYLUM - Turning a Crazy Vision into a Lakefront Gearhead Getaway: Year 6
Aw man, sorry to hear that.
I agree with that. I lost part of two days here this week, the heat pump quit and I had to chase parts and supplies.
Sent from my SM-A102U using The Garage Journal mobile app
Aw man, sorry to hear that.
A CHEAP, YET EFFECTIVE, PAINT STAND…
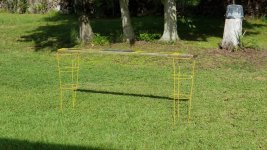
The neighbor was tossing out a bunch of tomato cages so I grabbed them in case my step-daughter needed more in her vegetable garden.

Then, I was about to spray paint some small parts in the backyard at the city house and it dawned on me one of those cages might make a decent paint stand… just stick it in the ground and level it out! Often times, I just grab a cardboard box and lay my part on it. But the box always seems unstable sitting on the grass, especially our St. Augustine grass from hell.
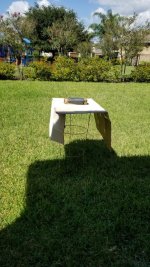
I had some spare tiles in the garage and one of them made a nice tabletop. Cardboard alone might have been sufficient if the parts were light enough.

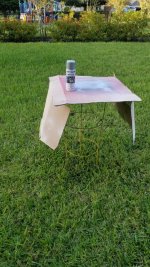
Some cardboard protected the tile from paint overspray.

The little temporary table worked better than expected. It was a good height and kept parts high enough off the ground so there was no overspray in the grass (not that that’s a big deal anyway). It was high enough that bugs weren’t jumping out of the grass onto my freshly painted parts too. The inward taper of the legs kept me from tripping on them as I circled the part while spraying. And if you need to buy them, they are cheap.
Here are a couple parts on the paint stand.

This red part was about 10 pounds.

I can see them working nicely without a top on for painting flat panels and even hanging a bunch of small parts from wire hooks to paint and dry on.
You can use two of them with a board spanning between to paint long items too.

I’m going to designate one for the Asylum and one for at the city house for painting. The step daughter can have the rest if she needs them!
The neighbor was tossing out a bunch of tomato cages so I grabbed them in case my step-daughter needed more in her vegetable garden.
Then, I was about to spray paint some small parts in the backyard at the city house and it dawned on me one of those cages might make a decent paint stand… just stick it in the ground and level it out! Often times, I just grab a cardboard box and lay my part on it. But the box always seems unstable sitting on the grass, especially our St. Augustine grass from hell.
I had some spare tiles in the garage and one of them made a nice tabletop. Cardboard alone might have been sufficient if the parts were light enough.
Some cardboard protected the tile from paint overspray.
The little temporary table worked better than expected. It was a good height and kept parts high enough off the ground so there was no overspray in the grass (not that that’s a big deal anyway). It was high enough that bugs weren’t jumping out of the grass onto my freshly painted parts too. The inward taper of the legs kept me from tripping on them as I circled the part while spraying. And if you need to buy them, they are cheap.
Here are a couple parts on the paint stand.
This red part was about 10 pounds.
I can see them working nicely without a top on for painting flat panels and even hanging a bunch of small parts from wire hooks to paint and dry on.
You can use two of them with a board spanning between to paint long items too.
I’m going to designate one for the Asylum and one for at the city house for painting. The step daughter can have the rest if she needs them!
Attachments
-
 4237-Temporary-Spray-Paint-Table-01.jpg157 KB · Views: 298
 -
 4236-Parking Meter - Duncan Model 60 - Restoration-16.jpg146.3 KB · Views: 296
 -
 4235-Parking Meter - Duncan Model 60 - Restoration-12.jpg143.3 KB · Views: 300
 -
 4234-Parking Meter - Duncan Model 60 - Restoration-23.jpg145.9 KB · Views: 304
 -
 4233-Parking Meter - Duncan Model 60 - Restoration-19.jpg146.1 KB · Views: 301
 -
 4232-Parking Meter - Duncan Model 60 - Restoration-49.jpg115.7 KB · Views: 299
Last edited:
Bob Heine
ALLIANCE MEMBER
I like that idea! 
For us outdoor, fair weather painter, I'm always looking for ways to make things a little easier/quicker... and sticking something in the ground is pretty quick.I like that idea!
YAMAHA FJR1300 MAJOR MAINTENANCE…
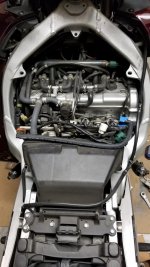
We are coming up the best riding weather of the year in Florida and I wanted to get some major maintenance behind me on the Yamaha FJR1300. I’ve had this bike since new in 2007 and she has treated me well over the last 46,000 miles. It’s my vehicle of choice for my work commute, well, before COVID-19 had me working from home anyway.
I have been watching the valve clearances closely on the Triumph Tiger over the last 17 years and have not had to do a valve clearance adjustment yet. When I get done with the job, I feel good that all is well, but I also think to myself that it was a lot of work just measure something and then put it back together unchanged. Knowing this, and also reading countless forum posts about other FJR owners experiences, I took a chance with the FJR by neglecting to do a valve clearance check until now. I know, I know… shame on me! I’m glad to report, however, that with the first check finally performed on the FJR, all valves clearances are still within spec.
It took me a couple hours to unearth the engine on the FJR, but I like to take my time and look stuff over good. It might be a long time before I’m in here again. Also, this bike is at the age when plastic parts could be getting brittle so I also didn’t want to break anything.

Here, the valve cover it finally removed for an inspection on the valve clearances. Like the Tiger, it’s nice and clean in there from running Mobil 1 oil.

Other things normally done while in this deep is a spark plug and air filter change. Before buttoning it up. I hooked up my carb sync tool and found the throttle bodies to be a bit out of adjustment, so that got sorted too.

I did find two valve clearances that were close to being out of spec. Did it come from the factory that way, or has it slowly been wearing? Who knows, especially not me because this is the first check. So to be safe, you can bet another 46K won’t go by without a check.
The throttle body sync really seemed to help smoothness just off idle, and that just makes it a little more enjoyable to ride. So all in all, to was a worthwhile exercise. Plus I’ve gotten to know the old girl just a bit more intimately.
We are coming up the best riding weather of the year in Florida and I wanted to get some major maintenance behind me on the Yamaha FJR1300. I’ve had this bike since new in 2007 and she has treated me well over the last 46,000 miles. It’s my vehicle of choice for my work commute, well, before COVID-19 had me working from home anyway.
I have been watching the valve clearances closely on the Triumph Tiger over the last 17 years and have not had to do a valve clearance adjustment yet. When I get done with the job, I feel good that all is well, but I also think to myself that it was a lot of work just measure something and then put it back together unchanged. Knowing this, and also reading countless forum posts about other FJR owners experiences, I took a chance with the FJR by neglecting to do a valve clearance check until now. I know, I know… shame on me! I’m glad to report, however, that with the first check finally performed on the FJR, all valves clearances are still within spec.
It took me a couple hours to unearth the engine on the FJR, but I like to take my time and look stuff over good. It might be a long time before I’m in here again. Also, this bike is at the age when plastic parts could be getting brittle so I also didn’t want to break anything.
Here, the valve cover it finally removed for an inspection on the valve clearances. Like the Tiger, it’s nice and clean in there from running Mobil 1 oil.
Other things normally done while in this deep is a spark plug and air filter change. Before buttoning it up. I hooked up my carb sync tool and found the throttle bodies to be a bit out of adjustment, so that got sorted too.
I did find two valve clearances that were close to being out of spec. Did it come from the factory that way, or has it slowly been wearing? Who knows, especially not me because this is the first check. So to be safe, you can bet another 46K won’t go by without a check.
The throttle body sync really seemed to help smoothness just off idle, and that just makes it a little more enjoyable to ride. So all in all, to was a worthwhile exercise. Plus I’ve gotten to know the old girl just a bit more intimately.
Attachments


Last edited:
PORCH OUTLET… (Part 1 of 2)
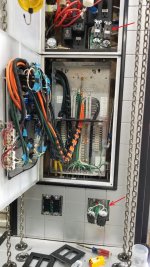
The other day, I told you I spliced into the “Night Light” junction box to finally hook up the “Asylum” sign spotlights. Well, I had to go back into that junction box again, but this time to add GFI protection. You see, I decided to add a dedicated outlet out on the porch for plugging in the gas pump and ultimately lighting it up.
The 2-gang white box on the upper left is the night light junction box.

A GFI outlet here at the source of the circuit near the breaker panel protects all the downstream outlets. I’m never very pretty with my wiring, but it gets the job done.

All finished. New GFI is upstream of the adjacent timer that controls when the night lights are on.

Luckily, I already had a branch of the night light circuit terminating in the front control panel, so extending this out on the other side of the wall was pretty straight forward. Mods are fairly easy at the Asylum since all wall panels are screwed on.
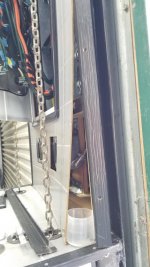
This view shows panels pulled away just enough to get my hand in there to fish wire in the wall and insert them in the wall boxes.

The view shows a similar situation on the exterior wall… enough room to get my arm in there to route wires.

My little hand nippler did a decent job of making the cutout for the new outdoor outlet.

Since I’m splitting the duplex outlet so that one socket will be powered all the time and the other will be controlled by the night light timer, I had to splice into to different boxes for power. Arrows point to these.

The other day, I told you I spliced into the “Night Light” junction box to finally hook up the “Asylum” sign spotlights. Well, I had to go back into that junction box again, but this time to add GFI protection. You see, I decided to add a dedicated outlet out on the porch for plugging in the gas pump and ultimately lighting it up.
The 2-gang white box on the upper left is the night light junction box.
A GFI outlet here at the source of the circuit near the breaker panel protects all the downstream outlets. I’m never very pretty with my wiring, but it gets the job done.
All finished. New GFI is upstream of the adjacent timer that controls when the night lights are on.
Luckily, I already had a branch of the night light circuit terminating in the front control panel, so extending this out on the other side of the wall was pretty straight forward. Mods are fairly easy at the Asylum since all wall panels are screwed on.
This view shows panels pulled away just enough to get my hand in there to fish wire in the wall and insert them in the wall boxes.
The view shows a similar situation on the exterior wall… enough room to get my arm in there to route wires.
My little hand nippler did a decent job of making the cutout for the new outdoor outlet.
Since I’m splitting the duplex outlet so that one socket will be powered all the time and the other will be controlled by the night light timer, I had to splice into to different boxes for power. Arrows point to these.
Attachments
-
 4247-Electrical-Night-Light-Circuit-07.jpg110.8 KB · Views: 231
 -
 4246-Electrical-Night-Light-Circuit-06.jpg47.7 KB · Views: 232
 -
 4245-Electrical-Night-Light-Circuit-05.jpg56.4 KB · Views: 235
 -
 4244-Electrical-Night-Light-Circuit-04.jpg74.2 KB · Views: 234
 -
 4243-Electrical-Night-Light-Circuit-03.jpg75.7 KB · Views: 236
 -
 4242-Electrical-Night-Light-Circuit-02.jpg61.4 KB · Views: 233
 -
 4241-Electrical-Night-Light-Circuit-01.jpg71.1 KB · Views: 234
Last edited:
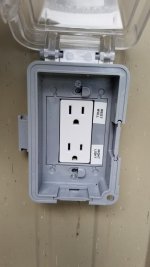
PORCH OUTLET… (Part 2 of 2)
Here you can see two metal clad wires extending down to the new outdoor outlet. (I found it easier just to take the whole siding panel off during the installation)

I like to label the incoming wires for future reference.

And here’s the new gas pump outlet, ready to use.

Of course, it wasn’t quite done until I externally labeled the outlets. Actually, I think I still need to add the “GFI Protected” sticker to be completely finished.

Here you can see two metal clad wires extending down to the new outdoor outlet. (I found it easier just to take the whole siding panel off during the installation)
I like to label the incoming wires for future reference.
And here’s the new gas pump outlet, ready to use.
Of course, it wasn’t quite done until I externally labeled the outlets. Actually, I think I still need to add the “GFI Protected” sticker to be completely finished.
Attachments


Last edited:
harley jim
Well-known member
Re: The ASYLUM - Turning a Crazy Vision into a Lakefront Gearhead Getaway: Year 6
That's a great design on your walls. I am forever adding a circuit or something so I tried to add extra conduit where I could. I need to pull another set of speaker wires to the main shop it's too quiet over there
Sent from my SM-A102U using The Garage Journal mobile app
That's a great design on your walls. I am forever adding a circuit or something so I tried to add extra conduit where I could. I need to pull another set of speaker wires to the main shop it's too quiet over there
Sent from my SM-A102U using The Garage Journal mobile app
Re: The ASYLUM - Turning a Crazy Vision into a Lakefront Gearhead Getaway: Year 6
I'm just glad power is supplied by AC and not DC (thanks Mr. Westinghouse and Mr. Tesla!), because there's enough wire in these walls to create an electro-magnet! LOL
Thanks. I've been in those walls so many times, I can't count it anymore.That's a great design on your walls. I am forever adding a circuit or something so I tried to add extra conduit where I could. I need to pull another set of speaker wires to the main shop it's too quiet over there
Sent from my SM-A102U using The Garage Journal mobile app
I'm just glad power is supplied by AC and not DC (thanks Mr. Westinghouse and Mr. Tesla!), because there's enough wire in these walls to create an electro-magnet! LOL
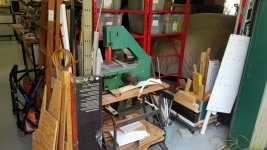
DRILL PRESS / BANDSAW / VERTICAL MILL / LATHE… (Part 1 of 6)
Our housing community has garage sales twice a year and I usually find a few tools worth buying. Our schedules didn’t match up and my wife and I checked out the bargains on two separate days. She came back from her hunting with pictures from a guy liquidating his woodworking garage/shop. I had totally missed his place the day before (but I did get a free treadmill that looks and works perfectly!). Items looked too intriguing not to go check it out in person so I hopped in the truck.
I have a big drill press at the Asylum and what I have been looking for lately is a benchtop vertical mill for smaller jobs. At the sale, I found a really nice variable speed benchtop drill press that I thought could be used for light milling, so I bought it. But before I started converting it over to milling jobs, it dawned on me I had already made the adaptations to my big press to do milling. So I thought, why not just start using this new benchtop press for drilling and convert the big press back over for milling jobs and just leave it that way. It seemed like the path of least resistance (even though I seldom take that path!)
Here is a stock image of the new-to-me benchtop drill press, a Delta model DP350.

And here is the actual one I purchased right after I picked it up. It is in really decent shape.

With the equipment juggling going on, I decided to move my benchtop bandsaw to this same rolling cart (more on that later). It has been camped out on my Black-n-Decker Workmate since the shop was built 15 years ago. I still use it quite a bit for wood, aluminum, and a rare steel cutting job, and it would be nice if it wasn’t tucked away in the dark corner of the shop.
The new smaller press has a handy speed adjustment knob, so I might be more apt to select the correct speed for the material and drill bit size now. At least, I will have no excuse for not doing it. A keyless chuck is a must for a drill, so that is on order.

Here’s a closer look at the Reeves drive. There are two variable pitch pulleys that allow on-the-fly speed changes. BUT, Delta had a problem with Reeve drives on these particular presses as well as the DP-250s… more on that a little later.

Another nice feature that might get used more often now that it will become a quicker job is the depth setting system. There’s a spring button on the knurled nut that, when pushed, allows you to slide the nut vertical down the threaded rod. Just slide it down close, do the fine height adjustment by turning the knob and you’re done. Easy!

In retrospect, knowing that Delta is now out of business and spare parts availability is lacking, I probably should have passed on it. But now that I have it, I’ll work through any issues that arise.
Our housing community has garage sales twice a year and I usually find a few tools worth buying. Our schedules didn’t match up and my wife and I checked out the bargains on two separate days. She came back from her hunting with pictures from a guy liquidating his woodworking garage/shop. I had totally missed his place the day before (but I did get a free treadmill that looks and works perfectly!). Items looked too intriguing not to go check it out in person so I hopped in the truck.
I have a big drill press at the Asylum and what I have been looking for lately is a benchtop vertical mill for smaller jobs. At the sale, I found a really nice variable speed benchtop drill press that I thought could be used for light milling, so I bought it. But before I started converting it over to milling jobs, it dawned on me I had already made the adaptations to my big press to do milling. So I thought, why not just start using this new benchtop press for drilling and convert the big press back over for milling jobs and just leave it that way. It seemed like the path of least resistance (even though I seldom take that path!)
Here is a stock image of the new-to-me benchtop drill press, a Delta model DP350.
And here is the actual one I purchased right after I picked it up. It is in really decent shape.
With the equipment juggling going on, I decided to move my benchtop bandsaw to this same rolling cart (more on that later). It has been camped out on my Black-n-Decker Workmate since the shop was built 15 years ago. I still use it quite a bit for wood, aluminum, and a rare steel cutting job, and it would be nice if it wasn’t tucked away in the dark corner of the shop.
The new smaller press has a handy speed adjustment knob, so I might be more apt to select the correct speed for the material and drill bit size now. At least, I will have no excuse for not doing it. A keyless chuck is a must for a drill, so that is on order.
Here’s a closer look at the Reeves drive. There are two variable pitch pulleys that allow on-the-fly speed changes. BUT, Delta had a problem with Reeve drives on these particular presses as well as the DP-250s… more on that a little later.
Another nice feature that might get used more often now that it will become a quicker job is the depth setting system. There’s a spring button on the knurled nut that, when pushed, allows you to slide the nut vertical down the threaded rod. Just slide it down close, do the fine height adjustment by turning the knob and you’re done. Easy!
In retrospect, knowing that Delta is now out of business and spare parts availability is lacking, I probably should have passed on it. But now that I have it, I’ll work through any issues that arise.
Attachments
-
 4256-Drill Press - Delta Benchtop DP350-05.jpg47.8 KB · Views: 193
 -
 4255-Drill Press - Delta Benchtop DP350-04.jpg75.7 KB · Views: 195
 -
 4254-Drill Press - Delta Benchtop DP350-03.jpg68.9 KB · Views: 194
 -
 4253-Drill Press - Delta Benchtop DP350-01.jpg67.4 KB · Views: 195
 -
 4252-Drill Press - Delta Benchtop DP350.jpg35 KB · Views: 193
Last edited:
sublime68charger
Well-known member
nice thought process us the little machine for the drilling and setup the big one for milling.
and if/when you need to due a heavy drill job it's worth the time hassle to switch over the big machine.
and if/when you need to due a heavy drill job it's worth the time hassle to switch over the big machine.
ODIS
Well-known member
Sir, You Are Amazing!
Thanks.nice thought process us the little machine for the drilling and setup the big one for milling.
and if/when you need to due a heavy drill job it's worth the time hassle to switch over the big machine.
You are right... if I look back over the years, not once have I ever felt I was pushing the big press to its limits, so a less powerful one should be fine. Also, I have never needed to drop the table way down for a large item on the floor press. It seems I normally take a portable drill to something bulky. So a benchtop version should be fine in that regard too. Time will tell!
Thank you sir! I'm really enjoying my shop time lately and good progress is being made. It helps having a bunch of vacation to burn at the end of the year too!Sir, You Are Amazing!
DRILL PRESS / BANDSAW / VERTICAL MILL / LATHE… (Part 2 of 6)
BANDSAW RELOCATION, CLEANUP, AND COVERUP.
As I said earlier, this bandsaw has sat on this B&D Workmate table for 15 years and it was located here because the close proximity to the back door allowed me to simply blow the sawdust outside when it was cleanup time.


Having moved it to the new spot, I thought it was a good time to clean it up and look it over good.


After 27 years, I think it still looks pretty good. And it still performs the same as the day I brought it home.


The color really doesn’t fit in around here and I had considered painting it recently, but since the paint was still in good shape, I decided to leave it be. I have plenty of other things to keep me busy. Besides, if I want to hide the green, I always have this Craftsman vinyl cover to hide it.

Hopefully I can look forward to another 27 years of use!!
BANDSAW RELOCATION, CLEANUP, AND COVERUP.
As I said earlier, this bandsaw has sat on this B&D Workmate table for 15 years and it was located here because the close proximity to the back door allowed me to simply blow the sawdust outside when it was cleanup time.
Having moved it to the new spot, I thought it was a good time to clean it up and look it over good.
After 27 years, I think it still looks pretty good. And it still performs the same as the day I brought it home.
The color really doesn’t fit in around here and I had considered painting it recently, but since the paint was still in good shape, I decided to leave it be. I have plenty of other things to keep me busy. Besides, if I want to hide the green, I always have this Craftsman vinyl cover to hide it.
Hopefully I can look forward to another 27 years of use!!
Attachments
-
 4263-Drill-Press-Bandsaw-Mill-09.jpg77.7 KB · Views: 419
 -
 4262-Drill-Press-Bandsaw-Mill-06.jpg149.2 KB · Views: 421
 -
 4261-Drill-Press-Bandsaw-Mill-07.jpg138.7 KB · Views: 430
 -
 4260-Drill-Press-Bandsaw-Mill-05.jpg153.2 KB · Views: 422
 -
 4259-Drill-Press-Bandsaw-Mill-04.jpg156.6 KB · Views: 419
 -
 4258-Drill-Press-Bandsaw-Mill-02.jpg148.6 KB · Views: 428
 -
 4257-Drill-Press-Bandsaw-Mill-01.jpg152.9 KB · Views: 434
Last edited:
harley jim
Well-known member
Re: The ASYLUM - Turning a Crazy Vision into a Lakefront Gearhead Getaway: Year 6
Looking good Shopnut. Your making great progress.
Sent from my SM-A102U using The Garage Journal mobile app
Looking good Shopnut. Your making great progress.
Sent from my SM-A102U using The Garage Journal mobile app
Re: The ASYLUM - Turning a Crazy Vision into a Lakefront Gearhead Getaway: Year 6
Thanks. Getting the shop more efficient is very satisfying for me. And it should save me a few steps too!
Looking good Shopnut. Your making great progress.
Sent from my SM-A102U using The Garage Journal mobile app
Thanks. Getting the shop more efficient is very satisfying for me. And it should save me a few steps too!
DRILL PRESS / BANDSAW / VERTICAL MILL / LATHE… (Part 3 of 6)
VERTICAL MILL / DRILL PRESS.
I also have a cover for a drill press too and it is shown on the Delta press here.

But I use a drill press so often that it likely will spend most of its time on top of the bandsaw or on the larger converted HF mill/drill press.

I set the big HF drill press back up to do light milling and intend to leave it this way in the foreseeable future.

Here is where it was discussed before on the GJ...
https://www.garagejournal.com/forum/showthread.php?p=2255142#post2255142
Add here are some pictures in action...


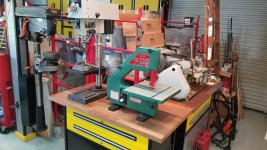
Here are some overall shots with everything in close proximity now.


I’m also considering mounting the little bending brake below the bandsaw table where it won’t be in the way. If I don’t have it handy, I’m not going to use it (if the last 15 years tells me anything!)

VERTICAL MILL / DRILL PRESS.
I also have a cover for a drill press too and it is shown on the Delta press here.
But I use a drill press so often that it likely will spend most of its time on top of the bandsaw or on the larger converted HF mill/drill press.
I set the big HF drill press back up to do light milling and intend to leave it this way in the foreseeable future.
Here is where it was discussed before on the GJ...
https://www.garagejournal.com/forum/showthread.php?p=2255142#post2255142
Add here are some pictures in action...
Here are some overall shots with everything in close proximity now.
I’m also considering mounting the little bending brake below the bandsaw table where it won’t be in the way. If I don’t have it handy, I’m not going to use it (if the last 15 years tells me anything!)
Attachments
-
 4264-Drill-Press-Bandsaw-Mill-10.jpg80.8 KB · Views: 381
 -
 4265-Drill-Press-Bandsaw-Mill-11.jpg148.1 KB · Views: 382
 -
 4266-Drill-Press-Bandsaw-Mill-13.jpg83.6 KB · Views: 375
 -
 4267-Drill-Press-Bandsaw-Mill-15.jpg157.6 KB · Views: 383
 -
 4268-Drill-Press-Bandsaw-Mill-16.jpg91.8 KB · Views: 375
 -
 4269-Drill-Press-Bandsaw-Mill-20.jpg117.4 KB · Views: 376
Last edited:
harley jim
Well-known member
Re: The ASYLUM - Turning a Crazy Vision into a Lakefront Gearhead Getaway: Year 6
I need one of those
Sent from my SM-A102U using The Garage Journal mobile app
I need one of those
Sent from my SM-A102U using The Garage Journal mobile app
Re: The ASYLUM - Turning a Crazy Vision into a Lakefront Gearhead Getaway: Year 6
$300 on ebay right now...")
https://www.ebay.com/c/1361985541
$300 on ebay right now...
https://www.ebay.com/c/1361985541
DRILL PRESS / BANDSAW / VERTICAL MILL / LATHE… (Part 4 of 6)
BENCHTOP DELTA DRILL PRESS.
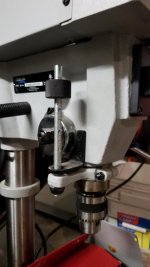
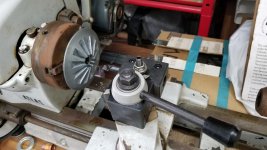
As I mentioned earlier, the new-to-me Delta drill press wasn’t without issues. Apparently the Reeves drive pulley has a tendency to self-destruct on these models. On mine, the bushing had shifted out of the pulley hub and the pulley was flailing all about, ready to blow. (Glad I caught it in time!) But since I have a lathe, the fix was pretty straight forward.
The bore that the bushing had worked itself out of was all wallowed out. So that needed to be trued up on the lathe and a spacer of some sort added in the gap. This gave me a chance to finally try out the Lathe QCTP and the boring bar adapter. More on this later, but I have no idea why I waited to install the QCTP. (More on the QCTP coming later.)

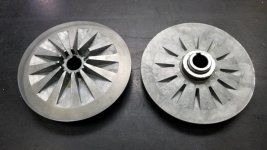
Here are the drive pulleys with the repaired one on the right in both pictures.


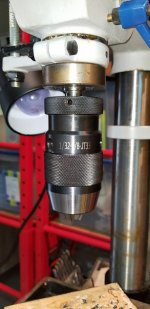
Keyed chucks are a pain, so I upgraded the OEM 1/2” to a 5/8” keyless. Here is a comparison shot with OEM still mounted.

I’m sure there are other ways to remove the chuck, but I opted to buy the proper wedge set to keep in the drill accessory drawer.

She’s all ready to go!!

BENCHTOP DELTA DRILL PRESS.
As I mentioned earlier, the new-to-me Delta drill press wasn’t without issues. Apparently the Reeves drive pulley has a tendency to self-destruct on these models. On mine, the bushing had shifted out of the pulley hub and the pulley was flailing all about, ready to blow. (Glad I caught it in time!) But since I have a lathe, the fix was pretty straight forward.
The bore that the bushing had worked itself out of was all wallowed out. So that needed to be trued up on the lathe and a spacer of some sort added in the gap. This gave me a chance to finally try out the Lathe QCTP and the boring bar adapter. More on this later, but I have no idea why I waited to install the QCTP. (More on the QCTP coming later.)
Here are the drive pulleys with the repaired one on the right in both pictures.
Keyed chucks are a pain, so I upgraded the OEM 1/2” to a 5/8” keyless. Here is a comparison shot with OEM still mounted.
I’m sure there are other ways to remove the chuck, but I opted to buy the proper wedge set to keep in the drill accessory drawer.
She’s all ready to go!!
Attachments
-
 4270-Lathe-QCTP-01.jpg135.9 KB · Views: 355
 -
 4271-Drill Press - Delta Benchtop DP350-14.jpg141.8 KB · Views: 353
 -
 4272-Drill Press - Delta Benchtop DP350-15.jpg130.6 KB · Views: 348
 -
 4273-Drill Press - Delta Benchtop DP350-22.jpg82.2 KB · Views: 334
 -
 4274-Drill Press - Delta Benchtop DP350-23.jpg62.2 KB · Views: 337
 -
 4275-Drill Press - Delta Benchtop DP350-24.jpg63.4 KB · Views: 340
Last edited:
DRILL PRESS / BANDSAW / VERTICAL MILL / LATHE… (Part 5 of 6)
QCTP FOR THE OLD LATHE.
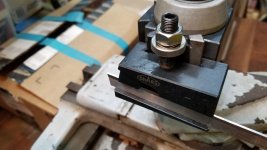
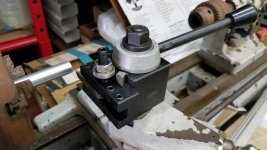
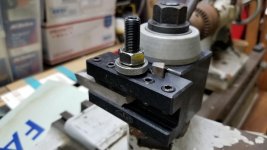
What is “QCTP” you ask? Well, it’s a Quick Change Tool Post, of course. It lets you switch between a boring bar, cutting tool, or knurling tool (for instance) in seconds. I bought this budget set years ago, along with a boring bar set, and both were still sitting in the boxes. I have done quite a few turning projects over the years, but this was the first boring job I needed to do. But I had no way to hold the boring bars besides the new QCTP. So I said to myself, there’s no time like the present! Actually mounting it to the lathe was a breeze, so I’m not sure why I didn’t do it sooner.
Here’s a view looking down on the QCTP. Notice the two dovetail shapes, these are where the interchangeable tool holders slide down on. The silver jaw moves ever so slightly to lock the tool holder on. The vertical stud with locknut set the precise height of the tool.

The shows the boring bar tool holder lifted up and off the QCTP.

This picture shows a standard turning tool positioned for OD turning. (Go easy on me, I hadn’t tuned it in for cutting angles yet.)

Here are the different tool holders I have. Boring bar, parting, knurling, and 3 basic double bit holders.

Like I said, it’s a budget minded set, but I believe it is going to work fantastic for my needs.

Here’s a better view of the boring bar.

And here is the parting tool mounted on the QCTP.

The fun begins!!
QCTP FOR THE OLD LATHE.
What is “QCTP” you ask? Well, it’s a Quick Change Tool Post, of course. It lets you switch between a boring bar, cutting tool, or knurling tool (for instance) in seconds. I bought this budget set years ago, along with a boring bar set, and both were still sitting in the boxes. I have done quite a few turning projects over the years, but this was the first boring job I needed to do. But I had no way to hold the boring bars besides the new QCTP. So I said to myself, there’s no time like the present! Actually mounting it to the lathe was a breeze, so I’m not sure why I didn’t do it sooner.
Here’s a view looking down on the QCTP. Notice the two dovetail shapes, these are where the interchangeable tool holders slide down on. The silver jaw moves ever so slightly to lock the tool holder on. The vertical stud with locknut set the precise height of the tool.
The shows the boring bar tool holder lifted up and off the QCTP.
This picture shows a standard turning tool positioned for OD turning. (Go easy on me, I hadn’t tuned it in for cutting angles yet.)
Here are the different tool holders I have. Boring bar, parting, knurling, and 3 basic double bit holders.
Like I said, it’s a budget minded set, but I believe it is going to work fantastic for my needs.
Here’s a better view of the boring bar.
And here is the parting tool mounted on the QCTP.
The fun begins!!
Attachments
-
 4282-Lathe-QCTP-12.jpg112.1 KB · Views: 296
 -
 4281-Lathe-QCTP-11.jpg139 KB · Views: 295
 -
 4280-Lathe-QCTP-04.jpg99.2 KB · Views: 302
 -
 4279-Lathe-QCTP-09.jpg147 KB · Views: 715
 -
 4278-Lathe-QCTP-05.jpg119.5 KB · Views: 726
 -
 4277-Lathe-QCTP-02.jpg118 KB · Views: 300
 -
 4276-Lathe-QCTP-03.jpg148.6 KB · Views: 303
Last edited:
shortykorte
Well-known member
Re: The ASYLUM - Turning a Crazy Vision into a Lakefront Gearhead Getaway: Year 6
I’m looking forward to getting a quick change. Did you have to use shims to get any of the cutters centered?
Sent from my iPhone using Garage Journal
I’m looking forward to getting a quick change. Did you have to use shims to get any of the cutters centered?
Sent from my iPhone using Garage Journal
Re: The ASYLUM - Turning a Crazy Vision into a Lakefront Gearhead Getaway: Year 6
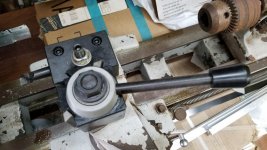
If I understand your question, you don't use shims to adjust tool height on QCTP's. The entire tool block's height is adjusted using a knurled nut on a threaded shaft on top that rests on the tool post's top:

I’m looking forward to getting a quick change. Did you have to use shims to get any of the cutters centered?
If I understand your question, you don't use shims to adjust tool height on QCTP's. The entire tool block's height is adjusted using a knurled nut on a threaded shaft on top that rests on the tool post's top:
Attachments

shortykorte/zanyad - Yep, that is correct. You dial it in once for the cutting tool and then it stays that way until you change out the cutting tool. I can’t imagine there not being enough adjustment for any given tool.
Here are a couple pictures to show the height adjustment.


Here are a couple pictures to show the height adjustment.
Attachments
DRILL PRESS / BANDSAW / VERTICAL MILL / LATHE… (Part 6 of 6)
LATHE MISC.
While I was messing around with the lathe, I decided to clean up the drawers a bit. Most everything I have was inherited from my grandfather. The QCTP tool holders also got a dedicated tray.

I’m not sure how these books got separated from the lathe, but my dad unearthed them a couple months ago and sent them to me with a note “I figured you would want these”. Haha, yes please and thank you Dad!!

I downloaded a digital copy of the lathe manual years ago, but it is REALLY cool having this one and knowing that my grandfather and my dad and thumbed their way through it.

The book covers exactly how to uncrate it. Hopefully that was done properly 70 or 80 years ago! LOL

A lube point chart will keep me from forgetting those spots.

The book also has great info on proper lathe turning techniques, which I should read over in detail because my shop class was, um, 40 years ago maybe. LOL
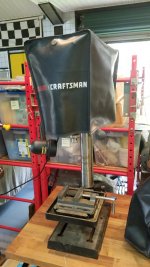
With covers for the other equipment, I decided the lathe is the one that really needs something most. I ran across this grill cover on Amazon and click, it was mine!

Here it is in real life. I would have preferred a black color instead of the brown, but for the price I will halt my complaint right there. It is very well made and has a vent near the top and drawstring at the bottom.

I ordered a second one to cover the workbench when I have something delicate taken apart, like a motorcycle engine.
LATHE MISC.
While I was messing around with the lathe, I decided to clean up the drawers a bit. Most everything I have was inherited from my grandfather. The QCTP tool holders also got a dedicated tray.
I’m not sure how these books got separated from the lathe, but my dad unearthed them a couple months ago and sent them to me with a note “I figured you would want these”. Haha, yes please and thank you Dad!!
I downloaded a digital copy of the lathe manual years ago, but it is REALLY cool having this one and knowing that my grandfather and my dad and thumbed their way through it.
The book covers exactly how to uncrate it. Hopefully that was done properly 70 or 80 years ago! LOL
A lube point chart will keep me from forgetting those spots.
The book also has great info on proper lathe turning techniques, which I should read over in detail because my shop class was, um, 40 years ago maybe. LOL
With covers for the other equipment, I decided the lathe is the one that really needs something most. I ran across this grill cover on Amazon and click, it was mine!
Here it is in real life. I would have preferred a black color instead of the brown, but for the price I will halt my complaint right there. It is very well made and has a vent near the top and drawstring at the bottom.
I ordered a second one to cover the workbench when I have something delicate taken apart, like a motorcycle engine.
Attachments
-
 4290-Lathe-Cover-02 (Amazon).JPG94.9 KB · Views: 222
 -
 4289-Lathe-Misc-04.jpg85.3 KB · Views: 224
 -
 4288-Lathe-Misc-03.jpg140.7 KB · Views: 224
 -
 4287-Lathe-Misc-02.jpg99 KB · Views: 224
 -
 4286-Lathe-Misc-01.jpg152.3 KB · Views: 224
 -
 4285-Lathe-QCTP-07.jpg149.4 KB · Views: 628
 -
 4291-Lathe-Cover-02.jpg155.2 KB · Views: 223
Last edited:
harley jim
Well-known member
Re: The ASYLUM - Turning a Crazy Vision into a Lakefront Gearhead Getaway: Year 6
I'll have to get a pic but that lathe in the book looks just like my lathe. Mine is an Atlas.
Sent from my SM-A102U using The Garage Journal mobile app
I'll have to get a pic but that lathe in the book looks just like my lathe. Mine is an Atlas.
Sent from my SM-A102U using The Garage Journal mobile app
andyvh1959
Well-known member
Wow, just,......wow. 40 years old and got that to escape to daily, great job. Now of course, that means you can NEVER move for ANY reason.
Back in 98 I completed the initial build of the 28.5 x 48 garage that I built next to my 1500 sq ft house (the garage was 1320 sq ft). I had it partitioned for a 26 x 28.5 back area just for my cycle shop. Overhead door on that south wall and two 48" x 60" thermpane windows to let in a lot of light. I bought the house for $60,000 and fixed it up. I was able to build the garage for less than $15,000 with a lot of salvaged material and sweat work. I was single, 37 then, and was ready to enjoy my cycle shop for many years to come. Had I stayed there, I would have paid it all off 15 years ago, mortgage free at 52. Coulda retired at 60.
Then,...I got stupid,...let my little head convince me to marry a gal in 02, sell my house, move to Green Bay. From a seven car capacity garage (just for me) to an attached two car, two teenagers, and all her and their stuff. My stuff got packed in where I could barely use it. And by 2007 divorced, in the much bigger house and now at 63 still paying off the remaining $60,000 on the mortgage. Dumb ***, dub ***, dumb ***.
Re: The ASYLUM - Turning a Crazy Vision into a Lakefront Gearhead Getaway: Year 6
Here are some better shots of mine. Its a 12"x ?? (that's weird, I never actually measured the bed length).
The next thing mine needs is a replacement 2-step motor drive pulley. I still have the broken original so I know the measurements. Its been running on that single pulley for as long as I remember.


Hey, maybe our lathes are twins.I'll have to get a pic but that lathe in the book looks just like my lathe. Mine is an Atlas.
Sent from my SM-A102U using The Garage Journal mobile app
Here are some better shots of mine. Its a 12"x ?? (that's weird, I never actually measured the bed length).
The next thing mine needs is a replacement 2-step motor drive pulley. I still have the broken original so I know the measurements. Its been running on that single pulley for as long as I remember.
Thanks. I've owned the property since '96 and the shop was started in '04. The original plan was to own it through retirement and I'm well on my way there.Wow, just,......wow. 40 years old and got that to escape to daily, great job. Now of course, that means you can NEVER move for ANY reason.
Back in 98 I completed the initial build of the 28.5 x 48 garage that I built next to my 1500 sq ft house (the garage was 1320 sq ft). I had it partitioned for a 26 x 28.5 back area just for my cycle shop. Overhead door on that south wall and two 48" x 60" thermpane windows to let in a lot of light. I bought the house for $60,000 and fixed it up. I was able to build the garage for less than $15,000 with a lot of salvaged material and sweat work. I was single, 37 then, and was ready to enjoy my cycle shop for many years to come. Had I stayed there, I would have paid it all off 15 years ago, mortgage free at 52. Coulda retired at 60.
Then,...I got stupid,...let my little head convince me to marry a gal in 02, sell my house, move to Green Bay. From a seven car capacity garage (just for me) to an attached two car, two teenagers, and all her and their stuff. My stuff got packed in where I could barely use it. And by 2007 divorced, in the much bigger house and now at 63 still paying off the remaining $60,000 on the mortgage. Dumb ***, dub ***, dumb ***.
We all do stupid things at times. You probably thought you were missing something... probably not quite sure what it was. And marriage seemed like the solution. Its one heck of a transition from living on your own and then suddenly having to share your life with others. It can be a HUGE sacrifice.
And teenagers are just plain challenging. It makes you think back to when you were their age and wonder if you caused your parents as much worry and grief. Chances are, YES!
Sorry to hear about the divorce, but I wish you luck steering your life on the path of your choosing in the future. And thanks for stopping in. You are always welcome here.