To avoid these ads, REGISTER NOW!

The Road to Nowhere . . .

Cemoto

Well-known member
Joined
Aug 26, 2012
Messages
427
Location
Central Massachucetts
The Road to Nowhere . . . now somewhere!

Well, that's what my wife calls it. The road to nowhere.

I'm starting the thread now because when the spring comes I'm going to be pretty busy and it will be easier to update with it already started.

I've been hoping to build something down on the back corner of my property for quite a few years and it looks like it may happen this spring. A 30x40' carriage house garage is really what I'd like.

Thirty years ago I worked for a custom home builder as part of a framing crew.

A big problem I have is the watertable is very high. In fact, I needed to get approval (done and silt fence/hay bales in place) from the conservation commission because there are wetlands within 60' of the proposed build, and if I dig a footings 48" below grade (frost requirement) I will hit water. So any suggestions are very welcome. Thank you.

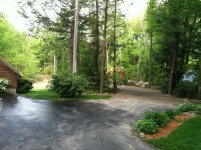
We all like photos so here goes . .

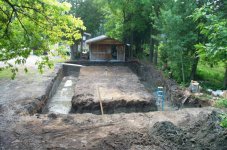
The first shows an old wood shed and lots of trees where the building will go, don't pay attention to the moss on the roof (We have a lot of trees).

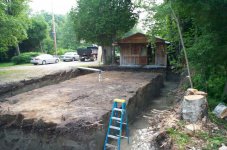
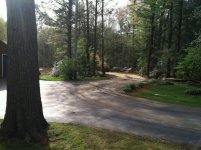
The second shows the excavator arriving..

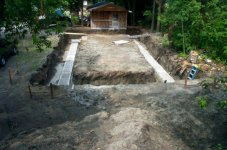
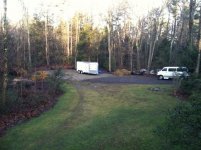
The third, the excavator going to work. The old shed peeks out at you.

Fourth shows a hollow pine tree that was leaning in the direction of the house.
 

Attachments

  • Img_0700s.jpg
    Img_0700s.jpg
    126.3 KB · Views: 519
  • Img_0709s.jpg
    Img_0709s.jpg
    146.5 KB · Views: 556
  • Img_0726s.jpg
    Img_0726s.jpg
    132.6 KB · Views: 732
  • Img_0713s.jpg
    Img_0713s.jpg
    124.2 KB · Views: 542
Last edited:
To avoid these ads, REGISTER NOW!
OP
C

Cemoto

Well-known member
Joined
Aug 26, 2012
Messages
427
Location
Central Massachucetts
The fifth photos shows a leveled off area.

Sixth is the road . . .

Then we have a nice old tractor which spread the topsoil and T-base. No it is not mine. It ran great.

View from the deck.
 

Attachments

  • Img_0733s.jpg
    Img_0733s.jpg
    107.7 KB · Views: 302
  • Img_0887s.jpg
    Img_0887s.jpg
    122.3 KB · Views: 339
  • Img_0843s.jpg
    Img_0843s.jpg
    133.5 KB · Views: 321
  • Img_0801s.jpg
    Img_0801s.jpg
    139.9 KB · Views: 441
  • Img_0788s.jpg
    Img_0788s.jpg
    100.2 KB · Views: 302
OP
C

Cemoto

Well-known member
Joined
Aug 26, 2012
Messages
427
Location
Central Massachucetts
And what it looked like before the silt fence was finished and the snow came.

I hope to build something like this . . . Please pardon my cartoon drawing.

Thanks guys. What a great site this is.

Regards,
 

Attachments

  • Img_1420s.jpg
    Img_1420s.jpg
    106.8 KB · Views: 497
  • Img_0844test1s.jpg
    Img_0844test1s.jpg
    137.2 KB · Views: 1,077
Last edited:

ConCretin

Well-known member
Joined
Jan 20, 2011
Messages
3,378
Location
Central Maine
A big problem I have is the watertable is very high. In fact, I needed to get approval (done and silt fence/hay bales in place) from the conservation commission because there are wetlands within 60' of the proposed build, and if I dig a footings 48" below grade (frost requirement) I will hit water. So any suggestions are very welcome. Thank you.

The best way to deal with water is to over-excavate by 6" and install a layer of 3/4" crushed stone throughout the excavation. Dig a sump hole for a pump or daylight a drain if you can as early in the process as possible. Install a bucket with holes drilled in the sides in the sump hole before filling it with stone for your pump.

This will give you a dry place to work, will prevent the sub grade from getting all churned up from walking on it and will give you a good solid base for your foundation. It is well worth the expense. Good luck
 
OP
C

Cemoto

Well-known member
Joined
Aug 26, 2012
Messages
427
Location
Central Massachucetts
"daylight a drain"

I don't know what that is, please explain it if you would. Thank you.

I'm afraid if I dig a hole for a sump it will run 24 hours a day and I would be discharging water into a wetland area (a big no-no here in MA), which will find it's way back to the hole in short time and begin the cycle all over again.

My excavator mentioned an option "tailings" says we could put the footings on stone that has been tamped down, which sound like what you are suggesting Mr. Willy's fan.

Or he said we could build up, in other words go down 2' and bring gravel in to provide the 48". The only problem with this plan is that we have already brought in 48" of clay/rock fill in the back to level the area, so I'd be putting the footings on virgin soil.

Now you can see my concerns. Ben Franklins are not falling out of my pocket either.

Thanks in advance for any advice!

Regards,
 

Kevin54

MEMBER EMERITUS
Joined
Jan 12, 2005
Messages
29,341
Location
Urbana, Ohio
A daylight drain is a drain that exits into daylight, i.e. the side of a hill or some other lower area that can carry the water away or to a place where it will drain away on its own.
 
OP
C

Cemoto

Well-known member
Joined
Aug 26, 2012
Messages
427
Location
Central Massachucetts
Thank you for the responses so far.

I've noticed that many here have done the pole barn. My problem is the clay and water. I'm wondering how the water would play into that, rotting the posts that is. We plan to stay here for a long time. The Permapost concept is good but there are no distributors near me at all, so shipping costs go up. In the past I've used what we called "Sonotubes" ( a wax coated stiff cardboard) and pour concrete into them to make an in ground post, maybe that is a possibility. I need a concrete floor. So by the time you add it all up it seems the post/footing/floor for a pole barn is close to what a permanent foundation would be.

Plans have not been submitted for a permit yet as the cost of the foundation will dictate what size building goes up.

Regards,
 

ConCretin

Well-known member
Joined
Jan 20, 2011
Messages
3,378
Location
Central Maine
"daylight a drain"

I don't know what that is, please explain it if you would. Thank you.

I'm afraid if I dig a hole for a sump it will run 24 hours a day and I would be discharging water into a wetland area (a big no-no here in MA), which will find it's way back to the hole in short time and begin the cycle all over again.

My excavator mentioned an option "tailings" says we could put the footings on stone that has been tamped down, which sound like what you are suggesting Mr. Willy's fan.

As Kev mentioned, daylighting in this instance means running a drain to an area lower than your excavation so gravity takes care of your water. This wouldn't appear to be an option due to your topography.

The other option is a pump with a float switch that will only run when the water builds up. I'm in maine where we have equally strict environmental rules. I think you'll find you can pump water as long as it isn't full of silt. You cab construct a simple sedimentation basin with hay bales.

You are right to a degree about 'recycling' the water by pumping back onto the ground but there's no other way to create dry hole to build your foundation.

You're correct about the tailings, which are typically larger rocks that are produced during screening of gravel. They would work fine.
 
Last edited:

The Boss

Well-known member
Joined
Dec 9, 2012
Messages
387
Location
Connecticut
Wood destroying fungi need three things to survive - cellulose fiber (the wood), water and oxygen. Without one of the three - they cannot survive.

If the posts will always be submerged and are ground contact PTS, you can be sure the structure will outlast the balance of your lifetime.
 
OP
C

Cemoto

Well-known member
Joined
Aug 26, 2012
Messages
427
Location
Central Massachucetts
This Thursday I have an appointment the the Morton Building office near me.

I'll see what they have to offer.

I'm getting anxious to get something up this year.

Regards,
 

Greg9504

Well-known member
Joined
Dec 19, 2007
Messages
47
Location
Ottawa, Ontario, Canada
I had the same problem with ground water. I did as LLWillysfan suggested and dug a pit and put in a pump with float. Adding 3/4" clear is a good idea, something I didn't do and wish I had. Muddy boots **** :)

I was concerned about the frost wall foundation and the high water table so spoke with the civil engineer that did the soil test. He had no concerns.

These pictures were taken shortly after the foundation was dug. Water started coming up right away. Have the pump and gravel ready and you will be good to go.


attachment.php

(and yes after back filling we took another foot of soil from the inside pad area to get down to better soil...)
attachment.php


attachment.php
 

Attachments

  • excavation9.jpg
    excavation9.jpg
    145.4 KB · Views: 5,802
  • excavation11.jpg
    excavation11.jpg
    134.9 KB · Views: 5,544
  • excavation12.jpg
    excavation12.jpg
    120.4 KB · Views: 5,538

socapots

Well-known member
Joined
Jan 3, 2011
Messages
544
Location
Canada
I recently saw someone on here post a link to a company that made what looked to be an insulated block with a fabric at the bottom that makes the footing once filled with concrete.
Maybe that would work. No idea on costs though.
 
OP
C

Cemoto

Well-known member
Joined
Aug 26, 2012
Messages
427
Location
Central Massachucetts
Thanks for posting the pics Greg. That gives me hope and shows how it is done. I'm going to find how the Morton guys deal with it.

Best Regards,
 

JC23

Well-known member
Joined
Dec 31, 2009
Messages
11,718
Location
Northcoast
64Metals makes concrete pole bases for pole buildings.

Good luck and keep us 'posted.'
 
OP
C

Cemoto

Well-known member
Joined
Aug 26, 2012
Messages
427
Location
Central Massachucetts
Well, the Morton guy gave me a few good ideas. He is working up estimates and will get with me next week.

I need a new roof on the main house (BP shingles ****) and they are willing to do a steel roof on the house as well. I like the idea of everything matching, so we will see.

As far as the posts go they guaranty them for 50 years even in the wet areas.

Interesting to note; their steel has a polycloth membrane glued to the underneath to help w/ condensation.

Also, the engineer had never heard of GJ.

All set for a large noreaster . . .
 

sgnova72

Member
Joined
Apr 8, 2012
Messages
12
Location
Kentucky
I don't know if you looked further than Morton, but I have received a quote from The Barn Yard out of Ellington CT. They have pole building with pre-cast concrete column footings which may be just what you need for your water tale issues. My quote for a 40x40 was 43,310 which was cheaper than a smaller size Morton building.
 
To avoid these ads, REGISTER NOW!
OP
C

Cemoto

Well-known member
Joined
Aug 26, 2012
Messages
427
Location
Central Massachucetts
Thanks for the suggestion Nova, I'll look into them.

My numbers have not come in yet, but the base price for a Morton 30x40 is 21K installed, no floor. I had received a kit price delivered for $17,800. from someone else so that didn't seem out of line.

My main garage is attached so I'm really just looking for storage.

Regards,
 

Kevin54

MEMBER EMERITUS
Joined
Jan 12, 2005
Messages
29,341
Location
Urbana, Ohio
attachment.php


Just out of curiosity, what is your frost line depth and why did they dig so wide for the footers? I think that has to be one of the largest footers I have ever saw.
 

Greg9504

Well-known member
Joined
Dec 19, 2007
Messages
47
Location
Ottawa, Ontario, Canada
Don't want to hijack Cemoto thread... but to answer your question the top of the footer was at 48" deep. The footers were formed with fastfoot 28" wide. I did the work myself (hired out the backhoe) so I had him dig it that wide, probably could have gone a bit less but wanted the room to work. I did ICF frostwalls so I could form it myself and so that I could pass code using the ICF manufacturer engineer as I was doing something a bit different for the walls. Working by myself it took 2 days to put together the ICF walls, then I spent a few evenings to brace it. Dead simple to do. FWIW if I was doing a regular stick built garage I could have just done a monolith slab with thickened edges, would have been much cheaper. At the time I was quoted $20k to put in the foundation, even though the ICF cost a fair amount around $7K, total cost for the foundation was $12k including over $1k for the backfill material. As I didn't want to backfill with the clay, so I got sand.

attachment.php


attachment.php
 

Attachments

  • footing4.jpg
    footing4.jpg
    122 KB · Views: 2,580
  • frostwall_foundation_integraspec_13.jpg
    frostwall_foundation_integraspec_13.jpg
    152.3 KB · Views: 2,582
Last edited:
OP
C

Cemoto

Well-known member
Joined
Aug 26, 2012
Messages
427
Location
Central Massachucetts
Well I got an email from the Morton rep today and I don't know what happened to the basic 30x40 installed for 21K. My quote ended up about 20% higher than I expected so even if I drop a few items it is not coming down enough to make it work. So stick built is looking better.

Still not giving up on the pole barn idea w/ attic trusses.

This price does not include the floor or awning porch for the trailer to go under - - - -


Here is a look at their quote:

2/14/13

Al,

Thank you for your interest in Morton Buildings, Inc. The following is a proposal based on our Conversation.

Structure: 42’x12’x30’ Garage and storage building. Truss frame assemblies on wood laminated columns built on a properly prepared building site.

Roof: Flouroflex2000 Hi-rib steel with continuous ridge vent. 6/12 Roof pitch with Dry-panel condensation control.
1’ Vented overhangs on both sides
1’ Non-vented overhangs on both ends
5” Aluminum gutters with 4”x3” steel downspouts

Sides: Flouroflex1000 Hi-rib steel with 3’ wainscot and protective liner and color matched stainless steel screws.
[3] 10’x10’ Overhead doors with oval lites, operators and Hi-lift tracks.
[1] 3068 9-Lite insulated in-swing walk door with lockset and deadbolt.
[1] 3’x5’ Non-functional loft door.

Interior: Unfinished

Morton Buildings, Inc. can construct this garage and storage building for you for the price of $50,955.
The price includes all labor, materials, transportation, engineered structural plans, and applicable taxes. The price does not include any permits, site preparation, concrete slab, electrical or plumbing costs. During the construction, Morton will handle all pertinent building inspections and provide a dumpster and sanitary facilities.

Options: Change 3068 walk door to a double door Add $1,816.
Add spanned truss bay for future mezzanine 1,074.
Add 12’x42’ Mezzanine with only one column support $17,833.
Add Steel ceiling only with no insulation $5,923.
Add 12’x30’ Porch to side-wall $7,194.

Al,

Our buildings are custom built for you, so we can make any adjustments that you’d like.

Please feel free to contact me with any questions or if you’d like me to visit you at the job site. Also, I’d be glad to arrange for you to tour one or more of our local Morton buildings if you are interested. Just let me know.
 

Attachments

  • mortonImage1.jpg
    mortonImage1.jpg
    81.4 KB · Views: 43
Last edited:

MagKarl

Well-known member
Joined
Oct 15, 2012
Messages
684
Location
Olympia, WA
42 x 30 is very different than 30 x 40 in terms of span/truss size and post load. You chose the more expensive direction to run the ridge.
 
OP
C

Cemoto

Well-known member
Joined
Aug 26, 2012
Messages
427
Location
Central Massachucetts
42 x 30 is very different than 30 x 40 in terms of span/truss size and post load. You chose the more expensive direction to run the ridge.

That was the rep's suggestion. I wanted an attic truss and he suggested to make the building a little larger rather then use attic trusses.

Was he off base w/ the 42'?

Thank you.
 
OP
C

Cemoto

Well-known member
Joined
Aug 26, 2012
Messages
427
Location
Central Massachucetts
Just a small update as we got another 20" of snow yesterday.

Here in central MA we have had a total snowfall this season of 124"

So there is still a compacted snow depth of 36" on the building site. It won't be long though.

I have decided to go with the full concrete foundation after seriously considering a pole building, and plans are being drawn up now. I've changed from the garage door openings on the buildings side to a gable end opening. This way the rain/snow runoff will exit to the side of the building rather than in front right over the doors. More of a barn like building rather than a carriage house.

Re-orienteering it also opens up the possibility of adding a productive solar panel array in the future, so I'm happy with that.

Hurry up and melt will you! We actually got more snow than Maine this year.

Regards,
 
Last edited:

Daniel Dudley

Well-known member
Joined
Sep 4, 2009
Messages
3,546
I would want to get that floor up higher over the water table. Ask your engineer if you could put in 12 inches of gravel, and pour a monolithic slab over it. Then put 2'' blue foam around the perimeter and up the slab sides and back fill over that.

I would want to jumping jack tamp what you already have, and then tamp the gravel as well. I would want the gravel going out at least 5' from the slab, and I would use 3/4 inch crushed stone, as it packs well, and is high drainage. By varying the thickness of the slab, and using rebar, you can pour reinforcement into the slab at the edges and even the center if you want. Of course you will need a good vapor barrier.

Very do able and everything drains away from your building.
 
OP
C

Cemoto

Well-known member
Joined
Aug 26, 2012
Messages
427
Location
Central Massachucetts
Ok,

We are starting to melt here. It's the spring cycle, melt a little, freeze at night, melt a little, etc... We had a lot of rain the other day which really shows where the water table lies.

Interesting enough that even in the middle of winter it does not freeze. Kettle holes we call them.

I've made the seemingly final (hopefully) determinations on the size and layout so things should start to happen within a month, depending on the weather this spring.

I'm going to offset the garage doors a couple of feet to give a little more space on one side for the bikes.

Here is a photoshop rendering. The picture is not to scale but gives an idea of what the final project should look like.

Thanks for all the suggestions, I plan to use them.

Regards,
 

Attachments

  • Img_1420test2aa.jpg
    Img_1420test2aa.jpg
    142.1 KB · Views: 226

Red Leader

Well-known member
Joined
May 15, 2011
Messages
2,688
Location
Denver, CO
The fifth photos shows a leveled off area.

Sixth is the road . . .

Then we have a nice old tractor which spread the topsoil and T-base. No it is not mine. It ran great.

View from the deck.

Ahh...that reminded me of a tractor that my grandfather had. I remember riding on it...mmm been years since I thought about it.

Thanks for that:)
 

Re-Volv

Well-known member
Joined
Mar 11, 2008
Messages
77
I'll be curious to follow this thread and see which directions you go, as a fellow Central Mass'er (Webster).

I wish the warmer weather would come back though, 50* was NICE last week!
 
OP
C

Cemoto

Well-known member
Joined
Aug 26, 2012
Messages
427
Location
Central Massachucetts
OK - So things are looking up here with some spring melt. Still have a foot or so of compacted snow but the edges are melting.

I have a question about vapor barrier below the poured concrete floor.

Is it better to use a one piece industrial tarp rather than sheets of plastic. I do plan on using foam board as well. No PEX as this will be heated w/ a Modine unit heater.

Any thoughts?

Thank you.
 

The Boss

Well-known member
Joined
Dec 9, 2012
Messages
387
Location
Connecticut
If you're not putting heat in the floor I wouldn't bother to put foam under the slab - it will be cold regardless. I'll be using some old 40 x 60 blue tarps I have in combination with the torn cover off my 30 x 30 hoop house under the slab in my barn as soon as the frost goes out of the ground.

All that being said - a good 6 mil poly vapor barrier under the concrete should be all that you need.
 
OP
C

Cemoto

Well-known member
Joined
Aug 26, 2012
Messages
427
Location
Central Massachucetts
Thanks guys for any thoughts.

Since I'm near wetlands w/ that high water table, I thought the foam might help keep moisture from entering through the slab. But then again, because the water table is high and there are puddles that never freeze nearby, even in 20 degree weather, maybe the foam would keep any ground warmth out. Do you think it might be possible the building might be slightly warmer w/o it?

There is a guy the next town over selling new square end (not T&G) pink XPS 2" for $25. a 4'x8' sheet. The building size has changed slightly to 36'x30' so I'll need 36 sheets, that translates to $900.

On an upbeat note, the contractor is coming tomorrow night to hammer out the some trim and drainage details and collect a deposit. Excavation should start soon after, maybe two weeks.

Yea!

Regards,
 
Last edited:

Omphaloskeptic

Well-known member
Joined
Oct 11, 2008
Messages
2,346
Location
Ultima Ratio, Wa.
"Since I'm near wetlands w/ that high water table, I thought the foam might help keep moisture from entering through the slab."


With a high water table and concrete being porous, I would use a one-piece vapor barrier and the insulation; $900.00 is cheap insulation 'insurance', especially living in Mass..
 
OP
C

Cemoto

Well-known member
Joined
Aug 26, 2012
Messages
427
Location
Central Massachucetts
View attachment 250342

I have some news . . .

Plans have changed back to the original carriage house design. We (she) felt visually from the street a 36' gable end, 10' walls w/ attic trusses would be a very large face (if it had a steeple would look like a church) and would detract from the overall look to the property (read between the lines here).

Spoke w/ the building inspector today and he is fine w/ the carriage style plans. However he is on vacation next week so formal approval won't happen until the following week 4/22.

I've decided to make a bit narrower but deeper, 36'x32' deep. This will allow me to park the smaller cars nose to tail for the winter.

The excavator is coming this weekend to put in a diverter drain to help w/ any rain runoff from uphill to help avoid any possibility of undermining the foundation.

The builder is about a month away job-wise so I hope to get the foundation in and floor poured as soon as possible.

Thanks for tips and info posted. I've been playing around w/ the CD designs software and now have a rough floor plan that I think will work well for me.

Regards,
 

Attachments

  • !aaaplanapril2.jpg
    !aaaplanapril2.jpg
    95.3 KB · Views: 74
  • !aaaplanapril1.jpg
    !aaaplanapril1.jpg
    82.8 KB · Views: 61
OP
C

Cemoto

Well-known member
Joined
Aug 26, 2012
Messages
427
Location
Central Massachucetts
Today we put in an 80' trench of stone, perf pipe and silt screen fabric to create a drain to divert any potential sub-surface runoff away from the future foundation.

The yellow arrow is the back right corner stake.

The little Bobcat excavator worked well for this and was quiet.

We used the "goobers" dug from the trench to make a retaining wall off to the right in order to have a platform to park my snowmobile trailer on the side of the building.

This will be it for a few weeks until the foundation excavation starts.

Regards,
 

Attachments

  • Img_1695s.jpg
    Img_1695s.jpg
    156.3 KB · Views: 154
OP
C

Cemoto

Well-known member
Joined
Aug 26, 2012
Messages
427
Location
Central Massachucetts
Not much new to report except I filed the building permit application yesterday - $336.

Here is a shot taken yesterday.

If approved, I should pick it up next week, then the fun begins . . .
 

Attachments

  • Img_1700S.jpg
    Img_1700S.jpg
    152.2 KB · Views: 117
To avoid these ads, REGISTER NOW!
Top Bottom