To avoid these ads, REGISTER NOW!

Between 705 & 1200 SQ/FT The Time Machine Garage - 32x24 with loft

Workspaces between 705 and 1200 squarefeet.

Gerald O

Well-known member
Joined
Mar 5, 2013
Messages
1,884
Location
NC
The Time Machine Garage

Update:
This is no longer a new build so I've decided to rename the thread.
I'm calling it the "Time Machine Garage" to reflect the kind of 'vintage' theme I have going on. (and besides, there might be a time machine coming out of here someday...)
------
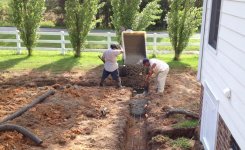
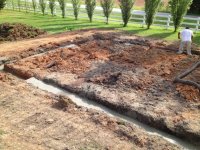
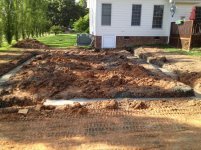
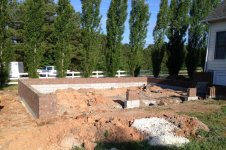
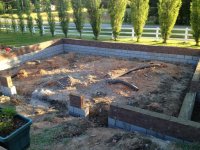
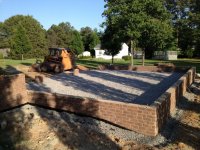
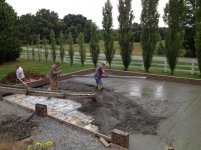
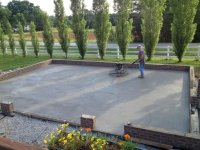
This is going to be a build thread to share progress on my new garage project. It's already been about 6 months since I first embarked on this project, and we are planning to break ground today.

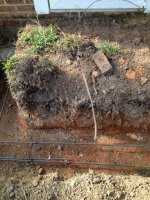
A lot of preparation has gone into the design and planning in that 6 months: permits, changes to my septic system drain field, creating the architectural drawings, finding contractors. Now it's at the stage where I can lean back a bit and let the GC take over and do his thing.

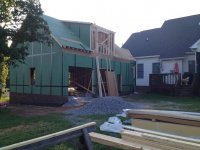
This had to be an attached garage due to the setbacks on my lot ruling out a detached building in the location I wanted, which was about the only reasonable place for it. So a lot of design challenges were related to making it attach at this location in an architecturally pleasing way, as well as making the elevations line up. I ended up having to design it from scratch, since none of the stock designs were a good fit.

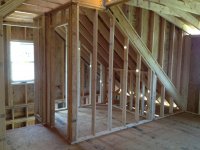
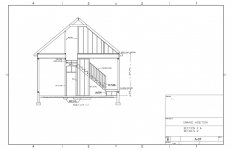
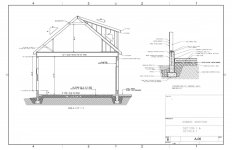
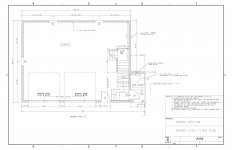
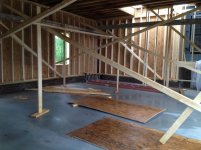
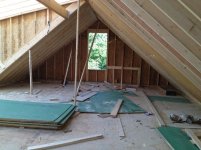
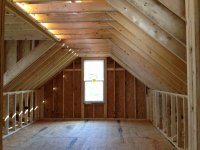
This garage will have a 32' x 24' outline, a 1.5 story design for the loft, and 11' ceiling clearance below to accomodate a lift. There are two 9'W x 8'H insulated sectional doors and a single man door on the exterior. This makes it something like a 2-1/2 car garage. The interior staircase to the loft takes up some room that would otherwise have been a 3-car.

For now, I'm going to start posting design pictures and renderings. As construction gets underway I'll update regularly with progress photos. I'm even thinking of sharing a live 'garage-cam' link to the outdoor camera that overlooks the site.

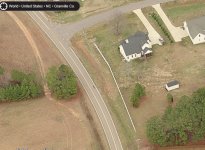
It is going in the back yard with an extension of the driveway wrapping around behind.
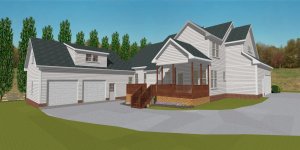
These renderings show how it should look when finished (the house part is already there.)
 

Attachments

  • garage12 SE view.jpg
    garage12 SE view.jpg
    148.5 KB · Views: 2,550
  • garage12 NW view.jpg
    garage12 NW view.jpg
    146.8 KB · Views: 1,697
Last edited:
To avoid these ads, REGISTER NOW!
OP
G

Gerald O

Well-known member
Joined
Mar 5, 2013
Messages
1,884
Location
NC
Here are some of the construction drawings: floorplans, framing details.
 

Attachments

  • garage plans 10.jpg
    garage plans 10.jpg
    129.2 KB · Views: 1,519
  • garage plans 9.jpg
    garage plans 9.jpg
    119.9 KB · Views: 1,558
  • garage plans 8.jpg
    garage plans 8.jpg
    139.1 KB · Views: 1,766
  • garage plans 7.jpg
    garage plans 7.jpg
    137 KB · Views: 1,824
  • garage plans 6.jpg
    garage plans 6.jpg
    134.7 KB · Views: 2,650
  • garage plans 3.jpg
    garage plans 3.jpg
    141.5 KB · Views: 1,948
OP
G

Gerald O

Well-known member
Joined
Mar 5, 2013
Messages
1,884
Location
NC
No room left to breath in my existing tiny 2-car. :headscrat
After the new garage is finished then this one can get a makeover.
 

Attachments

  • 028.jpg
    028.jpg
    144.8 KB · Views: 1,334

NCtim

Well-known member
Joined
Feb 9, 2013
Messages
79
Location
WNC
I can't tell from the photo, what year MGB? I've got a '73 rust-free that I'm putting an aluminum V8 into this summer (I hope). Also, why only 24' deep? Is that due to the lot restrictions?

Tim
 
OP
G

Gerald O

Well-known member
Joined
Mar 5, 2013
Messages
1,884
Location
NC
MG is a '78. I've had it for about 20 years. It's got the original engine but modified a bit for high performance which includes the usual higher compression, slight over-bore, cam, head work, and my own home-brew fuel injection system.

There are a couple reasons for the 24' depth. There's a limit on 'accessory building' square footage due to subdivision covenants, and also, my septic drain field ran through this area and I had to cut two of the lines off already. If I went deeper it would have gotten too close to a third line which would have forced me to add two more new lines instead of 1. Also, if I went deeper and made it shorter width-wise to stay in the sqft limits, it would limit me to a single double-wide door due to the tight space around the staircase. So it's the best compromise I could think of. The existing garage is only 21' deep x 20' wide, so 24' x 32' will feel spacious by comparison.

Well, groundbreaking has been delayed due to rain all weekend. Builder didn't want to risk the footing trenches getting flooded. So now we're just waiting for a long enough break in the weather.
 
OP
G

Gerald O

Well-known member
Joined
Mar 5, 2013
Messages
1,884
Location
NC
Here's an aerial view of the lot. New garage will connect to the back-left corner of the house, and the driveway will be extended around the back. Between garages and the extra driveway space that'll give me a lot of parking area.

Septic field cuts all the way across the lot, making the back half unbuildable.
 

Attachments

  • aerial.jpg
    aerial.jpg
    141.5 KB · Views: 1,454

NCtim

Well-known member
Joined
Feb 9, 2013
Messages
79
Location
WNC
Hey Gerald,

Good job on keeping the LBC alive and in great shape. My build is limited by being on a mountainside and I don't want to dig step footings. I'm debating 24' vs 28' deep and everyone in the car world is telling me I'll want the extra 4' in front of the cars for engine hoists, rotisseries, etc. I keep saying these little British cars aren't that long. Also, 28' deep makes my truss joists that much taller and expensive.

Cheers,
Tim
 
OP
G

Gerald O

Well-known member
Joined
Mar 5, 2013
Messages
1,884
Location
NC
And so it begins...

Got a break in the weather so we jumped on it!
Yesterday the footings trenches were dug and rebar put in place. Dug down even with the original house footings and tied in with rebar pins.
 

Attachments

  • day1-01.jpg
    day1-01.jpg
    148.5 KB · Views: 942
  • day1-02.jpg
    day1-02.jpg
    137.4 KB · Views: 1,294
OP
G

Gerald O

Well-known member
Joined
Mar 5, 2013
Messages
1,884
Location
NC
Today.
Got the trenches inspected, bonded in the UFER ground conductor, and did the pour. Just in time too. A couple hours after the concrete was placed it rained again. Fortunately the concrete had set up enough that the water on top wouldn't bother it. Most of the water ran off already but there are a couple wet spots still.

Rather than risking my driveway with the cement truck, the footing guy hauled it all up in a power buggy.
 

Attachments

  • day2-03.jpg
    day2-03.jpg
    158.3 KB · Views: 1,005
  • day2-02.jpg
    day2-02.jpg
    158 KB · Views: 1,013
  • day2-01.jpg
    day2-01.jpg
    145.1 KB · Views: 971
  • day2-04.jpg
    day2-04.jpg
    153.2 KB · Views: 1,011
OP
G

Gerald O

Well-known member
Joined
Mar 5, 2013
Messages
1,884
Location
NC
The lot looks pretty flat but it slopes more than you'd think. It was about a 16" difference across the length of it. So the footings got a couple of steps.

Ground conductor is protected where it exits the footing with a length of poly tubing. This will route pretty much straight up to the new power sub panel.
 

Attachments

  • day2-09.jpg
    day2-09.jpg
    139.3 KB · Views: 787
  • day2-08.jpg
    day2-08.jpg
    142.1 KB · Views: 758
  • day2-07.jpg
    day2-07.jpg
    154.3 KB · Views: 732
  • day2-06.jpg
    day2-06.jpg
    141.5 KB · Views: 766
  • day2-05.jpg
    day2-05.jpg
    153.4 KB · Views: 770
OP
G

Gerald O

Well-known member
Joined
Mar 5, 2013
Messages
1,884
Location
NC
Hey Gerald,

Good job on keeping the LBC alive and in great shape. My build is limited by being on a mountainside and I don't want to dig step footings. I'm debating 24' vs 28' deep and everyone in the car world is telling me I'll want the extra 4' in front of the cars for engine hoists, rotisseries, etc. I keep saying these little British cars aren't that long. Also, 28' deep makes my truss joists that much taller and expensive.

Cheers,
Tim
Another reason I stuck with 24' is because I'll be using I-joists for the second floor joists that will be a single span all the way across. No support beam across the middle. Can't really go much longer than 24' in a single span. This means my 11' ceiling height will be uninterrupted by beams.

The MG is only about 12' long. I imagine your Triumph is about the same. I'm not into big rigs, but even my full size Chevy Suburban 4WD is only about 18' long. Even that'll fit for the occasional oil-change or tire rotation.
 
OP
G

Gerald O

Well-known member
Joined
Mar 5, 2013
Messages
1,884
Location
NC
Progress

Has it been over a week already? The builders work fast -- when they work.
Yesterday they put up the foundation wall. All block and brick. Today foundation drains and gravel fill is going in.
 

Attachments

  • stemwall_01.jpg
    stemwall_01.jpg
    156.7 KB · Views: 1,056
  • stemwall_02.jpg
    stemwall_02.jpg
    149.3 KB · Views: 1,081
  • stemwall_03.jpg
    stemwall_03.jpg
    152.1 KB · Views: 1,003
OP
G

Gerald O

Well-known member
Joined
Mar 5, 2013
Messages
1,884
Location
NC
Got gravel

Foundation has been waterproofed below the grade line.
Base is backfilled with gravel.
Next is preparation for doing the slab. It will get poly moisture barrier, a grid of #4 rebar and 6" of 3500 PSI concrete.

:Violent:
 

Attachments

  • gravel_02.jpg
    gravel_02.jpg
    153.3 KB · Views: 901
  • gravel_01.jpg
    gravel_01.jpg
    152.6 KB · Views: 907
  • waterproofing01.jpg
    waterproofing01.jpg
    148.4 KB · Views: 883
OP
G

Gerald O

Well-known member
Joined
Mar 5, 2013
Messages
1,884
Location
NC
It's a '78. Which incidentally makes it 35 years old--no more state inspections required from here out.

Couple of older videos of it before I moved to my current home:
 
Last edited:
OP
G

Gerald O

Well-known member
Joined
Mar 5, 2013
Messages
1,884
Location
NC
The skinny ones along the fence? Those are Lombardy poplar. I wouldn't mind if they were a little wider to make a better visual break from the road. Hopefully they will fill in better as they mature.
 
Last edited:

NCtim

Well-known member
Joined
Feb 9, 2013
Messages
79
Location
WNC
It's a '78. Which incidentally makes it 35 years old--no more state inspections required from here out.

Couple of older videos of it before I moved to my current home:

Thanks Gerald,

I've got a '73 MGB that's getting ready to be restored when I get my garage done. I'm in NC also, what part of the state are you in?

Tim
 
OP
G

Gerald O

Well-known member
Joined
Mar 5, 2013
Messages
1,884
Location
NC
Hey Tim,
I'm in Granville county near Wake Forest. How about you?
I think if I get another MGB, a '73 might be one of my top choices--last of the chrome bumper years.
 
OP
G

Gerald O

Well-known member
Joined
Mar 5, 2013
Messages
1,884
Location
NC
Ready for concrete

Pour is scheduled tomorrow, weather permitting.
Had a long chat with the slab guy over the weekend. Good thing too--he had thought it was to be a 4" slab and had filled gravel to that level. I reviewed the details with him and got the depth corrected for the 6" that I had specified. We worked out the details of the floor slope and I settled on a 1" total fall across the slab. It's got to be sloped to meet code, but code doesn't say how much.

Most folks want a really shiny slab finish. This one is going to be machine troweled followed by a light broom to raise up a little tooth for adhesion of the tile. So, we're going to make it pretty then mess it up a bit.

Framing materials arrived today too.
 

Attachments

  • IMG_0316.jpg
    IMG_0316.jpg
    149.7 KB · Views: 1,255
  • IMG_0319.jpg
    IMG_0319.jpg
    149.9 KB · Views: 997
Last edited:
To avoid these ads, REGISTER NOW!
OP
G

Gerald O

Well-known member
Joined
Mar 5, 2013
Messages
1,884
Location
NC
Update

Another week has gone by, and oh what a difference a week makes!

Where did I leave off? Yeah, we were ready for the slab:
6" thick, 14 yards of fiber reinforced 3500 PSI concrete with rebar.

For best adhesion of porcelain tile you want this finish.

They didn't cut the control joints til a week after pouring the concrete. The guy said the slab would be so solid it probably wouldn't even really need them. We had rain storms all week so it was easy keeping the concrete wet for the hardening. Not so great for the framing though...
 

Attachments

  • IMG_0325.jpg
    IMG_0325.jpg
    149.3 KB · Views: 1,023
  • IMG_0327.jpg
    IMG_0327.jpg
    148.8 KB · Views: 1,069
  • IMG_0349.jpg
    IMG_0349.jpg
    148 KB · Views: 945
  • IMG_0366.jpg
    IMG_0366.jpg
    146.3 KB · Views: 998
Last edited:
OP
G

Gerald O

Well-known member
Joined
Mar 5, 2013
Messages
1,884
Location
NC
But wait there's more!..

This is about 3 1/2 days worth of framing work:
 

Attachments

  • IMG_0345.jpg
    IMG_0345.jpg
    140.3 KB · Views: 1,268
  • IMG_0352.jpg
    IMG_0352.jpg
    142.1 KB · Views: 1,142
  • IMG_0384.jpg
    IMG_0384.jpg
    142.5 KB · Views: 1,290
  • IMG_0389.jpg
    IMG_0389.jpg
    144.3 KB · Views: 1,207
  • IMG_0370.jpg
    IMG_0370.jpg
    148.6 KB · Views: 1,064
  • IMG_0371.jpg
    IMG_0371.jpg
    148.3 KB · Views: 1,051
OP
G

Gerald O

Well-known member
Joined
Mar 5, 2013
Messages
1,884
Location
NC
Inside the loft area.
 

Attachments

  • IMG_0382.jpg
    IMG_0382.jpg
    144.6 KB · Views: 862
  • IMG_0380.jpg
    IMG_0380.jpg
    142.3 KB · Views: 889
  • IMG_0379.jpg
    IMG_0379.jpg
    144.7 KB · Views: 976
OP
G

Gerald O

Well-known member
Joined
Mar 5, 2013
Messages
1,884
Location
NC
My original budget was $50k for the completed shell. I had it bid by a few outfits that specialize in garages, but the price went up considerably when they learned that it was a custom job due to being attached, 2x6 construction, 6" reinforced slab, and 11' ceiling. When I found a full custom builder that I was comfortable with it ended up coming to about $57k. That will get me the finished shell, trimmed, painted, and basic electrical with 150A service.
That still leaves the driveway and inside finish which I'll be doing sparately.

I did all the design work and drawings myself, so there was no cost for that.
I plan to do the inside finish myself. But that will be a longer term project done in stages. I guessing about another $10k by the time it's done.
 
Last edited:
OP
G

Gerald O

Well-known member
Joined
Mar 5, 2013
Messages
1,884
Location
NC
The water resistance properties of the Zip system sheathing have come in handy. We've been getting pounded with rain lately.

Windows are now in and siding is going up.

I just discovered that the builder changed my dormer roof pitch to 3/12 from the 4/12 I had specified in the plans. It changes the look somewhat from what I wanted, but I'll live with it.
 

Attachments

  • IMG_03x1.jpg
    IMG_03x1.jpg
    143.8 KB · Views: 927
  • IMG_03x2.jpg
    IMG_03x2.jpg
    136.4 KB · Views: 816
Last edited:

jlylec

Well-known member
Joined
Jul 20, 2012
Messages
185
Location
Charlottesville, VA
Very nice! We used that Zip on our house when we built it and it is a great product. Much better than simple Tyvek wrap.

Changing your plans like that is a pretty big no-no and would drive me nuts, but like you said you may as well be cool about it now. Would be a tough fix!

Building looks great if it makes you feel any better!
 
OP
G

Gerald O

Well-known member
Joined
Mar 5, 2013
Messages
1,884
Location
NC
I did some cleanup over the weekend in the loft and took a few updated photos. The contractors are about done with their part in this area. Interior finish will be up to me. They still have the electrical to do and exterior finish.
 

Attachments

  • loft_04.jpg
    loft_04.jpg
    135.8 KB · Views: 1,410
OP
G

Gerald O

Well-known member
Joined
Mar 5, 2013
Messages
1,884
Location
NC
There is a room framed out on the right that will be a bathroom.
On the left is a tiny room where the HVAC air handler will probably go.
To the far right is the dormer. The stairs down are at the far end.
The wall between the dormer and the bathroom is specially designed for the dartboard. ;)
:beer:
 

Attachments

  • loft_05.jpg
    loft_05.jpg
    135.8 KB · Views: 947
  • loft_03.jpg
    loft_03.jpg
    140 KB · Views: 1,042
Last edited:
OP
G

Gerald O

Well-known member
Joined
Mar 5, 2013
Messages
1,884
Location
NC
I'm thinking this might be the best spot for the pinball machines. What say you?
 

Attachments

  • loft_06.jpg
    loft_06.jpg
    132.5 KB · Views: 662
OP
G

Gerald O

Well-known member
Joined
Mar 5, 2013
Messages
1,884
Location
NC
Not much got done this week. The electrician got started on the wiring. Builders are stalled until rough-in inspection is done, and that is waiting on the electrical rough-in getting done.

Got 2 new Liftmaster 8500 garage door openers. These will handle the high-track garage door tracks and leave my ceiling clear for the lift.
 

Attachments

  • openers.jpg
    openers.jpg
    130.8 KB · Views: 295
OP
G

Gerald O

Well-known member
Joined
Mar 5, 2013
Messages
1,884
Location
NC
New Tools!

This just came today...

I had to take advantage of the sale at Harbor Freight on this 10" 2.5 hp tile saw. $199 on sale with coupon. Normally $329.

This should help a lot with the porcelain tile install!
 

Attachments

  • saw.jpg
    saw.jpg
    147.2 KB · Views: 448
OP
G

Gerald O

Well-known member
Joined
Mar 5, 2013
Messages
1,884
Location
NC
Another week of mostly waiting. Waiting for weather and waiting for word back from the power company to tell me if I can upgrade my service to 400 amp.

So I got word today--Yes! I just need to change the meter base from a 200A unit to a 320/400A unit and then I can split the service to feed both my existing 200A panel for the house and a new 150A panel for the new garage. Now the electrician can get back to work.

I got 760 square feet of thru body porcelain tile on order for .99 cents a square foot. 24" x 24" squares in black and white, matte finish.
http://www.builddirect.com/Porcelain-Tile/Film-Noir/ProductDisplay_6933_p1_10081618.aspx
(Thanks Angelfire!)

Started buying some of my lighting. Going with some vapor tight, caged bulb fixtures for a retro industrial look. For outside garage door lights I'm piecing together a set of custom barn/gas station style lights with shades and caged vapor-tight inserts. Pictures later.
 
Last edited:

NCtim

Well-known member
Joined
Feb 9, 2013
Messages
79
Location
WNC
Hey Gerald,

What size are your roof rafters? Are they spruce or white wood? They look like 2 x 8s.

Tim
 
OP
G

Gerald O

Well-known member
Joined
Mar 5, 2013
Messages
1,884
Location
NC
They are 2x8. Not sure about wood species. Probably whatever is typical for the local area. What is white wood, pine?
 

NCtim

Well-known member
Joined
Feb 9, 2013
Messages
79
Location
WNC
White wood is usually spruce or white pine, depending on your area. It's a lot lighter than yellow pine or fir. Usually wall studs are made with this and people use them for rafters because there's minimal deflection load on them.
 
OP
G

Gerald O

Well-known member
Joined
Mar 5, 2013
Messages
1,884
Location
NC
Parts arrived for my exterior overhead lamps, so I cobbled this together. About $60 in parts. One more to go. I'm going to mount one over each of the garage doors. :cool:
 

Attachments

  • lamp01.jpg
    lamp01.jpg
    125.4 KB · Views: 406
  • lamp02.jpg
    lamp02.jpg
    150.9 KB · Views: 358
To avoid these ads, REGISTER NOW!
Top Bottom