To avoid these ads, REGISTER NOW!

Between 705 & 1200 SQ/FT Quonset Hut Garage Build

Workspaces between 705 and 1200 squarefeet.

dwysywd

Well-known member
Joined
Sep 21, 2014
Messages
892
Location
SE Michigan - Romeo area
So, there are all types of garages. I am not sure why I've always liked these but I do. I think that the attraction has always been the do it yourself nature of them. They are one big erector set.

The story starts a month ago, right before Thanksgiving. I found a CL ad (I had been looking for a deal) for a building that had never been erected. I went and checked it out. Now DISCLAIMER: when the guy shows you the garage pieces and says it's been 5 years, moved twice and he lost the directions, free would have and should have been the deal.

But no, my over-enthusiastic, confident **** purchased it at a discount. Mind you, I had no directions, and he told me the size wrong. I purchased what I thought was a 22x24 with one end wall. It turned out to be 25x34, and you say BONUS... Yes it was!

So without instruction and no name or brand I called 4 MFG of these types of buildings. I finally found who built this one, American Steel. Turns out this 25x34 Alpine style steel building cost $8500 new and end walls cost about $1500-$2000 each. all buildings are self assembly. I paid $2200 and I am building my own end walls.

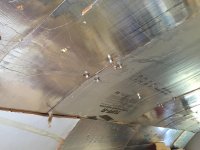
Here are some photos of the hoop strut assembly. And the building assembly. ImageUploadedByTapatalk1450618450.951892.jpgImageUploadedByTapatalk1450618472.869269.jpgImageUploadedByTapatalk1450618503.474389.jpgImageUploadedByTapatalk1450618552.296616.jpgImageUploadedByTapatalk1450618568.349155.jpg

All said and done, plan a day for footers. Here in MI they had to be 42" on the side walls and because my end walls are stick built and not load bearing, they had to be 36". But it's all close to 42". Cement was expensive cause I had a problem and we had to redid one footer.

Hoop struts took 1 hour each to build with 2 adults. I had 17 to build. I caulked between each joint even though they are built to shed water over the seam and have a foot overlay.

The hoops struts take 1 hour each to raise and bolt into place. We silicones each joint. The hardest one is the first 2 that you bolt together one the ground. After that it's 1 hour each with 4-5 guys working on it.

Still have to finish the walls but had to come up with some creative carpentry to attach wood walls to a steel building with 3 radius cuts on each end. I have my solution started. I will post a picture later. It involved attaching 1"x3" galvanized metal to the insides, cutting the 3" piece to make it bend the corners. Then cutting 1/2" plywood to fit each radius. This will give us something to attach the 2x4 walls against.


Sent from my bag phone...
 
To avoid these ads, REGISTER NOW!

txvwnut

Well-known member
Joined
Jan 1, 2015
Messages
7,603
Location
Bedford, Texas
Yup been there done that exactly, cept mine is a 20'w x 26'd and 20' high.


Won't ever do it again, think me and my brother spent two days tightening bolts after all the arches were stood up.
 
OP
D

dwysywd

Well-known member
Joined
Sep 21, 2014
Messages
892
Location
SE Michigan - Romeo area
LOL, I know. Mistake I made was tightening along the way...but we got it done. The number of man hours has made up for the great savings in cost!

24x32 Pole Barn cost $11,000 quote stood up
25x33 Quanset Hut cost $9000 after all said and done. If I am luck, It will be just about $2000 savings.
 

txvwnut

Well-known member
Joined
Jan 1, 2015
Messages
7,603
Location
Bedford, Texas
Yeah plus the fact that in around eight hours of work you've got two finished walls and a finished roof. That was the biggest factor in getting mine plus the cost savings which I really didn't end up with as I went beyond min code for the slab and a few other things. They are great buildings I'm just not sure if I'd do one a again, and if I did it wouldn't be a two story.

Here's a shot of mine.
 

Attachments

  • image.jpg
    image.jpg
    22.3 KB · Views: 1,147

CNGsaves

Well-known member
Joined
Sep 26, 2012
Messages
13,233
Location
KS and OK
LOL, I know. Mistake I made was tightening along the way...but we got it done. The number of man hours has made up for the great savings in cost!

24x32 Pole Barn cost $11,000 quote stood up
25x33 Quanset Hut cost $9000 after all said and done. If I am luck, It will be just about $2000 savings.

OP . . . how you have $9,000 in quanset hut with only $2,200 purchase price ??
 
OP
D

dwysywd

Well-known member
Joined
Sep 21, 2014
Messages
892
Location
SE Michigan - Romeo area
Mainly Labor and Cement
$2200 Hut
$3500 Cement, remember I had an issue and had to redig one of my 4 footings, resulting in an additional $1400 over my $1900 initial
$300 for backhoe and laser
$900 in materials for walls (screws, glues, wood, steel, etc)
$2000 est total labor for assembly and walls (all in all, you can't do this alone and ALL my buddies vanished once I started. So, I hired guys at $10/hr to work.) I've spent $1750 so far, and I figured it would be another $250 to button everything up.

thats $8900...

adds up quick!
 
Last edited:

CNGsaves

Well-known member
Joined
Sep 26, 2012
Messages
13,233
Location
KS and OK
Wow, for just footings, that's lot of money on concrete.

You still have likely another what $3K to $4K for the concrete floor ??

That's still lot of building for $9K . . . it's good to have roof over your stuff !! :thumbup:

Keep pics coming. Good luck.
 
OP
D

dwysywd

Well-known member
Joined
Sep 21, 2014
Messages
892
Location
SE Michigan - Romeo area
You're a brave man. I don't think I would venture into that kind of project without RTFM.

Sent from my SM-G920V using Tapatalk


RTFM. That's pretty funny. I had to look that one up! Here is the good news, aside from the cement footing issue, it's been a trouble free build thanks to the fact it goes up pretty much the way you'd think.

More pics
So here are the fasteners for the wood walls and the framing has started. ImageUploadedByTapatalk1450642712.816964.jpgImageUploadedByTapatalk1450642726.149514.jpgImageUploadedByTapatalk1450642741.650054.jpgImageUploadedByTapatalk1450642754.869964.jpg


Sent from my bag phone...
 
OP
D

dwysywd

Well-known member
Joined
Sep 21, 2014
Messages
892
Location
SE Michigan - Romeo area
Wall almost finished. Window framed in, 10'4" wide x 54" tall
ImageUploadedByTapatalk1450653985.227469.jpgImageUploadedByTapatalk1450653993.108580.jpg

Putting a 36" man door on the right. This faces west and is just he back of the garage.
Sent from my bag phone...
 
Last edited:
OP
D

dwysywd

Well-known member
Joined
Sep 21, 2014
Messages
892
Location
SE Michigan - Romeo area
as for flooring, right now I have decided to excavate the dirt 8" and fill with stone for this winter. I have a nice 15X15 outdoor carpet remnant left over from my last project, this will give me a dry surface to work with/on. Then with the rock, I can just take out what I don't need in the spring, and use it as my base for outside patio space I am pouring in front and behind the garage.

And I learned a nice way to finish my quanset edges on outside the unit. Trowl ready-mix mortar into the space and slope off to run off properly. Keeping it stiff enough to hold its shape. I will post pictures as soon as that gets done. Not sure what is going to happen with the weather in MI over next few months. That Indian Summer may be over or may come back.
 

EastEnder

Member
Joined
Aug 24, 2015
Messages
23
Location
NY
LOL, I know. Mistake I made was tightening along the way...but we got it done. The number of man hours has made up for the great savings in cost!

24x32 Pole Barn cost $11,000 quote stood up
25x33 Quanset Hut cost $9000 after all said and done. If I am luck, It will be just about $2000 savings.

What company was your pole barn quote for? Was that just for the kit itself and you supplying the labor to erect it?

I like your creative solution for the end walls :thumbup:
 

txvwnut

Well-known member
Joined
Jan 1, 2015
Messages
7,603
Location
Bedford, Texas
And I learned a nice way to finish my quanset edges on outside the unit. Trowl ready-mix mortar into the space and slope off to run off properly. Keeping it stiff enough to hold its shape.

Do this on the inside as well, it really helps to stabilize the building as well and keeps buildup out of the trough. You don't have to have the slope you did on the outside.
 
To avoid these ads, REGISTER NOW!
OP
D

dwysywd

Well-known member
Joined
Sep 21, 2014
Messages
892
Location
SE Michigan - Romeo area
Do this on the inside as well, it really helps to stabilize the building as well and keeps buildup out of the trough. You don't have to have the slope you did on the outside.
Thanks. Yeah the YouTube guy did both sides. Must have forgot to mention I was gonna do both. But yes, did know if I had to slope inside, figured not, but GTK.


What company was your pole barn quote for? Was that just for the kit itself and you supplying the labor to erect it?

I like your creative solution for the end walls :thumbup:


$11,000 was walls up and poles set. I'm at $8200 total cost before doors, which both would need. So, it's about $2800 total savings. It would have been more without my footer mistake.

And the building is a Steel Master building.
So, I paid $2200 off CL. Lots and Lots of deals out there. The kit new is $8800 for just the dome no end walls.
Labor ran me $2200 (after lots of Monday morning quarterbacking research, this is about normal and included the hours to build the end walls, I was just unprepared for the total costs of the project)

Cement ran me $3500 but $1400 was my mess up. **** happens no point in beating myself up about it. I do have a nice 2.5' wide sidewalk on the north side that I might not have poured otherwise. Comforting to know that at lease 70 sqft or so will get well used!

$500 in misc supplies. Buy LOTS of good Solar Seal caulk, I used silicone and it was half the price but meh...should have used Solar Seal. I will in the next one. We caulked EvERY joint. Wood, bought it all at the local building "salvage" place which have straighter and nicer lumber than Home Depot for 30% less.

$400 for my roller garage door 12'wX8'h from CL. Guy has another one I'm gonna snag too for next project. Again, lots of used doors out there.

If you want to build one, and I'm gonna build another after this experience, YouTube Quanset Hut and loads of great videos come up. Spend a few hours and really prep yourself for this project. It's a bit overwhelming but very DIY doable. And that's what I was looking for.

Hope that helps anyone looking to do this. If you got questions, I try to stay active here, but by all means, PM me and I will answer any question best I can! Happy new year.
 
Last edited:
OP
D

dwysywd

Well-known member
Joined
Sep 21, 2014
Messages
892
Location
SE Michigan - Romeo area
Update: finished the garage double 55gal barrel stove and installed and laid my rubber floor down. It's recycled rubber roof membrane! It's really thick and keeps the ground moisture out. Also, I can drive on it and it won't tear. I have an 8000 lb Hummer on it right now. It's fine! I'm gonna reuse it as my vapor barrier under my concrete this spring. If you live in the area of SE MI, they have about 10000 sqft of this stuff. Its only 10¢ sqft!!!! I did 800 sqft today

ImageUploadedByTapatalk1452488896.688763.jpg
 
Last edited:
OP
D

dwysywd

Well-known member
Joined
Sep 21, 2014
Messages
892
Location
SE Michigan - Romeo area
Ok guys. Update. I have come up with a solution to insulate and I think I got it all worked out. I am using the existing bolts that are exposed on the underside/inside of the roof. I am attaching a serrated flange but to the underside bolt head. Then putting a 1.5" 5/16 bolt through the insulation panel with a large 1.5" washer. Each panel will get 4 or 6 holding it up. Haven't mounted one yet, plan on doing it tonight. I am only going to mount to the flat part of the roof for now. Doing the end walls and knee walls next. Then I will Address the arches last.

ImageUploadedByTapatalk1452689845.118217.jpg


Regards,
Jeff

Sent from my bag phone...
 

txvwnut

Well-known member
Joined
Jan 1, 2015
Messages
7,603
Location
Bedford, Texas
What I did on mine was use coupling nuts on the building bolts then bolts and fender washers to hold up foam board. For the arches I set one end of the foam board on the lower row of roof bolts and forced it into the curve and used then attached it to first set wall bolts.
 
OP
D

dwysywd

Well-known member
Joined
Sep 21, 2014
Messages
892
Location
SE Michigan - Romeo area
What I did on mine was use coupling nuts on the building bolts then bolts and fender washers to hold up foam board. For the arches I set one end of the foam board on the lower row of roof bolts and forced it into the curve and used then attached it to first set wall bolts.


Any pics? Sounds like what I'm doing but always helpful to get another opinion.


Regards,
Jeff

Sent from my bag phone...


Regards,
Jeff

Sent from my bag phone...
 

walt111

Well-known member
Joined
Nov 25, 2006
Messages
305
Location
TN
I to put up 25x50 steel building. My wife and I did all the work.
The wife drove a school bus for 45 years and between runs and after work we put it together.
Seven panels per arch with 25 arches to build. AS you stated the worst part is the first two or three arches.
At that point they have a mind of there own all wiggly woggley. It got done in about 2 months. About 5000 nuts and bolts to install and tighten.
I got the building from american steel span, $9470.00 delivered.
walt
 
OP
D

dwysywd

Well-known member
Joined
Sep 21, 2014
Messages
892
Location
SE Michigan - Romeo area
Update. Added some ceiling supports to hang lights and ho,d Insullation. Adding t-nuts with sweated teeth and some blue locktite to secure them and then mounting the 16 ceiling wall panels. Pics coming
 

txvwnut

Well-known member
Joined
Jan 1, 2015
Messages
7,603
Location
Bedford, Texas
Any pics? Sounds like what I'm doing but always helpful to get another opinion

Here's a few shots of what I did in mine, and no I haven't figured out exactly what I want to do to finish out the ceiling yet. But that was the reason for the coupling nuts to give me attachment point once I figure out what I want to do.
 

Attachments

  • IMG_4125.jpg
    IMG_4125.jpg
    136.8 KB · Views: 558
  • IMG_4123.jpg
    IMG_4123.jpg
    138.7 KB · Views: 536
  • IMG_4122.jpg
    IMG_4122.jpg
    141 KB · Views: 571
OP
D

dwysywd

Well-known member
Joined
Sep 21, 2014
Messages
892
Location
SE Michigan - Romeo area
Added 16 ceiling panels that were 1 5/8" thick alum sheeting on both sides. 8 panels per side that were 4'x8' (32' deep and 24' wide) pics coming

Regards,
Jeff

Sent from my bag phone...
ImageUploadedByTapatalk1453838528.452213.jpgImageUploadedByTapatalk1453838540.085682.jpgImageUploadedByTapatalk1453838548.503086.jpg
 
Last edited:
OP
D

dwysywd

Well-known member
Joined
Sep 21, 2014
Messages
892
Location
SE Michigan - Romeo area
Trying to figure out my semi-circular wall for Insullation. Anyone have any thoughts?

As for the center ceiling, I'm putting up 4- panels that are 4x8


Regards,
Jeff

Sent from my bag phone...
 

SweetD

Well-known member
Joined
Feb 8, 2010
Messages
3,264
Location
Rhode Island
Coming along nicely!

I am right down the road from the original 'Quonset Hut' birthplace (North Kingstown, RI).

An efficient design for the ages!
 
OP
D

dwysywd

Well-known member
Joined
Sep 21, 2014
Messages
892
Location
SE Michigan - Romeo area
I'm getting there. I have ALWAYS loved these buildings. Guess I liked the diy piece of them. Been a project but have it do other way. Anyone with feedback on insulating the arch would be great.
 
OP
D

dwysywd

Well-known member
Joined
Sep 21, 2014
Messages
892
Location
SE Michigan - Romeo area
Spray foam works great. That is how I did mine. 25x50 16 foot at the center.


@walt111, what did that cost you if I may ask? Cause DIY seems to be $1.25 sqft and paid contractor is $2.50 sqft.

My 24x32 hut has a ceiling/wall sqft of 1205 sqft ceiling/walls plus 200 sqft on the wood end walls. So spray foam was a pricey option. But I might consider it for the arches on the sides. That's only 6' at 384 sq ft. I could buy one kit to do the small arch and it cost $500. So far I have $200 into panels and lag bolts. I did 608 sqft in the picture above with a nice R12 alum coated foam board that's is 1"5/8 thick for about $0.31 sqft. The bottom straight wall will get a 5' wall with roll Insullation and maybe some foam board behind that as well. The wood end walls are roll Insullation too with plywood t-111 overlay. That was about 200 sqft and cost again was $0.67 sqft for the rolls. Seeing I had to sheet the end walls either way, I didn't include that in my costs. But it was about $120 for the T-111 from the local salvage building supply company.

Now I understand there are lots of benefits to the spray foam. There is the air tight sealing component and the higher R- factor. But damn it's expensive. Plus it means waiting another 4 months before I can apply or pay 20% more for the cold cure stuff and the metal still needed to laser above 35 F for that to work.

Did I miss something?


Regards,
Jeff

Sent from my bag phone...
 
Last edited:

walt111

Well-known member
Joined
Nov 25, 2006
Messages
305
Location
TN
I do not remember the exact price. I bought 2 kits at a cost of about $1400.00 or 700. each.
Each kit does about 600 sq foot at 1 inch thick. I still had about two thirds of the ceiling left and saw a local company advertising spray foam. Contacted them and got a quote of $1200.00 for two inches thick. This area is from the top of my wall across the top to the 16 foot peak to the other wall. About 28 foot of ceiling. I was well pleased with the work done and I did not have to do it.
walt
 
OP
D

dwysywd

Well-known member
Joined
Sep 21, 2014
Messages
892
Location
SE Michigan - Romeo area
So @walt111 you had 2600 into it? Quotes I got was $2400 for whole bldg. It's just more than I want to spend right now. Maybe eventually, but not now. The cost of my cement, $2400. LoL. Priorities


Regards,
Jeff

Sent from my bag phone...
 
OP
D

dwysywd

Well-known member
Joined
Sep 21, 2014
Messages
892
Location
SE Michigan - Romeo area
Ok. Well I put up more lights this weekend. They are LED (T8) replacement bulbs I purchased from a guy on another forum. They were $10 each, he buys them directly from China. They cost $22 ea at Home Depot. If anyone wants some, PM me and he said he's glad to ship them from W.MI to anywhere. I just PayPal him the money. I ordered 10 more of the single bulb 36w for my garage and barn and 20 for the business.

I will try and take a picture up close. The LED on the center of the ceiling are 4' single strip 36w 3600 lumens ($15 each). The dual bulb T8 replacements are 18w 2000 lumens each ($10 per bulb ). So the T8 are 36w total and 4000 lumens.

The conversion was really simple. Cut the ballast, throw it in the garbage, wire nut red and blue from one end to the black wire. Wire nut yellow and white wires. Replace cover. Insert LED T8 bars. Plug in.

ImageUploadedByTapatalk1454934081.074504.jpgImageUploadedByTapatalk1454934088.459373.jpg


Regards,
Jeff

Sent from my bag phone...
 
Last edited:
To avoid these ads, REGISTER NOW!
Top Bottom