To avoid these ads, REGISTER NOW!

Hot Dawg 45K Heater Install

D45

Well-known member
Joined
Mar 21, 2014
Messages
4,834
Location
NW INDIANA
Hot Dawg 45K (NOW 75K) Heater Install

I picked up this used Hot Dawg 45,000 BTU natural gas heater

Resized_20160411_192311_zpsbqk8lh0i.jpg


Resized_20160411_192350_zpsbpubfka3.jpg


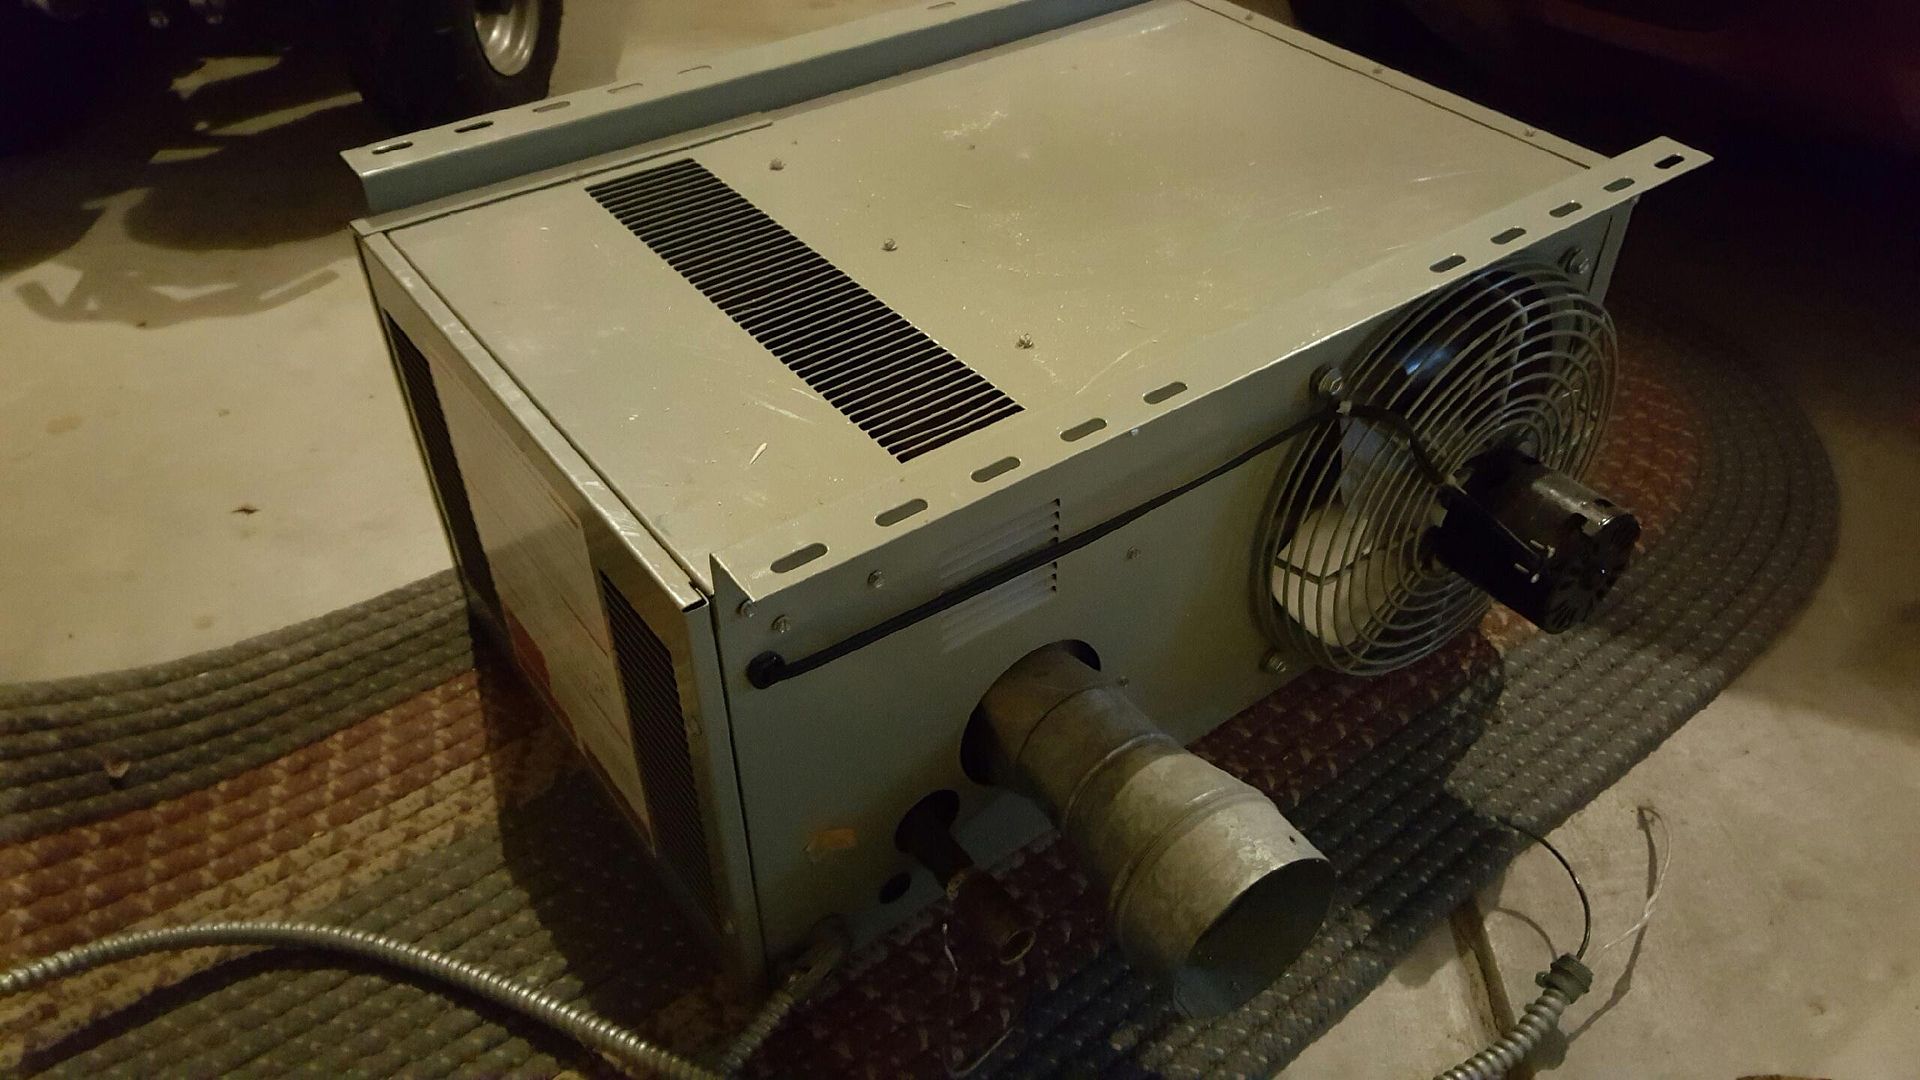
Obviously, I need three things:

-"low temp" thermostat
-Duct-work, vertical roof vented I assume
-Hanging kit/Mounting kit for the heater


Can I put a 110 outlet plug on the wiring or should it be direct wired? I have an outlet very close to where I want it mounted, just would be simple wiring
 
Last edited:
To avoid these ads, REGISTER NOW!
OP
D

D45

Well-known member
Joined
Mar 21, 2014
Messages
4,834
Location
NW INDIANA
Low temp tstats:

http://www.honeywellstore.com/store...eraturegarage-non-programmable-thermostat.htm

Doesn't go down past 50 degrees:
http://www.northerntool.com/shop/tools/product_200309407_200309407

See there is an LED version.........but is it bullet proof?

35-95 degrees:
http://www.homedepot.com/p/Rite-Temp-Digital-Non-programmable-Thermostat-6020/100625695

25 to 90 degrees:
http://pro1iaq.com/non-programmable/t771

The T771 seems nice, especially since it is battery powered (AA)......just wonder how long a battery would last in lower temp conditions

If hard wired, how does the tstat get its 24V power? From a panel in the heater?
 
Last edited:

rlitman

Well-known member
Joined
Oct 18, 2010
Messages
24,589
Location
Long Island
According to Modine, this can install 1" from the ceiling......right?

It can, but those flanges on the unit already setup that gap exactly, so you can screw those flanges directly to the ceiling if you wanted to. That makes installation really easy, if you're installing it where the flanges cross ceiling joists.

I just installed one of these in my parents' garage before this winter. We didn't want to lose any vertical space, so decided to bolt it with the flanges directly on the ceiling. I cut out a rectangle of ceiling, installed blocking in the areas I wanted, and then closed the ceiling (leaving behind some discreet markings about the blocking).

We then sat the unit on top of a 6' ladder, directly below where we wanted to install it. I used my laser plumb to mark four points on the ceiling where the blocking intersected screw holes on the flanges, and after some tape measure double checking, we drove machine lags into two of those on opposite corners.

Next, we lifted the unit to the ceiling, sticking the machine screw side of the lags through the flange holes, and stuck on a washer and spun a nut on. At this point, it was stable, and we could relax and drive lags into the other two holes when we were ready.
 

rlitman

Well-known member
Joined
Oct 18, 2010
Messages
24,589
Location
Long Island
...The T771 seems nice, especially since it is battery powered (AA)......just wonder how long a battery would last in lower temp conditions

If hard wired, how does the tstat get its 24V power? From a panel in the heater?

I'd expect you to get at least 1 year from a battery, even in freezing temperatures. A second winter, perhaps not. If you have a critical need to prevent freezing, then I'd replace batteries in a digital thermostat annually. If not, then you can always run until the low-battery shows on the display. Eventually you'll stop heating, as the thermostat has enough power to run the display, but not enough to engage it's internal relay.

The red (R) and white (W) wires coming from the heater actually supply 24V. A mechanical thermostat doesn't need any power to run, and just connects these two wires. If you have an electronic hard-wired thermostat, you'll need to run more than just these two wires, to supply constant power to the thermostat (because there is no power available from R and W when these two wires are connected)
 
OP
D

D45

Well-known member
Joined
Mar 21, 2014
Messages
4,834
Location
NW INDIANA
I could deal with tossing in one AA battery a year.......but would it be worthwhile to just run two wires to the heater

Thanks for the info on the 24V wiring...........I need to go find the manual for this heater somewhere online
 
OP
D

D45

Well-known member
Joined
Mar 21, 2014
Messages
4,834
Location
NW INDIANA
Looks like the duct coming out of the back is 3" and it expands to a 4" piece

IMG_20160413_080742551_zps8fk25wgh.jpg


IMG_20160413_080727858_zps3kvi4e5q.jpg


Is 4" the actual size of the ductwork I need or is 3" enough?
 
OP
D

D45

Well-known member
Joined
Mar 21, 2014
Messages
4,834
Location
NW INDIANA
This sound accurate?

3" vent (models 30,000-75,000 BTU)

4" vent (models 100,000-125,000 BTU)

Also I found this info: The HD30–HD75 models typically use 3" pipe. They can use 4" pipe, but only when an increaser (#21307) is used as well.

Sounds like I should remove the 4" expanded piece and just buy a 3" exhaust kit for $120? Are all kits the same basically?

Aluminum or steel duct material?
 
Last edited:
OP
D

D45

Well-known member
Joined
Mar 21, 2014
Messages
4,834
Location
NW INDIANA
Model: HD45A
CFM: 720
Air Temp Rise: 46°
Max Mounting Height: 10'
Heat Throw: 27'
AMPS: 3.7
Gas Line: 1/2"
 

rlitman

Well-known member
Joined
Oct 18, 2010
Messages
24,589
Location
Long Island
Yes, 3" sounds right. Steel! Having a few feet of single wall between the unit and the wall thimble actually increases your efficiency, as the exhaust radiates some heat into the space.
 
OP
D

D45

Well-known member
Joined
Mar 21, 2014
Messages
4,834
Location
NW INDIANA
The location I want to put it, is on the shared wall with the house.........closer to the gas supply line and I don't have an exterior wall in this location

Vertical seems easier for me
 

rlitman

Well-known member
Joined
Oct 18, 2010
Messages
24,589
Location
Long Island
The location I want to put it, is on the shared wall with the house.........closer to the gas supply line and I don't have an exterior wall in this location

Vertical seems easier for me

Fair enough. I just hate roof penetrations. And as I said, some horizontal vent within the space helps efficiency. You don't need to keep the venting as short as possible. It has a blower.

BTW, this unit is not sealed combustion, so be sure to follow the instructions for a combustion air inlet.
 
OP
D

D45

Well-known member
Joined
Mar 21, 2014
Messages
4,834
Location
NW INDIANA
Here is my shop area on the left

IMG_20160101_124158318_zpsyan9q15x.jpg


Here is the layout, with the gas line location in the crawl space

The red indicates the three optional areas I want the heater located


b9dc8d05-72c9-4a02-aa18-4f8bc25601fd_zpspvmygalj.png
 

csp

Well-known member
Joined
Mar 23, 2010
Messages
5,719
Location
Franktown, CO
It's in a garage that's not going to be tight enough to need combustion air. Think about how much air leaks in past those two garage doors (one at rear and at the front).
 
To avoid these ads, REGISTER NOW!

bczygan

Well-known member
Joined
Nov 4, 2009
Messages
22,002
Location
DETROIT! Arsenal of Scrappers
It's in a garage that's not going to be tight enough to need combustion air. Think about how much air leaks in past those two garage doors (one at rear and at the front).

In residential use, that is NOT the defining factor. Code assumes that the infiltration areas may be plugged up at some time in the future.

So the determining factor is if it is a "confined space".

A confined space is any space less than 50CF/1000BTUH.

If a confined space, then combustion air is required.

For a 45,000BTUH heater like yours (And mine), the break point is 2,250CF.

My small 1 car garage falls below that, so I need combustion air, especially since I intend to seal it up pretty good.

Your space, if 8' to the ceiling is 6,120CF, so no combustion air required.

It is still a good idea if you seal the space well.

In my case, I have a 2" gap at the bottom of my garage door, so I could well get away without combustion air in that case, as a practical matter. But why waste the fuel.

Bill
 
Last edited:

fastjohnny

Well-known member
Joined
Sep 3, 2011
Messages
261
Location
SW Michigan
I've got probably nearly all you will need for your install, in 3" as I should have had shipped 4". By the time I realized it, it was too late to change.

BTW, when I bought the 4" kit, it was not enough to do the job.

Let me know if interersted, and I'll take a look at my parts.
 
OP
D

D45

Well-known member
Joined
Mar 21, 2014
Messages
4,834
Location
NW INDIANA
I've got probably nearly all you will need for your install, in 3" as I should have had shipped 4". By the time I realized it, it was too late to change.

BTW, when I bought the 4" kit, it was not enough to do the job.

Let me know if interersted, and I'll take a look at my parts.

Please do, I found a cheap 3" kit online for around $85

Let me know what you have
 

brewchief

Well-known member
Joined
Sep 20, 2008
Messages
2,370
Location
Michigan
Before buying a kit that may or may not have what you need spend some time and plan and measure out what you should need.

In most cases you will need a tee and cap at the bottom, a support at the ceiling, possibly an insulation shield, a flashing for proper type and pitch of roof, a top cap and storm collar and of course the needed length of pipe.

You can use single wall to connect to the tee as long as you maintain 6" or more clearance to combustibles, if you plan on keeping the space at a low temp most of the time then I would run B-vent all the way to the unit to better resist condensation.

You can't mix and match brands of pipe so it's best to source it all from one place or if buying online make sure it is available locally if you aren't 100% sure of your parts list unless you are OK waiting for a second shipment.

Some of the companies should have an online calculator that will help make a good materiel list.

FWIW 3" b-vent isn't real common in our area, unless the unit requires 3" and can't be used with 4" I would automatically upsize to 4".
 

Dragfluid

ALLIANCE MEMBER
Joined
Sep 15, 2013
Messages
17,490
Location
Pillager, MN
If you're running this out the side wall, then B-vent isn't what you want to use. You need single wall stainless.
 

csp

Well-known member
Joined
Mar 23, 2010
Messages
5,719
Location
Franktown, CO
In residential use, that is NOT the defining factor. Code assumes that the infiltration areas may be plugged up at some time in the future blah blah blah

Thank you for sharing your google search results. This is a garage not a residential conditioned space and besides that, my comments were specific to the OPs space, not a hypothetical.
 
OP
D

D45

Well-known member
Joined
Mar 21, 2014
Messages
4,834
Location
NW INDIANA
Anyone have input on the thermostat? What works and what doesn't?

I believe the brown coated wires coming off the back of the unit, near the gas stub, will be the hook up for the tstat?
 

rlitman

Well-known member
Joined
Oct 18, 2010
Messages
24,589
Location
Long Island
Anyone have input on the thermostat? What works and what doesn't?


I believe the brown coated wires coming off the back of the unit, near the gas stub, will be the hook up for the tstat?


Pretty sure those are the ones too. Trace them back to where the screw down onto the terminals in the board and connect your thermostat wire there.
 
OP
D

D45

Well-known member
Joined
Mar 21, 2014
Messages
4,834
Location
NW INDIANA
Thanks, I will order the Honeywell CT50K1028 today..........found it for $20.05 shipped
 
OP
D

D45

Well-known member
Joined
Mar 21, 2014
Messages
4,834
Location
NW INDIANA
Now I have a question about heater positioning in the shop


b9dc8d05-72c9-4a02-aa18-4f8bc25601fd_zpspvmygalj.png


Model: HD45A
CFM: 720
Air Temp Rise: 46°
Max Mounting Height: 10'
Heat Throw: 27'
AMPS: 3.7
Gas Line: 1/2"

Would it be better to have the airflow blowing length-wise down the shop?

I was going to put it on the common wall with the house, blowing towards the exterior wall of the shop, which is about 16'-18' wide.......I am concerned that this will create a warm pocket area and not effectively distribute the warm air
 

rlitman

Well-known member
Joined
Oct 18, 2010
Messages
24,589
Location
Long Island
Would it be better to have the airflow blowing length-wise down the shop?

Yes, exactly. However, it does not actually have to be on an end wall to accomplish this.
Air blows out the front. But it also gets pulled in the back. You're better off with the back of the unit at least a couple of feet away from a wall.
 
OP
D

D45

Well-known member
Joined
Mar 21, 2014
Messages
4,834
Location
NW INDIANA
Ok thanks

I will make a replica cardboard box this weekend and start planning where I can mount it

Will these vibrate a lot? Do they benefit from some rubber isolation mounts?
 
Last edited:
OP
D

D45

Well-known member
Joined
Mar 21, 2014
Messages
4,834
Location
NW INDIANA
For $85.00 shipped, this looks like a good kit

DuraVent Vent Unit Heater Kit — 3in. Vertical, Model# 0370

http://www.ebay.com/itm/252249914650?_trksid=p2060353.m1438.l2649&ssPageName=STRK:MEBIDX:IT

Includes:
(3) 24 in. long pipe lengths
(1) 12 in. pipe length
(1) roof flashing
(1) storm collar
(1) cap
(1) 90° elbow
(1) draft hood connector

Item# 28794
Fuel Type Natural gas or liquid propane
Pipe Design Single wall
Product Style Venting kits
Pipe Diameter (in.) 3
Length (in.) 24
Mounting Type Vertical mount
Degree of Angle ( ° ) 90
Adjustable Yes
Material Type Steel
 

rlitman

Well-known member
Joined
Oct 18, 2010
Messages
24,589
Location
Long Island
Will these vibrate a lot? Do they benefit from some rubber isolation mounts?

I don't recall the one I did being bad (it is no worse than a bathroom exhaust fan), but I'd consider some isolation if a bedroom is above it.

IIRC there is some isolation built in as well. I believe the rear fan is on rubber mounts, and the combustion blower probably is too. Of course, more couldn't hurt.

What I would thing about doing (only IF this is below a bedroom, and if you're a light sleeper) is stick a set of hemispherical isolation bumpers onto the top of the mounting flange. Then when I run bolts through the flange, I'd run them through a piece of sorbothane (I have sheets of it, but a firm closed cell foam would work well too), topped with a washer.

If you go with my idea of hanging it from lag screws, or from all thread, and if your gas hookup uses a 2' flex at the end, it should be easy enough to let down the nuts and bring it down from the ceiling enough to add the isolation at a later time. So, I'd suggest you install it first and give it a try, before going to more drastic measures.

Again, I'd double check the manual for acceptable exhaust distances, but if it were me, I'd run a short length out the back (I think you need a foot straight back before adding any turns), then an elbow, and then run it across the room and exhaust out the side wall.
 
OP
D

D45

Well-known member
Joined
Mar 21, 2014
Messages
4,834
Location
NW INDIANA
No living space above my shop

I think, at this time, I still prefer a roof vent
 

csp

Well-known member
Joined
Mar 23, 2010
Messages
5,719
Location
Franktown, CO
They shouldn't vibrate at all.

rlitman is correct, Modine does recommend a foot of horizontal run in the vent before any bends are used.
 
OP
D

D45

Well-known member
Joined
Mar 21, 2014
Messages
4,834
Location
NW INDIANA
What is the best sealing method for all the joints in the venting?

Red high temp RTV, aluminum foil duct tape, or both?
 

rlitman

Well-known member
Joined
Oct 18, 2010
Messages
24,589
Location
Long Island
I did both myself. Actually, I just used a silicone caulk rated to 450F. High temp RTV is pretty much the same thing. A latex or "siliconized" caulk would fail at that temperature, so read the label carefully if just choosing a caulk at the hardware store.
 
To avoid these ads, REGISTER NOW!
Top Bottom