
You are using an out of date browser. It may not display this or other websites correctly.
You should upgrade or use an alternative browser.
You should upgrade or use an alternative browser.
Hot Dawg 45K Heater Install
- Thread starter D45
- Start date
Power Sedan
Well-known member
That's how mine is installed. Independent circuit to 15 Amp, at the breaker, with a seperate power supply switch.
Power Sedan
Well-known member
csp
Well-known member
There's no need for a separate circuit if you have a switch. It can't hurt, but there's nothing to require its own circuit.
Gonna get this thing done before winter or just talk about it?
Gonna get this thing done before winter or just talk about it?
BCreekDave
Well-known member
Tell me more about this "cleanout tee".....what does it do and what is the purpose of it
I looked at and have seen quite a few hanging heaters, including the one we have at work (municipal vehicle garage), that does not have any cleanout tee
The "T" is a somewhat arguable feature that can allow for any condensate to settle in. It can also provide for an easy inspection point to see if anything is blocking the vent pipe (birds,vermin).
I installed one and when the county inspector came by he asked about it and said it was not required by any code he was aware of, but said it made some sense. He was a bit concerned about the cover coming off. It just snaps in place on the inner pipe. I ran my Hot Dawg all last winter and never found a single drop of condensate. I actually had to order it from ebay as no local supply had one in 3 inch. Kind of goes along with what the inspector said.
Only other thing not mentioned in the thread so far is a CO detector. The inspector specifically had to see one installed and wanted a verification of its function.
One other thing I did was to pop rivet the b vent pipe to the cast aluminum Modine supplied exit vent. The area on the Modine part that the b vent pipe slips on is pretty short and could slip off easily.
Sent from using Tapatalk
csp
Well-known member
Pros use 3 sheetmetal screws (self-tappers at that heater exit). This is required on any slip type flue joint.
BCreekDave
Well-known member
Definitely 1 first. On mine, the final location was determined by #4 as the attic was very crowded in this area.
I made a cardboard template of the heater including the vent as it was going to penetrate the ceiling. I pitched the diagonal of the heater so that two of the lags would hit existing ceiling joists. That way I would only have to add two bridges between joists for the other two lags. My ceiling was drywalled so it is not easy to tell what's above. I wanted the vent to penetrate right in the middle between joists.
Once it was mounted, I then proceeded in the order you say, but I'm not sure it makes much difference.
Sent from using Tapatalk
BCreekDave
Well-known member
Pros use 3 sheetmetal screws (self-tappers at that heater exit). This is required on any slip type flue joint.
Self tappers don't work well on the thick aluminum exit housing. They are trying to drill and thread at the same time. They are really intended just for sheet metal to sheet metal joints. I know, I have seen the "pros" use them, but that's cause the pop rivet gun was in the truck.
Sent from using Tapatalk
csp
Well-known member
In what order do you suggest install:
1) Hang/Mount the unit
2) Run the gas line
3) Wire up electrical/tstat
4) Run duct work
The only one that matters in order is the first one. At some point you're just going to have to start and exercise some judgement of your own. Don't turn this into a job that's harder than you're already making it, seriously.

Self tappers don't work well on the thick aluminum exit housing. They are trying to drill and thread at the same time.
I can't even tell you how many of these things I've installed and have never had one problem with a self-tapper in those exit housings. Drove three of them into a housing just this afternoon on a furnace install. Yes, it's trying to drill and thread at the same time and it's a little more effort for the impact driver, but it works just fine. Time is money. I can't say that I've ever seen a pope rivet ever used in a flue.
Last edited:
Power Sedan
Well-known member
There's no need for a separate circuit if you have a switch. It can't hurt, but there's nothing to require its own circuit.
Gonna get this thing done before winter or just talk about it?
Must be a code requirement for our municipality, because I was informed to have a separate circuit, with a switch to pass inspection.
BCreekDave
Well-known member
Mine did too. It did seem redundant as my switch is directly above the panel that has the disconnect.
Sent from using Tapatalk
Sent from using Tapatalk
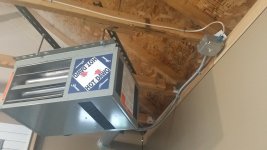
Here's a pic, at the garage ceiling.
My ceiling joists are 48" apart.........had to add a lot of 2x4s and bracing to hang mine
This kit was nice, but I could not justify spending $95 on it
http://www.qcsupply.com/quicksling-flush-mount-swivel-with-h-bracket.html
Last edited:
I am actually going to be swapping out my small 6 slot circuit subpanel (100amp) for a new 12 slot circuit (100 amp) subpanel next month......along with rewiring the entire shop
This way, I will just have the heater on its own circuit and its own switch, since I will have plenty of slots in the subpanel
This way, I will just have the heater on its own circuit and its own switch, since I will have plenty of slots in the subpanel
Power Sedan
Well-known member
My ceiling joists are 48" apart.........had to add a lot of 2x4s and bracing to hang mine
This kit was nice, but I could not justify spending $95 on it
http://www.qcsupply.com/quicksling-flush-mount-swivel-with-h-bracket.html
I too thought of utilizing this mounting hardware. Mines been mounted (as pictured) for almost 11 years now. It does look a little more professionally finished, but $95, thats debatable. I alwsys intended finishing the ceiling, so all-thread workd for me, since this adaptive mounting fixture wasn't available back then.
The heater is up and mounted, was very interesting hanging it myself!!!
8 total lag bolts.........rock solid
I spaced it on the back area of the garage, so that it can blow down the entire length of the shop........I also moved and remounted my adjustable three speed shop fan to help circulate air
I think the heater is spec'd out to blow 20-25 feet, so there is about 40 feet down range for the warm air to blow
I mounted the heater 20" off of the back wall, 18" is suggested........I need to move the shop light fixture over a few
Time to run some power, some gas line, hookup the tstate, and install the vent kit.............time is ticking, but I am also in no rush
csp
Well-known member
What happens when you want to finish the bottom side of those trusses?
rlitman
Well-known member
I'm loving that lifting rig!
csp
Well-known member
It's no a matter of amperage draw. It's a matter of being able to isolate the circuit and shut it off easily.
I took the tstat out and mocked up a good location for the low temp thermostat
I open the package, expecting a tstat wire harness............no luck
There is about 18" of tstat wiring coming off the back of the heater..........two wires in a sheath (I was expecting more wires, no???)
Time to buy some..........any suggestions or anything in a 2 wire bundle? Is wire gauge important? 18/2 looks very inexpensive and standard
Last edited:
csp
Well-known member
Go to the big box store and buy however many feet of two wire thermostat wire you need in the bulk wire section. That's as much detail as you need to be concerned with. It's literally called thermostat wire.
The t-stat didn't come with wire as the assumption is that the wire already exists in the wall.
The t-stat didn't come with wire as the assumption is that the wire already exists in the wall.
I got the DuraVent Vent Unit Heater Kit for pretty darn cheap, IMHO
$63.75 shipped.........very pleased for my FREE heater
3in. Vertical, Model# 0370
Includes:
(3) 24 in. long pipe lengths
(1) 12 in. pipe length
(1) roof flashing
(1) storm collar
(1) cap
(1) 90° elbow
(1) draft hood connector
D45- where did you go the vent kit for $63.75 Please share
csp
Well-known member
D45- where did you go the vent kit for $63.75 Please share
Link found in this thread:
For $85.00 shipped, this looks like a good kit
DuraVent Vent Unit Heater Kit — 3in. Vertical, Model# 0370
http://www.ebay.com/itm/252249914650?_trksid=p2060353.m1438.l2649&ssPageName=STRK:MEBIDX:IT
Ok thanks
Just bought 15 feet online for $8 shipped
I probably only need 10 feet
Just curious, do you have some aversion to buying something locally? I get the convenience thing, but I also get having a project completed and off the list.

jpeterson1976
Active member
- Joined
- Sep 1, 2016
- Messages
- 30
Looks nice. Good luck with the install!
Sent from my SM-G935V using Tapatalk
Sent from my SM-G935V using Tapatalk
Going to start running black gas pipe soon.......my plan is to start at the heater and run backwards, into the crawl
I am planning on two valves, or should I add three?
One valve at the heater
One valve where the pipe enters into the garage
One valve in the crawl
I will be getting into the crawl, and adding a "T" where the gas line is feeding the NG fireplace
Also......what size should be used, 1/2" or 3/4" to the heater?
csp
Well-known member
How far is the run and what size is the line you're tying into?
It's easier to start at the source and work your way to the appliance, using a flex line at the appliance.
One valve would be sufficient, but good thinking to put one where you tap into the existing line.
It's easier to start at the source and work your way to the appliance, using a flex line at the appliance.
One valve would be sufficient, but good thinking to put one where you tap into the existing line.
How far is the run and what size is the line you're tying into?
It's easier to start at the source and work your way to the appliance, using a flex line at the appliance.
One valve would be sufficient, but good thinking to put one where you tap into the existing line.
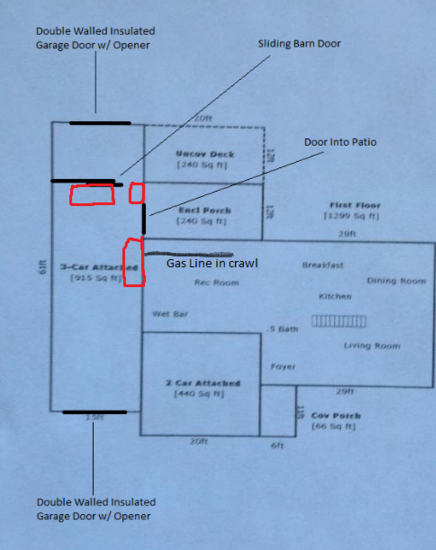
The line I was going to install a "T" onto, feeds the NG fireplace........this line runs under the crawl about 20 feet to the bottom of the fireplace. The fireplace is on the common wall with the garage. This line is 1/2"
The dryer and fireplace is fed off a 3/4" line (I believe?) shown in the top of the picture
The valve shown is soley for the fireplace
Lastly, what is the choice or best line to use for the flex line? Just flexible appliance line for like gas dryers and stoves?
