To avoid these ads, REGISTER NOW!

Fox Valley Fab: Shop Projects

yaidunno

Well-known member
Joined
Feb 10, 2011
Messages
1,336
Location
WI
In an effort to consolidate and document the various small projects that run through the shop, I've decided to start this new thread. Any tool and equipment related content will be added to the existing thread in the tool forum.

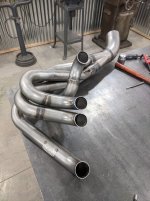
To start this off, I will detail a project that was completed this past weekend. A set of header pipes needed to be widened out by 2-3/8". This was a fun job that utilized a handful of different machines in the shop. The first step was to remove the flange from the pipes. I have no photo of this, but picture a guy going at a brand new header with a sawzall. Here's the aftermath:

attachment.php


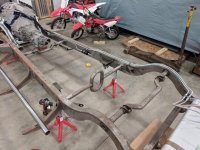
The next thing to do was straighten out the ends of the pipes. These are used on a square port head. This was half way through:

attachment.php


All the pipes set back to round:

attachment.php


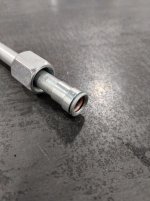
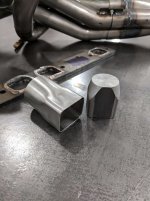
It's now time to make the new extensions which will also serve as the transitions. This was accomplished by using a mandrel and 2.5 tons of pressure in the press. The end result was more consistent than the hand beat factory ends:

attachment.php


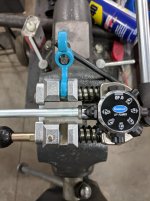
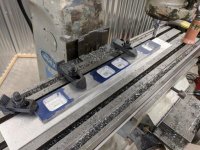
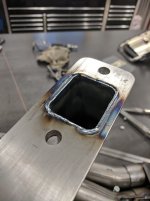
After the transitions were complete, it was time to make a new flange. Over to the mill for this one:

attachment.php


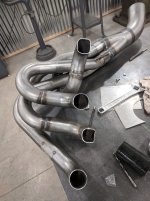
The transitions are a tight and snug fit. This will be critical for welding:

attachment.php


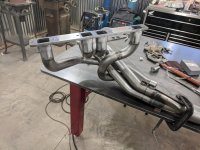
With the extensions snugly in place on the flange, it was time to get the pipes fitted. Most weren't far off the mark, but a few needed a trip or two to the disc grinder. Once satisfied, they are tacked firmly in place:

attachment.php
 

Attachments

  • IMG_20180124_192223.jpg
    IMG_20180124_192223.jpg
    143 KB · Views: 4,451
  • IMG_20180124_190729.jpg
    IMG_20180124_190729.jpg
    79.8 KB · Views: 4,410
  • IMG_20180124_191944.jpg
    IMG_20180124_191944.jpg
    85.8 KB · Views: 4,402
  • IMG_20180128_105446.jpg
    IMG_20180128_105446.jpg
    92.5 KB · Views: 4,410
  • IMG_20180128_154751.jpg
    IMG_20180128_154751.jpg
    103.1 KB · Views: 4,387
  • IMG_20180128_160220.jpg
    IMG_20180128_160220.jpg
    140.5 KB · Views: 4,388
  • IMG_20180126_172512.jpg
    IMG_20180126_172512.jpg
    75.5 KB · Views: 4,398
To avoid these ads, REGISTER NOW!
OP
Y

yaidunno

Well-known member
Joined
Feb 10, 2011
Messages
1,336
Location
WI
The flange was then tapped off the pipes, and each pipe was fully welded to the new extension. Once that was complete, it was reassembled. The last thing to do was weld the flange to the extension inside:

attachment.php


Here is the completed unit. I'm very happy with how this one turned out:

attachment.php
 

Attachments

  • IMG_20180128_163836.jpg
    IMG_20180128_163836.jpg
    53.8 KB · Views: 4,215
  • IMG_20180128_165540.jpg
    IMG_20180128_165540.jpg
    86.4 KB · Views: 4,212
OP
Y

yaidunno

Well-known member
Joined
Feb 10, 2011
Messages
1,336
Location
WI

NASTYZEN

Well-known member
Joined
Jun 11, 2010
Messages
2,823
Location
St-Colomban,Que. Canada
Great addition to this forum. Glad you decided to start a shop thread.:thumbup:
Nice job on the headers. What are they for?
Ahhhhhh! Nothing like the smell of cutting something new with a saw in the morning!
 
OP
Y

yaidunno

Well-known member
Joined
Feb 10, 2011
Messages
1,336
Location
WI
Great addition to this forum. Glad you decided to start a shop thread.:thumbup:
Nice job on the headers. What are they for?
Ahhhhhh! Nothing like the smell of cutting something new with a saw in the morning!

Thanks Claude. The headers are for a big block mopar engine going into a mid 60's dodge truck. I think they were made for an A/B body car, so they require a bit of tweaking to fit. Speaking of smells, burning off the Dykem blue with and endmill makes a pretty good one!

nice work!

Thanks much!
 
OP
Y

yaidunno

Well-known member
Joined
Feb 10, 2011
Messages
1,336
Location
WI
Thank you guys for the kind and encouraging words. It's good to see that others share an interest in this sort of stuff. I hope to keep this thread going with interesting and relevant projects.

-Bryan
 
OP
Y

yaidunno

Well-known member
Joined
Feb 10, 2011
Messages
1,336
Location
WI
Nice work. Why a new flange vs cleanup of the old? less work/time on a fresh one?

The original flanges were constructed by putting the tube through the openings, and then the tube was beat via hammer on the inside to form it to the rectangle shape. it was then welded as I have done. On the outside of the flange, there was a considerable gap between the port and tube. To reduce warping, all the ports were brazed in this area.

Long story short, it would have taken me a considerable amount of time to clean up, and I'd be left with openings that wouldn't all be the same size.

Thanks for the question! :beer:
 
To avoid these ads, REGISTER NOW!
OP
Y

yaidunno

Well-known member
Joined
Feb 10, 2011
Messages
1,336
Location
WI
Oh, this is going to be a good thread. Stellar work as usual.

yaidunno sweet, as per usual..:thumbup:

Thanks for checking things out gents!

Last night I started two projects, plumbing of the 3/8" hard line for a fuel system and putting together a bench top. The bench top was a simple screw and glue of some 4x4 Douglas Fir timbers. It's 200+ pounds and should hold most anything I put on top of it. The ends will be saw cut and finished with a metal wrap in the near future.

attachment.php


Enough with the wood, I'm far from a carpenter. This was my first go at plumbing hard line, so I had to acquire the proper tools. A Ridgid 3/8" bender and a flaring tool were procured. I've used the flaring tool previously, so its operation was easy to get the hang of.

attachment.php


I was not going to let my first endeavor with running line be an excuse for less than professional results. The bulkheads and flex lines were installed a week or so ago in preparation for the bender to arrive. From there, I started out with some simple 90 degree bends to run on top of the frame.

attachment.php


The lines were then formed over the arches. Here's a different view.

attachment.php


Once over the arch, it was time to drop the line to the inside of the rail and mate up with the 10 micron filter.

attachment.php


The last part of the supply was from the filter outlet to the front bulkhead.

attachment.php


And lastly, a shot that captures the supply run from start to finish.

attachment.php


Like many details of a project like this, it will go almost entirely un noticed once finished. There is still the satisfaction of knowing it's been done right though. It turns out that I only had 2 of the proper size line clamps on hand, so please excuse the lack of line securement. I'm hoping to get the return side wrapped up tonight.
 

Attachments

  • IMG_20180130_224623.jpg
    IMG_20180130_224623.jpg
    79.3 KB · Views: 2,297
  • IMG_20180130_224413.jpg
    IMG_20180130_224413.jpg
    77.5 KB · Views: 2,311
  • IMG_20180130_222012.jpg
    IMG_20180130_222012.jpg
    127.4 KB · Views: 2,302
  • IMG_20180130_214524.jpg
    IMG_20180130_214524.jpg
    79.6 KB · Views: 2,302
  • IMG_20180130_214509.jpg
    IMG_20180130_214509.jpg
    121.7 KB · Views: 2,313
  • IMG_20180130_214451.jpg
    IMG_20180130_214451.jpg
    73.3 KB · Views: 2,322
  • IMG_20180130_213050.jpg
    IMG_20180130_213050.jpg
    119.9 KB · Views: 2,331

red94chev

Well-known member
Joined
Jan 29, 2015
Messages
556
Location
Northeastern MD
Awesome job on the headers and the fuel lines! This may be a dumb question but is the header flange you made aluminum or steel? Kinda looks like aluminum sitting on the mill.
 
OP
Y

yaidunno

Well-known member
Joined
Feb 10, 2011
Messages
1,336
Location
WI
Awesome job on the headers and the fuel lines! This may be a dumb question but is the header flange you made aluminum or steel? Kinda looks like aluminum sitting on the mill.

Not a dumb question at all. The flange is indeed cold rolled 1018 steel. However, I did have some .090 aluminum underneath when milling to protect the table. So in the photo showing the flange in the mill, you are seeing the aluminum in the port openings and some alum chips.

Thanks for the question and checking things out!
 

red94chev

Well-known member
Joined
Jan 29, 2015
Messages
556
Location
Northeastern MD
Not a dumb question at all. The flange is indeed cold rolled 1018 steel. However, I did have some .090 aluminum underneath when milling to protect the table. So in the photo showing the flange in the mill, you are seeing the aluminum in the port openings and some alum chips.

Thanks for the question and checking things out!
Now that makes sense! Keep up the good work man. That flaring tool and bender are now on my wish list.

Sent from my Pixel XL using Tapatalk
 

Bigblue&Goldie

Well-known member
Joined
Mar 12, 2009
Messages
10,662
Location
AZ
On the hard fuel lines, what flare was used? It looks a sing flare, which is why I ask. I have the same Eastwood tool and had no luck doing single flares (non-AN) and the instruction didn't say how. Double flares are no problem.
 
OP
Y

yaidunno

Well-known member
Joined
Feb 10, 2011
Messages
1,336
Location
WI
On the hard fuel lines, what flare was used? It looks a sing flare, which is why I ask. I have the same Eastwood tool and had no luck doing single flares (non-AN) and the instruction didn't say how. Double flares are no problem.

Correct, I used a single AN (37 degree) flare. The single 45 degree works the same though. When you set the tube in the die blocks for a single, it needs to be flush with the chamfer face, not the end of the blocks as you would for a double. A light pull of the lever in the "Op 2" die set gives you a perfect single flare.

I'll grab some photos of this tonight to help clarify.
 

zmotorsports

ALLIANCE MEMBER
Joined
Oct 20, 2009
Messages
21,312
Location
Northern Utah
Nice job on the fuel lines. There is definitely a learning curve to bending fuel lines but if you attack them with the same mindset as large tube bending with bend radius and bend start points, etc. you will be fine. Looks to me like you ended up with professional results just like you aimed for.:thumbup:
 

Bigblue&Goldie

Well-known member
Joined
Mar 12, 2009
Messages
10,662
Location
AZ
Correct, I used a single AN (37 degree) flare. The single 45 degree works the same though. When you set the tube in the die blocks for a single, it needs to be flush with the chamfer face, not the end of the blocks as you would for a double. A light pull of the lever in the "Op 2" die set gives you a perfect single flare.

I'll grab some photos of this tonight to help clarify.

Cool, thanks! I knew there was trick, but I couldn't get the depth set right.

I really need to get the AN die set, but at $89 that will have to wait until I actually need it! :eyecrazy: It's been soo long since I've done AN hard lines that I can't remember what tool I last used to flare them? :confused:
 

Bears Fan

Well-known member
Joined
Jan 26, 2012
Messages
3,437
Location
Indiana
Great job on the headers and fuel lines! I do like the idea of using 4" x 4" for the bench top...you could park a tank on top of that thing now :thumbup:
 
Last edited:
OP
Y

yaidunno

Well-known member
Joined
Feb 10, 2011
Messages
1,336
Location
WI
Nice job on the fuel lines. There is definitely a learning curve to bending fuel lines but if you attack them with the same mindset as large tube bending with bend radius and bend start points, etc. you will be fine. Looks to me like you ended up with professional results just like you aimed for.:thumbup:

Thanks Mike! Your certainly correct on the learning curve. Some of the photos show scraps that were used as practice bends. Surprisingly, the instructions that came with the bender were quite helpful. Overall, I'm quite pleased with how it turned out!

Pure artwork. Looking forward to seeing more!

Thanks much!

Great job on the headers and brake lines! I do like the idea of using 4" x 4" for the bench top...you could park a tank on top of that thing now :thumbup:

Haha yea, it might be a bit overkill, but I'm ok with that! Thanks for checking things out!


I got a chance to snap a few shots of the flaring setup this evening. The first one here shows the tube position in the die when making a single flare. This type of flare is used in low pressure, low stress applications.

attachment.php


After a quick pull of the lever, this is the result.

attachment.php


This setup is where the tube should be when making a double flare. A quick and fool proof way to get this is to over extend the tube through the dies, lightly clamp, and use "Op 0" to push the tube to the edge of the dies.

attachment.php


"Op 1" takes a bit of force on 3/8" tube, but after performing it, and "Op 2", the tube will look like this.

attachment.php


I was able to finish up the return line tonight as well. It was a little tricky getting the bend from on top of, to the side of the frame rail, but it came out ok. Here's an overall shot.

attachment.php


The last one shows the flex lines going to the invisible EFI unit. You can see the insulation that I've added held in place with heat shrink.

attachment.php


As a disclaimer, I'm far from an expert on all of this. If anybody sees something that doesn't seem right, feel free to call it out!
 

Attachments

  • IMG_20180131_171512.jpg
    IMG_20180131_171512.jpg
    79.7 KB · Views: 2,178
  • IMG_20180131_171633.jpg
    IMG_20180131_171633.jpg
    64.3 KB · Views: 2,157
  • IMG_20180131_171731.jpg
    IMG_20180131_171731.jpg
    82.5 KB · Views: 2,163
  • IMG_20180131_171938.jpg
    IMG_20180131_171938.jpg
    66 KB · Views: 2,152
  • IMG_20180131_172919.jpg
    IMG_20180131_172919.jpg
    89.7 KB · Views: 2,145
  • IMG_20180131_172934.jpg
    IMG_20180131_172934.jpg
    109.5 KB · Views: 2,143
Last edited:

Bigblue&Goldie

Well-known member
Joined
Mar 12, 2009
Messages
10,662
Location
AZ
I got a chance to snap a few shots of the flaring setup this evening. The first one here shows the tube position in the die when making a single flare. This type of flare is used in low pressure, low stress applications.

attachment.php


After a quick pull of the lever, this is the result.
Thanks!
 
OP
Y

yaidunno

Well-known member
Joined
Feb 10, 2011
Messages
1,336
Location
WI

No problem.

That is welded tubing in the 45* double flare example, is that what you used for the 37* single flare lines on the truck frame?

It was not advertised as such, but yes, it does have a seam. It appears to be drawn and in the annealed condition, given how easy it is to work with. Expecting it to leak or split?

Why do I feel like I will be re plumbing this :sad:
 

dontlifttoshift

Well-known member
Joined
Mar 19, 2015
Messages
185
Location
Beach Park, IL
Yeah, the seam interferes with the mating surfaces....bigly.

You have options:

Tighten the bejeezuz out of them, forcing the seam into the male fiting. 50% of the time it works 100% of the time.......but if you ever take it apart, odds aren't good on it resealing.

Start over, least desirable on your end. You can buy seamless stainless from McMaster. Another option that I haven't tried, NiCopp or Cunifer should be seamless and would also work fine.


Get one of these, https://koultools.com/product/flare-lapping-tool/ I have one, it's okay. You will probably still need option 3.

Buy the SECO seals, Pegasus is your closest source for these. https://www.pegasusautoracing.com/productselection.asp?Product=3202

The seals are the easiest way out, I buy them 100 at a time as I have had perfect appearing flares that just will not seal. Sometimes taking apart existing lines and putting back together, will cause them not to seal also so I got tired of fighting and just use the seals when I have trouble.
 
OP
Y

yaidunno

Well-known member
Joined
Feb 10, 2011
Messages
1,336
Location
WI
Could have fooled me. Everything looks great from where I'm sitting. Keep up the great work.

Haha, well it appears that I might not have selected the best tube...

Yeah, the seam interferes with the mating surfaces....bigly.

You have options:

Tighten the bejeezuz out of them, forcing the seam into the male fiting. 50% of the time it works 100% of the time.......but if you ever take it apart, odds aren't good on it resealing.

Start over, least desirable on your end. You can buy seamless stainless from McMaster. Another option that I haven't tried, NiCopp or Cunifer should be seamless and would also work fine.


Get one of these, https://koultools.com/product/flare-lapping-tool/ I have one, it's okay. You will probably still need option 3.

Buy the SECO seals, Pegasus is your closest source for these. https://www.pegasusautoracing.com/productselection.asp?Product=3202

The seals are the easiest way out, I buy them 100 at a time as I have had perfect appearing flares that just will not seal. Sometimes taking apart existing lines and putting back together, will cause them not to seal also so I got tired of fighting and just use the seals when I have trouble.

Thanks much for the reply. I think I'll start off by pressure testing a tube tonight at 120 PSI and seeing if it leaks with moderate torque on the fittings. These will likely come apart a handful of times, so I'm looking for a repeatable seal.

The Seco 7 seals look like a great option. I need to get some hose adapters from Pegasus anyways, so it looks like I can add some seals to the list!

Funny you mention the Ni/Cop line, as I will be using that to plumb the brake lines along with the air lines for the suspension. I guess for that reason, it wouldn't really upset me to need to redo the fuel lines in this material. Why I didn't go with that in the first place is any body's guess.

Thanks again for the very helpful reply! :beer:
 

dontlifttoshift

Well-known member
Joined
Mar 19, 2015
Messages
185
Location
Beach Park, IL
With that in mind, just replumb it. You run the risk of trashing your bulkhead fitings trying to get the tubing to seal and you already have nice templates so it won't take long.

If it makes you feel any better, I have scrapped miles of tubing for a myriad of reasons.

Side note, did I see in another thread that you also had the BrakeQuip flaring tool? Just curious if they are the same thing with different colors. I have the BQ one and love it but there I times where it would be nice to have an extra here at the shop.
 

1953mercury

Well-known member
Joined
Nov 25, 2012
Messages
701
Location
Steamboat Springs CO
Just checking out your thread. Great job on the headers, and while it can be tough, I really enjoy header and exhaust work. If you haven't used it before, you will like working with the Ni/Cop line. Mike
 
OP
Y

yaidunno

Well-known member
Joined
Feb 10, 2011
Messages
1,336
Location
WI
With that in mind, just replumb it. You run the risk of trashing your bulkhead fitings trying to get the tubing to seal and you already have nice templates so it won't take long.

If it makes you feel any better, I have scrapped miles of tubing for a myriad of reasons.

Side note, did I see in another thread that you also had the BrakeQuip flaring tool? Just curious if they are the same thing with different colors. I have the BQ one and love it but there I times where it would be nice to have an extra here at the shop.

Haha, well I suppose that makes me feel marginally better!

I don't personally own the BQ tool, but the shop I used to work at did. I'd estimate that I used it about a dozen times, so I'm fairly familiar with it. I can comfortably say that this is the same tool. It's also marketed by K-Tool and S.U.R.&R in a nice orange color.

Brakequip now offers a model that clamps from the side, and does away with the arched clamp and pin arraignment. That I have not found rebranded though.

Just checking out your thread. Great job on the headers, and while it can be tough, I really enjoy header and exhaust work. If you haven't used it before, you will like working with the Ni/Cop line. Mike

Thanks much Mike! Exhaust work can certainly be satisfying when it turns out, and frustrating when things don't go as planned. I've worked with the Ni/Cop just once, and like you say, it's very nice to work with.
 
Last edited:
To avoid these ads, REGISTER NOW!
Top Bottom