To avoid these ads, REGISTER NOW!

Old Weaver Jack (Weaver Utility, 5000lb jack)

Shelbylex

Well-known member
Joined
Jan 20, 2018
Messages
3,105
Location
MA
I asked about a vintage jack a while ago and one of my friends picked it up and delivered it for me today.

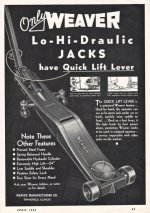
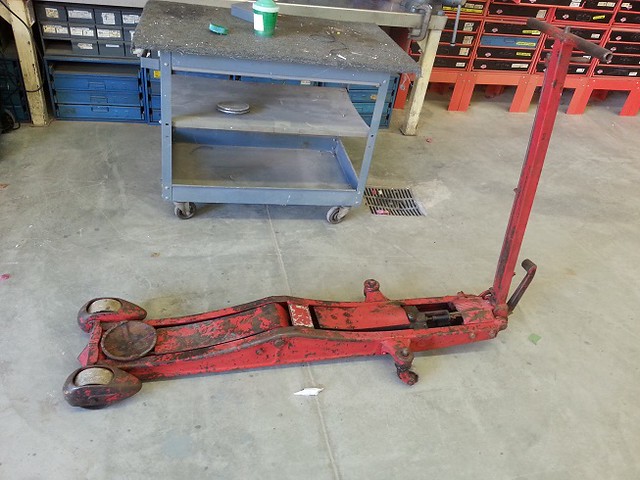
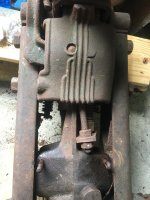
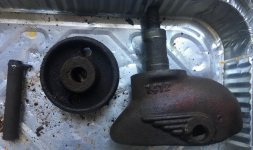
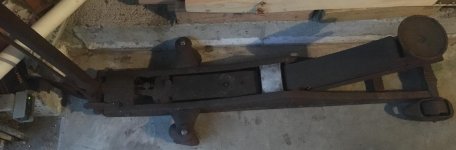
Weaver. 51.5" long, 5.5" saddle. Likely a 2 ton.

Unfortunately description by seller was wrong - bought it unseen. Was told that all wheels work, jack needs some oil and is stuck...

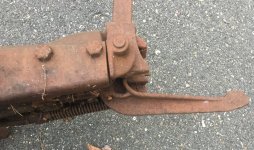
Well - it's rust frozen except for handle. With a little bit of rubber mallet I started moving the pedal and released the lock handle (which probably needs to lock on a half-circular piece at the bottom which probably moves up...
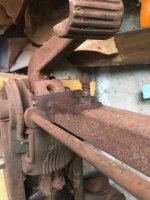
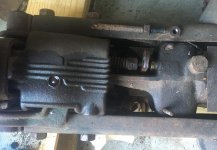
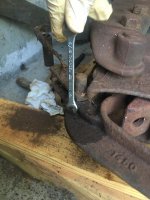
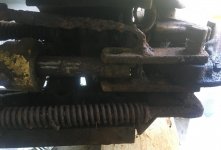
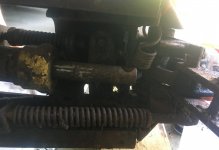
Discovered that the cover from label till rear wheel is missing. Emailed the PO today - may be I get lucky? (doubt it though...) The last picture here shows some corrosion on the rod going into hydraulic unit. I hope it can be cleaned up without machining (it probably goes against rubber seals which might cause problems if not tight).
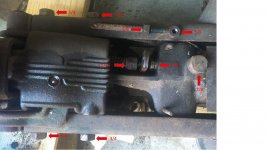
It was left in the dirt somewhere - some rust on the bottom, one of the springs is broken and there is another very corroded, there is another part on the bottom which will need replacement, the bolt on the left part of image 9 is moving freely...

Well: tons of negatives...
Positive: I could not find another picture of this jack on the internet.

I am out 40$ as of now

How bad did I do?

E-mailed Castle Equipment Co for jack diagram...


I never restored a jack in my life and never tried to fix anything that complex which is rusted solid.

Any advise would be appreciated (including what would you spray it with when attempting disassembly - I think WD40 would not work and evaporust would be too expensive for the size)! PB Blast?
The work is busy, but I will start slowly working on it as time permits using all the advises.

...I wonder how much it would cost to professionally rebuild this hydralulic unit?

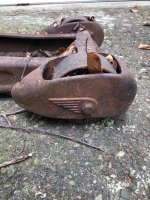
Does anybody by any chance have a similar complete or parts jack? If it's a parts one, do you have a cover? If complete, can you make pictures of it? In case I succeed with the restoration and make it work, I assume that somebody can create a new part for me - it's a bent plate with the designers detail at the bottom - I hope it would not cost me an arm and a leg to have a machine shop make a reproduction...

All ideas will be greatly appreciated. I am well over my head with this one...
 

Attachments

  • Jack1.jpg
    Jack1.jpg
    152.9 KB · Views: 137
  • Jack2.jpg
    Jack2.jpg
    151.6 KB · Views: 121
  • Jack3.jpg
    Jack3.jpg
    82.2 KB · Views: 106
  • Jack4.jpg
    Jack4.jpg
    162.1 KB · Views: 93
  • Jack5.jpg
    Jack5.jpg
    154.8 KB · Views: 94
  • Jack6.jpg
    Jack6.jpg
    151.1 KB · Views: 93
  • Jack7.jpg
    Jack7.jpg
    121.3 KB · Views: 101
Last edited:
To avoid these ads, REGISTER NOW!
OP
S

Shelbylex

Well-known member
Joined
Jan 20, 2018
Messages
3,105
Location
MA
more pictures

The last 2 pictures: ad from 1936 from GJ site (previously posted by CRTDI) and 38 ad. Thus I assume it's pre-1937. Please let me know if you can pinpoint years of production...
… just found 2 more pictures from 1936 jacks. The utility jack WA-72 looks similar, but has no cover and saddle size is different...
 

Attachments

  • Jack12.jpg
    Jack12.jpg
    87.8 KB · Views: 68
  • Jack11.jpg
    Jack11.jpg
    127 KB · Views: 80
  • Weaver2.jpg
    Weaver2.jpg
    151.1 KB · Views: 72
  • Jack9.jpg
    Jack9.jpg
    145.8 KB · Views: 67
  • Jack8.jpg
    Jack8.jpg
    137.3 KB · Views: 62
  • Jack13.jpg
    Jack13.jpg
    91.9 KB · Views: 62
  • Jack14.jpg
    Jack14.jpg
    101.8 KB · Views: 53
Last edited:

Hiball

Well-known member
Joined
Apr 30, 2009
Messages
14,027
Location
Missery
I’d give $40 because I’m a weaver nut and the older models are getting harder to find. It’s going to be a project and possibly a total loss in regards to the hydraulic unit, It very well might need a New cylinder, Pump piston along with a New Main Ram. I’d pay close attention to the Valve seats and release seats also... A seal kit should be the last thing you buy. I knew when looking at your original thread that it had been outside for many moons, that patina isn’t shop corner normal... Not to mention the old dried up leaves tucked away in the frame rails.

Good luck
 

garthg

Well-known member
Joined
Sep 8, 2012
Messages
535
Location
Winchester MA
"I wonder how much it would cost to professionally rebuild this hydralulic unit?"

Wow! Seriously?
I agree it's very cool, but do you really need an expensive museum piece?

This is what I'd be looking at, but that's me. I buy tools to use. Now $219, far less than you would pay a professional to do anything with your old Weaver, and probably less than a restoration even if you did it yourself. (They've actually raised the price, I guess because it's selling so well but there are coupons occasionally.):

63183_W3_1.jpg
 
OP
S

Shelbylex

Well-known member
Joined
Jan 20, 2018
Messages
3,105
Location
MA
Thank you, Hiball. I will keep it in the corner of the garage for some time to decide what to do. I emailed the company and am waiting for more information on a model and if they still have parts.
Ndnchf - the skirts and the style were part of the reason I liked the style so much.
Garth, I would like to have a working jack like that, but I made a decision based on wrong information presented by the seller (unfortunately unseen - was told that the wheels work and it just needed some oil. They refused to send any pictures and did not provide the dimensions just saying it would fit in any car...). Well, trusting people does not always work. I thought it would be just surface rust and possibly seal replacement). As Hiball mentioned, it may need a whole hydraulic unit

I will try to collect more opinions from GJ and information for now to see what is going to be the plan for it, but not giving up on it yet...
 

Hiball

Well-known member
Joined
Apr 30, 2009
Messages
14,027
Location
Missery
I wouldn’t be too depressed.. it’s a Rare model as there isn’t many around, let alone working examples. It’s not a project that I would recommend to someone simply needing a jack for general service, but a cool example of American history to say the least.

If you ever decide to part with it, Gimme a shout.
 
OP
S

Shelbylex

Well-known member
Joined
Jan 20, 2018
Messages
3,105
Location
MA
Thank you for the support, Hiball! I guess I got disappointed that I missed the cover ,was mislead by the sellers description of the jack and got doubts that I can fix it. I will start slowly working on it as time permits and see where it leads me. If I fail or give up, I will contact you.
Sorry in advance about all the future questions...
You are right - I got it not because I need a jack to work on my car, but because I loved the beautiful Art Deco lines of it and wanted to give it another life in my family for some decades to come. In our world of replaceable things I enjoy old tools because they were made with the goal of lasting decades and made with pride!


I am still working on trying to get a Walker 770 from another state as well. Also $40, but hopefully in a better shape (though hydraulics might need work...).
I guess vintage jacks sometimes come in pairs...

Again, thank you for the support!
 

paulsomlo

Well-known member
Joined
Jul 16, 2013
Messages
3,866
Location
Northern Colorado
Unfortunately description by seller was wrong - bought it unseen. Was told that all wheels work, jack needs some oil and is stuck...

Over the past few years, I've purchased four "vintage" jacks. None of them was ready for prime time. The one that came from Craigslist, seller told me all the casters were good - except for the one he didn't tell me about. The others came from various auctions - one is a parts jack for it's mate that became my #1, another had so many issues, I gave it away. Another one had enough repair and machining, that I now refer to it as the "$800 floor jack" - and I still don't like the release on it. In general, they live hard lives - by the time they go to a new home, many are ready for a rebuild or plagued with bodges from a previous owner. "Needs some oil" has become the catch all phrase for "something's wrong with it, but I don't know what".

At any rate, $40 is not much of an investment. It's a beautiful old jack, and I look forward to seeing you dig into it.
 
OP
S

Shelbylex

Well-known member
Joined
Jan 20, 2018
Messages
3,105
Location
MA
Thank you for encouragement, Paul. I guess it’s a new skill to learn - will slowly start disassembling it as time permits. I do not have the skills or the tools to get to your level of restorations but I will start with trying to take it apart as everything is rusted solid and will see what happens once the hydraulic unit is freed.
Will try to pick up PB Blaster this weekend...
 
Last edited:
OP
S

Shelbylex

Well-known member
Joined
Jan 20, 2018
Messages
3,105
Location
MA
Well, as the old Russian proverb says "The eyes are afraid, but hands are doing the job"

I will slowly start the project and will try to document on the way I go. I could not find another jack which is identical on the internet - may be this write up will help somebody to restore the one they have somewhere in the corner on the garage. I will also ask questions on the way I go. Sorry, it will be a slow project...

Had some time today to start disassembling the jack. This is probably the easiest part of the whole project - took off the rear left wheel assembly. The nut size is 3/4". Some WD40 and a little bit of pushing and I was able to remove the assembly. Above and below are old style bearings with 16 balls each (you can take a guess how I know as they promptly rolled all over the floor from the bottom...). The grease was hard as a rock on the bottom and a very high density clay consistency on the top.
The rest of the stuff is solidly stuck at the point.

- the axel (not sure of the proper term) is rusted and damaged on one side.
-I assume there are some bearings inside - may be cylinders inside the wheel around the axel...

-What type of grease would you use when reassembling it?
-Would you use slow soak in WD40 initially (and then evaporust if it fails) or any other solution? Need to try to preserve ornament on the side - thus will try to avoid combination of ATF and acetone which people recommend for now...

Information about ball bearings: 16 balls on top and 16 on the bottom.
 

Attachments

  • W3.jpg
    W3.jpg
    133.9 KB · Views: 65
  • W2.jpg
    W2.jpg
    136.5 KB · Views: 66
  • W1.jpg
    W1.jpg
    137.3 KB · Views: 64
Last edited:

bpjr

Well-known member
Joined
Sep 2, 2013
Messages
554
Location
Florida east coast
Cool old jack. Heat might break stuff free without using chemicals. Bicycle repair shops are a good source of single ball bearings if you need any. I don't think the type of grease is critical. Good luck.
 

paulsomlo

Well-known member
Joined
Jul 16, 2013
Messages
3,866
Location
Northern Colorado
If you're talking about removing all the surface rust, I'd say electrolysis, maybe evaporust for the small parts. I've heard talk about using a mix of molasses and water, not sure if it would be thick enough to brush on the frame and have it stay there.

First order of business though, is to get the hydraulic unit out and apart for inspection.
 
OP
S

Shelbylex

Well-known member
Joined
Jan 20, 2018
Messages
3,105
Location
MA
Thank you, PpJr and Paulsomlo.
I am trying to unfreeze the wheel first so I could at least move it. It's sitting in the garage now and unfortunately I do not have a place to put a large work bench (wife would not be able to help with moving - it feels too heavy - at least 100-120lb). My idea was once it is movable, I will try to take it outside, lay it on the side and try to take it apart.
If time permits today, will try to wirebrush the sides and put some WD40. and see if it soaks in.
Electrolysis is a good idea, may be will try it - will require a huge plastic been to put the whole jack in. Never did it before.
Still waiting for Castle Equipment to send me the diagrams - will have to give them a call this week. I am also interested in learning from them how much would be a hydraulic unit if it's a complete loss - I have no idea what is my worst case scenario cost wise...

I wonder if heating the wheels up in the oven and then throwing them in cold water would break the rust and free them or would cause more damage through bending the small parts which are used as bearings (probably small cylinders around the axel)
 
Last edited:

paulsomlo

Well-known member
Joined
Jul 16, 2013
Messages
3,866
Location
Northern Colorado
Maybe get a dolly under it, so you can move it around. Divide and conquer - at 5'7" and 140 lbs, my strategy is usually break them down into pieces that I can lift, ASAP. That usually means working on the garage floor or the driveway.

New hydraulic unit for that? I don't think you want to know.
 
OP
S

Shelbylex

Well-known member
Joined
Jan 20, 2018
Messages
3,105
Location
MA
How bad? $400? More? I hope that it can be rebuilt...
One of my fears is that there will be no available parts. Custom fabrication could be expensive.

Picture 7 in the first shows the rust on the rod going from the lifting part with saddle to the hydraulic cylinder (sorry, I do not know the proper terms...). My hope is that once I can clean that up a little bit and free the rust on the frame it could move. This would point me towards higher hopes of rebuild vs replace (if financially not too crazy)

I think that the hydraulic unit is completely try: tried to move a pedal with the mallet, it moves (picture 8 (the first one on second post), but appears very dry and covered with dried grease...

Breaking down would also be complicated by significant amount of rust anywhere - I suspect it will not be a short breakdown. Having a family I am basically working on projects between work and family responsibilities - usually 15-20 minutes at a time...
 
Last edited:

ndnchf

Well-known member
Joined
Jan 9, 2012
Messages
1,556
Location
Fredericksburg, Virginia
Ditch the WD40 and get a good penetrating oil. WD40 is almost useless for this purpose, despite what it says on the can. I suggest either Kroil, PB Blaster or a home brew 50/50 mix of automatic transmission fluid/acetone. Keep the later in a sealed oil can or the acetone will evaporate. Soak your parts for a couple days with this. It wont necessarily work miracles, but it will help. Heat will be your friend too.
 
OP
S

Shelbylex

Well-known member
Joined
Jan 20, 2018
Messages
3,105
Location
MA
Thank you, Ndnchf Will have to pick it up this weekend.
I tried to look more into jack last night. It has a lot of cotter pin connections. I think if I could succeed taking out around 5 cotter pins and separate the connections, I could take the hydraulic unit out and try to clean it up and take it apart to see how bad it is. The problem is that holes through which cotter pins go appear to be solidly rusted. Will probably have to go slow with some sharp tool and PB Blaster sprays.

I tried to call Castle Equipment today and spoke to a nice gentlemen who told me that they did not have kits for something that old (and unfortunately no diagrams for this jack). However, he gave me a phone of another gentleman at Weaver plant who might know the history of the jacks better and might point me in the correct direction and potentially give me more information. The search continues...
 

don long

Well-known member
Joined
Mar 31, 2012
Messages
8,841
Location
southern california
I just discovered your Weaver jack thread. I'm very interested in your rebuild as I too have one that needs some attention and love. I'll be checking in often to see your progress good luck with the rust and hydraulics.

Here is a shot of my jack. I've owned it for a few years

$_57 (14) by don long, on Flickr

2015-09-09 09.39.47 by don long, on Flickr

I too like the art deco designs on this jack.

.
 
Last edited:
OP
S

Shelbylex

Well-known member
Joined
Jan 20, 2018
Messages
3,105
Location
MA
Thank you, Don_Long
This is great! Your jack is in significantly better condition! At least there will be some reference for me (some parts appear broken on mine)
I left a message with my phone number to the manager at the Weaver Factory who might know the history and have diagrams. Hopefully he will get in touch with me. I also hope that The hydraulic unit did not change much and if mine is not a complete loss, I can use the kit to rebuild it.

Please make a picture of the jack from another side, from the bottom, close up next to the handle/body. If possible, add them as large attachmentS so I could magnify them.
There appears to be a cover to the right of the emblem towards the handle. Mine is flat at that level.
The smaller handle attached next to the main handle is not doing much. I assume the thing which it’s supposed to hold is frozen too low on my jack.

If you changed the hydraulic oil, please let me know which one you used and how much. Once I free the refill bolt, I will put some in to start liquefying old one (it’s probably solid dry or paste)
No big progress as work is busy. Couple of bolts were freed. The bolts covering the cover are solid frozen and started deforming from a screwdriver - will need more soaking.
 
Last edited:
To avoid these ads, REGISTER NOW!

don long

Well-known member
Joined
Mar 31, 2012
Messages
8,841
Location
southern california
Last edited:
OP
S

Shelbylex

Well-known member
Joined
Jan 20, 2018
Messages
3,105
Location
MA
Thank you! This definitely helps!
Blackhawk is a masterpiece! I remember your thread!
You have a very impressive collection! I do not recognize all, but it looks like you have other Weavers, 3 Walker 740, Two Blackhawks...
You will need to restore and open the museum!
 

469 runner

Well-known member
Joined
Jan 5, 2006
Messages
353
Location
North Carolina
That is an awesome jack. I have to admit, I love these projects, and I would be doing what I could to bring that one back. In my travels I ran across a shop in NJ that does lots of jacks. The business caught my attention from the antique Blackhawk jack on top of a pole out front. He had many vintage jacks, lots of parts, and a nice machine shop to fabricate obsolete parts. It is only a part time thing with him. Maybe he could be of some help. I was able to buy the parts for my light on my Blackhawk S-4 from him. Hydraulic Jack Specialists, Carl Lewis Towaco, NJ. (973) 800-4779

Best of luck to you.
 

whateg01

Well-known member
Joined
Mar 13, 2006
Messages
11,212
Location
doo dah, kansas, usa
Here is what I have for other close up shots for you

...

Thanks Don! Now I have to wipe the drool off of my keyboard!

Shelbylex, that would be a dream to have. Is it ever going to be "worth" the time and money to rebuild it? Not if you think of it in dollars and cents. Reason I say that is that unless you can find a replacement hydraulic unit, paying to have parts made for that one will cost a lot. That said, it was made once, so it can be made again. Many a machine arrived in my shop not working, or not working right, or not working because it was designed poorly. That's why I have the machinery I do, so I can make that stuff again. Don't get discouraged by people saying you should have bought a new jack because [reason]. There's no cool factor in most things new, and this jack definitely is loaded with cool factor!

As far as getting burned goes, I'd say you did okay for that money. Even stuff that works often needs more work. I have a 10T Weaver that I still haven't figured out. It works fine to a point, then acts like it's sucking air. I've done a bit of troubleshooting, but it got put on the back burner after it was working well enough to lift Dad's tractor when he needed to. I have an S4 that works, but has a bent side frame. I didn't notice that until I got home. I'm still working on getting ready to cast a new lens for it. I picked up a Walker 4T that didn't work for low money. Got it home and got lucky. It really did just need oil. Apparently after the rebuilt hydraulic unit was put in, they never filled it.

Keep us posted on the progress. I love seeing old iron come back from the dead!

Dave
 
OP
S

Shelbylex

Well-known member
Joined
Jan 20, 2018
Messages
3,105
Location
MA
Thank you, Dave! I am a little OCD and I think I got upset that I could not evaluate it properly. However, the more I see it in my garage, the more I like it.

My tool collection is more about learning and enjoying the process of saving some rusty and not so rusty tools. As my friends are always laughing, I should work extra couple of weekends and just buy what I want. However, this would kill the primary interest.

I am really glad I found this board - I learned a lot about US tool companies, different tools and continue learning daily. I also take a special pride in using the tools which I found and restored (nothing big, to confess, mostly wrenches, adjustable wrenches, pliers, C-clamps, etc.) . Some of the tools I restored would be usually thrown away and some were saved from recycling piles.

I will continue working on this jack. I hope I can get the hydraulics working, but you are right - there are a lot of great people here who will point me in the right direction and help to figure out how to get remanufactured parts or try to remanufacture them myself.

We are saving history here and having a lot of fun with it!


… never mind it also makes me push my boundaries and fix things I never tried. I actually fixed my 13 year old microwave this week : )
 
OP
S

Shelbylex

Well-known member
Joined
Jan 20, 2018
Messages
3,105
Location
MA
Work is busy and the project is going slowly.
Small update:
1. After some PB blaster sprays, light hummer hits and some pressure applied in both directions the bolt on the handle was freed. This allows the top button to go up and down (well, mostly down - probably there is some spring inside which rusted or is weak). Have to pull it back up with pliers. Tons of rust fell from inside...
2. Two cotter pins from the top of the jack finally started moving and can be taken out.
3. No luck with the screws on top of the plate covering hydraulic unit - will keep spraying with BP Blaster. Same with the screw to fill up the jack hydraulic unit.
4. One of the cotter pins on the removed wheels came off. The other one is solidly stuck and somewhat broken. Keep spraying BP blaster on top - hopefully the whole axel will eventually come off and I will be able to free the wheel.
5. The cotter pin connecting the handle side of hydraulic unit started moving after some work - might come out. This side will probably be not that bad to remove.
6. The cotter pin on the other side connecting hydraulic unit to the part which is lifting the car is rusted and in somewhat awkward position with the "tails" of cotter pin facing away from the bottom. They are probably easy to reach once the top cover gets removed, but will see.
7. Couple of cotter pins on the front of the unit under the cup started moving and will probably be removed soon with more work.

Sorry - a lot of tiny progress points, nothing major. This will take time and be initially boring to read about. Eventually I hope to approach the most interesting and scary part once I find a way to remove hydraulic unit (I will do it without disassembling the whole jack as parts are welded...)


Interesting observation - when I wirebrushed the very rusty wheel unit which I removed, there are remnants of red pain on it (consistent with the color of Don_Long, though I have more rust then paint at this point). On the bottom of hydraulic unit there appear to be some green pain remnants. I thought Weavers were black or green for early models.
Still no word from the manager - will try calling the company again about potential information and may be even a diagram (I honestly hope for more details on the parts and hydraulic unit)
 

Attachments

  • W5.jpg
    W5.jpg
    87.3 KB · Views: 41
  • W6.jpg
    W6.jpg
    151.2 KB · Views: 40
Last edited:
OP
S

Shelbylex

Well-known member
Joined
Jan 20, 2018
Messages
3,105
Location
MA
Don, I think we have slightly different versions of the jack:
1. There is slightly different distance between parts (please see the pictures)
2. Your cover is rounded towards the handle side, mine is flat

Do you have the same jack size as mine?

Please make me a picture of the rear of the jack from the left side (from the pictures above I am possibly missing a part or have a different mechanism. I do not have this bolt. The picture is taken with handle up.
 

Attachments

  • W6a.jpg
    W6a.jpg
    119.1 KB · Views: 39
  • W6B.jpg
    W6B.jpg
    97.9 KB · Views: 37
Last edited:
OP
S

Shelbylex

Well-known member
Joined
Jan 20, 2018
Messages
3,105
Location
MA
Thank you, Don. My jack is different. I checked my jack - there is no hole for the safety stop on the panel.
I guess we both have similar but unique jacks. I assume the majority of design is similar - will keep posting pictures as I keep taking it apart...
 

dffay

Well-known member
Joined
Jul 9, 2015
Messages
431
What a great restoration project!! It will come out amazing! Take your time, have fun and enjoy the satisfaction. Watch those wheel pants if they are cast....fracture risk and tough to fix. But wow, how cool!
 
OP
S

Shelbylex

Well-known member
Joined
Jan 20, 2018
Messages
3,105
Location
MA
Thank you, dffay! Going very slowly indeed due to work and fact that PB Blaster smell allows me to spray it only with garage door being opened. Working this weekend, but hopefully will get some time to work on it.
 
OP
S

Shelbylex

Well-known member
Joined
Jan 20, 2018
Messages
3,105
Location
MA
Had a small progress today after work. I put sizes on the bolts in case somebody decides to work on similar or the same jack in the future.

1. All bolts marked 3/4 are finally loose
2. I removed the part with 5/8 nuts (it either broke or rusted off) - once the cover is lifted, will need to see if the second half is there and figure out what it is for
3. loosened 11/16 nuts which are now moving freely
4. the yellow nut to the right of 11/16 nuts is now freely moving
5. no luck with 7/8

Made no progress with the right rear wheel assembly - needs to be soaked further. I assume the axle can be moved with the hammer once cotter pin is removed, but have no luck. The wheel is still frozen...

The screws which I mentioned in previous bolt are still not moving (second post, second image)- keep soaking. I wonder if I will end up learning how to use the manual impact driver. The metal is bending out of shape. The side bolts can be probably grinded off if needed, but the filling screw is a problem... Will keep soaking for now
 

Attachments

  • W7.jpg
    W7.jpg
    149.4 KB · Views: 36
  • W7b.jpg
    W7b.jpg
    113.4 KB · Views: 24
Last edited:

paulsomlo

Well-known member
Joined
Jul 16, 2013
Messages
3,866
Location
Northern Colorado
For fasteners with slotted heads, manual impact will work wonders. Either that, or square shanked screwdriver with adjustable wrench on the shank.
 
OP
S

Shelbylex

Well-known member
Joined
Jan 20, 2018
Messages
3,105
Location
MA
I tried a large screwdriver with the wrench on the ?nut (not sure what to call the nut shaped extension under the handle on Snap On screwdrivers) - it just keeps spreading hole on the top of the bolt. Tried another less valuable screwdriver with good counterclockwise hand tension and slight hammer hits on top - no luck.
Will continue soaking it for some time. Might need to borrow/buy impact piece with slotted screwdriver end. Have the impact driver, but only philips and sockets on it...
I guess there is a long list of tools I need.

One thing I noticed - trying to use mostly 6 point sockets. I think 12 points might work just as well, but for some reason feel more afraid using them and damaging the bolt heads... hmm, I think I will start paying more attention to 6 point wrenches and sockets from now on...
 
OP
S

Shelbylex

Well-known member
Joined
Jan 20, 2018
Messages
3,105
Location
MA
Small progress:
-Was able to completely free and take out cotter pins on top of the jack
-Removed cotter pin on the part connecting hydraulic unit to the pedal and remove that part. The part which I freed with additional picture in the 3d image shows how significant is the rust damage on some parts. "Just needs some oil they said" : ) I assume that the part which crosses two plates and goes left (image 1 shows it better) can be removed with time and replaced instead of being one piece...
-Tried to remove the 1/4" square bolt from the pedal, but no luck. Slight movement after soaking, will need to work on it more
-Finally after a lot of soaking and light hammering was able to take apart the rear wheel assembly. The damaged/rusted/broken part of the axe still has the cotter pin - it broke and I could not remove the reminder. What really helped is slightly moving the axel with the hammer, soaking with PB blaster, tapping it back, soaking more so it would get inside the assembly, tapping it back... "repeat once more..." Eventually it came out with me using a small aluminum cylinder of similar diameter to push the axle through... An interesting thing is that I expected bearings inside the wheel (a lot of small cylinders), but it appears to be solid inside.

I guess this project gives me a reason to use my older tools which I am slowly collecting
 

Attachments

  • W11.jpg
    W11.jpg
    91.1 KB · Views: 33
  • W12.jpg
    W12.jpg
    149.4 KB · Views: 32
  • W10.jpg
    W10.jpg
    155.9 KB · Views: 36
  • W8.jpg
    W8.jpg
    128.3 KB · Views: 38
  • W9.jpg
    W9.jpg
    116.4 KB · Views: 43
Last edited:

whateg01

Well-known member
Joined
Mar 13, 2006
Messages
11,212
Location
doo dah, kansas, usa
So you don't think you can save that part in pics 2&3? Lol. That's got some pretty rough parts. All can be remade with enough time, effort, money, or some combination of those. Sometimes progress on old tools goes slow.
 
OP
S

Shelbylex

Well-known member
Joined
Jan 20, 2018
Messages
3,105
Location
MA
It will buff right out! After all, the seller said it “just needs some oil”

Once I take it apart, I will need to see if some parts will be similar to modern version of the jack. I assume some parts will need to be remanufactured. The biggest gamble is the hydraulic unit...
 

paulsomlo

Well-known member
Joined
Jul 16, 2013
Messages
3,866
Location
Northern Colorado
You didn't tell us the jack sailed with the Titanic - now I understand why it's taking so long. I'll keep my fingers crossed regarding the main and pump cylinder walls.
 
To avoid these ads, REGISTER NOW!
Top Bottom