To avoid these ads, REGISTER NOW!

12'x16' Deck build

isuhunter

Well-known member
Joined
Aug 27, 2011
Messages
532
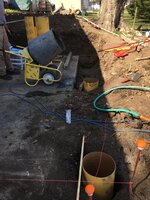
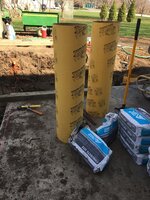
Greetings everyone! We are in the process of starting to plan out a new deck. Currently we have a huge deck (4 levels) that is rotting away and we really don't use it. It is built around an ash tree and the ash borer has moved into our area.

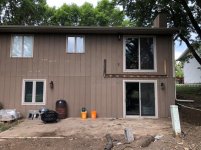
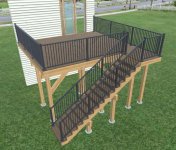
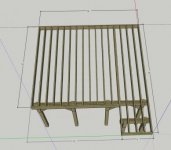
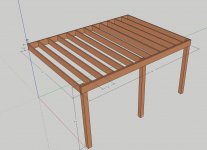
Our plans for a new deck are 12x16' single level and a stair case to get down. 16' Will put us at the edge of the kitchen sink window you see in the photo. Not exactly sure how to run the stairs yet. I've been looking through the AWC Design for Code 6 document to determine my build/design.

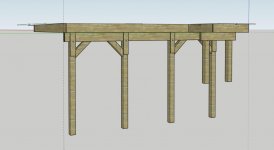
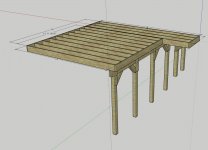
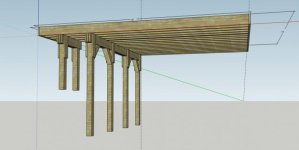
So far I have drawn out the attachment. I'd like to minimize the number of posts and I like the idea of 45* braces on the posts to the beam. Beams and Joists are all 2x10'. The current walk/step out of the house is 8'2" above the concrete. We will likely deck it with a trex product.

Open to all thoughts and have you looked ats. Sketchup is such a fun app.

- Where would you place the steps?
- Would you use 12" centered 2x8 or 16" centered 2x10"?
 

Attachments

  • Deck.JPG
    Deck.JPG
    98.8 KB · Views: 138
  • old deck.jpg
    old deck.jpg
    153.8 KB · Views: 163
To avoid these ads, REGISTER NOW!

bassJAM

Well-known member
Joined
Jun 10, 2020
Messages
861
Location
Cincinnati, OH
I know it was common practice forever, but I'd recommend against notching your posts to support the beam (if that's what you've shown, kind of hard to tell). The cut weakens the post, and creates a pocket of sorts to hold moisture. I've used Simpson Strong tie post-to-beam connectors on a couple decks and really like them.

simpson-strong-tie-post-cap-connectors-bcs2-3-6z-64_1000.jpg


There's a nice series on youtube from Fine Homebuilding on decks if you haven't already seen it.
 

nafterclifen

Well-known member
Joined
Nov 22, 2014
Messages
525
Location
Poconos, PA
Also, checkout Lowe's Deck Designer web software if you want to mess around with designs and see something visually. Trex is one of the brands in their system so you can choose from all of the colors. You have to register for an account but it's free. Only thing is - it's going away on June 30th and is being replaced by Lowe’s Deck Designer Pro.
 
OP
I

isuhunter

Well-known member
Joined
Aug 27, 2011
Messages
532
I know it was common practice forever, but I'd recommend against notching your posts to support the beam (if that's what you've shown, kind of hard to tell). The cut weakens the post, and creates a pocket of sorts to hold moisture. I've used Simpson Strong tie post-to-beam connectors on a couple decks and really like them.

simpson-strong-tie-post-cap-connectors-bcs2-3-6z-64_1000.jpg


There's a nice series on youtube from Fine Homebuilding on decks if you haven't already seen it.

I watched a couple yesterday and plan to watch some more!
 
OP
I

isuhunter

Well-known member
Joined
Aug 27, 2011
Messages
532
Need some recommendations on a couple things as I near my build:

Best blade for mitre saw blade Trex material? - Diablo? Makita?

I have a makita mitre saw and I need a stand for it. The ryobi stand leaves the saw tilted to the rear.
 

Jackfre

Well-known member
Joined
Dec 26, 2010
Messages
4,408
Location
N CA
Are you taking the trees down? What is the N/S orientation of the deck
 

ItsNemo

Well-known member
Joined
Mar 5, 2016
Messages
4,805
Location
Canada
I used the branded trex blade from freud, worked very well, clean cuts.

Just do 12" OC for any composite decking, even if perpendicular allows for 16" OC. The lumber cost for a few extra 2x10's is nothing but the decking will feel far better.

Also, I don't like your beam design, this is the way to do it:

18815395_819638752103_1435144493651791869_o.jpg

18527136_817532862323_1510121955954366305_o.jpg
 
OP
I

isuhunter

Well-known member
Joined
Aug 27, 2011
Messages
532
I used the branded trex blade from freud, worked very well, clean cuts.

Just do 12" OC for any composite decking, even if perpendicular allows for 16" OC. The lumber cost for a few extra 2x10's is nothing but the decking will feel far better.

Also, I don't like your beam design, this is the way to do it:

18815395_819638752103_1435144493651791869_o.jpg

18527136_817532862323_1510121955954366305_o.jpg

ItsNemo- appreciate the reply. On your post to beam connections do the outside "strap" pieces remain in place? I like the look of it!

I'm laying out a new design in sketchup now. I'll build it with 12" OC
 
To avoid these ads, REGISTER NOW!

ItsNemo

Well-known member
Joined
Mar 5, 2016
Messages
4,805
Location
Canada
ItsNemo- appreciate the reply. On your post to beam connections do the outside "strap" pieces remain in place? I like the look of it!

I'm laying out a new design in sketchup now. I'll build it with 12" OC
Yes, those outside pieces of the post/beam connection remained in place. They are bolted through with several 1/2" galvanized carriage bolts each, 4 for most, but 6 in the middle two posts where the two pieces of beam meet. The beams are three 2x10's with 1/2" plywood sandwiched between the layers to get it out to 5.5 inches thick like the posts. All the layers are glued with PL Premium and nailed on 12" centers. You'll notice a gap in the plywood in each beam in the pic below when they're sitting on the ground...once hoisted in place, I slotted in additional chunks of plywood and using extra long nails, nailed them in to "join" the beams together a bit better.

The structure is as solid as can be, it's a bit overkill even (e.g. I used hurricane ties on all the joists and doubled up a couple joists that didn't need to be), but there's no bounce or wobbliness whatsoever. The neighbours had the builder do theirs and most complained that they felt a little sway in it, so I made sure to build mine better. The inspectors were quite impressed with the construction and had zero deficiencies :)

Couple more pics:

18558764_817532717613_3629237379878173575_o.jpg


18556665_817532657733_7783324434576621795_o.jpg


18880046_819638836933_777484618450625751_o.jpg


I also did trex decking:
19621146_824880542513_8570195938605658219_o.jpg
 

manwithtools

ALLIANCE MEMBER
Joined
Aug 24, 2015
Messages
13,726
Location
Lebanon, TN
Yes, those outside pieces of the post/beam connection remained in place. They are bolted through with several 1/2" galvanized carriage bolts each, 4 for most, but 6 in the middle two posts where the two pieces of beam meet. The beams are three 2x10's with 1/2" plywood sandwiched between the layers to get it out to 5.5 inches thick like the posts. All the layers are glued with PL Premium and nailed on 12" centers. You'll notice a gap in the plywood in each beam in the pic below when they're sitting on the ground...once hoisted in place, I slotted in additional chunks of plywood and using extra long nails, nailed them in to "join" the beams together a bit better.

The structure is as solid as can be, it's a bit overkill even (e.g. I used hurricane ties on all the joists and doubled up a couple joists that didn't need to be), but there's no bounce or wobbliness whatsoever. The neighbours had the builder do theirs and most complained that they felt a little sway in it, so I made sure to build mine better. The inspectors were quite impressed with the construction and had zero deficiencies :)


Nice work, I'm curious how you connected the pergola posts to the deck framing to prevent the pergola from racking?
 

ItsNemo

Well-known member
Joined
Mar 5, 2016
Messages
4,805
Location
Canada
The sandwiched plywood in your beams will rot away pretty fast.


Sent from my iPad using Tapatalk

It is pressure treated plywood, there's self sealing joist tape on the top of the beam to keep water out from between the layers, and I treated with end cut preservative all the cut ends.

Nice work, I'm curious how you connected the pergola posts to the deck framing to prevent the pergola from racking?

Just blocking between the joists to give me multiple angles to screw from and big carriage bolts to secure it to the joists. It's also part of the railing which helped a lot. It is surprisingly solid and doesn't sway whatsoever.

And you were right, I didn't miss that detail on the plywood in the beam ;)
 
OP
I

isuhunter

Well-known member
Joined
Aug 27, 2011
Messages
532
Yes, those outside pieces of the post/beam connection remained in place. They are bolted through with several 1/2" galvanized carriage bolts each, 4 for most, but 6 in the middle two posts where the two pieces of beam meet. The beams are three 2x10's with 1/2" plywood sandwiched between the layers to get it out to 5.5 inches thick like the posts. All the layers are glued with PL Premium and nailed on 12" centers. You'll notice a gap in the plywood in each beam in the pic below when they're sitting on the ground...once hoisted in place, I slotted in additional chunks of plywood and using extra long nails, nailed them in to "join" the beams together a bit better.

The structure is as solid as can be, it's a bit overkill even (e.g. I used hurricane ties on all the joists and doubled up a couple joists that didn't need to be), but there's no bounce or wobbliness whatsoever. The neighbours had the builder do theirs and most complained that they felt a little sway in it, so I made sure to build mine better. The inspectors were quite impressed with the construction and had zero deficiencies :)

ItsNemo - thanks for your inspiration

Did you use Cedartone treated?

Here are my thoughts. I cant push my posts in any further because of the lay of the landscape. There will be a retaining wall on the "inside" of the deck posts. Also there will be stairs coming down along the main deck. This sketchup is at 16" centers, I'll redo it tomorrow at 12" centers
 

Attachments

  • deck1.jpg
    deck1.jpg
    61.8 KB · Views: 39
  • deck2.jpg
    deck2.jpg
    110.7 KB · Views: 36
  • deck3.jpg
    deck3.jpg
    93.8 KB · Views: 35
  • house.jpg
    house.jpg
    154.3 KB · Views: 45
  • deck4.jpg
    deck4.jpg
    153.5 KB · Views: 44
OP
I

isuhunter

Well-known member
Joined
Aug 27, 2011
Messages
532
Here is the updated drawing
 

Attachments

  • deck7.jpg
    deck7.jpg
    18.5 KB · Views: 21
  • deck5.jpg
    deck5.jpg
    19.4 KB · Views: 19
  • deck6.jpg
    deck6.jpg
    19.5 KB · Views: 22

ludakris04

Well-known member
Joined
May 16, 2011
Messages
3,763
Location
Maryland
I used a cheap Avanti 24t ripping blade and had zero problems.
 

Attachments

  • trex1 (2).jpg
    trex1 (2).jpg
    125.3 KB · Views: 20
Last edited:
OP
I

isuhunter

Well-known member
Joined
Aug 27, 2011
Messages
532
Things finally started happening...due to a sick child we stayed home for Easter and poured footings.


38e58636237a0068b6e4a6e3ebcdc80e.jpg

5d99c5baa4fb6655a71459a5c5d79852.jpg

0f26e231bff565edd54c1956a40e2cce.jpg

732f2570cc32e35969fe9d9b41aab068.jpg


Sent from my iPhone using Tapatalk
 

Attachments

  • 732f2570cc32e35969fe9d9b41aab068.jpg
    732f2570cc32e35969fe9d9b41aab068.jpg
    216.8 KB · Views: 0
  • 0f26e231bff565edd54c1956a40e2cce.jpg
    0f26e231bff565edd54c1956a40e2cce.jpg
    167.9 KB · Views: 0
  • 5d99c5baa4fb6655a71459a5c5d79852.jpg
    5d99c5baa4fb6655a71459a5c5d79852.jpg
    170.2 KB · Views: 0
  • 38e58636237a0068b6e4a6e3ebcdc80e.jpg
    38e58636237a0068b6e4a6e3ebcdc80e.jpg
    163.7 KB · Views: 0
To avoid these ads, REGISTER NOW!
Top Bottom