To avoid these ads, REGISTER NOW!

1937 Blackhawk Red Rover Restoration

thehorse13

Well-known member
Joined
Mar 15, 2015
Messages
3,479
Location
Jefferson County, WV
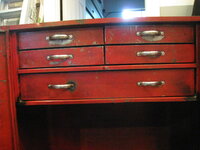
I'm firing up this thread so that those of you who are interested in my restorations can follow along. The real work will start in the spring but I do plan on doing the smaller things over the winter.

I acquired this box from another GJ member that many of you know well. Ricky Joe gave me the back story on this box so I will go ahead and share that information with all of you.

The back story:
The box came from a shop located a little bit south east of Roanoke Virginia. It was in a repair shop there it's entire life before rolling on to an auction block. Ricky Joe won the auction and found mostly 1937 dated Blackhawk tools so the going theory is that this is a 1937 model year box. I can tell by looking at it that it's certainly from the late 1930s based on the handles, metal construction and drawer slide types. It's also an, "open bottom" design which was exactly what you found on late 30s Red Rovers.


The Plan:
1) Remove all parts.
2) Repair the original Blackhawk badge. This may require some paintwork by hand.
3) Determine if the original handles can be polished. If not, they will go out for dipping.
4) Plug weld all the holes added by the original owner. Someone added their own door to the bottom of the box but that will be remedied.
5) Repair all drawer slides so that the drawers open butter smooth.
6) Straighten all bent tray tool partitions.
7) Strip all paint after creating the Blackhawk triple black stripe template.
8) Prep all metal for respray of Rustoleum sunrise red.
9) Wet sand any imperfections.
10) Add triple black stripes in satin black.
11) Clear coat with my vintage spray gun.
12) Polish and repair all 3 original locks. I may add period correct keys and redo the cylinders at a later date.

Well, there ya have it. Another restoration adventure is queued up and waiting.
 

Attachments

  • IMG_4206.jpg
    IMG_4206.jpg
    736.2 KB · Views: 248
To avoid these ads, REGISTER NOW!

Shelbylex

Well-known member
Joined
Jan 20, 2018
Messages
3,132
Location
MA
Great plan, thehorse13! If you are going to be fixing, recreating small rollers which are attached to both the box and the drawers, please write the details (I am missing some...)
 

4xdog

Well-known member
Joined
Aug 18, 2012
Messages
5,621
Location
Santa Fe, NM
This will be fun to watch. Are you sure about Sunrise Red? Might be worth having your local paint supplier shoot the colorimetric data on a piece. It could be useful to have that in the project file in case you decide to do a custom red at some point.
 

Jayman17

Well-known member
Joined
Feb 6, 2017
Messages
3,812
Location
Seattle, Wa
Nice box, seems strange they located the badge in that location. Will follow to see you work your magic.

Jay
 

Ricky Joe

Well-known member
Joined
Sep 15, 2013
Messages
2,452
Location
Roanoke, Va.
Nice box, seems strange they located the badge in that location. Will follow to see you work your magic.

Jay
The badge was originally in the center of the bottom drawer. It was inside the box when I got it. There were a lot of tools dated 1937 and newer, not just Blackhawk, but also Snap-On. Most were well used. The locks were originally in place. Like the Neanderthal I can be, I destroyed them trying to remove them. They are made of some soft metal I am unfamiliar with. The original owner’s name plate is also there. It went behind the top lock. A. A. Prilllaman. He was the grandfather of the person who consigned the box to auction. The original Prillaman’s son was also a mechanic in the same shop. The consignor had been an attorney, and had passed. I believe his wife and/or heirs used the auction house. There were boxes of antique tools. At a different point in my life, not so long ago, I would have spent a lot of money. I saw this box when I went down to talk to them about selling mine. My health and age tell me it is time to let go. But this box called to me, and now it is where it belongs. Paint I was using was Matte Red Pepper. I was so tired of the sunrise red.
 
OP
T

thehorse13

Well-known member
Joined
Mar 15, 2015
Messages
3,479
Location
Jefferson County, WV
This will be fun to watch. Are you sure about Sunrise Red? Might be worth having your local paint supplier shoot the colorimetric data on a piece. It could be useful to have that in the project file in case you decide to do a custom red at some point.

Believe it or not, I have a number of well preserved 30s Blackhawk boxes still wearing their original paint. Sunrise red is damn close, if not a perfect match, for this box.
Nice box, seems strange they located the badge in that location. Will follow to see you work your magic.

Jay
The badge is just laying on the top of the box. I put it there when I was sorting through the parts jar also seen on top. Here is what she will look like once again.

1667381199318.png
 
OP
T

thehorse13

Well-known member
Joined
Mar 15, 2015
Messages
3,479
Location
Jefferson County, WV
Great plan, thehorse13! If you are going to be fixing, recreating small rollers which are attached to both the box and the drawers, please write the details (I am missing some...)
I meant to quote you above but somehow missed the button...lol.

I haven't looked at the rollers yet but I can tell just by tugging the drawers that they will need serious attention. It will be the hardest part of the restoration process.

Once I get a good look in there I will weigh my options. Of course anything that I find will be posted here.
 

FJ 432

Well-known member
Joined
Aug 2, 2010
Messages
3,735
Location
Littleton Colorado
Great plan, thehorse13! If you are going to be fixing, recreating small rollers which are attached to both the box and the drawers, please write the details (I am missing some...)

I would like to echo this request as I recently purchased a 1968 MAC bottom roller that also needs new rollers. Nice box Horse.
 
OP
T

thehorse13

Well-known member
Joined
Mar 15, 2015
Messages
3,479
Location
Jefferson County, WV
I thought the bottom two drawers had decent rollers. The top drawer they are worn flat.
That very well could be the case. I have not even looked inside yet but I have dealt with so many of these old tanks that I can tell by the feel that I have work to do in there. Whatever I do find, I will remedy though.
 

Shelbylex

Well-known member
Joined
Jan 20, 2018
Messages
3,132
Location
MA
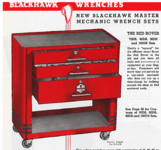
Thehorse13, I tool the ad you posted above and reposted it on another thread - it gives some ideas of what could be the order for the drawers (Blackhawk Tool Chests and Tool Rollers (Caterpillar by Blackhawk are welcomed as well!)
 
OP
T

thehorse13

Well-known member
Joined
Mar 15, 2015
Messages
3,479
Location
Jefferson County, WV
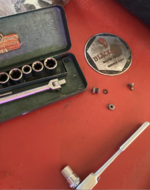
I decided to take a quick look at the Red Rover today. Some of you may wonder if the vintage tools ever get used on these tear downs. The answer is yes. Without the little Plomb helper, I would have myself two stripped flatheads in this tight area. As a side note, I'm convinced that this drawer is for 3/4 drive tools given the socket space. I did a quick straightening job and then dropped in a complete set of 3/4 drive sockets and they fit like a glove. ShelbyX will be especially interested in this news.
1667899945907.png

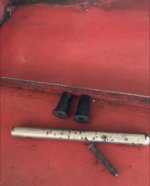
The two little plugs that you see here should be attached to the back of this emblem. The good news is that I can easily remedy that issue but the bad news is that what I thought was paint on the front of the emblem is actually a scuff mark that goes down to the base metal. Restoring the emblem is going to be a much bigger challenge than originally thought. My other two options are to use a reproduction or source an original. I'm not really leaning in that direction yet though.
1667900283481.png

All of the metal that was treated to resprays looks like this. It's very common to find these old hulks with surfaces that are comparable to the face of the moon. I've dropped this here because those who work in the auto body business know the work it takes to get a surface like this ready for paint.
1667900483831.png

One of the surprises that I came across was the bakelite stems on all of the drawer handles. Another nod to the art deco era where this box came from. The stems will clean up just fine but as expected, the chrome is too far gone on these handles for a simple clean and shine. I will sort that later but a re-dip appears to be in the cards.

If you look closely at the very top left corner, you'll see what 1930s drawer rollers look like. I didn't look too closely at all of them but initial examination tells me that all of them are round but some have bent frames. This is an easy fix and may solve the resistance issues I've noted already.
1667900631185.png

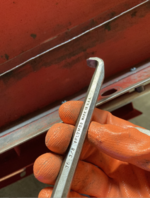
The lines seen here on the sides of the drawers had me scratching my head. This seems to be friction between the drawer frame and the drawers, which should be a pretty simple fix.
1667900886783.png

We're on our way and over the winter months I will prepare the gingerbread for the spring strip down and respray. I figured that everyone who likes my posts would appreciate the update.
 

Shelbylex

Well-known member
Joined
Jan 20, 2018
Messages
3,132
Location
MA
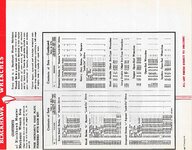
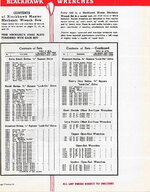
Great job! Great to know that the 2nd drawer had 3/4 set (consistent with the catalog listing that I got)
Do not forget that the rollers are also present on the front part of the box frame. They can cause friction too One of mine was solidly rusted in - was royal pain in the RS to keep spraying it with BP blaster and moving an extremely thin piece of metal on both sides of the wheel back and forward to break down the rust.
If you disassemble one of the rolling combos, please make pictures of the "axles" - couple of my pins were broken, but they did not appear purely cylindrical - had a tiny narrowing part at the end (which also could have been from them wearing out over time though...)
 
To avoid these ads, REGISTER NOW!

Shelbylex

Well-known member
Joined
Jan 20, 2018
Messages
3,132
Location
MA
This is the list I found (sorry, no clue how to rotate it - I saved it this way some time ago), If you want word file (easier to read), PM me (I could not attach it to this thread...)RedRoverSets_large.jpg
 
OP
T

thehorse13

Well-known member
Joined
Mar 15, 2015
Messages
3,479
Location
Jefferson County, WV
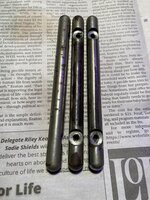
The next time you see these pull handles, they will look brand new. Now, I do not have a nickel dipping tank at home nor would I want one. I've seen guys buy chrome dipping kits for home use and 500 bucks later, they end up with a terrible plating result and 5 gallons of higly toxic liquid. This is one of those things that makes sense to farm out. The only thing I can take credit for here is knowing when to use a specialist.
 

Attachments

  • IMG_4230.jpg
    IMG_4230.jpg
    802.2 KB · Views: 134
OP
T

thehorse13

Well-known member
Joined
Mar 15, 2015
Messages
3,479
Location
Jefferson County, WV
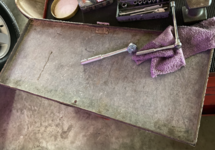
Someone went through a lot of trouble to fabricate a front and rear panel for this Rover. Pictured here is the front panel, which was already removed. What you see out on the Rover is an assortment of Armstrong and Blackhawk tools being used to remove the fasteners on the rear panel. The holes will need to be plug welded and then ground flush but we won't get to that for quite some time. Plenty of pictures will be included.

1668277281847.png

There must be one or two Plomb fans following along. Ever wonder if you'll use a tiny 5/16th pebble wrench? The answer is yes today. The fasteners used to affix these panels are 5/16th.

1668277281975.png
 
OP
T

thehorse13

Well-known member
Joined
Mar 15, 2015
Messages
3,479
Location
Jefferson County, WV
A quick update to those riveted to this edge of your seat restoration project.

I found a small plating operation in the DC metro area willing to nickel plate the pull handles. I've made an appointment to drop them off next week and the turn around is 1 to 3 weeks.

Meanwhile, I'm going to haul the original emblem inside to mull over restoration options a little more precisely. In other news, I found my copper plug welding tool so I'm now ready to go once I get to the pot hole repair step.
 
OP
T

thehorse13

Well-known member
Joined
Mar 15, 2015
Messages
3,479
Location
Jefferson County, WV
I was able to sneak in about 10 minutes of time with the rover today. I decided that I can quickly get a template made for the triple black stripes but it turned out to be a little more difficult than I thought.

Let's start with the easy measurement, which is where the bottom line begins. It's 2 1/8th inches from the bottom of the box. This was dead on all the way around so I'm happy with that one.

The next easiest measurement is the gap between the three stripes. All of them are 1/2 inch apart and this also is dead on all the way around the box.

Now, the measurement that proved a bit more troublesome to nail down is the actual thickness. The stripes have endured more than 80s years of shop use. The stripes have nicks and cuts which led me to measure the widest stripe point of 5/8ths. There was one spot that seemed to be 11/16ths though. This bothers me.

The stripes should go all the way around to the spot where someone added the homemade panel in the back. This of course will be removed and all holes will be plug welded.

Now, if you're paying close attention to picture #1, you can see that somewhere along the line, the castors were welded. Initial inspection tells me that the person who performed the welding was actually skilled and knew how to weld. I have no fear of them breaking. What I don't know is if the casters are original or not. It has Noelting-Faultless Evansville, IN No. 20 Plaskite swivel castors all the way around. I know these are vintage and rated for industrial use but I have no idea of they are originals.

Here is where I hope that one of you other rover owners can help me out. Can you confirm the triple stripe measurements and if these casters are originals? Any help would be much appreciated.
 

Attachments

  • IMG_4275.jpg
    IMG_4275.jpg
    487.2 KB · Views: 107
  • IMG_4274.jpg
    IMG_4274.jpg
    494.7 KB · Views: 106

FJ 432

Well-known member
Joined
Aug 2, 2010
Messages
3,735
Location
Littleton Colorado
Horse,

I realize that my bottom is not a Rover and my guess is a little newer. Similar to the catalog drawing my bottom stripe begins at 2" with each stripe consistant at 3/4" wide with a 1/2" break between stripes.

My casters were added by the PO so no help there.

IMG_3053.JPGIMG_3056.JPG
 

Farmer J.

Well-known member
Joined
Sep 18, 2016
Messages
1,995
Location
UK, Cornwall/Hertfordshire.
The next easiest measurement is the gap between the three stripes. All of them are 1/2 inch apart and this also is dead on all the way around the box.

Now, the measurement that proved a bit more troublesome to nail down is the actual thickness. The stripes have endured more than 80s years of shop use. The stripes have nicks and cuts which led me to measure the widest stripe point of 5/8ths. There was one spot that seemed to be 11/16ths though. This bothers me.
Can't help here with your actual request, but may as well throw in an observation, a possible explanation, to try and help you feel less bothered.... It looks to me like whoever originally applied the stripes used 1/2" wide masking tape between the stripes. This gives the precise and consistent measurement you observe between the stripes. He didn't bother to be accurate when he stuck it on, and didn't get the lines of tape precisely parallel, so the width of the black stripes vary slightly... I suppose it looked OK like that and didn't bother anyone until you measured it! Now I'm awake at 3am and it bothered me too..
 

Shelbylex

Well-known member
Joined
Jan 20, 2018
Messages
3,132
Location
MA
Sorry, did not read the whole thing and did not measure the stripes. If I forget tomorrow, please PM me to remind.
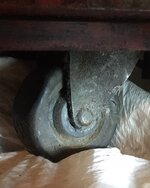
Here are couple of pictures of the casters (front, rear and the front on the opposite side to show different angles)
... If you are planning to replace the actual wheels, please let me know which ones you get - as you can see mine are in bad shape...
...Sorry for poor images - done with a flash light and a cell phone
Caster1.JPGCaster2.JPGCaster3.jpgCaster4.jpg
 
OP
T

thehorse13

Well-known member
Joined
Mar 15, 2015
Messages
3,479
Location
Jefferson County, WV
Can't help here with your actual request, but may as well throw in an observation, a possible explanation, to try and help you feel less bothered.... It looks to me like whoever originally applied the stripes used 1/2" wide masking tape between the stripes. This gives the precise and consistent measurement you observe between the stripes. He didn't bother to be accurate when he stuck it on, and didn't get the lines of tape precisely parallel, so the width of the black stripes vary slightly... I suppose it looked OK like that and didn't bother anyone until you measured it! Now I'm awake at 3am and it bothered me too..
The stripes are factory applied. However, upon closer inspection later in the day, I did discover that somewhere along the road the stripes were touched up in some areas by a less than precise painter. Now I feel much better knowing that the factory didn't half *** the stripes. Unless another rover owner chimes in with a different stripe width from "5/8ths, that will be what a lay down at the end of our adventure.

Sorry, did not read the whole thing and did not measure the stripes. If I forget tomorrow, please PM me to remind.
Here are couple of pictures of the casters (front, rear and the front on the opposite side to show different angles)
... If you are planning to replace the actual wheels, please let me know which ones you get - as you can see mine are in bad shape...
...Sorry for poor images - done with a flash light and a cell phone
Okay, so by the looks of your casters, you have what I expected to see; two fixed and two swivel. This tells me that somewhere along the road of life, the original casters were swapped out for the 4 swivel casters that are on here now. This is actually very welcome news to me because I can replace the ones that are on there with period correct fixed and swivel casters. Are your caster bolt distances "2 3/4ths by "1 3/4ths?
 
OP
T

thehorse13

Well-known member
Joined
Mar 15, 2015
Messages
3,479
Location
Jefferson County, WV
I hope you don't think it's less interesting because it may be newer. Fantastic box either way. These blackhawk rollers are about as common as hens teeth.
I love them all and even this newer one is extremely appealing to me. :)

Horse,

I realize that my bottom is not a Rover and my guess is a little newer. Similar to the catalog drawing my bottom stripe begins at 2" with each stripe consistant at 3/4" wide with a 1/2" break between stripes.

My casters were added by the PO so no help there.
Ahh, here we go with our first 3/4" measurement. Excellent. I was going to roll with 5/8ths but 3/4 was what my eyeball ruler concluded before I started messing with an actual ruler. :) Thank you for this info.

Thank you to everyone else who chimed in as well. All of you play a part in my junk mania.
 

Farmer J.

Well-known member
Joined
Sep 18, 2016
Messages
1,995
Location
UK, Cornwall/Hertfordshire.
Thank you to everyone else who chimed in as well. All of you play a part in my junk mania.
Thank you for taking the trouble to post the pics and tell the whole honest story of your restorations. It's just so much more interesting than some random post showing a finished project, which may actually be of doubtful quality beneath the shine.
Looking forward to following along, sharing in your mania and also the joy of seeing your results.
 

Shelbylex

Well-known member
Joined
Jan 20, 2018
Messages
3,132
Location
MA
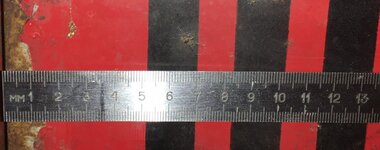
Here are coupe of pictures of the stripes in both metric and Imperial. I figured out, it's easier to make pictures: if you magnify them it will be more precise measurement than what I am getting with a flashlight and a ruler (plu it shows the paint - mine is probably original)Stripe2.jpgStripe3.jpgStripe4.jpg
 

Attachments

  • Stripe1.jpg
    Stripe1.jpg
    119.4 KB · Views: 146

Shelbylex

Well-known member
Joined
Jan 20, 2018
Messages
3,132
Location
MA
Bolt distances are approximately 1 3/4 x 3 (approximate - I do not want to turn it upside down and measured from the top)

Please recheck your distances
 
OP
T

thehorse13

Well-known member
Joined
Mar 15, 2015
Messages
3,479
Location
Jefferson County, WV
Here are coupe of pictures of the stripes in both metric and Imperial. I figured out, it's easier to make pictures: if you magnify them it will be more precise measurement than what I am getting with a flashlight and a ruler (plu it shows the paint - mine is probably original)
Bolt distances are approximately 1 3/4 x 3 (approximate - I do not want to turn it upside down and measured from the top)

Please recheck your distances

I really appreciate the pictures and measurement information. Thanks to you and everyone else, I'm 100% set to re-stripe this rover when the time comes! :)
 
To avoid these ads, REGISTER NOW!
Top Bottom