
You are using an out of date browser. It may not display this or other websites correctly.
You should upgrade or use an alternative browser.
You should upgrade or use an alternative browser.
1937 Blackhawk Red Rover Restoration
- Thread starter thehorse13
- Start date
OP
thehorse13
Well-known member
This will be a paint job. I'm pretty handy with a spray gun and/or rattle can.Any time. Are you planning to paint it or powdercoat it?
OP
thehorse13
Well-known member
In between my assigned Christmas duties, I was able to sneak this pile of hardware into the ultrasonic cleaner. This is a Horrible Freight special but works surprisingly well when you heat up simple green in the solution tank.
A lot of this hardware is leftover add ons that don't belong on the rover. This stuff will be sorted and dropped into my hardware cabinet. Some of the factory parts cleaned up nice enough to move on to detailed cleaning. The rest will require a 24 hour soak in straight Simple Green. Once complete, they'll move on to the polishing wheel.
I do plan on putting the original owner's name plate back on the box. As for the original badge, I'm really on the fence here. I know that I can restore this badge to it's original glory at this point. I'm still toying with the idea of cleaning it and leaving it alone. That decision can wait for now.
As for the steel pull handles, I'm eagerly awaiting for the pick up date. They're getting a fresh nickel plating and from what I'm hearing, they will be ready this week!
PS
Pay no mind to the vintage Snap-On 3/8ths thumbwheel. That just needed a bath after some grime got inside. It's perfectly tidy now that it had a nice hot bath.
A lot of this hardware is leftover add ons that don't belong on the rover. This stuff will be sorted and dropped into my hardware cabinet. Some of the factory parts cleaned up nice enough to move on to detailed cleaning. The rest will require a 24 hour soak in straight Simple Green. Once complete, they'll move on to the polishing wheel.
I do plan on putting the original owner's name plate back on the box. As for the original badge, I'm really on the fence here. I know that I can restore this badge to it's original glory at this point. I'm still toying with the idea of cleaning it and leaving it alone. That decision can wait for now.
As for the steel pull handles, I'm eagerly awaiting for the pick up date. They're getting a fresh nickel plating and from what I'm hearing, they will be ready this week!
PS
Pay no mind to the vintage Snap-On 3/8ths thumbwheel. That just needed a bath after some grime got inside. It's perfectly tidy now that it had a nice hot bath.
Attachments


OP
thehorse13
Well-known member
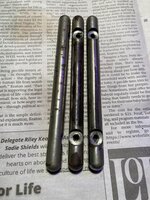
We've started down the road of making all the bright work and small bits look new again. Today you get to see the very first items in their fully restored state. I'd say these handles look beautiful now. As a side note, the plating company was 100% certain that these handles were high shine nickel plated when new. They even showed me how they could tell. Pretty nice to have confirmation of this for future restorations.
Here are the before and after photos of the drawer handles.
Here are the before and after photos of the drawer handles.
Attachments

JoCoSawdust
Well-known member
Wow!!
Those are beautiful.We've started down the road of making all the bright work and small bits look new again. Today you get to see the very first items in their fully restored state. I'd say these handles look beautiful now. As a side note, the plating company was 100% certain that these handles were high shine nickel plated when new. They even showed me how they could tell. Pretty nice to have confirmation of this for future restorations.
Here are the before and after photos of the drawer handles.
OP
thehorse13
Well-known member
Given how beautiful the pull handles came out, I've decided to bring the original badge back to brand new condition.And I think restoring that badge would be sweet. I had the same contemplation with an arbor press badge I restored but in the end I was quite glad I did. The bright brass really glistened as a finishing touch.

don long
Well-known member
You are moving thru this project pretty well Horse.
Those handles will look like a million $$$ on the box when it's done!!
Those handles will look like a million $$$ on the box when it's done!!
OP
thehorse13
Well-known member
The down side of plating is that it's expensive. These were 50 bucks a piece but that's far cheaper than I could have ever done this for on my own. The home plating kits are around 500 bucks and they produce sub par results. Sometimes you have to know when to farm out work.Handles look great!!! If it's not a secret, how much did it cost you ? (mine are not in the best shape either...)

Farmer J.
Well-known member
Yea, agreed. If the available budget for a project can stretch to it then sending parts off for professional finishing is well worth it. Greatly enhanced result considering the percentage of total input to a project.The down side of plating is that it's expensive. These were 50 bucks a piece but that's far cheaper than I could have ever done this for on my own. The home plating kits are around 500 bucks and they produce sub par results. Sometimes you have to know when to farm out work.
In my last Land Rover rebuild I just sent every steel part of the vehicle body off to be galvanised.


RTM
Well-known member
My eyes, I'm blindedHere are the before and after photos of the drawer handles.
don long
Well-known member
I find that the more pieces I send in for chrome the less per piece I pay. So I'm always working 2 or 3 projects at a time for chrome. I have the chrome done and waiting on me for the pedal car, An Alemite oiler and my phone booth right now while I'm working on cars and trucks lol
OP
thehorse13
Well-known member
Yea, this is a small shop located off the beaten path just north of the D.C. city limits. I'm sure you know the backdrop. An old forgotten neighborhood that you can tell was beautiful 100 years ago but now looks worn down, dirty and tired. The gruff but kind lady who runs the front end of the operation told me that they discount volume jobs and repeat customers. I love places like this and their work speaks for itself. I will surely be back.I find that the more pieces I send in for chrome the less per piece I pay. So I'm always working 2 or 3 projects at a time for chrome. I have the chrome done and waiting on me for the pedal car, An Alemite oiler and my phone booth right now while I'm working on cars and trucks lol
OP
thehorse13
Well-known member
I'm no stranger to refurbishing and restoring badges on old toolboxes. This one is going to be another hand painted restoration but in addition to painting, you can see that I have another issue to solve as well.
It appears that this badge is bronze, which was very popular in the art deco era. Another opinion is that the badge may be brass but either way, it's non magnetic and should fix up just the same no matter the material. It appears that someone tried to fix these mounting pins in the past but it didn't work out very well. I've poked at it with a razor and super glue flakes came off. There also appears to be some sort of solder sweating remains which is going to be my play here.
Now, feel free to chime in with any suggestions you may have. Constructive criticism is something that I welcome.
1) Dip the badge and pins to remove all paint and residues.
2) Remove as much of the scuffs/scrapes as I can with careful sanding.
3) Properly solder the pins back on the badge.
4) Using several learned techniques, hand paint all the gray, red and black parts of the badge.
5) Post the results here for cheers or flames.
Also, I did have a chance to look over the original locks and hardware. Sadly, most of them are damaged beyond repair. The original name plate and a few various small parts can be salvaged but I do have period correct locks so nobody will ever know the difference. I don't plan on locking this box so it's not a big deal to me.


It appears that this badge is bronze, which was very popular in the art deco era. Another opinion is that the badge may be brass but either way, it's non magnetic and should fix up just the same no matter the material. It appears that someone tried to fix these mounting pins in the past but it didn't work out very well. I've poked at it with a razor and super glue flakes came off. There also appears to be some sort of solder sweating remains which is going to be my play here.
Now, feel free to chime in with any suggestions you may have. Constructive criticism is something that I welcome.
1) Dip the badge and pins to remove all paint and residues.
2) Remove as much of the scuffs/scrapes as I can with careful sanding.
3) Properly solder the pins back on the badge.
4) Using several learned techniques, hand paint all the gray, red and black parts of the badge.
5) Post the results here for cheers or flames.
Also, I did have a chance to look over the original locks and hardware. Sadly, most of them are damaged beyond repair. The original name plate and a few various small parts can be salvaged but I do have period correct locks so nobody will ever know the difference. I don't plan on locking this box so it's not a big deal to me.
Last edited:
Farmer J.
Well-known member
Sounds like a good strategy and I look forward to seeing your results.
The front of the badge is scratched and scuffed, but not so deep to be beyond refinishing IMHO. Personally I wouldn't have the patience to bother with the pins on the back and just fix it with double sided tape, but that's why your restorations are better finished than mine!!
Go at it Horse
The front of the badge is scratched and scuffed, but not so deep to be beyond refinishing IMHO. Personally I wouldn't have the patience to bother with the pins on the back and just fix it with double sided tape, but that's why your restorations are better finished than mine!!
Go at it Horse
kaymccampbell
Well-known member
Sounds like a plan.
OP
thehorse13
Well-known member
This is a somewhat boring update but the process of prepping the original badge has begun. Uncut Simple Green will eat paint and so the hope is that I will prove or disprove that this badge has some nickel plating.

OP
thehorse13
Well-known member
It's conversation time. Y'sguy has a beautiful Blackhawk box that he restored. He's also well known for reproducing Blackhawk badges for those of us who can't source originals. I had a conversation with him about painting Blackhawk badges and he said something that got me thinking. The theory is that original badges where nickel plated first and then painted. Hmmmmm....
Now, I love a good theory and even more so, good supporting evidence. Any difference of opinion and/or other evidence is certainly welcome here.
Have a look at the paint lifting off of this original badge. From what I'm seeing here, Blackhawk badges started life as a blank bronze disk that went into a nickel plating tank. Afterwards, it went through an engraving process where the hex pattern, Indian head and lettering were cut into the badge. After that, they painted everything that was recessed. This painting process is the only piece of the puzzle missing and I really wish I had it.
Now, because I know how nickel plating works, this badge will not be going through that process. I'm going to simulate the plating with nickel paint. From there, I will hand paint all of the other recesses and in the end, a nice blast of clear coat will be used to seal things up. There's no way for me to reproduce the original process without a blank, engraving machine and the missing paint process but I'm very confident that I can get this badge looking like a million bucks.

Now, I love a good theory and even more so, good supporting evidence. Any difference of opinion and/or other evidence is certainly welcome here.
Have a look at the paint lifting off of this original badge. From what I'm seeing here, Blackhawk badges started life as a blank bronze disk that went into a nickel plating tank. Afterwards, it went through an engraving process where the hex pattern, Indian head and lettering were cut into the badge. After that, they painted everything that was recessed. This painting process is the only piece of the puzzle missing and I really wish I had it.
Now, because I know how nickel plating works, this badge will not be going through that process. I'm going to simulate the plating with nickel paint. From there, I will hand paint all of the other recesses and in the end, a nice blast of clear coat will be used to seal things up. There's no way for me to reproduce the original process without a blank, engraving machine and the missing paint process but I'm very confident that I can get this badge looking like a million bucks.
kaymccampbell
Well-known member
Have you considered using one of those nickel plating swab things for touching it up? A cheap Chinese power supply, a couple alligator clips and the chemical. I used to use a bastardized battery charger to do bumpers, back when we had bumpers. Dated myself, didn't I?
4xdog
Well-known member
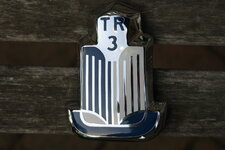
There are companies in the UK who restore automobile badges to a very high standard. Probably folks here who do the same. although my experience is in the UK. Here's the original head badge from my 1962 Triumph TR3 before and after restoration. They do things as original -- hard enamel and all. Not cheap, but very nice. In case you wanted to go completely over the top on your badge...
before:

after:
before:
after:
OP
thehorse13
Well-known member
I did consider getting nickel plating gear for this project, however, Mrs. Horsey was less than enthused with this 'idiotic' idea. I'd prefer to survive long enough to complete this restoration so I am going to go with paint and my perceived ability to paint things. lolHave you considered using one of those nickel plating swab things for touching it up? A cheap Chinese power supply, a couple alligator clips and the chemical. I used to use a bastardized battery charger to do bumpers, back when we had bumpers. Dated myself, didn't I?
kaymccampbell
Well-known member
This is not the tanks of boiling corrosive\caustic chemicals, and awful stinks deal. It fits in a hat box, and is pretty easy.I did consider getting nickel plating gear for this project, however, Mrs. Horsey was less than enthused with this 'idiotic' idea. I'd prefer to survive long enough to complete this restoration so I am going to go with paint and my perceived ability to paint things. lol
Farmer J.
Well-known member
I get the impression that Horse is (quite reasonably) more afraid of causing domestic disharmony than of boiling corrosive/caustic chemicals..
The other thing you could do is sand the surface really smooth to a mirror finish. Then hand paint everything. After that clear coat over it all, bare metal included. That would give you a bright and shiny surface without having to plate it.
OP
thehorse13
Well-known member
Can you throw a link in here? If I can get away with it...I will.This is not the tanks of boiling corrosive\caustic chemicals, and awful stinks deal. It fits in a hat box, and is pretty easy.
Thanks
Lookin4'67Galaxieconv
Well-known member
I did consider getting nickel plating gear for this project, however, Mrs. Horsey was less than enthused with this 'idiotic' idea. I'd prefer to survive long enough to complete this restoration so I am going to go with paint and my perceived ability to paint things. lol
If the chemicals don't get you, the missus will!

kaymccampbell
Well-known member
Here's one. I can't swear to it's efficacy, as my experience was decades before wall warts, but the voltage sounds about right.Can you throw a link in here? If I can get away with it...I will.
Thanks
OP
thehorse13
Well-known member
The link didn't post. lolHere's one. I can't swear to it's efficacy, as my experience was decades before wall warts, but the voltage sounds about right.
kaymccampbell
Well-known member
OP
thehorse13
Well-known member
I can't say no to this at less than 50 bucks. The novelty of playing with this thing alone makes it worth it. I can also easily conceal this in my existing junk pile so I have a very low risk exposure of being beaten to death with it! Thanks for the link!One more time, with feeling.
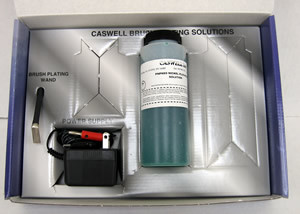
Plug N' Plate Nickel Kit
caswellplating.com
For everyone else,
The Simple Green soak has done its job. I have some very minor pick work to do and then we're all going to see what a sub 50 dollar nickel plating kit will do to the badge. At worst, I can always paint it like I originally intended but as of now, we're all going to be doing a science experiment.
Did you see this thread?
https://www.garagejournal.com/forum/threads/anyone-successfully-nickel-plate-anything.507267/
Kevin
https://www.garagejournal.com/forum/threads/anyone-successfully-nickel-plate-anything.507267/
Kevin
OP
thehorse13
Well-known member
Here's a quick update before I'm plunged head first into the madness of the holiday season.
This is what the badge looks like after a nice bath in undiluted simple green. I also tacked the badge mounts in place with good old JP weld. Believe it or not, this stuff holds incredibly well. Unfortunately I had to do this process twice because while the pins were setting, they moved slightly. I had to make a brace out of a wooden ice pop stick and once I did that, the pins lined up and set perfectly.
Once I got past the fun of doing the pins twice, I moved on to the face of the badge. The scuffs are a bit deep and I realized that the best I can do here is clean them up. I don't want to fill them with JB weld because I'm unsure how that would impact the next step, which is home nickel plating.
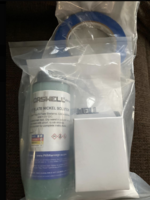
This is the 48 dollar plating kit. We're either going to see a work of art or a destroyed badge. You're all along for the ride either way.
Lastly, I finally tracked down half inch wide painters tape. This will be used to lay down perfect satin black triple stripes on the rover once we get to the painting stage.
I will report back once the badge has gone into the home nickel plating bath. Until then, Merry Christmas to all.


This is what the badge looks like after a nice bath in undiluted simple green. I also tacked the badge mounts in place with good old JP weld. Believe it or not, this stuff holds incredibly well. Unfortunately I had to do this process twice because while the pins were setting, they moved slightly. I had to make a brace out of a wooden ice pop stick and once I did that, the pins lined up and set perfectly.
Once I got past the fun of doing the pins twice, I moved on to the face of the badge. The scuffs are a bit deep and I realized that the best I can do here is clean them up. I don't want to fill them with JB weld because I'm unsure how that would impact the next step, which is home nickel plating.
This is the 48 dollar plating kit. We're either going to see a work of art or a destroyed badge. You're all along for the ride either way.
Lastly, I finally tracked down half inch wide painters tape. This will be used to lay down perfect satin black triple stripes on the rover once we get to the painting stage.
I will report back once the badge has gone into the home nickel plating bath. Until then, Merry Christmas to all.
Last edited:
kaymccampbell
Well-known member
Try it on the back first. Don't be surprised if you have to sand lightly with 600 grit, or so, paper, then buff with compound, then clean with simple green before a successful plating.
OP
thehorse13
Well-known member
That was my plan after I paint the badge up. A final buff and shine. I'm hoping that there is a little texture for the paint to bite. We're going to find out!Try it on the back first. Don't be surprised if you have to sand lightly with 600 grit, or so, paper, then buff with compound, then clean with simple green before a successful plating.
y'sguy
Well-known member
I like your progress. If it were me, I would first try block sanding with 1000-1500 without the nickel plating process. I still see the nickel remains there. Then infill painting. That would leave some of its patina, aged look. To each his own though, Good luck with the nickel though.
OP
thehorse13
Well-known member
Just today I hit it with 1000 grit. I'm hoping for some time after Christmas to give it the plating treatment.I like your progress. If it were me, I would first try block sanding with 1000-1500 without the nickel plating process. I still see the nickel remains there. Then infill painting. That would leave some of its patina, aged look. To each his own though, Good luck with the nickel though.