To avoid these ads, REGISTER NOW!

1947 Unisaw

OP
B

BradnCali

Well-known member
Joined
Mar 14, 2014
Messages
81
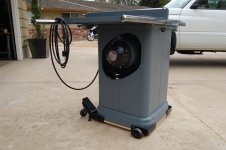
Well, I've completed the restoration...almost. It took me a bit longer, and had to redo a few things along the way but I finally got everything back together and I'm ready to make some sawdust. To start with, I wasn't happy with the Krylon grey I used to paint the motor case. One I compared it side-by-side to the cabinet, it just wasn't a close enough match so I repainted it with the Sherwin Williams color I had matched up to the dust shield, which is what I used to paint the cabinet.

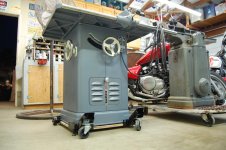
Last weekend I got the motor back together but the shaft wasn't turning. So when I pulled the end bells back off, I found that one of the brushes was broken. I don't know if I broke it during this process or not because I hadn't noticed it before but I did not find the broken off corner. Anyway, I had to order new brushes which arrived today and I took my time reassembling the motor and IT RUNS...smoothly and quietly.

Last weekend I got the arbor back together after four tries; I kept forgetting to include all the necessary parts and kept having to take it back apart. Nevertheless, even though I was frustrated with myself I persevered and was able to get this back together and installed.

In addition to getting the motor back together and installed, today did a bit of detail work. I painted red the numbers back on the front rail tube with a paint marker; painted the angle pointer and fence pointer red; finished polishing the back rail tube;installed the top and extension wings; reinstalled the serial number tag; added new switch and wiring; and installed the fence rails. I powered the saw up and ran the nickle test and she passes; though the torque on start-up does knock it over.

The only thing I have left to do is to figure out how to adjust the fence. I cannot get the fence to square up with the blade when I lock the fence in place so I'm going to have to figure out how to make those necessary adjustments.

It has been a long journey from the bucket of rust I found at the landfill in May to the final product. It may not be as good as new but I appreciate the character it has developed over the past 70 years and happy that some is still evident.

Brad
 

Attachments

  • IMG_1943.jpg
    IMG_1943.jpg
    146.4 KB · Views: 155
  • DSC_0210.jpg
    DSC_0210.jpg
    141.1 KB · Views: 141
  • DSC_0221.jpg
    DSC_0221.jpg
    138.5 KB · Views: 168
  • DSC_0228.jpg
    DSC_0228.jpg
    144.7 KB · Views: 135
To avoid these ads, REGISTER NOW!
OP
B

BradnCali

Well-known member
Joined
Mar 14, 2014
Messages
81
What kind of de-rusting process did you use on the top? It looked pretty rough in the before photos.

Thanks dkroth. I started with WD40 and a razorblade to knock the heaviest rust and assorted ***** particles from all the rats nest that were built on it. I followed that it up with an electrolysis bath for a few days and after electrolysis, I rinsed it off with simple green and a nylon brush. I broke out the WD40 again, this time for use with increasingly fine-grade wet/dry sandpaper. I might have hit the heavily pitted areas with a wire wheel on my angle grinder but I don't recall for sure as its been awhile since I worked on it. Finally, I waxed it with Johnsons Furniture Wax and my car polisher.

You can see some of those steps in the photos below which I believe represent the sequence though not all the steps in the process. It is by no means perfect but is perfect enough for my needs.

Brad
 

Attachments

  • IMG_0582_2.jpg
    IMG_0582_2.jpg
    90.1 KB · Views: 91
  • IMG_0609.jpg
    IMG_0609.jpg
    145.4 KB · Views: 84
  • IMG_0819.jpg
    IMG_0819.jpg
    145.6 KB · Views: 89
  • IMG_0833.jpg
    IMG_0833.jpg
    138.4 KB · Views: 103
  • IMG_1948.jpg
    IMG_1948.jpg
    144.6 KB · Views: 91

The Cobbler

Super Moderator
Staff member
Joined
Oct 24, 2013
Messages
25,854
Location
Niagara Region, Ontario, Canada
Well, I've completed the restoration...almost. It took me a bit longer, and had.....

The only thing I have left to do is to figure out how to adjust the fence. I cannot get the fence to square up with the blade when I lock the fence in place so I'm going to have to figure out how to make those necessary adjustments.
......

great job.. to adjust the fence to be parallel to the blade, you loosen the 2 bolts on the top of the fence near the clamp and swing the fence side to side . loosen them just enough so you can tap the fence to adjust, not so loose it flops around.
 
OP
B

BradnCali

Well-known member
Joined
Mar 14, 2014
Messages
81
Thanks all. I solved the issue with the fence. It seemed to be pretty true until you moved the fence more than about 3" away from the blade. It turned out that the front fence rail tube had a very slight bend in it to where it was pushing the fence out about 1/16th of an inch. I had previously bought a front tube at the same time I bought a new fence. I didn't use it originally because it was chrome and didn't match the original rear tube Also the end caps don't fit on this one. Anyway, I've checked and checked and now it appears to be reliably true with the replacement tube. The saw is now good to use.

Brad


Sent from my iPhone using Tapatalk
 

atthebeach

Well-known member
Joined
Mar 18, 2014
Messages
311
Location
At The Beach
BradnCali>>> What a terrific restoration. I grew up using that same model saw in my dad's shop in northern Cali. Helped him replace the arbor bearings in the late 1990's when his eyesight and knees were getting bad. In 2002 my brother donated, sold, and horse traded the larger equipment to settle the estate. He gave me the pick of hand tools, but I didn't have room for any of the larger equipment at the time. When I saw this thread, I had to wonder if this might be the same saw, but the new arbor bearings from the 1990's should have still been good....the original bearings lasted 50 years. Congratulations on the restoration and thanks for triggering some great memories.
 

Voi

Well-known member
Joined
Oct 10, 2010
Messages
5,140
Location
Western South Dakota
I wasn't happy with the Krylon grey I used to paint the motor case. One I compared it side-by-side to the cabinet, it just wasn't a close enough match so I repainted it with the Sherwin Williams color I had matched up to the dust shield, which is what I used to paint the cabinet.

Do you have that Sherwin Williams color? I have a 1943 Unisaw that I really need to get working on.

is your final color just a bit more grey than the more blue looking original color?

Also, did you chrome the height and angle adjust wheels?
 

MichaelBikel

Well-known member
Joined
Apr 11, 2015
Messages
379
Location
CT
Jealous, lets get a video! if you don't mind my asking, how much did you put into it ?
 
To avoid these ads, REGISTER NOW!

exmaxima1

Well-known member
Joined
Jun 25, 2011
Messages
6,339
Location
Midwest
Do you have that Sherwin Williams color? I have a 1943 Unisaw that I really need to get working on.

I think he said it was a "matched" paint that I take to mean it was custom blended using the computer color scanner. That would be the best/easiest way. I had that done at a Ace Hardware many years ago when I restored my '69 Unisaw, and it turned out exactly as I wanted.
 
OP
B

BradnCali

Well-known member
Joined
Mar 14, 2014
Messages
81
Do you have that Sherwin Williams color? I have a 1943 Unisaw that I really need to get working on.

is your final color just a bit more grey than the more blue looking original color?

Also, did you chrome the height and angle adjust wheels?

Sorry, I haven't replied to comments lately; I haven't had the time lately to check out Garage Journal. The color code is white 44; black 36; new green 1. It's hard for me to say if it is more grey than usual. I took the dust shield down and had them match the color and it did look close. Regardless, I'm happy with the color. For the hand wheels, it was just a matter of wet sanding (again and again) and then some time on the polisher. That it looks like chrome to you then I guess it was time well spent!
 
OP
B

BradnCali

Well-known member
Joined
Mar 14, 2014
Messages
81
What mobile base are you using?

I used a WoodRiver Universal Mobile Base I got off eBay. The only problem that I've had with it is the 3/4" plywood is bowing from all the weight which makes the screws drag on my garage floor. If you use this base, double the plywood!
 
OP
B

BradnCali

Well-known member
Joined
Mar 14, 2014
Messages
81
Jealous, lets get a video! if you don't mind my asking, how much did you put into it ?

I hadn't added my costs up to know what I spent. Off the top of my head, I had to buy a new fence and front tube for $25; belts for about $20; new wire $20; switch $10; carbon brushes $55; mobile base $65. Some of these are guesses and I had to buy numerous chemicals, solvents, cleaners, etc and I'm probably overlooking something. I'm all in though for less than $300.
 
OP
B

BradnCali

Well-known member
Joined
Mar 14, 2014
Messages
81
If we had a hand-clapping emoticon, it would be used right now.

Stellar job!

I'm honored to earn your hand-clapping emoticon! Like many on this board, I got into these old tools after seeing the work you did! :bowdown:
 
OP
B

BradnCali

Well-known member
Joined
Mar 14, 2014
Messages
81
I think he said it was a "matched" paint that I take to mean it was custom blended using the computer color scanner. That would be the best/easiest way. I had that done at a Ace Hardware many years ago when I restored my '69 Unisaw, and it turned out exactly as I wanted.

Spot on! I'd purchased a cheap HVLP gun from harbor freight and this was the first opportunity I had to use it. It was the best $10 I've spent there. I'll never use rattle cans again for big pieces like this. You get the right color and don't have to settle for close enough like you get with the cans.
 

Voi

Well-known member
Joined
Oct 10, 2010
Messages
5,140
Location
Western South Dakota
Sorry, I haven't replied to comments lately; I haven't had the time lately to check out Garage Journal. The color code is white 44; black 36; new green 1. It's hard for me to say if it is more grey than usual. I took the dust shield down and had them match the color and it did look close. Regardless, I'm happy with the color. For the hand wheels, it was just a matter of wet sanding (again and again) and then some time on the polisher. That it looks like chrome to you then I guess it was time well spent!

Thanks. Yeah the code is what I wanted. I've had people give me color matched codes to SW before, at least for house paint.

I want to leave some patina on some of the exposed parts so I might just have them match the color locally, but will take your code as a starter. The cabinet is way too far gone to try to leave any patina on it.

Thanks again.
 
To avoid these ads, REGISTER NOW!
Top Bottom