To avoid these ads, REGISTER NOW!

1981 Yamaha 550 Seca Resurrection

Max

ALLIANCE MEMBER
Joined
Jun 16, 2018
Messages
3,352
Location
Georgia
In 1981 I was able to buy my first new motorcycle. I wanted to buy a mid size street bike, and I looked at the Kawasaki GZ550, the GPZ550, the Yamaha 550 Seca, and the Suzuki GS 550. The GS seemed a bit dated to me, and I’d just had a Kawasaki 175 scrambler with middlin results so I decided on the Yamaha – a 1981 XJ550RH to be exact.

Rider Magazine has a nice retrospective on the Seca 550 here:
A quote from the article: Two things a motorcycle manufacturer has to look out for when introducing a new model: the competition and the economy. Yamaha got the competition right when it introduced the XJ550 Seca in 1981, as mid-size bikes had not been very popular during the horsepower wars of the late 1970s. Honda had recently upsized its rather boring CB550 to the CB650, while Suzuki’s GS550E had been around for quite a while. Newish but not dazzling was Kawasaki’s KZ550, which was soon slightly hotted up, with problems, for the GPZ550 version.

While this new Yamaha was the cat’s pajamas…to use a 100-year-old phrase that means it is doing what it is supposed to do extremely well. The engine had been around a while, with all problems sorted out, an in-line four with two shim-adjusted valves per cylinder and two chain-driven overhead camshafts.


The Seca makes a bit over 50 HP at 10K RPM. I am sad to say that in my younger and stupider years I was able to verify that it would do 10K RPM in top gear with a passenger which was 120 MPH plus. But I digress...

I rode the bike solid for about six years, but after I bought my 1987 FZ700 I rode it less and less. So I eventually gave the 550 to my BiL some time in the early to mid 90s. He rode it for a few years and then he parked it in his garage where it sat for the next 25 years. It was last registered in 1999 but I expect that it was sitting for a long time before the registration was allowed to expire.

So time moves on, and my BiL is cleaning out his house and downsizing, so I now have my old bike back again. It cost me $1200 to have it shipped from CA to GA which is I am certain more than it is worth. (Although it was cheaper to have it shipped than drive out there and trailer it back.) But it’s part of my personal history, an old friend, and I’d like to get it running again and ride it, so there we are.

I am calling this thread a resurrection, but I have to admit that at this point I just don’t know whether it will run again or not. I know that it needs new tires and a new chain, but I’m starting on the engine first to make sure that I can get it running without any unobtanium parts before I start spending money on the chassis.

I got my first motorcycle when I was in high school. It was a Honda "enduro" - a CL175. That was followed by a Kawasaki 175. I was generally strapped for money during this time so I did all of the maintenance and repair myself. I continued that with the Seca so working on it now is still very familiar for me. Except that due to age some things just don't disassemble like they used to...

Here she is in her current beauty:
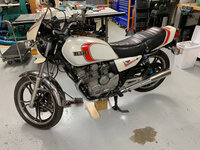
1714668245449.jpeg


I’ve got $350 of misc parts on order – a few are cosmetic, but most are for the engine. New filters, plugs, o-rings here and there, etc. As you’d expect, there are no new chassis parts available like fairings, fenders, or decals. But there are still a lot of the basic parts available so I am hopeful.

Very fortunately I saved my old valve shims and the special tool for adjusting the valves. A quick check shows that you probably can’t buy the shims any more, so it’s good that I’ve got 8-10 of them that I can swap around. Although they are a standard size and there may be shims for a later model that would work. I also still have the special tool for synchronizing the carbs as well, so that is good.

The Seca has four Mikuni 28 mm carburetors. I am starting there, as I expect them to be a mess. The first thing up is to remove the tank. Bummer. The tank while in generally good shape does have rust on the inside. I can fix that, at least I think I can “good enough” with a chain and a lot of vinegar and time. But that’s for later.

A shot of the carbs:

1714668335093.jpeg

The carbs came off about as I’d expect. The rubber boots from the air filter to the carbs look just as good (if dirtier) than when I had the bike. Good news! But the intake manifolds are showing their age with a few cracks. They are solid and the cracks do not go through, but I’d prefer no cracks as all. Hmm. New manifolds are $70+ each and I need four of them. As the manifolds are solid it looks like they’ll get a little high temp. RTV on the cracks for insurance and then back they go.

So on to the carbs themselves. I try to drain the carbs but nothing comes out. So off to remove the bottoms and then I discover that the 25+ year old gas has changed to a green oil. I had expected more of a brown varnish. But wait – one carb does have a brown oil/varnish. Why the carbs are different I have no idea.

1714668367762.jpeg

So green, olive green, dark green, and brown. Given that they all came from the same gas tank I've got no idea as to why they are all different colors.

Here are two of the float bowls:
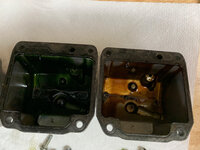
1714668453221.jpeg


I have the main and pilot jets out and I’m sure that I can clean them up ok. But I am stuck on the floats and the float valves as they simply will not move. My next step will be more carb cleaner and an attempt to get them out so I can continue on the carbs. I do have the special YICs tool that I need to synchronize the carbs, but if possible I’d really prefer to keep the carbs attached so I don’t need to synchronize them. Stay tuned for an update in a couple of days...
 
To avoid these ads, REGISTER NOW!

Nessism

Well-known member
Joined
Nov 12, 2023
Messages
184
Location
Torrance, CA
Good luck with your project! I'll be following. I've got a lot of experience with older UJM's, and carbs in particular.

Cracks in the rubber carb manifolds are a NO GO. RTV in the cracks is a fools play. Bite the bullet and buy new boots.

Regarding the carbs, do a full teardown, not just a "remove the float bowls" cleanout. You need to soak the carb bodies in carb dip to clean the internal passages.

As a hobby, I restore carbs and sell O-ring kits for old Mikuni's from that era. I've never messed with Yamaha carbs, but if you need help sourcing O-rings, don't hesitate to message me as needed.

For things like valve shims, try Z1 Enterprises. I haven't checked, but I'd be surprised if they don't have any.
 

Ohmthis

Well-known member
Joined
Jan 20, 2013
Messages
3,021
Location
Outside of Louisville KY
I’ll second what was said above. Cracks are a NO GO. You don’t want to get things together and then a leaky intake cause a lean issue and melt down a piston. As for cleaning the carbs, two words……….Ultrasonic Cleaner! Try some EvapoRust for the tank. That stuff is very good. Phosphoric acid can be used, but be very cautious. Great bike!
 

Nessism

Well-known member
Joined
Nov 12, 2023
Messages
184
Location
Torrance, CA
I use my ultrasonic cleaner as the second stage of carb body cleaning. First, Berrymans Professional Carb Dip, then the ultrasonic to wash off all the residue before assembly.

BTW, I can see some S&W shocks on this bike. When I was in college in the mid 80's, I worked at S&W. They were circling the drain at that time, and using engineering college students to keep things moving. They couldn't make payroll, which forced me to quit. And they folded sometime shortly after. It was fun while it lasted. We had late night beer and pizza parties regularly (management's way of trying to appease, not paying us.)
 
OP
M

Max

ALLIANCE MEMBER
Joined
Jun 16, 2018
Messages
3,352
Location
Georgia
I use my ultrasonic cleaner as the second stage of carb body cleaning. First, Berrymans Professional Carb Dip, then the ultrasonic to wash off all the residue before assembly.

BTW, I can see some S&W shocks on this bike. When I was in college in the mid 80's, I worked at S&W. They were circling the drain at that time, and using engineering college students to keep things moving. They couldn't make payroll, which forced me to quit. And they folded sometime shortly after. It was fun while it lasted. We had late night beer and pizza parties regularly (management's way of trying to appease, not paying us.)
i upgraded my shocks pretty quickly, so maybe 83ish. That's cool that you used to work there, although with maybe not so fond memories.
 
OP
M

Max

ALLIANCE MEMBER
Joined
Jun 16, 2018
Messages
3,352
Location
Georgia
The first set of stuff I posted was from about 5 days ago. So let me get you updated to the current status:
  • I've replaced the old battery and charged the new one. It's nice to see a neutral light again.
  • I changed the oil and filter. The old oil was thin and nasty. I used Valvoline motorcycle oil as I was afraid that synthetics might not play nice with the clutch. I do expect to change this oil relatively quickly once I get it working again.
  • I put in new spark plugs, all nicely gapped and torqued.
The carbs were a lot of "fun". Firstly, the float pins were glued into the carbs and there was no easy way to remove them. Spray type carb cleaner was just not working. So I bought a gallon can of the dip clean carb stuff.

What's the worst thing you can do with the dip carb cleaner? I figure that #1 is get it in your eyes, #2 is drink it, and #3 is knock it off your bench where it spills about 75% of the liquid on the floor of your shop. "Bob, I'll take door #3 for a huge mess..." Not fun. And it's rather nasty stuff. 5 days later I am still airing out my shop, and that's after I've cleaned the floor four times. I suspect that there is a fifth time in my future...

Also, there's no way to dip the carbs while assembled. So I unfortunately had to disassemble the set of carbs and work on each one independently. This means that I will eventually have to resynchronize the carbs. Fortunately I have the special tool, but I'll need to buy a set of gauges. Does anyone have a set that they can recommend?

Fortunately after my mess there was still enough dip left to reach the float valves. They say dip for 20 minutes, but I generally had to go 3-4 hours. Even so it was tough getting the pins out. Here are my tools:

1714678928047.jpeg

Needless to say we're talking very small taps with the hammer - which is also why I'm using a brass punch instead of steel. Although on two of the pins I did have to go to steel.. The key thing was the block of wood to support the carb posts. First I tapped the carb into the wood to get a placement and outline, and then I drilled out the holes. This gave me crucial support on the posts when I was tapping. And I have to say that I did not like the center punch as despite my using a low setting it dimpled the end of the pin. But I was unable to get the pins out until I used the punch, so need's must. In any case I was successful in getting all four of the pins out.

I very much appreciate the feedback on the intakes. I need to clarify that none of the cracks are through the maifolds but are rather just some exterior cracks. But, you shamed me into it. :) So I ordered $250 worth of intake manifolds today. While I was there I ordered new pins as well. Let's hope that Yamaha has the parts in stock still. So far I've been mostly lucky, but the flasher lens I needed was changed from "available" to "out of stock".

This is the first old bike that I've worked on. First of all, I'm really happy to see that I can get any parts at all. And they have online parts diagrams that show placement, cost, and availability so that is nice. But the downside is that the dealers have to order the parts from Yamaha and it takes Yamaha some time to send the parts out. So it may easily be 3-4 weeks before I get the parts I ordered today.

In any case I've got the carbs cleaned and re-assembled. Here they are independent but clean:

1714679763576.jpeg

And here they are all back together as a group:

1714679789498.jpeg

I really don't want to spend money on tires until I know that the engine runs. So that is on hold for the moment. Things that I'll work on next:
  • I've got to get the rust out of the gas tank. I've also got to find a place that will take nasty old gas. Fortunately I've already got a place that will recycle engine oil. Given that the carbs are on hold waiting for new manifolds I suppose that the tank is next.
  • The clutch cable is completely frozen. It doesn't look rusty at all, so I expect that it's just old oil that's gummed up the cable. I've tried a variety of lubricants but no joy so far.
 
OP
M

Max

ALLIANCE MEMBER
Joined
Jun 16, 2018
Messages
3,352
Location
Georgia
Just a quick update: Yamaha USA is out of the intake manifolds so they'll have to come from Japan. My crack, I mean parts supplier says that is typically 30-45 days. So this is not going to be a fast project. :)
 

ericm

Well-known member
Joined
Apr 17, 2016
Messages
1,963
Location
Southern Oregon
Sounds like a fun project.

Back in the '90s I owned an RZ500, which wasn't sold in the US but was sold in Canada. If I went to a dealer and asked for a part for an RZ500 they would just say no. But Yamaha was pretty good about using parts for multiple models (unlike Honda) so I could cross check the RZ500 parts fische and one for a contemporary bike like the FZ700 and often find a match. Or just order by number and see if they'd get it.

One time I went to a local California dealer for a set of carb jets (four). The old parts guy lit up when I gave him the number and said "that's for a 1969 AT125!". Most of the time I went to San Jose Yamaha. A lot of my friends did not have nice things to say about the woman who ran the parts dept there but she was great to me. One time I got done ordering and a guy was behind me patiently waiting. As I walked away I saw it was Erv Kanemoto, the famous tuner.

For parts that were RZ500 specific there was a dealer in Canada who would send me parts. But those would take a long time to get through customs.
 
OP
M

Max

ALLIANCE MEMBER
Joined
Jun 16, 2018
Messages
3,352
Location
Georgia
A friend of mine worked for a while at San Jose Yamaha in the mid 70s. He had a R5C and it seemed natural to him. He ended up getting a MBA and making a ton of money in software.

I loved my FZ700 but it was just too brutal on my wrists.
 
OP
M

Max

ALLIANCE MEMBER
Joined
Jun 16, 2018
Messages
3,352
Location
Georgia
Good luck with your project! I'll be following. I've got a lot of experience with older UJM's, and carbs in particular.
Thank you!
Cracks in the rubber carb manifolds are a NO GO. RTV in the cracks is a fools play. Bite the bullet and buy new boots.
The cracks are not all the way through. But you are right, and new ones are on order.
Regarding the carbs, do a full teardown, not just a "remove the float bowls" cleanout. You need to soak the carb bodies in carb dip to clean the internal passages.
Agreed. Before I gave my Seca to my BiL I was mostly riding my FZ. The Seca sat a lot so I am no stranger to taking these carbs apart. :) I even did some basic tuning on them at one point.
As a hobby, I restore carbs and sell O-ring kits for old Mikuni's from that era. I've never messed with Yamaha carbs, but if you need help sourcing O-rings, don't hesitate to message me as needed.
Thank you - that is a very kind offer. I am ok so far but we’ll see how it goes.
For things like valve shims, try Z1 Enterprises. I haven't checked, but I'd be surprised if they don't have any.
Thank you.
 

ChefRex

Well-known member
Joined
Jun 1, 2020
Messages
3,756
Location
NJ
Watching, I looked at the Seca when I was buying my first real street bike, I bought the GPZ, loved that bike.
I would love to find one that looks as good as yours but that doesn’t look likely not that I need any more projects.
Good luck!
 
OP
M

Max

ALLIANCE MEMBER
Joined
Jun 16, 2018
Messages
3,352
Location
Georgia
Watching, I looked at the Seca when I was buying my first real street bike, I bought the GPZ, loved that bike.
I would love to find one that looks as good as yours but that doesn’t look likely not that I need any more projects.
Good luck!
My Seca looks great from 20 feet. When you get closer you can see the road rash on the fairing and two turn signals. Not to mention rust in a variety of places. I have non-stock replacements for the turn signals and I plan on some limited body work on the fairing.

The GPz was a nice bike as well. The Rider article says that they had reliability issues but I have not heard that before.
 

driftpin

Well-known member
Joined
Dec 22, 2016
Messages
11,308
Location
Miami-Dade/Broward Co. Florida
Well, anytime on here, when you mention 'I'm rebuilding a crusty old bike,' and then you tell us it's a Yamaha midsize inline-4, I'm interested to see how things turn out. My first new Yamaha was a '72 RT-2 (360 Enduro), and along the way, I found a '71 360 Enduro, and a '73 250 Enduro. They're all awaiting their turns in the queue.

My particular fixation is the Generation 1 VMax. I've had...some. They have Mikuni CV carbs like yours, but since it's a V-4, they're downdraft, in a square-four pattern. I can do a set pretty-well by now, as things come easier if you do the same thing a dozen times, or more.

Yes to an ultrasonic cleaner for the carbs. I don't use a Berryman's pre-soak, but I suppose it can't hurt. My friend whose shop has built stock Vmaxes, big-bore VMaxes, NOS VMaxes, supercharged VMaxes, turbocharged VMaxes, and various combinations of those, uses an ultrasonic machine exclusively.

About the carb rubber 'donuts,' I'm surprised some say, 'get new ones, only.' Most of the time, the exterior cracks are only superficial. You can easily check their integrity by spraying something like starting fluid, propane, or another aerosol hydrocarbon onto the individual boots to see if the bike picks-up revs, which would indicate a penetration, and reason to yes, replace one or more. It depends on what you find, and your budget. Sure, you can buy new ones, and aftermarket ones are available, but I'd suggest hanging-onto the old ones. Yes, dressing the exterior cracks with RTV may make them look prettier, but who's examining 'em that closely?

I expect you gave the CV boots a close look-over? Shining a light from the backside can reveal a pinhole which may not be apparent from a visual inspection otherwise. I've bought aftermarket CV boots by themselves as the boots and slides combined is how Yamaha sells them and they are not cheap. Some people replace the boots by grinding-off the metal lip holding the rubber CV boot, replacing the rubber, and then using the metal ring glued back on with JB Weld. Others use a tiny pick and maybe a thin small slot screwdriver to remove/replace the CV rubber boot. I've done both, the easier one is using a pick & slot screwdriver. However, I have one CV boot which needed replacement, on which I used the grinding/JB Weld attachment method, and it's still holding-up fine > 10 years later. My longest-owned VMax is one I bought from the Ft. Lauderdale Yamaha dealer, it's now 32 years old.

When you get around to it, be sure to check the steering head for brinelling (notchiness) and lubrication. All Balls sells steering head bearing kits, which I've used with good results, or you can match them to your local bearing supply house's stock. Getting the outer race out of the steering head top & bottom can be difficult, if you don't have enough of a lip protruding to catch with a cold chisel or a driftpin. You can use a small cutoff wheel to slice the outer bearing race, or you can run a couple of weld beads opposite each other, on the outer race, and the heat from the process, coupled with a better point of placement for the cold chisel or the driftpin should make it pretty-simple to remove 'em.

My suggestion on the front end is that you use OEM fork seals rather than aftermarket. If the downtubes have any nicks, don't waste your $ on new seals, as they will soon leak as the seals get chewed-up by the rusty, corroded chrome finish. Try the Race-Tech website for replacement tubes, they have a couple different price-points. They also have bushings if your front end uses them, oil, and Gold Valve cartridge emulators which work far-better than the 1970's design damper rods do. The Gold Valve set takes a bit of fiddling to get set-up properly, but the result is a far-more compliant front fork. They sell fork spring pairs too, set for your riding weight, and the type of riding you do. Some say the Race -Tech springs are a bit harsh, so maybe go one rate softer than what the directions call-for, if you prefer a plush ride. Also taking time to set the static sag by the length of the spacers has a lot to do with the way the forks work.

Progressive Suspension uses variable-rate springs, and they are a choice of decades of riders, so that's another option.

Not sure if your forks are also using a bit of air pressure, the Gen. 1 VMax recommended pressure runs from about 5 to 15 psi. I know that I prefer the pressure with my set-up at about 12 psi. The Progressive Suspension fork springs say you don't need to run any air pressure.

I think it's a good move to get the engine operational and then spend $ for tires. It sounds like the tires are maybe from last century. If you haven't bought a battery yet, I suggest an AGM and forget about the lead-acid, so last-millenium! I actually use the lithium ion batteries, small, light, and powerful.

You know about the ATF/acetone mix for a penetrating oil, yes? Easy to do, and it works great. It may be just the thing your clutch cable needs. I'd use it in all your cables, to free 'em up. Do you have a cable lubricator attachment, which accepts a red-aerosol wand? They work great for quick and easy lubrication.

1714704081083.png

On old-style bikes without ABS, I use a reverse-flush to bleed hydraulics. I use a 60 cc syringe w/a short piece of 1/4" clear hose on it, and I push fluid up from the caliper bleeder. I use it on the VMax for its hydraulic clutch, I have found it's the easiest way to quickly have a fully-bled system. Just make sure that you keep an eye on the brake fluid level in the master cyl to prevent any paint-removing action from spilled brake fluid. Having the handlebars in a front wheel straight-ahead position seems to work best. Some bikes, like cruisers with 'pullback' bars, may need to have the master cyl/front wheel in a different position to prevent spillage.

There are many more things which could be discussed. One in closing, is to open and close the various electrical disconnects, checking for oxidation, corrosion, frayed crimps, skinned-wires, and bad grounds. Grounds should be shiny clean, and tight. You can check the alternator/generator output at the battery to see if it's putting out 13 - 14V at say 3000 rpm. Especially in a bike as-old as this, you will have grounding issues and bad wiring due to years, decades of corrosion and oxidation.

Post pics as we all like the story accompanied by pictures of what you find and how you tackle the issues you discover.
 
OP
M

Max

ALLIANCE MEMBER
Joined
Jun 16, 2018
Messages
3,352
Location
Georgia
Well, anytime on here, when you mention 'I'm rebuilding a crusty old bike,' and then you tell us it's a Yamaha midsize inline-4, I'm interested to see how things turn out. My first new Yamaha was a '72 RT-2 (360 Enduro), and along the way, I found a '71 360 Enduro, and a '73 250 Enduro. They're all awaiting their turns in the queue.

My particular fixation is the Generation 1 VMax. I've had...some. They have Mikuni CV carbs like yours, but since it's a V-4, they're downdraft, in a square-four pattern. I can do a set pretty-well by now, as things come easier if you do the same thing a dozen times, or more.

Yes to an ultrasonic cleaner for the carbs. I don't use a Berryman's pre-soak, but I suppose it can't hurt. My friend whose shop has built stock Vmaxes, big-bore VMaxes, NOS VMaxes, supercharged VMaxes, turbocharged VMaxes, and various combinations of those, uses an ultrasonic machine exclusively.

About the carb rubber 'donuts,' I'm surprised some say, 'get new ones, only.' Most of the time, the exterior cracks are only superficial. You can easily check their integrity by spraying something like starting fluid, propane, or another aerosol hydrocarbon onto the individual boots to see if the bike picks-up revs, which would indicate a penetration, and reason to yes, replace one or more. It depends on what you find, and your budget. Sure, you can buy new ones, and aftermarket ones are available, but I'd suggest hanging-onto the old ones. Yes, dressing the exterior cracks with RTV may make them look prettier, but who's examining 'em that closely?

I expect you gave the CV boots a close look-over? Shining a light from the backside can reveal a pinhole which may not be apparent from a visual inspection otherwise. I've bought aftermarket CV boots by themselves as the boots and slides combined is how Yamaha sells them and they are not cheap. Some people replace the boots by grinding-off the metal lip holding the rubber CV boot, replacing the rubber, and then using the metal ring glued back on with JB Weld. Others use a tiny pick and maybe a thin small slot screwdriver to remove/replace the CV rubber boot. I've done both, the easier one is using a pick & slot screwdriver. However, I have one CV boot which needed replacement, on which I used the grinding/JB Weld attachment method, and it's still holding-up fine > 10 years later. My longest-owned VMax is one I bought from the Ft. Lauderdale Yamaha dealer, it's now 32 years old.

When you get around to it, be sure to check the steering head for brinelling (notchiness) and lubrication. All Balls sells steering head bearing kits, which I've used with good results, or you can match them to your local bearing supply house's stock. Getting the outer race out of the steering head top & bottom can be difficult, if you don't have enough of a lip protruding to catch with a cold chisel or a driftpin. You can use a small cutoff wheel to slice the outer bearing race, or you can run a couple of weld beads opposite each other, on the outer race, and the heat from the process, coupled with a better point of placement for the cold chisel or the driftpin should make it pretty-simple to remove 'em.

My suggestion on the front end is that you use OEM fork seals rather than aftermarket. If the downtubes have any nicks, don't waste your $ on new seals, as they will soon leak as the seals get chewed-up by the rusty, corroded chrome finish. Try the Race-Tech website for replacement tubes, they have a couple different price-points. They also have bushings if your front end uses them, oil, and Gold Valve cartridge emulators which work far-better than the 1970's design damper rods do. The Gold Valve set takes a bit of fiddling to get set-up properly, but the result is a far-more compliant front fork. They sell fork spring pairs too, set for your riding weight, and the type of riding you do. Some say the Race -Tech springs are a bit harsh, so maybe go one rate softer than what the directions call-for, if you prefer a plush ride. Also taking time to set the static sag by the length of the spacers has a lot to do with the way the forks work.

Progressive Suspension uses variable-rate springs, and they are a choice of decades of riders, so that's another option.

Not sure if your forks are also using a bit of air pressure, the Gen. 1 VMax recommended pressure runs from about 5 to 15 psi. I know that I prefer the pressure with my set-up at about 12 psi. The Progressive Suspension fork springs say you don't need to run any air pressure.

I think it's a good move to get the engine operational and then spend $ for tires. It sounds like the tires are maybe from last century. If you haven't bought a battery yet, I suggest an AGM and forget about the lead-acid, so last-millenium! I actually use the lithium ion batteries, small, light, and powerful.

You know about the ATF/acetone mix for a penetrating oil, yes? Easy to do, and it works great. It may be just the thing your clutch cable needs. I'd use it in all your cables, to free 'em up. Do you have a cable lubricator attachment, which accepts a red-aerosol wand? They work great for quick and easy lubrication.

1714704081083.png

On old-style bikes without ABS, I use a reverse-flush to bleed hydraulics. I use a 60 cc syringe w/a short piece of 1/4" clear hose on it, and I push fluid up from the caliper bleeder. I use it on the VMax for its hydraulic clutch, I have found it's the easiest way to quickly have a fully-bled system. Just make sure that you keep an eye on the brake fluid level in the master cyl to prevent any paint-removing action from spilled brake fluid. Having the handlebars in a front wheel straight-ahead position seems to work best. Some bikes, like cruisers with 'pullback' bars, may need to have the master cyl/front wheel in a different position to prevent spillage.

There are many more things which could be discussed. One in closing, is to open and close the various electrical disconnects, checking for oxidation, corrosion, frayed crimps, skinned-wires, and bad grounds. Grounds should be shiny clean, and tight. You can check the alternator/generator output at the battery to see if it's putting out 13 - 14V at say 3000 rpm. Especially in a bike as-old as this, you will have grounding issues and bad wiring due to years, decades of corrosion and oxidation.

Post pics as we all like the story accompanied by pictures of what you find and how you tackle the issues you discover.
Thank you very much for the long detailed post.

I haven't gotten to the steering head yet but I will be sure to check. I really want to ensure that the engine is good before I spend too much money on new tires and other stuff. Although I am already breaking that rule as I discovered that Ebay has things like flasher lenses that are out of stock at Yamaha. :) At least visually the front forks look good and there are no nicks on the tubes. I think that my BiL rode the bike for a few months and then garaged it for three decades so there doesn't seem to be any wear past what I did to it previously.

I bought a lubricator attachment for my clutch cable and tried it out yesterday with no luck. (I used PB Blaster as the lube) The ATF/acetone mix is a great suggestion, and I think that next I'll try that in a bucket with the clutch cable for a couple of days. It looks like the cable is just gummed up as I can't see any visible rust, but the rust could all be internal and hidden. I found a spare cable on Ebay that I ordered as a backup just in case, but I am far from done on the original cable. And I already plan to hit all of the other cables up with Dri-slide.

I will be sure to include more pics as I go along as well. Next up is to drain the tank and start working on the rust. My wife is buying 4 gallons of vinegar as I type...
 

rd65

Well-known member
Joined
Sep 29, 2017
Messages
2,833
Location
Granite Falls, WA
Sweet bike, one that I would like have ridden but never had the chance. I did own a Radian for awhile and it was basically the same bike. Always sync carbs after disassembly, even if the rack isnt disturbed. I believe that style of float pin always require being driven out vs other that will slide out.
I bought a sync tool off Amazon that is a needle/gauge style (lost the mercury out of my better set). It works well but the hoses needed to be replaced immediately. They were so soft and thin that they collapsed as soon as the engine was up to temp.
Clutch plates will likely be stuck together after sitting for so many years. You may need to physically separate them to free things up.
Have fun, nothing as much fun as getting an old bike back into service.
 

driftpin

Well-known member
Joined
Dec 22, 2016
Messages
11,308
Location
Miami-Dade/Broward Co. Florida
A point of caution on the gas tank and vinegar. It's a great bio-disposable rust remover, but with that you need to be aware of when it isn't a good choice, due to ignorance of what can happen if you don't know the pitfalls of its use. Fortunately, you can circumvent the problems with a bit of forethought.

About vinegar, you can (I have) find it in increasing concentrations at the big box store like Home Depot. I bought some at 30% concentration, which is 'way-stronger than you need. That means you can buy 30% and dilute it to a much lower concentration. I usually use 6% to clean-out a rusty gas tank, and while it may take several days, it does get it shiny-clean, check it often. I recommend every 6 hours and that should be done with the gas tank stripped of any insignia, petcocks, or other through-wall penetrations, like an electrical sender/fuel level gauge or anything which is not steel. The acidic vinegar will dissolve potmetal, that would be your fuel petcock or some electrical piece inside the gas tank. Make a simple steel blank-off plate for where the fuel petcock mounts, and use a piece of rubber to seal-off the screws, a daub of Permatex or RTV on the screws will help.

Place the gas tank, stripped as I suggested, into a plastic container big-enough to hold the gas tank. Then either fill the gas tank with the diluted vinegar and let it sit, or you can leave the fuel petcock and the gas tank cap off, and fill the plastic box with the vinegar dilution. I use some concrete bricks to displace free space around the gas tank, so you don't need as-much vinegar to fill the container.

Check how well the rust removal is going every few hours, and at some point you will have a film on the once-rusty spots, inside and out, if you're immersing the entire tank in the vinegar, inside the container. A shop rag or a paper towel wiping off the once-rusty spots will show you if it needs a longer soak.

Let's say that the last time you brought the gas tank out of the solution, the rust was gone. You need to rinse the gas tank thoroughly, inside and out, and (very important!) dry it completely. Failure to do that will cause immediate flash-rust in < a half-hour!

Now is a good use for some of that used motor oil you have sitting around, replace the fuel petcock and the gas cap, and anything else that ends-up on the tank inside. Pour in a quart or two of the used motor oil, and turn the tank thoroughly to have the used oil completely coat the tank inside. You could now paint the outside if you need to or put a coat of primer on the exterior.

Electrolysis I haven't used, it's a possibility, but I'd only do it outside to avoid any tragedies from a failure of an unattended electrical appliance.

An example of 6% vinegar rust removal. Before:

1714779407266.png

After:

1714779503293.png

A Murray 'Sad Face' pedal car detail. Made from 1949-'59. I have a few vintage pedal cars.

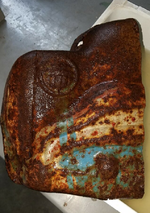
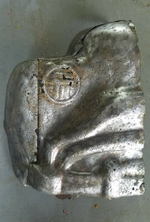
Here's a near forty year old vintage body panel from a Japanese 'muscle-cruiser.' As you can see the underside was pretty-much a mass of solid rust. The 'after' is much better! No scrubbing, no sanding, no media-blasting, just 'high-effort' soaking. :LOL: Then, a rinse.

1714779950398.png1714779967806.png

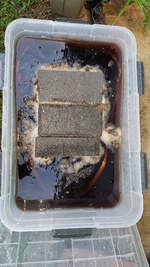
The process underway. Note the full submersion, the container, and the masonry bricks to displace vinegar/water solution.

1714780220751.png
 
Last edited:

rharman

Well-known member
Joined
Apr 22, 2012
Messages
8,904
Location
SoCal
Wow, this whole thread is a blast from the past. Yamaha 125 Enduro's, cable luber (I still have one in my tool box), Erv Kanemoto, S&W shocks, valve shims...
Thanks for the trip down memory lane.

I worked parts and later managed parts for a Yamaha dealer (HD was their primary line and Honda added later as a third line) from 1973 to 1980 and then moved to an HD only dealer. I don't remember that 550 model specifically - probably came out after I left the first dealer. I was always a Yamaha guy - rode a 125 Enduro (1971) and, later, RD350 and SR500 as well as a TT500

Looks like a fun restoration and it's a great back story.

Good luck with the project - looking forward to updates.
 
OP
M

Max

ALLIANCE MEMBER
Joined
Jun 16, 2018
Messages
3,352
Location
Georgia
A point of caution on the gas tank and vinegar. It's a great bio-disposable rust remover, but with that you need to be aware of when it isn't a good choice, due to ignorance of what can happen if you don't know the pitfalls of its use. Fortunately, you can circumvent the problems with a bit of forethought.

About vinegar, you can (I have) find it in increasing concentrations at the big box store like Home Depot. I bought some at 30% concentration, which is 'way-stronger than you need. That means you can buy 30% and dilute it to a much lower concentration. I usually use 6% to clean-out a rusty gas tank, and while it may take several days, it does get it shiny-clean, check it often. I recommend every 6 hours and that should be done with the gas tank stripped of any insignia, petcocks, or other through-wall penetrations, like an electrical sender/fuel level gauge or anything which is not steel. The acidic vinegar will dissolve potmetal, that would be your fuel petcock or some electrical piece inside the gas tank. Make a simple steel blank-off plate for where the fuel petcock mounts, and use a piece of rubber to seal-off the screws, a daub of Permatex or RTV on the screws will help.

Place the gas tank, stripped as I suggested, into a plastic container big-enough to hold the gas tank. Then either fill the gas tank with the diluted vinegar and let it sit, or you can leave the fuel petcock and the gas tank cap off, and fill the plastic box with the vinegar dilution. I use some concrete bricks to displace free space around the gas tank, so you don't need as-much vinegar to fill the container.

Check how well the rust removal is going every few hours, and at some point you will have a film on the once-rusty spots, inside and out, if you're immersing the entire tank in the vinegar, inside the container. A shop rag or a paper towel wiping off the once-rusty spots will show you if it needs a longer soak.

Let's say that the last time you brought the gas tank out of the solution, the rust was gone. You need to rinse the gas tank thoroughly, inside and out, and (very important!) dry it completely. Failure to do that will cause immediate flash-rust in < a half-hour!

Now is a good use for some of that used motor oil you have sitting around, replace the fuel petcock and the gas cap, and anything else that ends-up on the tank inside. Pour in a quart or two of the used motor oil, and turn the tank thoroughly to have the used oil completely coat the tank inside. You could now paint the outside if you need to or put a coat of primer on the exterior.

Electrolysis I haven't used, it's a possibility, but I'd only do it outside to avoid any tragedies from a failure of an unattended electrical appliance.

An example of 6% vinegar rust removal. Before:

1714779407266.png

After:

1714779503293.png

A Murray 'Sad Face' pedal car detail. Made from 1949-'59. I have a few vintage pedal cars.

Here's a near forty year old vintage body panel from a Japanese 'muscle-cruiser.' As you can see the underside was pretty-much a mass of solid rust. The 'after' is much better! No scrubbing, no sanding, no media-blasting, just 'high-effort' soaking. :LOL: Then, a rinse.

1714779950398.png1714779967806.png

The process underway. Note the full submersion, the container, and the masonry bricks to displace vinegar/water solution.

1714780220751.png

Thank you for the great information! I have not started the tank treatment yet, but I will start today or tomorrow. Like you suggest, I am using a more dilute vinegar solution (5%) and will use more time.

I am a bit leery of using full submersion as I have almost no external rust, just internal. (There is one exception on the external rust that I'll show a pic of.) I really don't want to take a chance on messing up the external paint or decals. And as you suggest, I will absolutely remove the petcock, sender, and logos from the tank.

While the tank is rusted, I am fortunate in that it isn't too bad. Here is the external part I talked about that I plan to spot treat:


1714841879964.jpeg

And then the inside looks like this:

1714841961259.jpeg

So it's rusty, but it doesn't look deep or that I'll have flakes. Of course, i have not drained out the old nasty gas yet, so based on the carbs that may take some and cleaning as well.
 

rd65

Well-known member
Joined
Sep 29, 2017
Messages
2,833
Location
Granite Falls, WA
Yamaha used to make an excellent tank derust treatment but good 'ol CA killed it. We would apply a HEAVY layer of paste wax, leaving it on and not wiped off, to the tank in case any of the solution splashed the outside of the tank. Be sure to check the tank for any pinholes after treatment.
 
  • Like
Reactions: Max
OP
M

Max

ALLIANCE MEMBER
Joined
Jun 16, 2018
Messages
3,352
Location
Georgia
Some updates today. I got my flasher lens and backup clutch cables today, so I am set on that front. And yesterday I cleaned the shop floor for the fifth time and this morning the carb cleaner smell wasn't too bad. So progress.

I also made big strides on the tank today. I poured out the gas into a can (anybody have ideas on what to do with 30 year old gas?) and then I took off the insignia, petcock, sender, and gas cap. So the tank is completely bare now.

Here is a picture of the rust left in the pan after I poured off the collected gas:

1715030332508.jpeg

I had to buy a container larger enough for my tank, as we only had stuff that went to 21" long and I needed 25". I also bought a total of 14 - yes 14, gallons of 5% vinegar. Initially I had planned to use bricks as filler but I realized that I didn't have that many. So I hit on the idea of filling up some of the empty vinegar containers with water and using them to displace the liquid. It worked well, and there are no worries about the containers scratching the paint on the tank either. So now it's just waiting and letting the vinegar do its thing.

And @driftpin - you were right. Originally I had planned to just plug the petcock and fill the tank. But the fuel sender left a 2" hole so I had to go to the full immersion approach.

1715030624600.jpeg
 
To avoid these ads, REGISTER NOW!
OP
M

Max

ALLIANCE MEMBER
Joined
Jun 16, 2018
Messages
3,352
Location
Georgia
I forgot to mention that I ordered a Carb Tune Pro 4 as well. Rather than use a liquid or gauge it uses metal slugs to show you the intake vacuum. I was going to wait to get it until I knew that the engine runs OK, but then I realized that I could use it on my injected Triumph as well, so off the order went. :)


Also, when messing around with the flasher lens, I tried the blinkers. No joy. And then I noted that the headlight is dead too. So there is obviously some electrical work that I'm going to have to do. But no worries there - it's just more work but it should be straightforward as I have schematics and meters...
 

driftpin

Well-known member
Joined
Dec 22, 2016
Messages
11,308
Location
Miami-Dade/Broward Co. Florida
About the old gas, if it is still flammable, I pour it into a shallow, wide pan and light it off.

Your local AHJ/county government may have a haz-mat drop-off site, look on the website for info.

Your corrosion doesn't look very-bad. That should clean-up nicely.

1715042198148.png

Here's what can happen if you don't remove the electrical sending unit. There was a lot more there, before! Yes, that's a blank-off plate.

About the turn signals (I assume that's what you are calling 'flashers') I suggest finding the grounds for the circuit, and checking them. Shiny, bright metal connections, and tight! It may help to clean the bottom of the bulbs with crocus cloth or some fine sandpaper. The front bulbs should have two contacts, as they are both running lights and turn signal lamps.

You should take a look at the switch pod for the turn signals, they may be corroded/dirty from near-30 years of storage and non-use. Disassemble, inspect, clean/sand them, and a smidge of dielectric grease on the copper or brass contacts to help actuate the signals. I once had a bulb burn out for a headlight, and I was sure it was a bad connection or wire. No, it was a bad bulb, even though I had recently replaced it. 'How can it be a bad bulb? I just replaced it!' I always ensure the bulb is clean and has no fingerprint or grease on it, which may cause the bulb to shatter. This one was probably defective, it worked upon installation but it failed soon. It happens.

A tip, if your headlight burns out, remove the lenses from your front turn signals, and there may be sufficient light to allow you to limp home. The running light wattage may be sufficient for that.
 

genog

Well-known member
Joined
Sep 4, 2021
Messages
2,015
Location
Silicon Valley
Watching, I looked at the Seca when I was buying my first real street bike, I bought the GPZ, loved that bike....
Me too!
I opted for the GPz in 81
xxGPz.jpg
Saw a Gorgeous 81 just like my old one parked in front of a house a few years ago...
...thought about knocking on doors and trying to buy it.

Then, that Thought went kabosh when I saw it with crash damage a week or so later.... :cry:
 
OP
M

Max

ALLIANCE MEMBER
Joined
Jun 16, 2018
Messages
3,352
Location
Georgia
About the old gas, if it is still flammable, I pour it into a shallow, wide pan and light it off.

Your local AHJ/county government may have a haz-mat drop-off site, look on the website for info.

Your corrosion doesn't look very-bad. That should clean-up nicely.

1715042198148.png

Here's what can happen if you don't remove the electrical sending unit. There was a lot more there, before! Yes, that's a blank-off plate.

About the turn signals (I assume that's what you are calling 'flashers') I suggest finding the grounds for the circuit, and checking them. Shiny, bright metal connections, and tight! It may help to clean the bottom of the bulbs with crocus cloth or some fine sandpaper. The front bulbs should have two contacts, as they are both running lights and turn signal lamps.

You should take a look at the switch pod for the turn signals, they may be corroded/dirty from near-30 years of storage and non-use. Disassemble, inspect, clean/sand them, and a smidge of dielectric grease on the copper or brass contacts to help actuate the signals. I once had a bulb burn out for a headlight, and I was sure it was a bad connection or wire. No, it was a bad bulb, even though I had recently replaced it. 'How can it be a bad bulb? I just replaced it!' I always ensure the bulb is clean and has no fingerprint or grease on it, which may cause the bulb to shatter. This one was probably defective, it worked upon installation but it failed soon. It happens.

A tip, if your headlight burns out, remove the lenses from your front turn signals, and there may be sufficient light to allow you to limp home. The running light wattage may be sufficient for that.
I figured out that the lack of a headlight is because the engine isn’t running so the headlight relay is off. :)

But the turn signals should be working with the key on so I’ll hit them tomorrow. And yeah, Yamaha calls them flashers when you look at the parts diagram so I used their term. Sorry for any confusion. And yes, I agree that grounds and the switches are good places to start.

My neighbor has a Land Cruiser addiction problem (he’s up to 3) so when I’m done with the tank I’m going to ask him if he needs to de-rust anything. Although he may need a tank the size of a dumpster. :)
 
OP
M

Max

ALLIANCE MEMBER
Joined
Jun 16, 2018
Messages
3,352
Location
Georgia
More misc work today:
- The turn signals work now, as well as the rear light and brake light. The issue was just a bit of corrosion in the turn signal switch, and exercising it a bit cleaned it up so it works great.
- The tank is at 20+ hours and I think it still has a good ways to go. I can't see into the tank very well but I can see rust on the rim of the tank fill and it's still there.
- I replaced the clutch cable and it works the way you'd expect. Whether that is actually disengaging the clutch plates or not I won't know until I can get the engine running. But the cable, clutch springs, etc. are clearly working correctly.
- As I noted earlier I've got the intake manifolds on order. But I also can't see any cracks that go through the manifolds. So I've decided to use the old ones to validate that the engine works and then replace them when the new ones come in.

While I'm waiting for the tank to clean up I've decided to start on some cosmetic stuff as well. There are two Yamaha emblems on the tank, one on each side. They look like this:

1715100459945.jpeg

If you look closer at the right badge it's actually broken and some of the "H" as well as the back is gone:


1715100494501.jpeg

I decided to use metal tape as a backer so I could epoxy the gap:

1715100570620.jpeg

And here they are with epoxy on the cracks of the bottom one as well as the fill on the upper:

1715100614682.jpeg

After I took this picture I noticed that there were more cracks on the lower one, as well as the upper one. So while it isn't shown in these pics I have strengthened all of the cracked areas.

Once the epoxy is solid (tomorrow) I'll file the one area to clean and shape it. Then I'll spray them with gold metallic paint, hand paint the black back in, and hit it all with several coats of clear. Hopefully that will hold it for another 43 years.
 

driftpin

Well-known member
Joined
Dec 22, 2016
Messages
11,308
Location
Miami-Dade/Broward Co. Florida
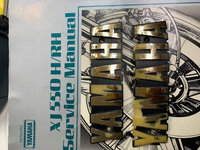
Oh you have the wrong one! AHAMAY, you need the opposite one.

A good job on the 'make it work' fix. It takes a bit of time, and some supplies and skill to make it work, but I bet you'll be happy with the appearance, once done. I suggest you use a flat black, and a matte clear as I bet the appearance will be a better fit once all is done.

About the vinegar, don't be afraid to take the tank out and to empty it, to inspect it, and then to re-fill it. The vinegar can be used repeatedly, so store it in a plastic 5 gal gas container, suitably labelled and use it for whatever else is needing rust treatment.

Some ideas, use or discard:
One of the great uses for baking soda or cleaning soda is in a pressurized tank, to spray something having rust pits, like an exhaust system. I also use that equipment for cleaning carburetor bodies, and the inside of the float bowls. A work of caution, getting the sodium bicarbonate onto your grass is like the Roman Legions did to their enemies, 'salting the earth,' to make it dead to growing anything. Harbor Freight I saw just had one of their bicarb. of soda pressurized systems on close-out. That's what I have, and it works great for me. I was pleased with it when I did my first chrome exhaust system. The pits get scoured clean, and then you can refinish them however you want.

A cheap way to temporarily treat the pits after media blasting is to make a ball of tinfoil, and to rub it into the pits of the chrome finish. It's nothing that is going to look like new chrome, but it costs nearly-nothing, and it does improve the appearance.

Martin Seymour, the inventor of 'rattle cans' of spray paint, makes what I consider one of the good products to make aluminum castings look great again. It's called 'Alumi Blast,' and with a bit of care you can make your bare aluminum diecast pieces look really-good. I buy it at a local auto parts store. Like any paint job, the more time you put into prep work, the better your results using the spray can will be.

1715103887989.png

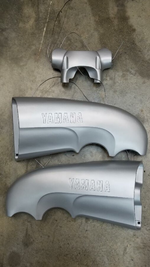
Some fellow Yamaha pieces, polished and clear-coated from the factory. When the clear-coat started bubbling, I sanded them down, and used the Martin Seymour Alumi-Blast silver paint for aluminum. I removed the clear coat with airplane paint stripper and sanding. After my home-remedy work.

1715105796752.png

I had another set of the Yamaha airhorns which a previous owner had chromed. As it frequently does, over time, the chrome lifted. When I got them I took 'em to a local chrome-plater to remove the chrome and then I used the Alumi-Blast. Much better, and far-cheaper than re-chroming.

For not-shiny painting of things like engine cases, I use the Ford engine paint, from one of the major paint spray can suppliers. Again, prep is the word to having a decent finish.

1715104252412.png
This one is flat black. Duplicolor DE1654-3 PACK Engine Enamel Paint w/ Ceramic, Flat Black-12oz Aerosol

There is a gloss black engine paint also.
1715104732611.png
Duplicolor DE1613(2PACK) Engine Enamel Paint Gloss Black 12 oz Can

I use a small pressurized sandblasting tank and kiln-dried sand, in bags to sandblast. The sand comes in different grades, I use a medium grade.

If you do it on a canvas or other dropcloth, you may be able to screen the sand for re-use.

Sandblasting an engine out of the frame. Before.

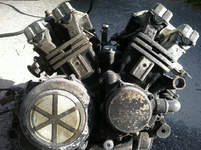
1715105031906.png

After.

1715105089460.png

Painted with the flat black engine paint, gold areas/pieces are powder-coated.

1715105179706.png

Powder-coating by a local shop.
1715105299800.png
 
Last edited:

acer66

Well-known member
Joined
Dec 4, 2010
Messages
4,418
Location
Western North Carolina
A bit too late to the party to wish you luck since you seem to have it sorted out.

I liked the look of that time period.
I had XS400 78ish myself back in the day.

Have to read the whole thread later but the engine looks great.
 
  • Like
Reactions: Max
OP
M

Max

ALLIANCE MEMBER
Joined
Jun 16, 2018
Messages
3,352
Location
Georgia
Oh you have the wrong one! AHAMAY, you need the opposite one.

A good job on the 'make it work' fix. It takes a bit of time, and some supplies and skill to make it work, but I bet you'll be happy with the appearance, once done. I suggest you use a flat black, and a matte clear as I bet the appearance will be a better fit once all is done.

About the vinegar, don't be afraid to take the tank out and to empty it, to inspect it, and then to re-fill it. The vinegar can be used repeatedly, so store it in a plastic 5 gal gas container, suitably labelled and use it for whatever else is needing rust treatment.

Some ideas, use or discard:
One of the great uses for baking soda or cleaning soda is in a pressurized tank, to spray something having rust pits, like an exhaust system. I also use that equipment for cleaning carburetor bodies, and the inside of the float bowls. A work of caution, getting the sodium bicarbonate onto your grass is like the Roman Legions did to their enemies, 'salting the earth,' to make it dead to growing anything. Harbor Freight I saw just had one of their bicarb. of soda pressurized systems on close-out. That's what I have, and it works great for me. I was pleased with it when I did my first chrome exhaust system. The pits get scoured clean, and then you can refinish them however you want.

A cheap way to temporarily treat the pits after media blasting is to make a ball of tinfoil, and to rub it into the pits of the chrome finish. It's nothing that is going to look like new chrome, but it costs nearly-nothing, and it does improve the appearance.

Martin Seymour, the inventor of 'rattle cans' of spray paint, makes what I consider one of the good products to make aluminum castings look great again. It's called 'Alumi Blast,' and with a bit of care you can make your bare aluminum diecast pieces look really-good. I buy it at a local auto parts store. Like any paint job, the more time you put into prep work, the better your results using the spray can will be.

1715103887989.png

Some fellow Yamaha pieces, polished and clear-coated from the factory. When the clear-coat started bubbling, I sanded them down, and used the Martin Seymour Alumi-Blast silver paint for aluminum. I removed the clear coat with airplane paint stripper and sanding. After my home-remedy work.

1715105796752.png

I had another set of the Yamaha airhorns which a previous owner had chromed. As it frequently does, over time, the chrome lifted. When I got them I took 'em to a local chrome-plater to remove the chrome and then I used the Alumi-Blast. Much better, and far-cheaper than re-chroming.

For not-shiny painting of things like engine cases, I use the Ford engine paint, from one of the major paint spray can suppliers. Again, prep is the word to having a decent finish.

1715104252412.png
This one is flat black. Duplicolor DE1654-3 PACK Engine Enamel Paint w/ Ceramic, Flat Black-12oz Aerosol

There is a gloss black engine paint also.
1715104732611.png
Duplicolor DE1613(2PACK) Engine Enamel Paint Gloss Black 12 oz Can

I use a small pressurized sandblasting tank and kiln-dried sand, in bags to sandblast. The sand comes in different grades, I use a medium grade.

If you do it on a canvas or other dropcloth, you may be able to screen the sand for re-use.

Sandblasting an engine out of the frame. Before.

1715105031906.png

After.

1715105089460.png

Painted with the flat black engine paint, gold areas/pieces are powder-coated.

1715105179706.png

Powder-coating by a local shop.
1715105299800.png

Lots of great advice - thank you. Also some very nice work yourself.

The emblems are no longer obtainable from either Yamaha or Ebay, so if I want them to look good I've got to fix them myself.

Fortunately my cases are in reasonable shape cosmetically. However three are are several covers (clutch, generator, starter) that I will want to redo. Since the area isn't that large I'll probably remove any remaining clear coat and use Happich Semi-Chrome to clean it up and then clear coat again. I've used sime-chrome in the past and it puts a nice shine on Al. Although one cover will need paint as well for the logo. BTW, I like your idea of a flat black and a matte clear.

Oh, and I'll work on the AHAMAY emblem and see if I can fix that. :)
 
OP
M

Max

ALLIANCE MEMBER
Joined
Jun 16, 2018
Messages
3,352
Location
Georgia
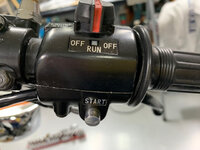
Some fun updates. First of all, yesterday I thought that I'd at least turn the engine over (no fuel) and see that the starter works. And then I saw this:

1715201936301.jpeg

Fortunately I can still buy the switch assembly. But it's $90 and it will take 1-2 months to get. So I'm looking at it and thinking, "it still has the spring and contacts, so all I need is a new button...". And if I have to replace the switch anyway, I can't really mess anything up...

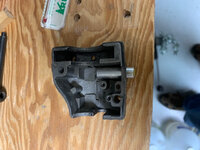
Here is inside the switch: (the switch is at the bottom of the pic)

1715202019093.jpeg

And here is the shot of the switch with everything else out of the picture:

1715202116729.jpeg

And here is the switch apart. It's a pretty standard momentary switch - the button is one side of the circuit, and when you press the button in it touches the contact that the spring keeps apart. There is a small insulator around the central contact that keeps the spring from shifting and shorting out the switch. That "C" is what's left of the old switch. (The washer to the right is not part of the switch so sorry for any confusion.) The button is kind of shaped like a "T" so that it can't escape the body of the switch once you put in the spring.

1715202239060.jpeg

Around this time I remembered that I had some 3/8" Al rod left over from another project. And that Al machines so easy I could probably chuck it in the drill press and file it down to what I needed. So here is the prototype before I shortened the rod:

1715202371602.jpeg

Once I roughly filed down the piece I moved to a finer file, then 600 grit, then 1500 grit, and then Semi-chrome on a paper towel. And here is the final switch back in place:

1715202398672.jpeg

So now my starter switch is made from billet Aluminum. :) And yes it works, and even better the starter does as well. Although it cranks louder than I remember, which hopefully is just due to not having any oil in there for 25 years and it will get better once I crank it more.

I also pulled out the gas tank from the vinegar bath. In the GA humidity the flash rust was more like a couple of minutes instead of 30 minutes. I did the best I could, and it's got a quart of oil on the inside hopefully keeping it rust free. It looks like most of the paint made it ok, although the vinegar did take off the over spray that was on the bottom of the tank. I'll have to hit that with something before I put it back so it doesn't rust more as right now it's just got oil on it. More pics on that in a couple of days, as I've got a bunch of other stuff to do tomorrow.
 

rharman

Well-known member
Joined
Apr 22, 2012
Messages
8,904
Location
SoCal
< snip >

Oh, and I'll work on the AHAMAY emblem and see if I can fix that. :)

< /snip >

You might try turning and facing the other way when you apply them. :bounce:
Of course, that means you have to work with your hands behind your back.

Trust me, I know things - My dad taught me about left and right hand nails way back in the day.... :cool:
 
OP
M

Max

ALLIANCE MEMBER
Joined
Jun 16, 2018
Messages
3,352
Location
Georgia
You might try turning and facing the other way when you apply them. :bounce:
Of course, that means you have to work with your hands behind your back.

Trust me, I know things - My dad taught me about left and right hand nails way back in the day.... :cool:
I'll just use my left hand monkey wrench. I keep it near the snipe pens. :)
 
OP
M

Max

ALLIANCE MEMBER
Joined
Jun 16, 2018
Messages
3,352
Location
Georgia
Last edited:

Fixr

Well-known member
Joined
Dec 23, 2012
Messages
9,709
Location
SW VA
You might try turning and facing the other way when you apply them. :bounce:
Of course, that means you have to work with your hands behind your back.

Trust me, I know things - My dad taught me about left and right hand nails way back in the day.... :cool:
Which side of the barn do the left-handers go on?
 

rharman

Well-known member
Joined
Apr 22, 2012
Messages
8,904
Location
SoCal
You might try turning and facing the other way when you apply them. :bounce:
Of course, that means you have to work with your hands behind your back.

Trust me, I know things - My dad taught me about left and right hand nails way back in the day.... :cool:

Which side of the barn do the left-handers go on?

Well, obviously the ones with the pointy end to the left when you pick them up go on your left-hand side....
Jeesh, do I have to explain everything? :cool:
 

Nessism

Well-known member
Joined
Nov 12, 2023
Messages
184
Location
Torrance, CA
Carb Tune is awesome! Good pickup!

Before derusting the tank, you must remove the gasoline varnish. The acid will not remove that effectively. Carb cleaner spray may help, but keep it off the paint.

And something is wrong with your carbs; the float bowl drains are angled incorrectly. It could be as simple as the bowls being installed incorrectly (1&2 swapped with 3&4), or you have the carbs miss ordered during assembly.

It's too late, but this rebuild tutorial may help with some fine details. It's about Suzuki carbs, but many elements are the same as yours.

 
  • Like
Reactions: Max
OP
M

Max

ALLIANCE MEMBER
Joined
Jun 16, 2018
Messages
3,352
Location
Georgia
Carb Tune is awesome! Good pickup!
Thanks. I was kind of nervous about it, but the reviews are good. Unless I spent a lot of money for a digital unit it seemed the best.
Before derusting the tank, you must remove the gasoline varnish. The acid will not remove that effectively. Carb cleaner spray may help, but keep it off the paint.

And something is wrong with your carbs; the float bowl drains are angled incorrectly. It could be as simple as the bowls being installed incorrectly (1&2 swapped with 3&4), or you have the carbs miss ordered during assembly.
I tried to keep the parts for each carb with each carb but it's certainly possible that I made a mistake with the float bowls. I'm pretty certain that the carbs are not misordered though as they'll mostly only go together one way. It's possible to swap 2 and 3 I think, but 1 and 4 are clear from where they fit on the fuel chain. I did label them as I took them off the rail as well.

I appreciate your input, and I'll check it out and see.
It's too late, but this rebuild tutorial may help with some fine details. It's about Suzuki carbs, but many elements are the same as yours.

Thank you - I'll give it a look.
 
To avoid these ads, REGISTER NOW!
Top Bottom