To avoid these ads, REGISTER NOW!

2 Sluggo's Garage

Bob Heine

ALLIANCE MEMBER
Joined
Oct 24, 2009
Messages
10,703
Location
Boca Raton, Florida
Nice memory Bob and I can understand why you wanted t draw that car with it's very fluid lines. That would have been the Phaeton model. Here's a picture of one very nice example.
Another very rare vehicle. Wouldn't this be the best fun ever to take the family out on a sunny day with the top down.
RM2, it's funny how my six-decade-old memories seem to be OK. Last week, not so much.

Taking the family out on a sunny day with the top down triggered another memory -- putting the top down. The '37 Phaeton had glass roll-up side windows and my neighbor thought it would be tight enough for winter driving. His wife, a German war bride wasn't at all impressed with the car and wanted nothing to do with it (memories of Nazi staff cars may have been part of that). I remember him being near hysterical putting the top back up. It obviously wasn't a one-man job and required more than pushing a button. Getting the side pillars in and out probably wasn't real easy either. My neighbor owned that car for a very short time. Maybe a week, maybe a month or two but it really made an impression on me. The top went down once and I can't be sure if he ever got it back up -- he may have sold it with the top down.
1937%20Ford%20Phaeton_zpsf7tezpyg.jpg


Our PT Cruiser is my homage to that memory...
04CruiserFront.jpg

spaceout.gif
 
To avoid these ads, REGISTER NOW!
OP
R

rmalkow2

Well-known member
Joined
Jun 26, 2009
Messages
4,087
Location
Brighton, MI
This weeks garage project has been to finish up a fabrication/welding table that I've had in mind and to use or re-purpose as much as possible from around the garage/house.
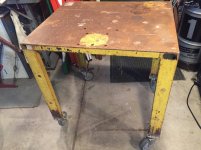
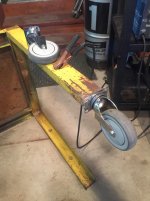
I've had this old heavy steel table that was bought at auction a few years ago and always had in mind to fix it up for my use. It's not too big, 33" x 27" but big enough for my garage and projects. It came pretty crusty looking with remnants of old yellow paint and has gotten worse over the past couple years as I kept moving it around in storage and finally it had to spend last winter outside so a lot of clean up was needed now.

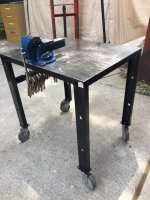
The first upgrade was to raise it a little higher for me and to get it rolling around on wheels. I had a set of good casters (one that locks) and proceeded to tack weld those on the the leg bottoms. This made the overall height 35" and much more comfortable for my size. And now it rolls freely.

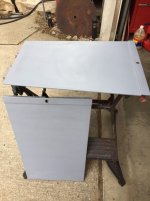
Next was a total wire brushing with the wire wheel cup on a grinder to remove all loose paint and rust, a good wipe down to remove dirt, dust, grime and, then a paint job using some Rustoleum matte black paint that has been on the shelf for a long time waiting for such a purpose. One cheap HF 1" paint brush was sacrificed in this effort and served its purpose well.

The top was also wire brushed and then gone over again with a flap disc on the grinder to clean it up and give a little character.

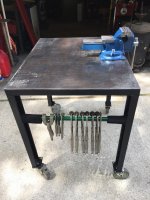
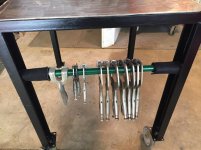
A steel tube that was another auction purchase turned out to be just the thing for a cross bar to hold clamps. It needed a little bending of the ends and some left over bolts, washers and spacers made from pipe to custom fit it between the two legs and bolt in place. The tube was already powder coated green so I didn't even bother to repaint it. To finish this off I repurposed an old bicycle cross bar pad by cutting it in half and with the existing velcro was able to secure each half at the ends of the round bar as a cushion to stop the clamps from hitting those freshly painted legs.

Finally I added a vise to the spot where one had been mounted before and was able to use some of the existing holes. It's just a cheap 4" Chinese vise with a bit of cleaning and a coat of paint from some left over spray paint. It works smoothly enough to hold projects for grinding and welding and I won't feel bad about hitting it with the grinder, or getting scrapes or weld slag on it. Perfect for dirty jobs and I already had it from some past sale.

All fasteners were salvaged from my spare nut and bolt bins so I didn't even have to buy a washer. I think the .69 cent paint brush was the only thing actually purchased from a store specific for this project.

Ready for work now so I better think up the next project :lol_hitti

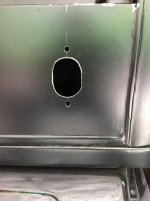
Here's some pictures from beginning to end product.

attachment.php

attachment.php

attachment.php

attachment.php

attachment.php

attachment.php

attachment.php
 

Attachments

  • IMG_1964.jpg
    IMG_1964.jpg
    119.9 KB · Views: 518
  • IMG_1972.jpg
    IMG_1972.jpg
    147.3 KB · Views: 518
  • IMG_1971.jpg
    IMG_1971.jpg
    145 KB · Views: 516
  • IMG_1969.jpg
    IMG_1969.jpg
    132.3 KB · Views: 513
  • IMG_1967.jpg
    IMG_1967.jpg
    138.8 KB · Views: 515
  • IMG_1966.jpg
    IMG_1966.jpg
    133.1 KB · Views: 520
  • IMG_1965.jpg
    IMG_1965.jpg
    124.2 KB · Views: 517

HSpencer

ALLIANCE MEMBER
Joined
Nov 28, 2010
Messages
2,854
Location
South Central US
Fantastic Work Table

WOW I really like that!! I could use one in my own shop. You did a super job on building it!

Best Regards
Herb
 
OP
R

rmalkow2

Well-known member
Joined
Jun 26, 2009
Messages
4,087
Location
Brighton, MI
Looks great.

Thank you sir.

Fantastic Work Table

WOW I really like that!! I could use one in my own shop. You did a super job on building it!

Best Regards
Herb

Thanks Herb, It's basically just handy now that I have it. I'm already using it for any little task because it's just the right height and I can roll it around easy. It will be nice to roll outside the garage too for really dirty jobs.
 
OP
R

rmalkow2

Well-known member
Joined
Jun 26, 2009
Messages
4,087
Location
Brighton, MI
I have a new project starting this week that I just picked up today. I answered a CL ad for a 70's era gas pump and brought home this little treasure to restore for display purposes.

attachment.php


The seller helped me load this into the back of my truck laying down but getting it back out at home would be a larger chore and rather than pull out my engine hoist to safely lift it I figured I would just lighten the load first. So while it rested on the tailgate I was able to pull off the front panels and unbolt the electric motor and then the very heavy pump assembly. The bottom panel on the back was already off and it is missing the top face panel for the back side.
This work made the difference by getting it down to the bare frame which was light enough to lower off the back of the truck by myself.

Then I gave it a good scrub with simple green and brush and hosed it off good. Here are some pics of it after the bath.

attachment.php

attachment.php

attachment.php


The front and back panels will be first up for some paint stripping and repaint. Thankfully it is not dented up too much so it will not need a lot of body work and once re-painted it should make a pretty good display. I was going to put this away for later work but since I had the guts stripped and saw that it does not need a lot of work I thought why wait. Just do it now and enjoy the finished product.

attachment.php


The plan is to make small progress each day this week so we'll see if I can stick to the plan.
 

Attachments

  • Untitled.jpg
    Untitled.jpg
    13.2 KB · Views: 455
  • IMG_1981.jpg
    IMG_1981.jpg
    146.1 KB · Views: 461
  • IMG_1982.jpg
    IMG_1982.jpg
    148.1 KB · Views: 463
  • IMG_1984.jpg
    IMG_1984.jpg
    147.6 KB · Views: 458
  • IMG_1985.jpg
    IMG_1985.jpg
    140.3 KB · Views: 460

taumac

Well-known member
Joined
Aug 30, 2011
Messages
8,104
Location
Brooksville, Fl
Nice fab table. That should be really handy to use. The gas pump looks to be great project and looking forward to seeing that.
 

HSpencer

ALLIANCE MEMBER
Joined
Nov 28, 2010
Messages
2,854
Location
South Central US
wow

I think that gas pump is great!! I would like restoring one for display. You will have a lot of fun with that!!

Best Regards
Herb
 

metalhead140

Well-known member
Joined
Jan 15, 2013
Messages
1,456
Location
NSW, Australia
You've been busy! Good work on the trailer, love the slope back Ford project, nice work on the bench, and cool pick up on the pump!
 

dlcwent

Member Emeritus
Joined
Feb 24, 2014
Messages
8,427
Location
coastal maine
rmalkow2, I'm jealous. I've been trying to find a reasonably priced pump for ever. Any I've come across are in terrible shape and they want big money for them or they've been restored already and they want bigger money for them.

I'll be anxious to see it done.
 
OP
R

rmalkow2

Well-known member
Joined
Jun 26, 2009
Messages
4,087
Location
Brighton, MI
Nice fab table. That should be really handy to use. The gas pump looks to be great project and looking forward to seeing that.

Thanks man. I'm enjoying both right now.

wow

I think that gas pump is great!! I would like restoring one for display. You will have a lot of fun with that!!

Yep, restoring for display and fun of the task. This one should be fairly easy except that I will have to continue looking for the missing back panel. But it should look good from the front.

Best Regards
Herb

You've been busy! Good work on the trailer, love the slope back Ford project, nice work on the bench, and cool pick up on the pump!

Thank you very much.

Great job! :thumbup:
As we say - your hands grow from the right place. :beer:

That's a quote I will remember, thank you.

rmalkow, another project, unreal:bowdown:

Always another project around the corner. I'm trying to catch up to you. :bowdown:

rmalkow2, I'm jealous. I've been trying to find a reasonably priced pump for ever. Any I've come across are in terrible shape and they want big money for them or they've been restored already and they want bigger money for them.

I'll be anxious to see it done.

This was total luck. While the 70's era pumps are not the most popular they usually command a higher price than this deal. I got it pretty cheap. Keep looking and be persistent on CL or other ad places and yours will pop up one day.

Thanks guys for looking in on my little bit of fun.
 
OP
R

rmalkow2

Well-known member
Joined
Jun 26, 2009
Messages
4,087
Location
Brighton, MI
Gas Pump Project

In between work and yard work and travel I'm making some slow progress on the gas pump. I've started stripping the bottom front and rear panels to get them ready for final paint.

I started with a twisted wire cup brush on an electric grinder which was doing a pretty good job on the paint alone but wanted to smear the old vinyl letters too much so I had to stop and get out the hand scraper and make short work off the old stickers.
attachment.php


Here's the before look at those panels.

attachment.php


Next I went at the remaining paint with the flap disc on my grinder and followed up with sanding the whole surface with my vibrating palm sander to get the last bits of old paint and make a smooth surface.

attachment.php


Knocked out a few minor dents with the dolly and body hammer, a good wipe down with prep/cleaner and then a couple light coats of primer for now. After I get all panels stripped and primed I will sand and primer again before applying the final color.

attachment.php


I've been looking at color themes and I've always liked some of the Texaco brand graphics. I found this picture on line and think I will try to duplicate it as close as possible. I like the red and white colors that really pop out. Even though this pump was not originally a retail sales unit I think it will look good in the Fire-Chief theme.

attachment.php
 

Attachments

  • IMG_1990.jpg
    IMG_1990.jpg
    21 KB · Views: 352
  • IMG_1985 (1).jpg
    IMG_1985 (1).jpg
    140.3 KB · Views: 347
  • IMG_1986.jpg
    IMG_1986.jpg
    143.1 KB · Views: 358
  • IMG_2016.jpg
    IMG_2016.jpg
    142.8 KB · Views: 351
  • IMG_2017.jpg
    IMG_2017.jpg
    128.5 KB · Views: 355
To avoid these ads, REGISTER NOW!
OP
R

rmalkow2

Well-known member
Joined
Jun 26, 2009
Messages
4,087
Location
Brighton, MI
A couple new decorative items added to the garage just for fun.

The Rat Fink reproduction sign was on sale at Speedway Motors and I couldn't resist a little Big Daddy Ed Roth inspiration hanging around.
The Route 66 neon sign was a cheap find on CL and being a lover of that old highway and story as well as liking the soft glow of neon I couldn't pass up the deal.

They are not in their final locations yet. Just set there until I think about a proper spot along the walls.

attachment.php
 

Attachments

  • IMG_1987.jpg
    IMG_1987.jpg
    136.3 KB · Views: 547

HSpencer

ALLIANCE MEMBER
Joined
Nov 28, 2010
Messages
2,854
Location
South Central US
rmalkow2

Indeed great finds to look beautiful in your shop. The neon sign of route 66 is fantatic!

Good additions to your place!

Best Regards
Herb
 
OP
R

rmalkow2

Well-known member
Joined
Jun 26, 2009
Messages
4,087
Location
Brighton, MI
Making a list!

I have a bunch of hot rod parts on order this week for what hopefully will be a productive weekend on the car. So I figured any project needs a good list of things to do. And I had an extra Model A grille shell that was pretty rough to make a theme correct chalk board frame. Picked up a sheet of masonite painted with chalk board paint.

And the work list is ready to start crossing off items as completed. I feel more motivated already.

attachment.php
 

Attachments

  • IMG_2025.jpg
    IMG_2025.jpg
    23.9 KB · Views: 519

Vieux

Well-known member
Joined
Jan 31, 2014
Messages
2,519
Location
Russia
Luminous sign and to-do list it's cool:thumbup:
! it is necessary to make a similar list.
 
OP
R

rmalkow2

Well-known member
Joined
Jun 26, 2009
Messages
4,087
Location
Brighton, MI
rmalkow, consider you idea stolen I have a 30 grille that would work well..


Steal way 1/2Cup. I'm sure I'm not the first person to do this but have had the idea in my head for awhile. The chalk board was cheap at the local home center and I just cut it to fit on the band saw with a couple scrap wood pieces on the back side to hold it in place.

That's awesome!!!! Looks great!!!!

Sent from my Venue7 3740 using Tapatalk

Thanks Gerard!
 
OP
R

rmalkow2

Well-known member
Joined
Jun 26, 2009
Messages
4,087
Location
Brighton, MI
My buddy (Sluggo #1) came over yesterday to help me get some progress made on the hot rod To Do List. We spent the better part of the day pulling out previous work by the initial shop that built this car and as usual discovering things that were not done quite right and will need fixing when put back together.

Jobs of the day were to pull the seat out to not only facilitate the wiring job but also to see how I would make seat risers for it to raise it up a bit. I needs about 3 more inches at the top of the seat back and a little more than that at the front of the seat cushion to give it just a little rear slant so I'm not sitting flat on the cushion bottom.
Other jobs were to start running wires and to cut into 80year old sheet metal to install tail lights.

With the seat out it was time to cut out the sketchy and very minimal old wiring. All existing connections were cut with a pigtail left and a label applied so I would not trust my memory for the connections.
I'm using a really well thought out 12 circuit vehicle harness with fuse box from Speedway Motors. Includes all fuses and relays and each wire is labeled along its length for intended function and matches up to their easy instructions. It will just be a methodical process of routing, cutting to length and attaching every wire needed. I'll have circuits left over because real hot rods don't have radios and power antennas and heaters and A/C. Well maybe a radio some day but it's a roadster! If you want heat drive it in warm weather! :lol_hitti
attachment.php


So in terms of wiring progress, we opened up all the bundles and started by pulling all required engine compartment circuits through the firewall grommet and out in the general direction of the front of vehicle. That will include ignition, start and charging wiring along with head lights and all sensors and the electric cooling fan power.
attachment.php


That still leaves a bunch of wires in the interior that at the end of the day looked like a rats nest. But it looked worse than it is.
attachment.php


One group runs to the rear of the vehicle and the remaining group routes up under the instrument panel to switches and gauges, etc. Any extra circuits not to be used right now were coiled up and tie strapped for storage out of the way. The kit supplies lots of little tie straps for just such a purpose.
Today I've started making a proper automotive wiring harness by taking the group that goes to rear of vehicle and wrapping it in black vinyl tape (no adhesive) before routing it along the right side of the interior and under the carpet. This is the same tape that automotive harnesses are wrapped in today and I luckily had a couple rolls left over from a prior life (job) where I had to carry this stuff for repairs and such.
attachment.php


Now its on to the tedious job of making connections one at a time and trying to be conscious of good routing away from sharp edges and hot exhaust etc.
 

Attachments

  • IMG_2035.jpg
    IMG_2035.jpg
    24.3 KB · Views: 423
  • IMG_2034.jpg
    IMG_2034.jpg
    21 KB · Views: 428
  • IMG_2038.jpg
    IMG_2038.jpg
    25.3 KB · Views: 432
  • IMG_2037.jpg
    IMG_2037.jpg
    23.3 KB · Views: 428
OP
R

rmalkow2

Well-known member
Joined
Jun 26, 2009
Messages
4,087
Location
Brighton, MI
Roadster Tail Lights

I've labored over what type of tail lights to use on this vehicle ('29 Ford Roadster). So finally I made a decision and yesterday was the cut and install day. I have some very nice original type "29 tail lights but since I don't have rear fenders there was no good looking way to mount these without them needing some sort of bracket and then sticking out from the body. So I opted for some reproduction "38-"39 Ford tail lights that mount flush to the body metal and are very period correct lights for hot rods built post WWII.
I ordered a pair with rubber gaskets from Speedway Motors and opted for the LED versions to they would be nice and bright and hopefully never need replacement.

Using the gasket as my template I measured for location and traced the opening size along with the locations of the attachment bolt holes. Then using a hole saw just slightly smaller then the required opening I cut the initial opening.
attachment.php


Next was to elongate the opening using a rotary rasp tool in my cordless drill and slowly open up the hole to just fit the tail light housing.
attachment.php


Once the hole was finished and bolt holes drilled I filed off all metal burrs and hand touched up all the bare metal edges with some black paint just for corrosion protection.
attachment.php


After a lunch break of grilled tube steak which let the paint dry I could do the final fitting of the tail lights. I think they will look good when finally powered up. At least I'm happy with the result and the look of the vehicle now.
attachment.php
 

Attachments

  • IMG_2029.jpg
    IMG_2029.jpg
    125.3 KB · Views: 428
  • IMG_2031.jpg
    IMG_2031.jpg
    114.8 KB · Views: 434
  • IMG_2033.jpg
    IMG_2033.jpg
    107 KB · Views: 428
  • IMG_2032.jpg
    IMG_2032.jpg
    134.7 KB · Views: 435

Strouty

Well-known member
Joined
Mar 21, 2010
Messages
38,206
Location
Southern Maine
Looking good, I really like the black board as well. Also learned about a rotary rasp tool, never seen one before!
 

metalhead140

Well-known member
Joined
Jan 15, 2013
Messages
1,456
Location
NSW, Australia
Very neat, those will look great. I also hadn't seen a rotary rasp before! I would have used a carbide burr in my die grinder for that sort of job, looks like the rotary rasp might be better for larger diameter openings like that, I like it.
 
OP
R

rmalkow2

Well-known member
Joined
Jun 26, 2009
Messages
4,087
Location
Brighton, MI
Looking good, I really like the black board as well. Also learned about a rotary rasp tool, never seen one before!

Very neat, those will look great. I also hadn't seen a rotary rasp before! I would have used a carbide burr in my die grinder for that sort of job, looks like the rotary rasp might be better for larger diameter openings like that, I like it.

Thanks guys.

The rotary rasp was pure coincidence to be honest. I had never seen one before either. I bought a lot at auction some time back that had a bunch of hole saws and also had a couple of these rotary rasps in with them. I'm not totally sure this is their intended purpose but on sheet metal it worked great and made a pretty smooth opening. I had minimal hand filing to do on the edge of the hole to get any sharp burs off after done with the rasp. And it cut equally running the drill in forward or reverse.
 
OP
R

rmalkow2

Well-known member
Joined
Jun 26, 2009
Messages
4,087
Location
Brighton, MI
Another small job completed and crossed off the ToDo list was to install a new inspection cover under the trans/converter, flex plate area. The hot rod never had one installed so I ordered a new metal one off eBay and thought this should be an easy job to install. How hard can it be to put in 4, 1/4-20 bolts with washers? Well the bolts would not thread in more than a turn or two and after checking sources on line to make sure this was the right size I finally had to find a 1/4-20 tap and chase the threads on all 4 holes which was a PITA just because hand access was restricted and I could only turn the tap handle a little at a time. The one next to the starter had to be done with a loose tap hand started and then turned a half turn at a time with an open end wrench. :lol_hitti
This picture was the easy one.
attachment.php


But it got done, just took a little longer. So one less part laying around the garage and small progress made towards completion. Also got the ignition switch wired but no exciting pics of that.

attachment.php
 

Attachments

  • IMG_2039.jpg
    IMG_2039.jpg
    136.4 KB · Views: 402
  • IMG_2041.jpg
    IMG_2041.jpg
    84.4 KB · Views: 406
OP
R

rmalkow2

Well-known member
Joined
Jun 26, 2009
Messages
4,087
Location
Brighton, MI
rmalkow, your tail lights came up well:thumbup:

Thank 1/2 Cup, I labored over using original looking tail lights but in the end I think these will look best on a fenderless car and are period correct for a post war style hot rod.

Lights came out nice. Couldn't you use a 1/4 ratchet and 12p socket or was there not enough room?

I definitely tried to go that route but searching through my sockets could not find the right size to fit the tap. Now maybe that has something to do with the general disorganization of all my sockets but that's a garage task for another day.
 
To avoid these ads, REGISTER NOW!
Top Bottom