Mustang Brake Job - Simple right?
Last week while driving to work I suddenly started hearing that dreadful metal on metal noise typical of a brake pad that has worn down to the steel backing plate. I had to limp it home at the end of the day and vowed to put some new pads on the rear brakes over the weekend. It was specifically on the right rear. While it did strike me as odd this would happen I thought it could be a quick easy fix. I only bought this car late last summer and have not driven it too many miles and I remember the previous owner saying that the brakes and tires were really new to the car so it seemed odd this would happen so soon. That should have been my first clue this would be a bigger job than normal.
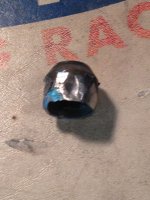
First issue arises, getting the wheel off. I remove the center cap from the wheel and SURPRISE! The car has wheel locks. A little fact the prior owner never told me about and did not give me a lug key for. Of course I went straight to You Tube for a solution and saw various references to using a 12 point socket hammered onto the outside of the special lug to then turn it free. A search through all my regular and spare sockets and just my luck that I had nothing close to fitting this locking nut. Internet idea number 2 is to buy some special reverse thread generic removal sockets, so off to the parts store and picked up a set of two sockets they had. Get home and yep, neither socket in the package fits this particular locking nut diameter. Out comes the air grinder and I start shaving that stupid nut down until I could just start to get an old impact socket on and beat it into place with a hammer. At this point I was willing to sacrifice a socket since I'm spending over an hour just trying to get the wheel off. But it worked and finally that dang lock nut came off with some help from the impact.

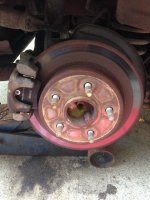
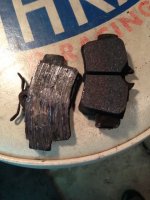
Next is to unbolt the caliper which was easy enough with a little help from PB Blaster and that revealed the offending old pads. Sure enough the inboard pad was worn down to the metal plate and the outboard one looked almost new.
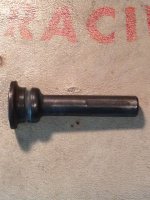
Now I'm checking the slide pins and they are both stuck and not sliding at all. So that was the problem causing abnormal pad wear. the slide pins were all gunked up and stuck in place preventing the caliper from relaxing away from the rotor. I cleaned up the slide pins and cleaned out the holes in the mounting bracket the slide into. Put on a little lube and they slide in and out like new.
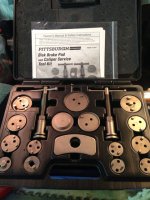
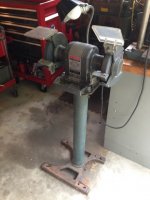
So in order to fit the new pads on rear discs you have to compress the piston back into the caliper and with integral parking brake the piston has to be compressed while also being turned. Thus far when doing this job I have resorted to various red neck methods of compressing the piston with a c clamp while turning it with some channel locks. On this car that became extremely awkward and by this time I'm ready for a better solution so a quick printing of a 20% off HF coupon and run down to the local Harbor Freight to buy one of their caliper service tool kits. It's surprisingly well made for HF stuff.
Finally something that made the job easier and I'll use it many times in the future without the old struggle factor mixed in because I was too cheap in the past to buy the right tool for the job.
After many hours on what should have been a 1 hour job I finally got the right rear done. Next will be the task of working on the left rear.
Now you may wonder about rotor damage and to my surprise it was not that bad and this is really a temporary fix for the short time left this summer that I will use this car. I plan to install a performance brake upgrade before next summer with new rotors and hi performance pads. This fix will get be by until that happens.


 I owe you for this one.